
Apache Shiro™ is a powerful and easy-to-use Java security framework that performs authentication, authorization, cryptography, and session management. With Shiro’s easy-to-understand API, you can quickly and easily secure any application – from the smallest mobile applications to the largest web and enterprise applications.
Shiro
一、现存问题
1.1 现存问题
认证(登录):认证操作流程都差不多,但是每次都需要手动的基于业务代码去实现,很麻烦!
授权:如果权限控制粒度比较粗,可以自身去实现,但是如果控制粒度比较细,操作麻烦!
分布式会话管理:单体项目时,需要依赖Web容器的Session实现会话,搭建了集群或者是分布式项目,手动去基于Redis或者其他拥有公共存储能力的中间件实现分布式会话管理。
单点登录:在一处服务认证,所有其他服务都信任。(了解)
1.2 Shiro框架介绍
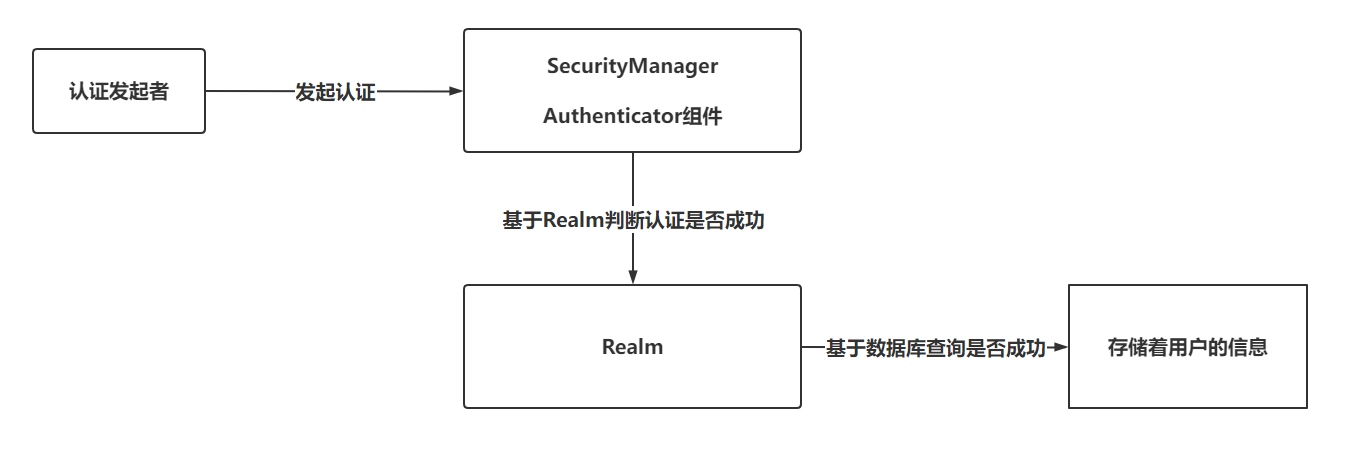
Shiro是基于Java语言编写的,Shiro最核心的功能就是认证和授权。
Shiro官方:http://shiro.apache.org
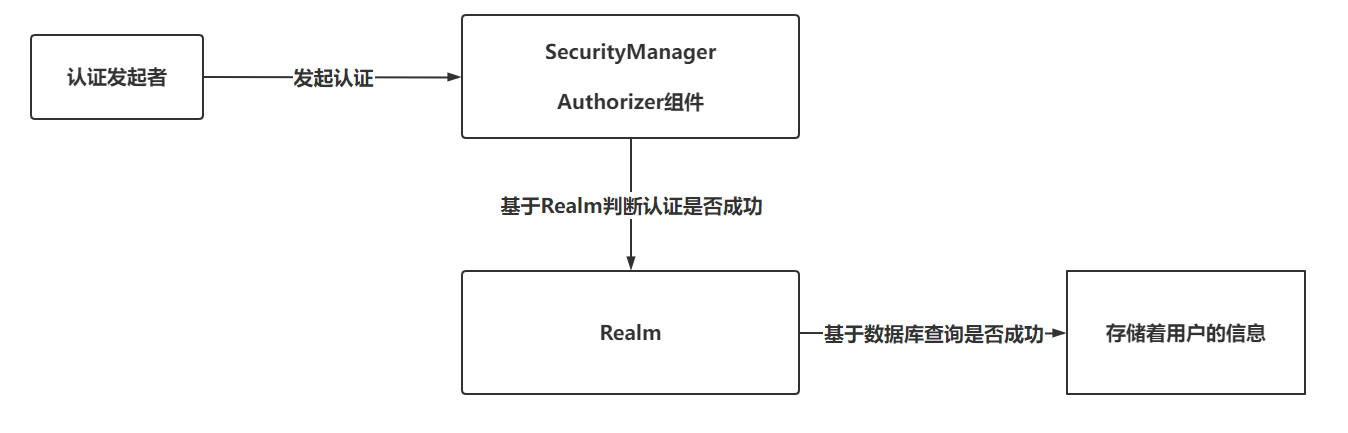
Shiro的核心架构图

二、Shiro的基本使用
2.1 SimpleAccountRealm
认证流程:
授权流程:
具体操作代码:
1 |
|
2.2 IniRealm
基于文件存储用户名,密码,角色等信息
准备一个.ini文件,存储用户信息,并且IniRealm支持权限校验
1 | [users] |
具体实现业务的代码:
1 |
|
2.3 JdbcRealm
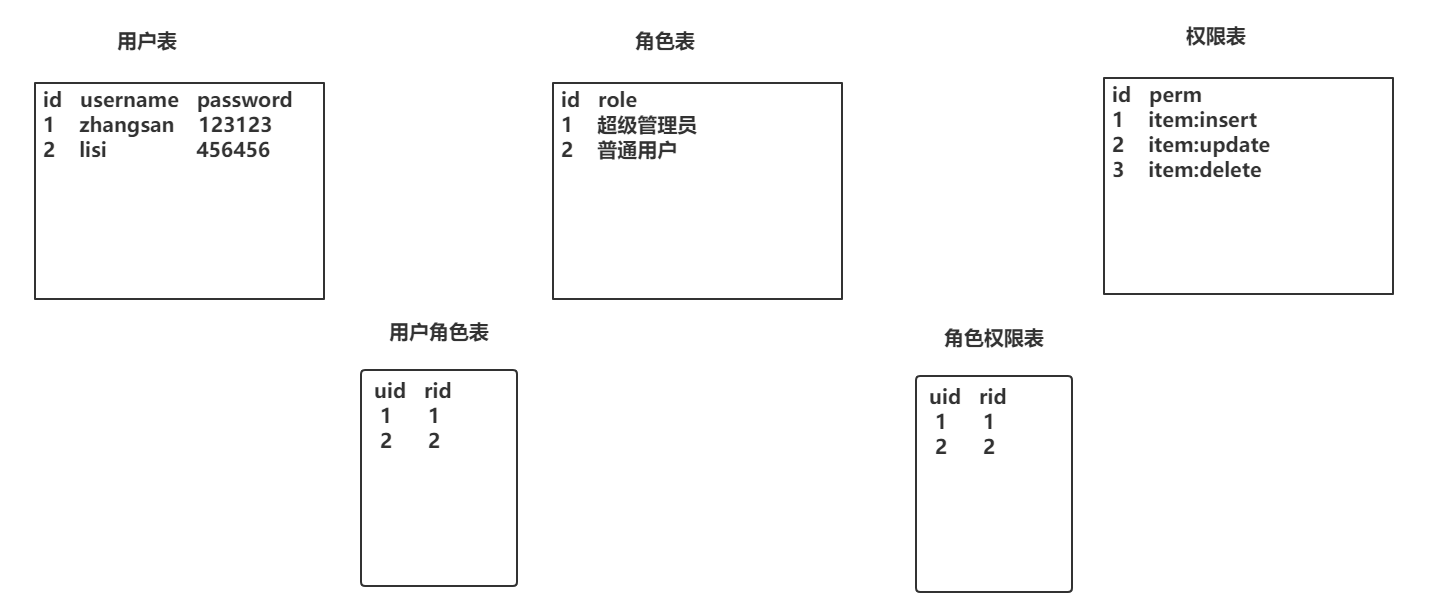
实现权限校验时,库表设计方案
用户认证、授权时推荐的表结构设计,经典五张表!
具体实现业务代码:
1 |
|
SQL构建代码
1 | DROP TABLE IF EXISTS `roles_permissions`; |
2.4 CustomRealm(自定义Realm)
仿照JdbcRealm实现一个自定义的Realm对象
- 声明POJO类,继承AuthorizingRealm
1
2
3public class CustomRealm extends AuthorizingRealm {
……………………
} - 重写doGetAuthenticationInfo方法(认证)
1
2
3
4
5
6
7
8
9
10
11
12
13
14
15
16
17
18
19
20
21
22
23
24
25
26
27
28
29
30
31
32
33
34
35
36
37
38
39
40
41
42
43/**
* 认证方法,只需要完成用户名校验即可,密码校验由Shiro内部完成
* @param token 用户传入的用户名和密码
* @return
* @throws AuthenticationException
*/
protected AuthenticationInfo doGetAuthenticationInfo(AuthenticationToken token) throws AuthenticationException {
//1. 基于Token获取用户名
String username = (String) token.getPrincipal();
//2. 判断用户名(非空)
if(StringUtils.isEmpty(username)){
// 返回null,会默认抛出一个异常,org.apache.shiro.authc.UnknownAccountException
return null;
}
//3. 如果用户名不为null,基于用户名查询用户信息
User user = this.findUserByUsername(username);
//4. 判断user对象是否为null
if(user == null){
return null;
}
//5. 声明AuthenticationInfo对象,并填充用户信息
SimpleAuthenticationInfo info = new SimpleAuthenticationInfo(user,user.getPassword(),"CustomRealm!!");
//6. 返回info
return info;
}
// 模拟数据库操作
private User findUserByUsername(String username) {
if("admin".equals(username)){
User user = new User();
user.setId(1);
user.setUsername("admin");
user.setPassword("admin");
return user;
}
return null;
} - 重写doGetAuthenticationInfo方法(密码加密加盐)
1
2
3
4
5
6
7
8
9
10
11
12
13
14
15
16
17
18
19
20
21
22
23
24
25
26
27
28
29
30
31
32
33
34
35
36
37
38
39
40
41
42
43
44
45
46
47
48
49
50
51
52
53
54
55{
HashedCredentialsMatcher matcher = new HashedCredentialsMatcher();
matcher.setHashAlgorithmName("MD5");
matcher.setHashIterations(1024);
this.setCredentialsMatcher(matcher);
}
/**
* 认证方法,只需要完成用户名校验即可,密码校验由Shiro内部完成
* @param token 用户传入的用户名和密码
* @return
* @throws AuthenticationException
*/
protected AuthenticationInfo doGetAuthenticationInfo(AuthenticationToken token) throws AuthenticationException {
//1. 基于Token获取用户名
String username = (String) token.getPrincipal();
//2. 判断用户名(非空)
if(StringUtils.isEmpty(username)){
// 返回null,会默认抛出一个异常,org.apache.shiro.authc.UnknownAccountException
return null;
}
//3. 如果用户名不为null,基于用户名查询用户信息
User user = this.findUserByUsername(username);
//4. 判断user对象是否为null
if(user == null){
return null;
}
//5. 声明AuthenticationInfo对象,并填充用户信息
SimpleAuthenticationInfo info = new SimpleAuthenticationInfo(user,user.getPassword(),"CustomRealm!!");
// 设置盐!
info.setCredentialsSalt(ByteSource.Util.bytes(user.getSalt()));
//6. 返回info
return info;
}
// 模拟数据库操作
private User findUserByUsername(String username) {
if("admin".equals(username)){
User user = new User();
user.setId(1);
user.setUsername("admin");
user.setPassword("1ebc4dcaf1e21b814ece65f27531f1a9");
user.setSalt("weruiothergjkdfnbgjkdfngjkdf");
return user;
}
return null;
} - 重写doGetAuthorizationInfo方法(授权)
1
2
3
4
5
6
7
8
9
10
11
12
13
14
15
16
17
18
19
20
21
22
23
24
25
26
27
28
29
30
31
32
33
34// 授权方法,授权是在认证之后的操作
protected AuthorizationInfo doGetAuthorizationInfo(PrincipalCollection principals) {
//1. 获取认证用户的信息
User user = (User) principals.getPrimaryPrincipal();
//2. 基于用户信息获取当前用户拥有的角色。
Set<String> roleSet = this.findRolesByUser();
//3. 基于用户拥有的角色查询权限信息
Set<String> permSet = this.findPermsByRoleSet(roleSet);
//4. 声明AuthorizationInfo对象作为返回值,传入角色信息和权限信息
SimpleAuthorizationInfo info = new SimpleAuthorizationInfo();
info.setRoles(roleSet);
info.setStringPermissions(permSet);
//5. 返回
return info;
}
private Set<String> findPermsByRoleSet(Set<String> roleSet) {
Set<String> set = new HashSet<>();
set.add("user:add");
set.add("user:update");
return set;
}
private Set<String> findRolesByUser() {
Set<String> set = new HashSet<>();
set.add("超级管理员");
set.add("运营");
return set;
}
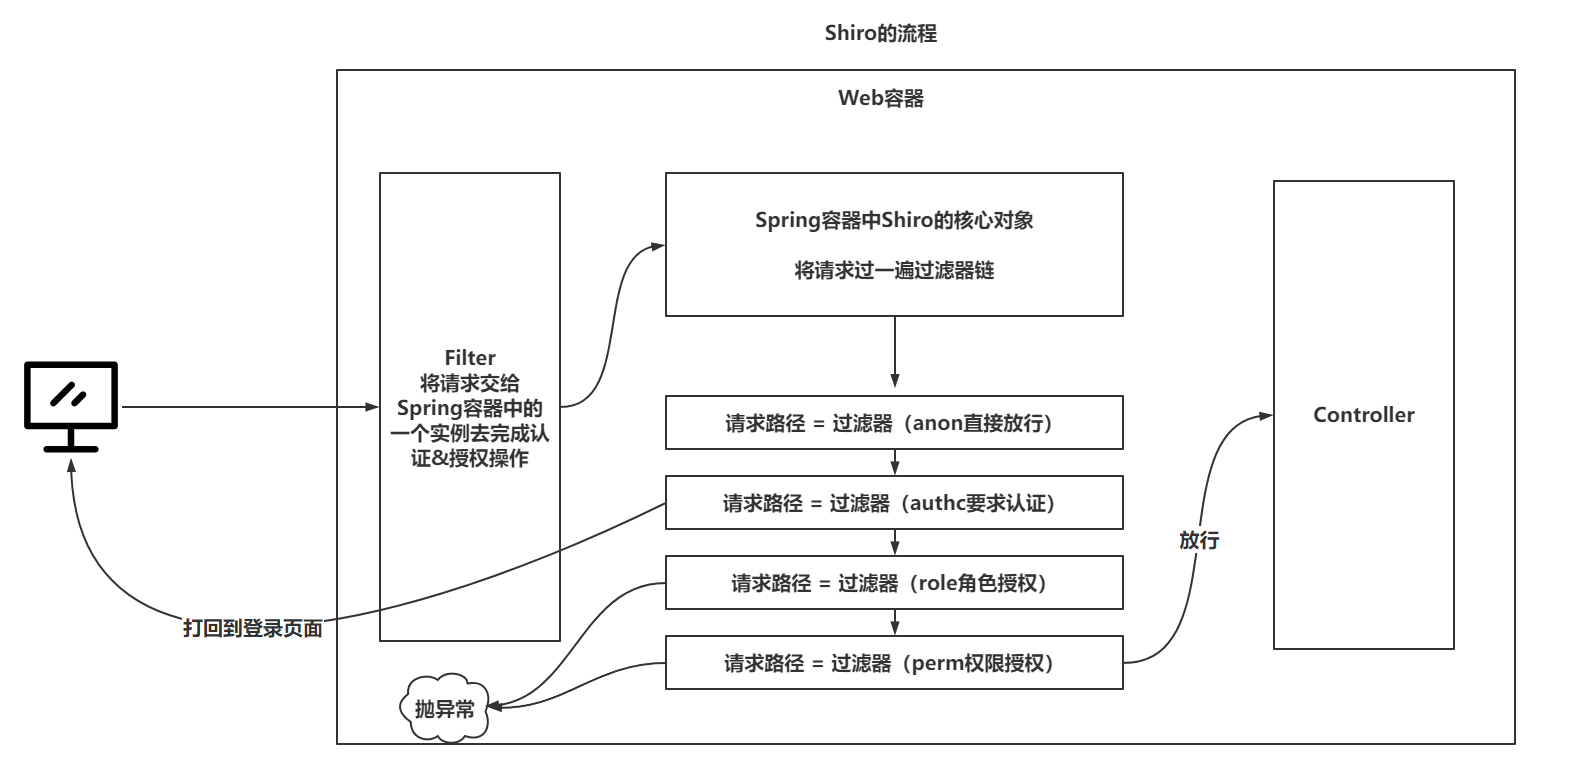
三、Shiro的Web流程
四、Shiro整合Web(SpringMVC,SpringBoot)
4.1 SSM方式
准备SSM的配置(掌握跳过)
准备经典五张表,完成测试
准备Shiro的配置
准备核心过滤器
1
2
3
4
5
6
7
8
9
10<!-- 配置Shiro整合web的过滤器-->
<filter>
<!-- 默认情况下,请求到达这个过滤器,会去Spring容器中名字为filter-name的实例去处理-->
<filter-name>shiroFilter</filter-name>
<filter-class>org.springframework.web.filter.DelegatingFilterProxy</filter-class>
</filter>
<filter-mapping>
<filter-name>shiroFilter</filter-name>
<url-pattern>/*</url-pattern>
</filter-mapping>准备shiroFilter实例
1
2
3<bean id="shiroFilter" class="org.apache.shiro.spring.web.ShiroFilterFactoryBean">
.....
</bean>注入SecurityManager,登录页面路径,过滤器链
1
2
3
4
5
6
7
8
9
10
11
12
13
14
15
16
17
18
19
20<!-- 构建realm-->
<bean id="realm" class="com.mashibing.realm.ShiroRealm" />
<!-- 构建securityManager-->
<bean id="securityManager" class="org.apache.shiro.web.mgt.DefaultWebSecurityManager">
<property name="realm" ref="realm"/>
</bean>
<!-- 构建ShiroFilter实例-->
<bean id="shiroFilter" class="org.apache.shiro.spring.web.ShiroFilterFactoryBean">
<property name="securityManager" ref="securityManager"/>
<property name="loginUrl" value="/login.html" />
<property name="filterChainDefinitionMap">
<map>
<entry key="/login.html" value="anon" />
<entry key="/user/**" value="anon" />
<entry key="/**" value="authc" />
</map>
</property>
</bean>将ShiroRealm的模拟数据库操作,修改为与数据库交互
编写登录功能,并测试效果
1
2
3
4
5
6
7
8
9
10
11
12
13
14
15
16
17
18("/login")
public String login(String username,String password){
// 执行Shiro的认证操作
//1. 直接基于SecurityUtils获取subject主体,不需要手动的将SecurityManager和SecurityUtils手动整合,Spring已经奥丁
Subject subject = SecurityUtils.getSubject();
//2. 发起认证
try {
subject.login(new UsernamePasswordToken(username,password));
return "SUCCESS";
} catch (UnknownAccountException exception){
return "username fail!!!";
} catch (IncorrectCredentialsException exception){
return "password fail!!!";
} catch (AuthenticationException e) {
return "donot know...!!!";
}
}
4.2 SpringBoot方式
- 搭建SpringBoot工程(准备工作)
- 配置Shiro整合SpringBoot内容
1
2
3
4
5
6
7
8
9
10
11
12
13
14
15
16
17
18
19
20
21
22
23
24
public class ShiroConfig {
public DefaultWebSecurityManager securityManager(ShiroRealm realm){
DefaultWebSecurityManager securityManager = new DefaultWebSecurityManager();
securityManager.setRealm(realm);
return securityManager;
}
public DefaultShiroFilterChainDefinition shiroFilterChainDefinition(){
DefaultShiroFilterChainDefinition shiroFilterChainDefinition = new DefaultShiroFilterChainDefinition();
Map<String, String> filterChainDefinitionMap = new LinkedHashMap<String, String>();
filterChainDefinitionMap.put("/login.html","anon");
filterChainDefinitionMap.put("/user/**","anon");
filterChainDefinitionMap.put("/**","authc");
shiroFilterChainDefinition.addPathDefinitions(filterChainDefinitionMap);
return shiroFilterChainDefinition;
}
}
五、Shiro的授权方式
5.1 过滤器链
1 | public enum DefaultFilter { |
1 | filterChainDefinitionMap.put("/item/select","roles[超级管理员,运营]"); |

5.2 自定义过滤器
- 仿照RolesAuthorizationFilter实现自定义过滤器
1
2
3
4
5
6
7
8
9
10
11
12
13
14
15
16
17
18
19
20
21
22
23
24
25
26/**
* 在要求的多个角色中,有一个满足要求,就放行
* @author zjw
* @description
*/
public class RolesOrAuthorizationFilter extends AuthorizationFilter {
protected boolean isAccessAllowed(ServletRequest request, ServletResponse response, Object mappedValue) throws Exception {
// 获取主体subject
Subject subject = getSubject(request, response);
// 将传入的角色转成数组操作
String[] rolesArray = (String[]) mappedValue;
// 健壮性校验
if (rolesArray == null || rolesArray.length == 0) {
return true;
}
// 开始校验
for (String role : rolesArray) {
if(subject.hasRole(role)){
return true;
}
}
return false;
}
} - 将自定义过滤器配置给Shiro
1
2
3
4
5
6
7
8
9
10
11
12
13
14
15
16
17
18
19
20
21
22
23
24
25
26
27
28
29
30
31
32
33
34
35
36
37
38
39
40
41
42
43
44
45
46
47
48
49
50
51
52
53
54
55
56
57
58
59
public class ShiroConfig {
public DefaultWebSecurityManager securityManager(ShiroRealm realm){
DefaultWebSecurityManager securityManager = new DefaultWebSecurityManager();
securityManager.setRealm(realm);
return securityManager;
}
public DefaultShiroFilterChainDefinition shiroFilterChainDefinition(){
DefaultShiroFilterChainDefinition shiroFilterChainDefinition = new DefaultShiroFilterChainDefinition();
Map<String, String> filterChainDefinitionMap = new LinkedHashMap<String, String>();
filterChainDefinitionMap.put("/login.html","anon");
filterChainDefinitionMap.put("/user/**","anon");
filterChainDefinitionMap.put("/item/select","rolesOr[超级管理员,运营]");
filterChainDefinitionMap.put("/item/delete","perms[item:delete,item:insert]");
filterChainDefinitionMap.put("/**","authc");
shiroFilterChainDefinition.addPathDefinitions(filterChainDefinitionMap);
return shiroFilterChainDefinition;
}
("#{ @environment['shiro.loginUrl'] ?: '/login.jsp' }")
protected String loginUrl;
("#{ @environment['shiro.successUrl'] ?: '/' }")
protected String successUrl;
("#{ @environment['shiro.unauthorizedUrl'] ?: null }")
protected String unauthorizedUrl;
protected ShiroFilterFactoryBean shiroFilterFactoryBean(SecurityManager securityManager,ShiroFilterChainDefinition shiroFilterChainDefinition) {
//1. 构建ShiroFilterFactoryBean工厂
ShiroFilterFactoryBean filterFactoryBean = new ShiroFilterFactoryBean();
//2. 设置了大量的路径
filterFactoryBean.setLoginUrl(loginUrl);
filterFactoryBean.setSuccessUrl(successUrl);
filterFactoryBean.setUnauthorizedUrl(unauthorizedUrl);
//3. 设置安全管理器
filterFactoryBean.setSecurityManager(securityManager);
//4. 设置过滤器链
filterFactoryBean.setFilterChainDefinitionMap(shiroFilterChainDefinition.getFilterChainMap());
//5. 设置自定义过滤器 , 这里一定要手动的new出来这个自定义过滤器,如果使用Spring管理自定义过滤器,会造成无法获取到Subject
filterFactoryBean.getFilters().put("rolesOr",new RolesOrAuthorizationFilter());
//6. 返回工厂
return filterFactoryBean;
}
} - 测试功能
1
2// 修改当前用户的角色授权过滤器
filterChainDefinitionMap.put("/item/select","rolesOr[超级管理员,运营]");
5.3 注解
注解进行授权时,是基于对Controller类进行代理,在前置增强中对请求进行权限校验
因为咱们使用SpringBoot的测试方式,直接在Controller方法上添加注解即可
1
2
3
4
5
6
7
8
9
10
11
12
13("/update")
(value = {"超级管理员","运营"})
public String update(){
return "item Update!!!";
}
("/insert")
(value = {"超级管理员","运营"},logical = Logical.OR)
public String insert(){
return "item Update!!!";
}
// @RequiresPermissions(value = "",logical = Logical.AND)在SpringBoot中注解默认就生效,是因为自动装配中,已经配置好了对注解的支持
1
2
3
4
5
6
7
8
9
10
11
12
13
14
15
16
17
18
19
(name = "shiro.annotations.enabled", matchIfMissing = true)
public class ShiroAnnotationProcessorAutoConfiguration extends AbstractShiroAnnotationProcessorConfiguration {
("lifecycleBeanPostProcessor")
public DefaultAdvisorAutoProxyCreator defaultAdvisorAutoProxyCreator() {
return super.defaultAdvisorAutoProxyCreator();
}
public AuthorizationAttributeSourceAdvisor authorizationAttributeSourceAdvisor(SecurityManager securityManager) {
return super.authorizationAttributeSourceAdvisor(securityManager);
}
}注解的形式无法将错误页面的信息定位到401.html,因为配置的这种路径,只针对过滤器链有效,注解无效。为了实现友好提示的效果,可以配置异常处理器,@RestControllerAdvice,@ControllerAdvice
5.4 标签(前端,不玩,JSP、Freemarker、Thymeleaf)
5.5 记住我
记住我在开启后,可以针对一些安全级别相对更低的页面采用user过滤器拦截,只要登录过,不需要重新登录就可以访问
准备工作:
准备两个接口
1
2
3
4
5
6
7
8
9("/rememberMe")
public String rememberMe(){
return "rememberMe!!!";
}
("/authentication")
public String authentication(){
return "authentication!!!";
}配置不同的过滤器
1
2filterChainDefinitionMap.put("/item/rememberMe","user");
filterChainDefinitionMap.put("/item/authentication","authc");
在页面追加记住我按钮,并且在登录是,添加rememberMe效果
1
2
3
4
5
6
7
8
9
10
11<form action="/user/login" method="post">
用户名:<input name="username" /> <br />
密码:<input name="password" /> <br />
记住我:<input type="checkbox" name="rememberMe" value="on" /> <br />
<button type="submit">登录</button>
</form>
<!-- ================================== -->
UsernamePasswordToken token = new UsernamePasswordToken(username, password);
token.setRememberMe(rememberMe != null && "on".equals(rememberMe));
subject.login(token);测试效果
问题1:认证后,后台报错,原因是记住我,需要以浏览器的cookie和后台的user对象绑定,user对象需要序列化。
1
public class User implements Serializable { ……}
问题2:认证后,重新打开浏览器,还可以访问角色授权、权限授权的地址。没有在Realm的授权方法中先判断用户是否认证,导致可以直接方案,因为cookie绑定的是认证成功后,返回的第一个参数,而第一个参数和授权方法中参数能获得到的用户信息是一个内容。直接在授权方法中先做认证判断
1
2
3
4
5
6
7
8
9
10
11
12
protected AuthorizationInfo doGetAuthorizationInfo(PrincipalCollection principals) {
//0. 判断是否认证
Subject subject = SecurityUtils.getSubject();
if(subject == null){
return null;
}
if (!subject.isAuthenticated()) {
return null;
}
………………
}测试效果:需要认证的接口地址,无法在关闭浏览器后重新访问,必须要重新认证。
测试效果:需要记住我的接口地址,可以在浏览器重新打开后正常访问。
六、Shiro的分布式Session的处理
6.1 Shiro的Session管理
Shiro在认证成功后,可以不依赖Web容器的Session,也可以依赖!
在SpringBoot自动装配之后,Shiro默认将HttpSession作为存储用户认证成功信息的位置。
但是SpringBoot也提供了一个基于JVM内存存储用户认证信息的位置。
修改Shiro默认使用的SessionDAO,修改为默认构建好的MemorySessionDAO
1 | // 构建管理SessionDAO的SessionManager |
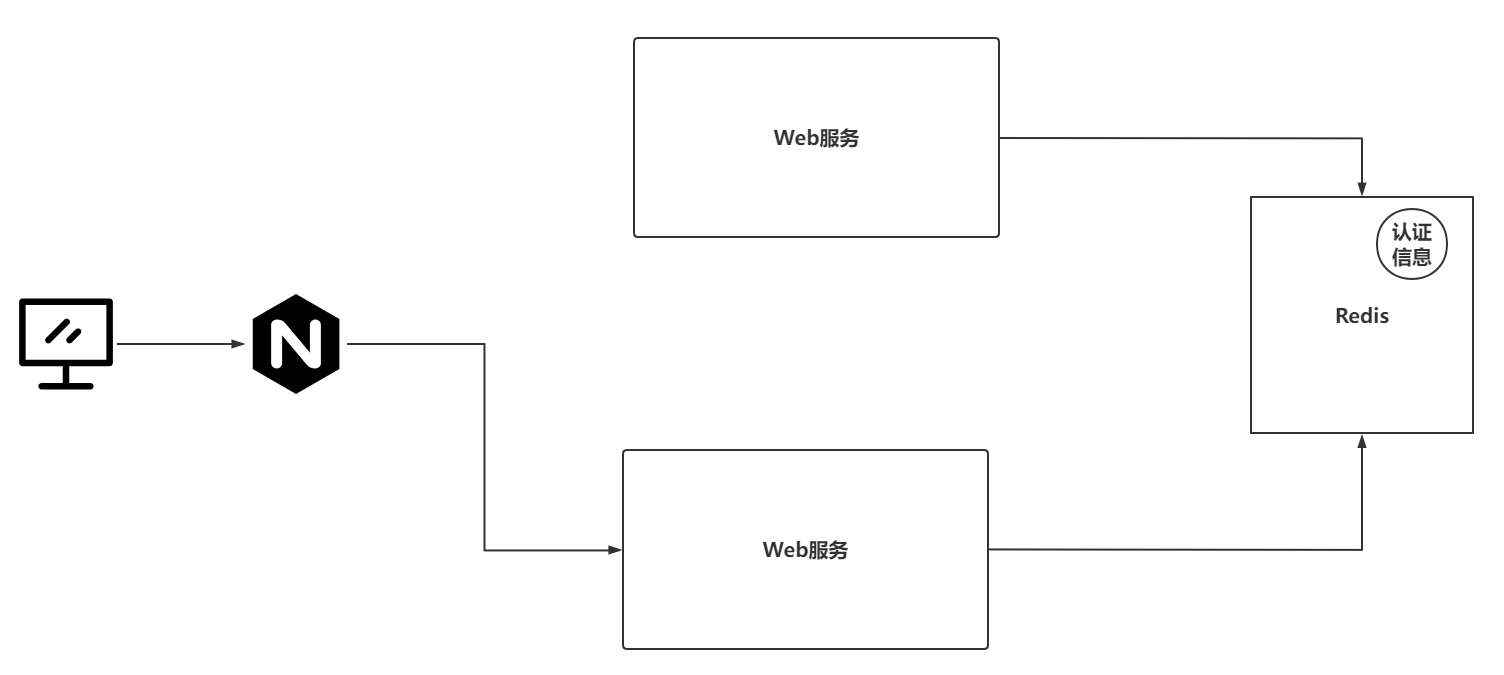
6.2 Shiro解决分布式Session
在服务搭建集群后,或者是服务是分布式架构的,导致单台服务的认证无法让其他服务也得知到信息:
- 基于Nginx做ip_hash策略,但是也只是针对单台服务搭建集群有效果
- 基于Shiro提供的SessionDAO解决,让SessionDAO去与公共的Redis进行交互,存储用户信息
6.3 实现Shiro的分布式Session处理
项目连接Redis
导入依赖
1
2
3
4<dependency>
<groupId>org.springframework.boot</groupId>
<artifactId>spring-boot-starter-data-redis</artifactId>
</dependency>编写配置
1
2
3
4
5spring:
redis:
host: 49.233.115.171
port: 6379
password: xxxxx
声明SessionDAO的实现类,并重写核心方法
1
2
3
4
5
6
7
8
9
10
11
12
13
14
15
16
17
18
19
20
21
22
23
24
25
26
27
28
29
30
31
32
33
34
35
36
37
38
39
40
41
42
43
44
45
46
47
48
49
50
51
52
53
54
55
56
57
58
59
60
61
62
63
64
65
66
67
68
69
70
71
72
73
74
public class RedisSessionDAO extends AbstractSessionDAO {
private RedisTemplate redisTemplate;
// 存储到Redis时,sessionId作为key,Session作为Value
// sessionId就是一个字符串
// Session可以和sessionId绑定到一起,绑定之后,可以基于Session拿到sessionId
// 需要给Key设置一个统一的前缀,这样才可以方便通过keys命令查看到所有关联的信息
private final String SHIOR_SESSION = "session:";
protected Serializable doCreate(Session session) {
System.out.println("Redis---doCreate");
//1. 基于Session生成一个sessionId(唯一标识)
Serializable sessionId = generateSessionId(session);
//2. 将Session和sessionId绑定到一起(可以基于Session拿到sessionId)
assignSessionId(session, sessionId);
//3. 将 前缀:sessionId 作为key,session作为value存储
redisTemplate.opsForValue().set(SHIOR_SESSION + sessionId,session,30, TimeUnit.MINUTES);
//4. 返回sessionId
return sessionId;
}
protected Session doReadSession(Serializable sessionId) {
//1. 基于sessionId获取Session (与Redis交互)
if (sessionId == null) {
return null;
}
Session session = (Session) redisTemplate.opsForValue().get(SHIOR_SESSION + sessionId);
if (session != null) {
redisTemplate.expire(SHIOR_SESSION + sessionId,30,TimeUnit.MINUTES);
}
return session;
}
public void update(Session session) throws UnknownSessionException {
System.out.println("Redis---update");
//1. 修改Redis中session
if(session == null){
return ;
}
redisTemplate.opsForValue().set(SHIOR_SESSION + session.getId(),session,30, TimeUnit.MINUTES);
}
public void delete(Session session) {
// 删除Redis中的Session
if(session == null){
return ;
}
redisTemplate.delete(SHIOR_SESSION + session.getId());
}
public Collection<Session> getActiveSessions() {
Set keys = redisTemplate.keys(SHIOR_SESSION + "*");
Set<Session> sessionSet = new HashSet<>();
// 尝试修改为管道操作,pipeline(Redis的知识)
for (Object key : keys) {
Session session = (Session) redisTemplate.opsForValue().get(key);
sessionSet.add(session);
}
return sessionSet;
}
}将RedisSessionDAO交给SessionManager
1
2
3
4
5
6
public SessionManager sessionManager(RedisSessionDAO sessionDAO) {
DefaultWebSessionManager sessionManager = new DefaultWebSessionManager();
sessionManager.setSessionDAO(sessionDAO);
return sessionManager;
}将SessionManager注入到SecurityManager
1
2
3
4
5
6
7@Bean
public DefaultWebSecurityManager securityManager(ShiroRealm realm,SessionManager sessionManager){
DefaultWebSecurityManager securityManager = new DefaultWebSecurityManager();
securityManager.setRealm(realm);
securityManager.setSessionManager(sessionManager);
return securityManager;
}
6.4 RedisSessionDAO问题
将传统的基于Web容器或者ConcurrentHashMap切换为Redis之后,发现每次请求需要访问多次Redis服务,这个访问的频次会出现很长时间的IO等待,对每次请求的性能减低了,并且对Redis的压力也提高了。
基于装饰者模式重新声明SessionManager中提供的retrieveSession方法,让每次请求先去request域中查询session信息,request域中没有,再去Redis中查询
1
2
3
4
5
6
7
8
9
10
11
12
13
14
15
16
17
18
19
20
21
22
23
24
25
26
27
28
29
30
31
32public class DefaultRedisWebSessionManager extends DefaultWebSessionManager {
protected Session retrieveSession(SessionKey sessionKey) throws UnknownSessionException {
// 通过sessionKey获取sessionId
Serializable sessionId = getSessionId(sessionKey);
// 将sessionKey转为WebSessionKey
if(sessionKey instanceof WebSessionKey){
WebSessionKey webSessionKey = (WebSessionKey) sessionKey;
// 获取到request域
ServletRequest request = webSessionKey.getServletRequest();
// 通过request尝试获取session信息
Session session = (Session) request.getAttribute(sessionId + "");
if(session != null){
System.out.println("从request域中获取session信息");
return session;
}else{
session = retrieveSessionFromDataSource(sessionId);
if (session == null) {
//session ID was provided, meaning one is expected to be found, but we couldn't find one:
String msg = "Could not find session with ID [" + sessionId + "]";
throw new UnknownSessionException(msg);
}
System.out.println("Redis---doReadSession");
request.setAttribute(sessionId + "",session);
return session;
}
}
return null;
}
}配置DefaultRedisWebSessionManager到SecurityManager中
1
2
3
4
5
6
public SessionManager sessionManager(RedisSessionDAO sessionDAO) {
DefaultRedisWebSessionManager sessionManager = new DefaultRedisWebSessionManager();
sessionManager.setSessionDAO(sessionDAO);
return sessionManager;
}
七、Shiro的授权缓存
如果后台接口存在授权操作,那么每次请求都需要去数据库查询对应的角色信息和权限信息,对数据库来说,这样的查询压力太大了。
在Shiro中,发现每次在执行自定义Realm的授权方法查询数据库之前,会有一个执行Cache的操作。
先从Cache中基于一个固定的key去查询角色以及权限的信息。
只需要提供好响应的CacheManager实例,还要实现一个与Redis交互的Cache对象,将Cache对象设置到CacheManager实例中。
将上述设置好的CacheManager设置到SecurityManager对象中
7.1 实现RedisCache
1 |
|
7.2 实现CacheManager并测试
实现CachaManager
1 |
|
将RedisCacheManager配置到SecurityManager
1 |
|
八、Shiro整合CAS框架实现单点登录
8.1 单点登录
单点登录(Single Sign On),简称为 SSO,是比较流行的企业业务整合的解决方案之一。SSO的定义是在多个应用系统中,用户只需要登录一次就可以访问所有相互信任的应用系统。
一般这种单点登录的实现方案,分为两种
中心化方式: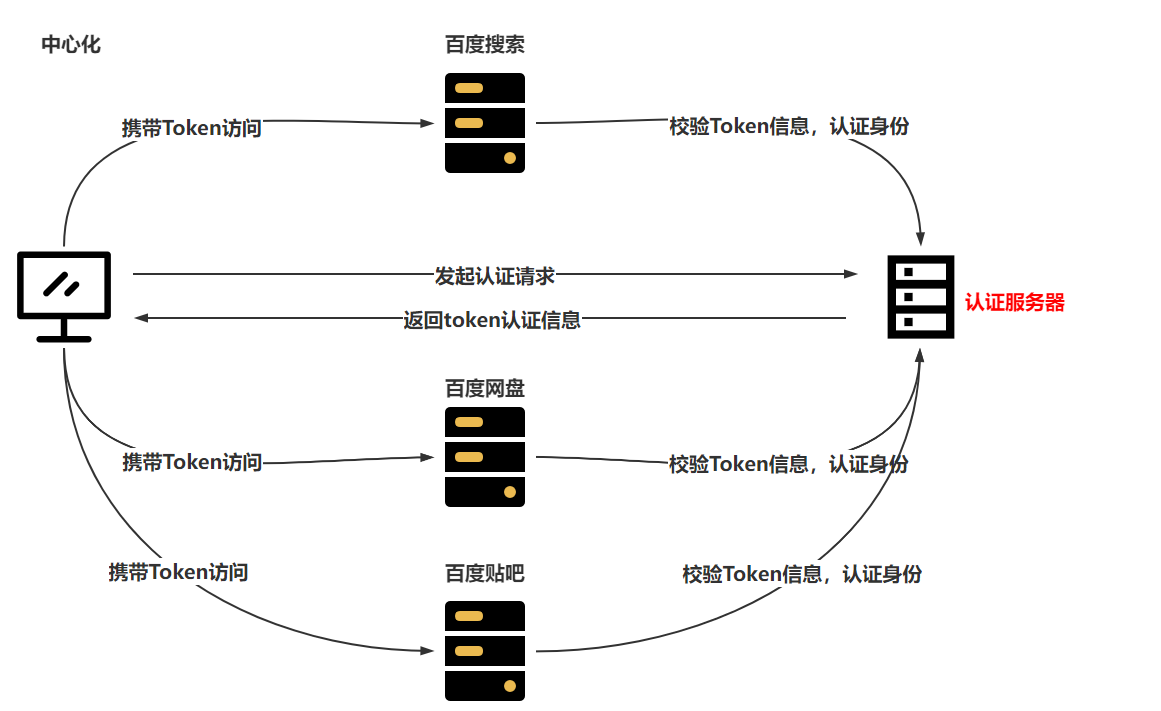
去中心化方式: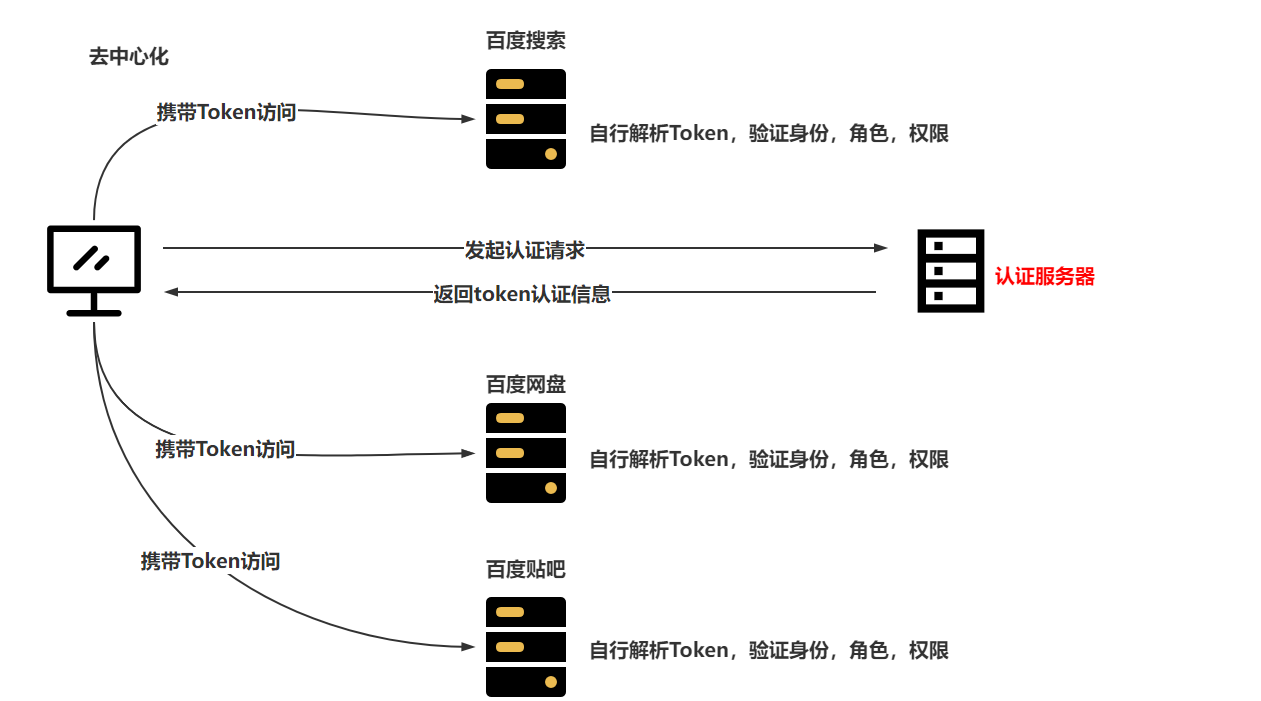
去中心化方式:不存在单点故障,并且在访问时,可以减少网络IO所占用的时间,并且针对认证服务器没有请求压力。去中心化的方式,采用JWT实现。
中心化方式:存在单点故障,单台服务的访问压力较大,每次请求认证身份都需要访问认证服务器,导致压力相对比较大,效率也比较低。
咱们即将搞定的Shiro+CAS的方式,就是基于中心化实现的。
8.2 CAS介绍&搭建
8.2.1 CAS介绍
CAS是一个开源项目,CAS是应用于企业级别的单点登录的服务,CAS分为CAS Server,CAS Client
CAS Server是需要一个单独部署的Web工程
CAS Client是一个项目中的具体业务服务,并且在需要认证或授权时,找到CAS Server即可
整体CAS的认证和授权流程就是中心化的方式
8.2.2 CAS搭建
在知道CAS是什么内容后,第一步就是将CAS Server单独部署并运行起来
CAS Server的5.x版本更改为使用gradle构建,平时更多的是使用Maven,采用4.x版本、
采用CAS的4.x版本使用……
下载CAS:https://github.com/apereo/cas/archive/refs/tags/v4.1.10.zip
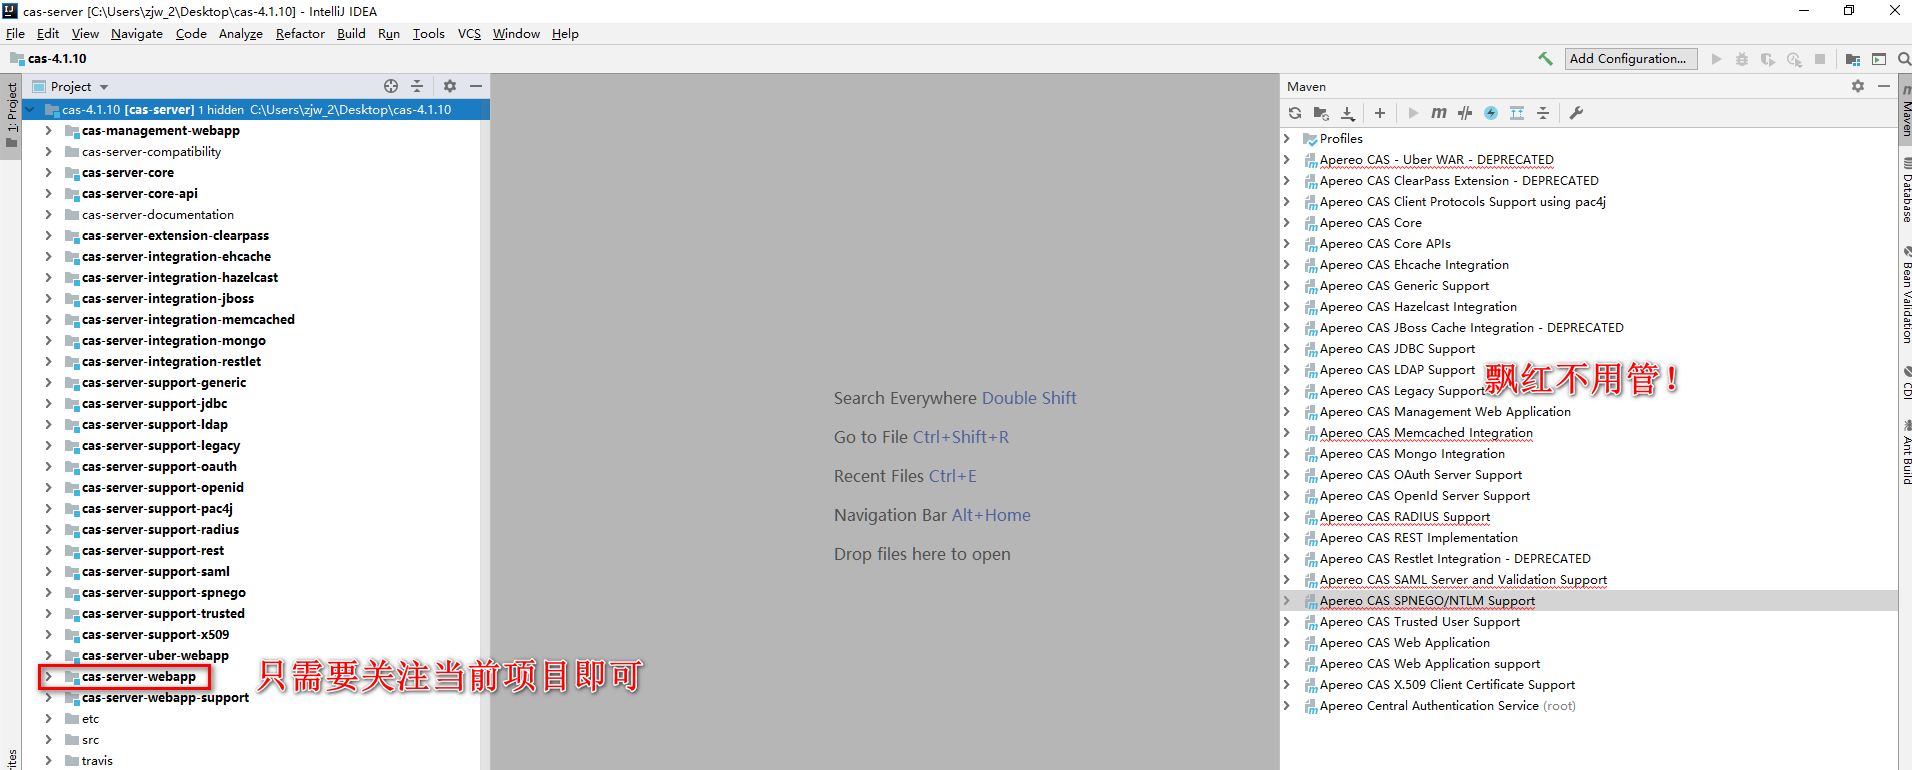
使用IDEA打开CAS Server,并修改一些配置信息,将CAS Server进行打包,扔到Tomcat服务中运行
- 采用IDEA打开CAS Server,并加载
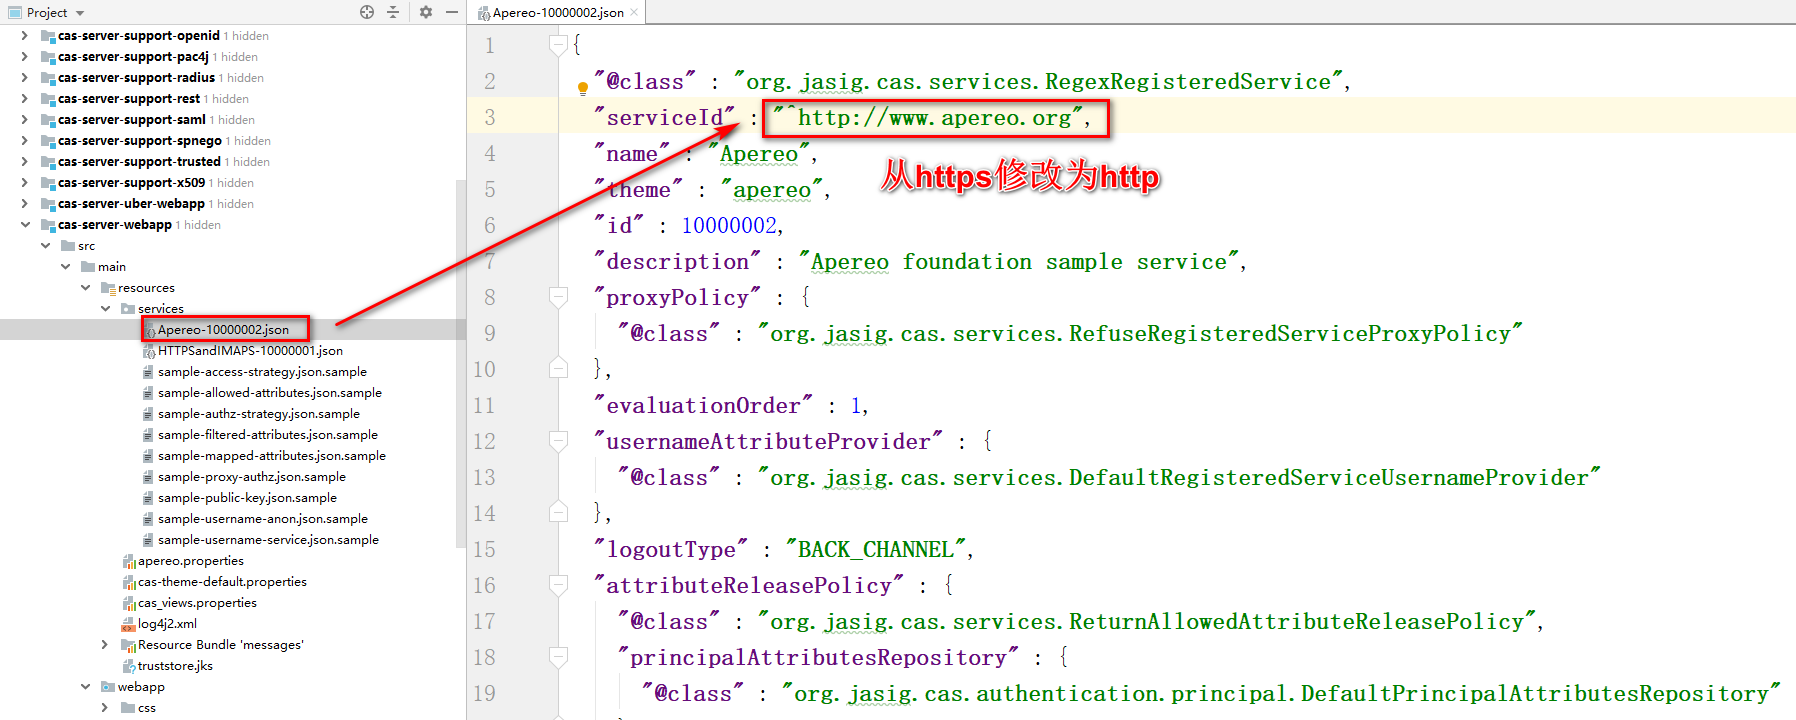
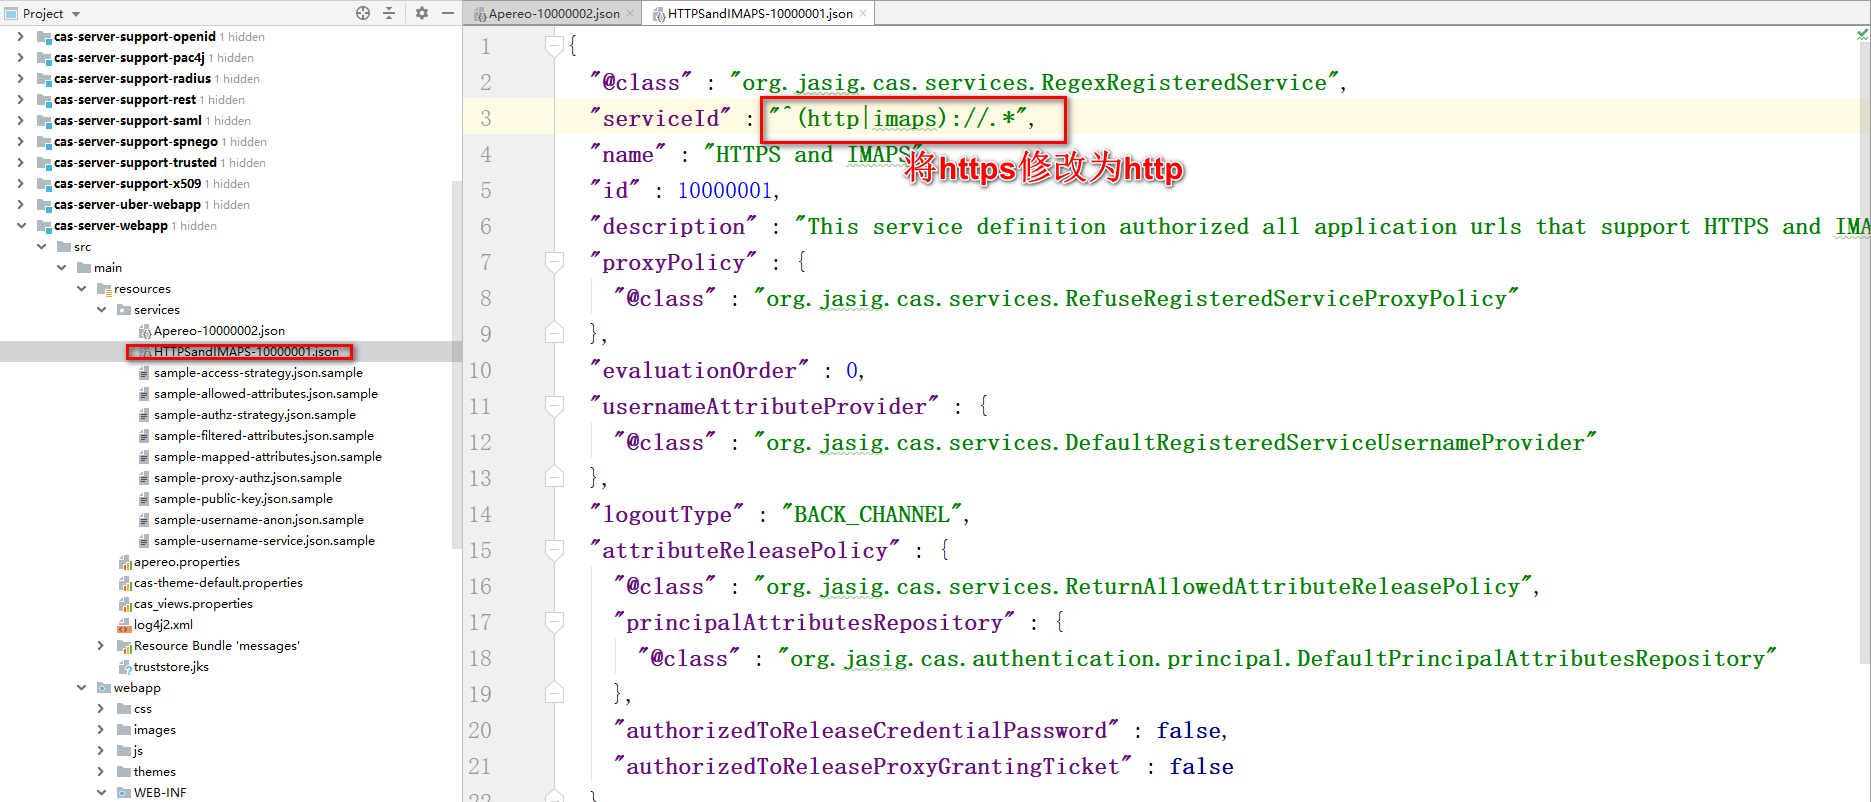
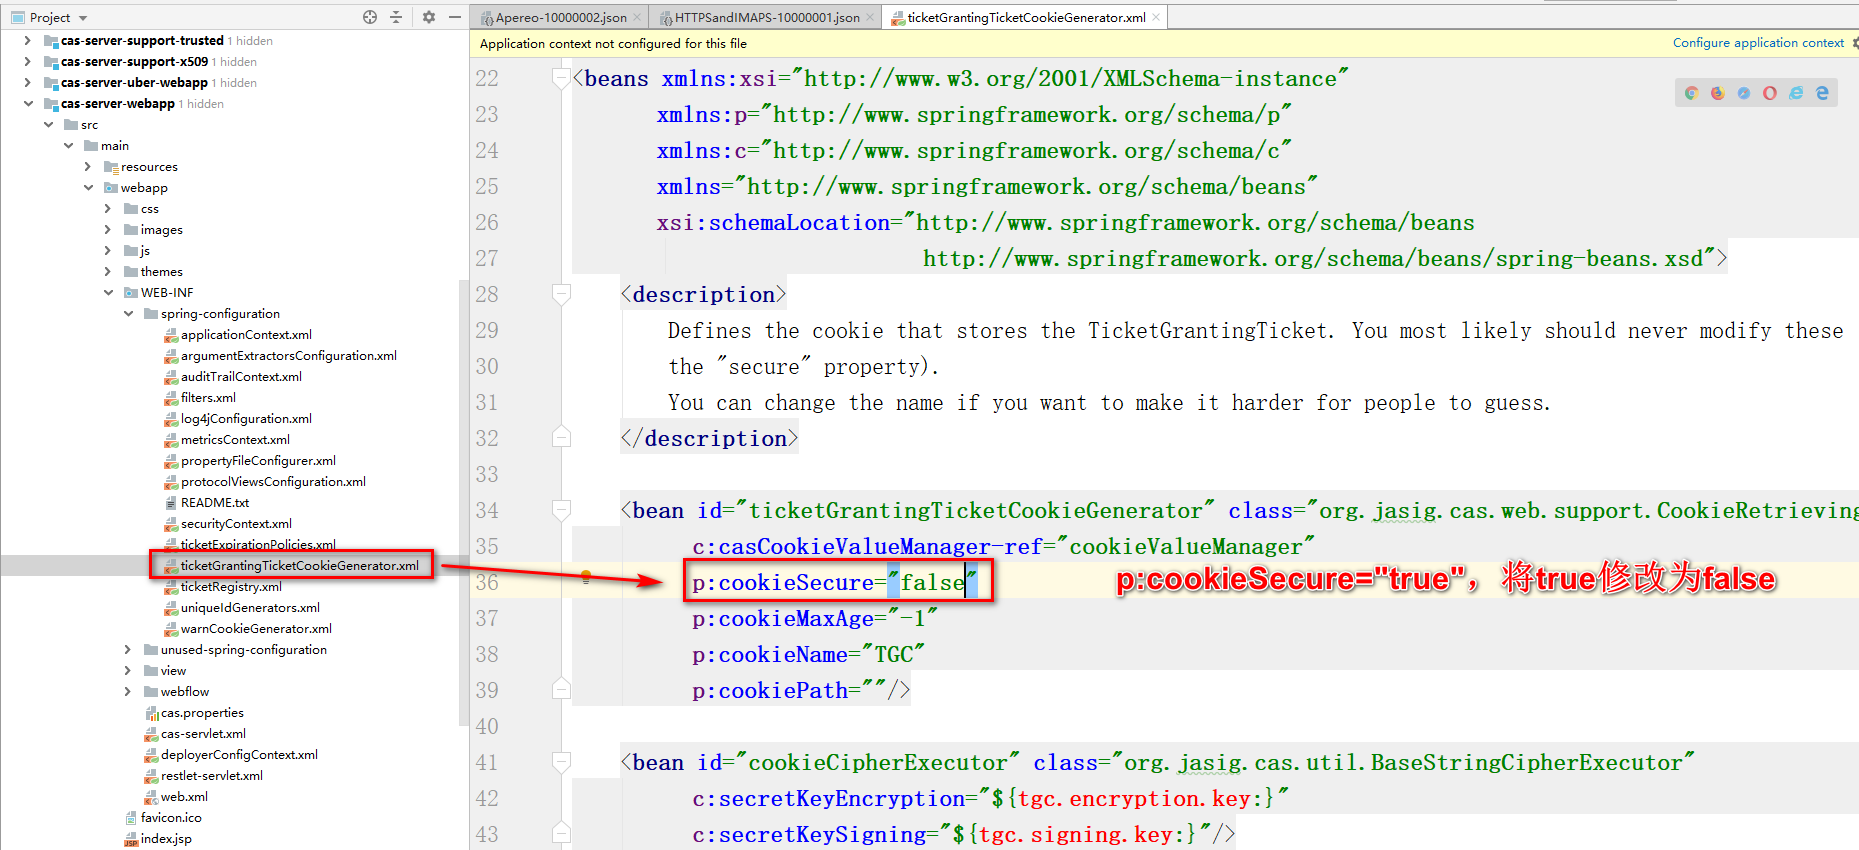
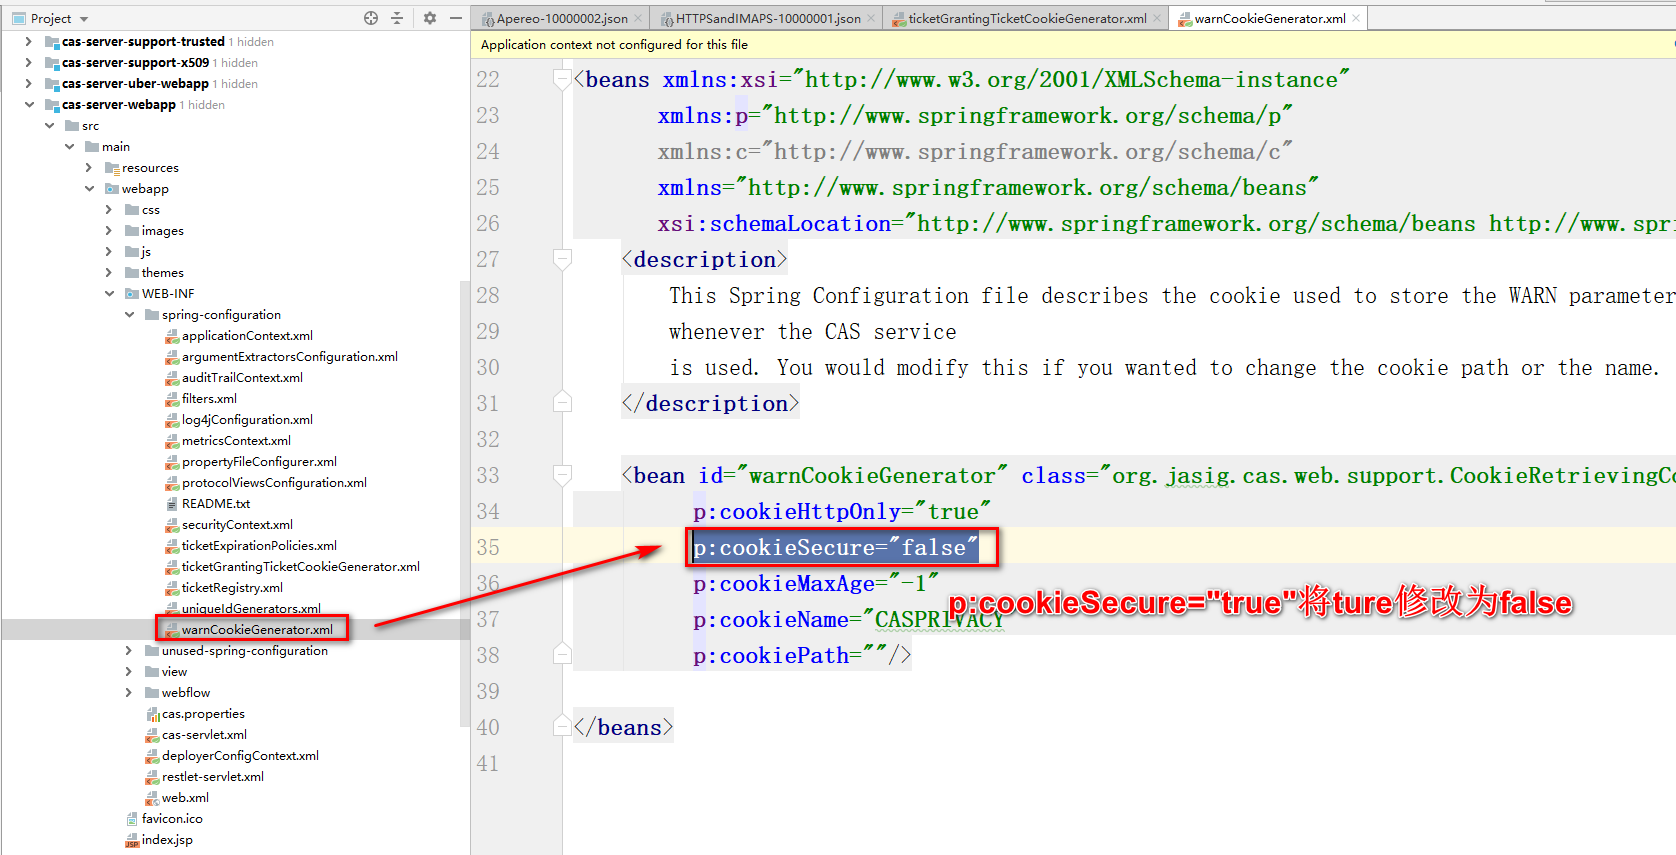
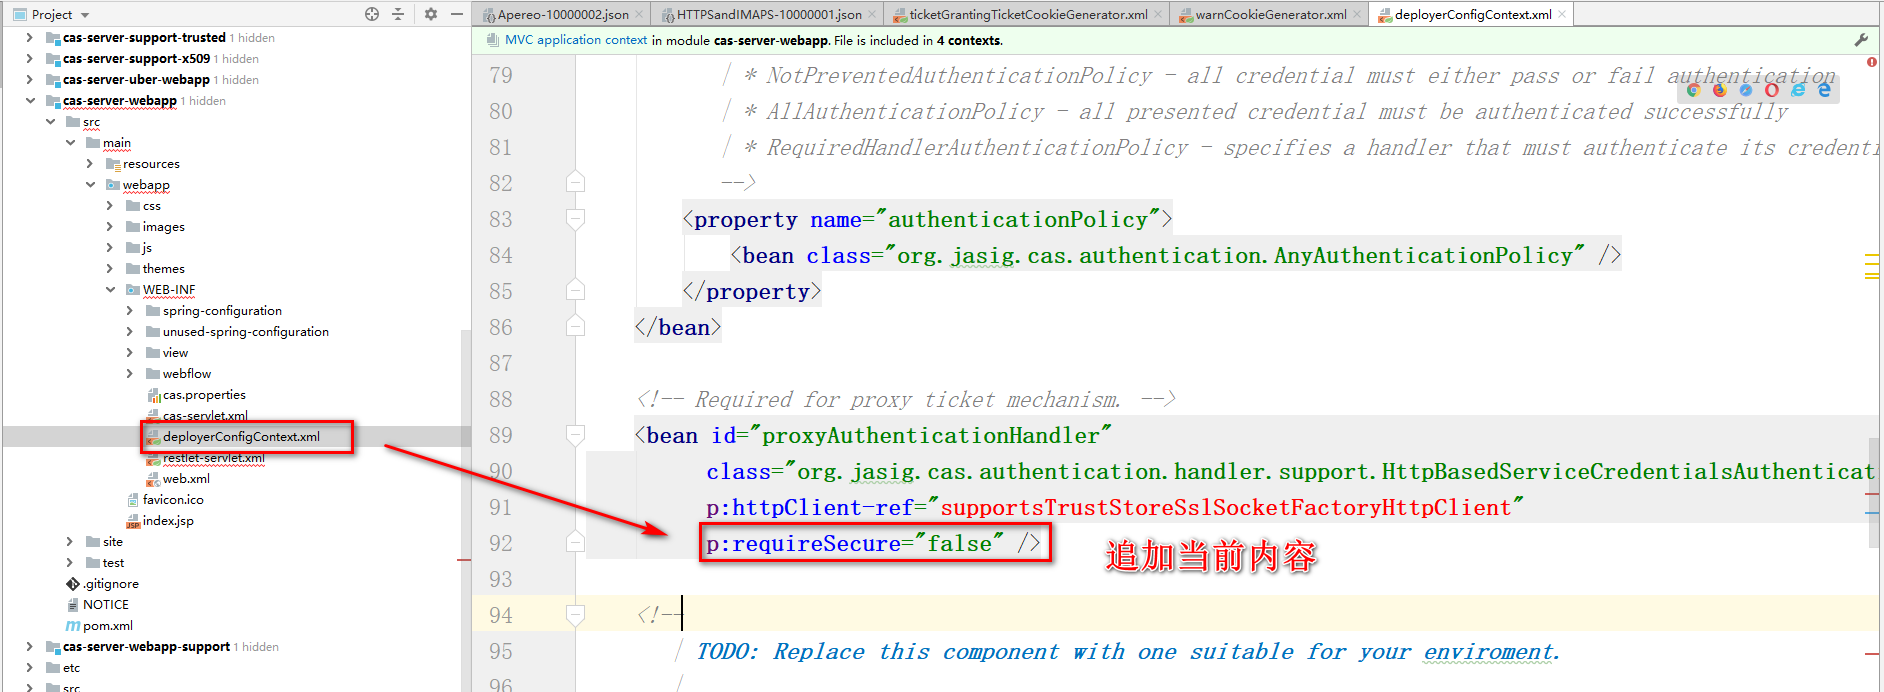
- CAS Server默认只支持HTTPS,需要让CAS Server支持HTTP
- Apereo-10000002.json
- HTTPSandIMAPS-10000001.json
- ticketGrantingTicketCookieGenerator.xml
- warnCookieGenerator.xml
- deployerConfigContext.xml
- Apereo-10000002.json
- 将项目进行打包,采用项目中的Maven插件,war的形式打包
- 打包前,先将CAS Server进行compile,避免启动项目时,出现类路径下的配置文件无法找到
- 再执行plugins中提供的war:war执行打包
- 将war包扔到Tomcat的webapps里,并运行即可
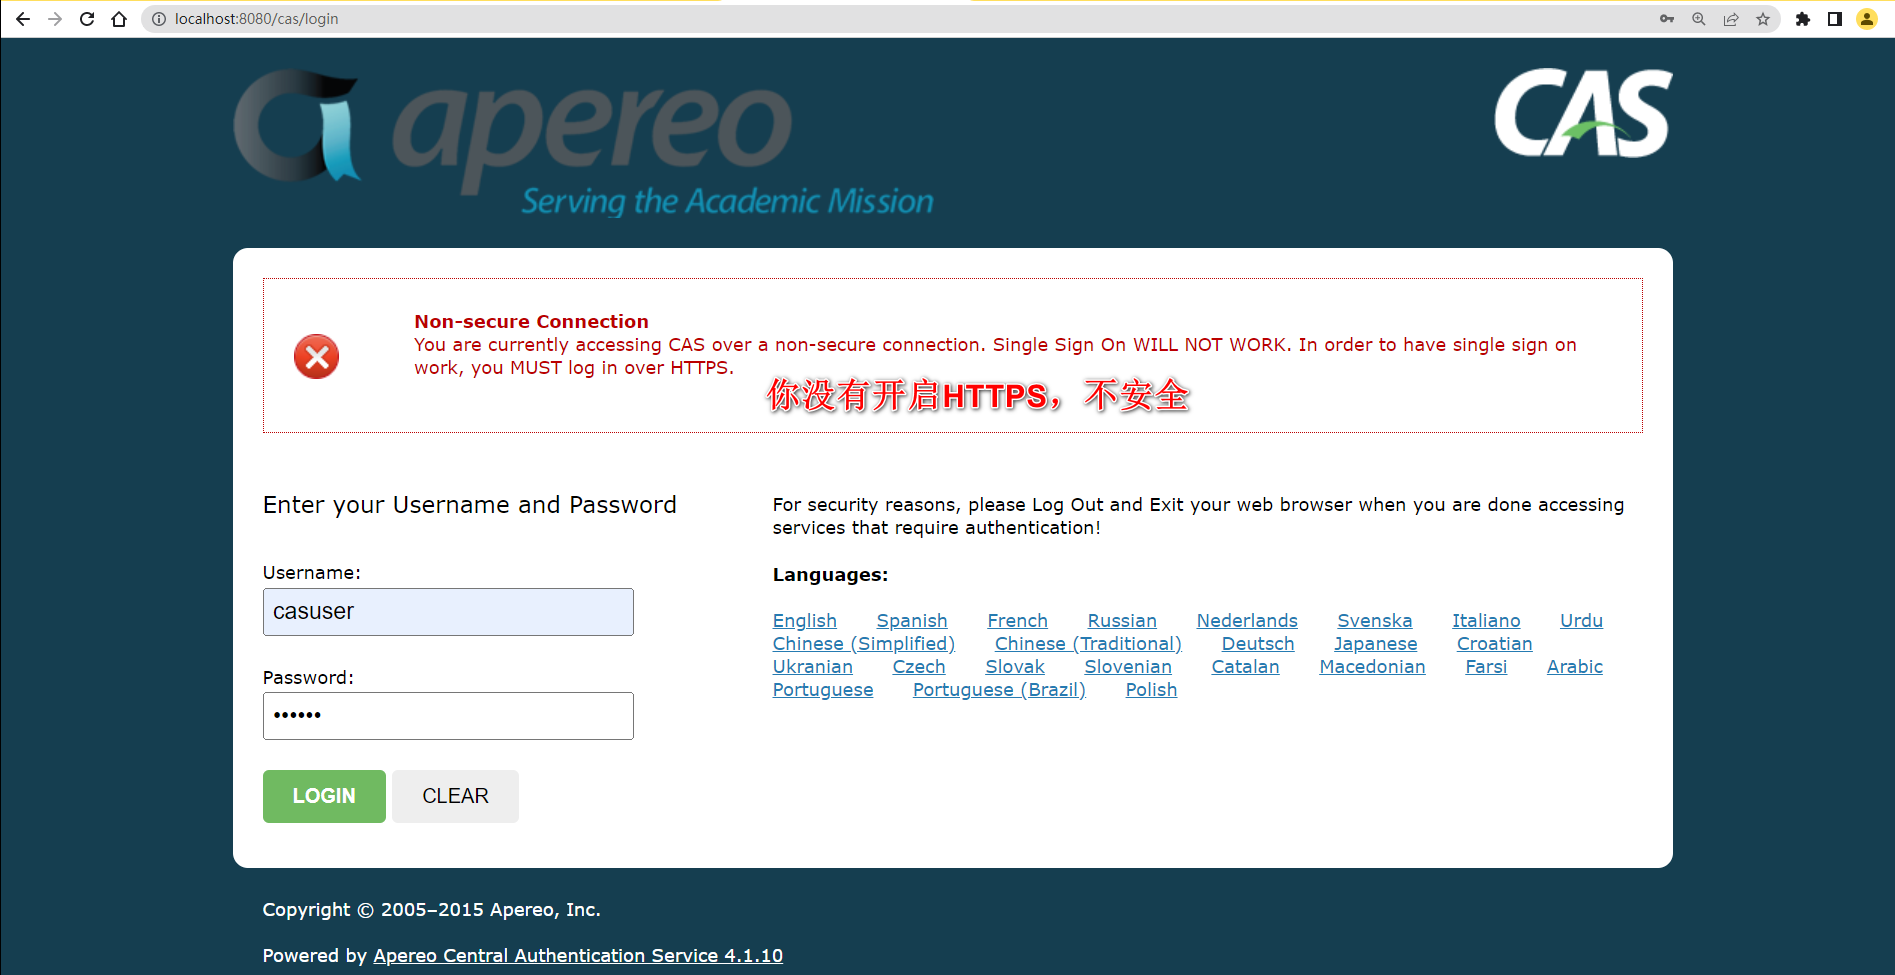
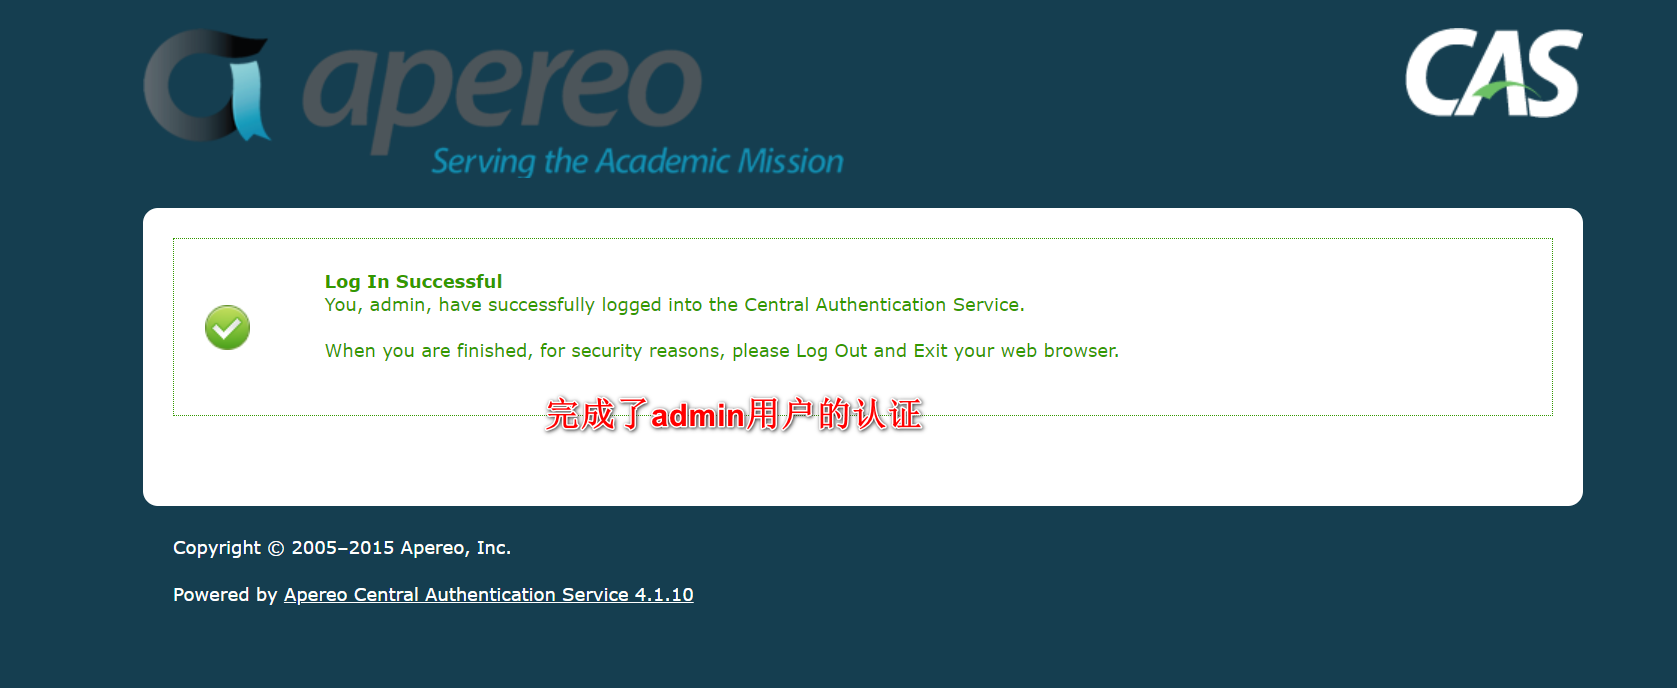
- 访问CAS Server首页,并且完成认证
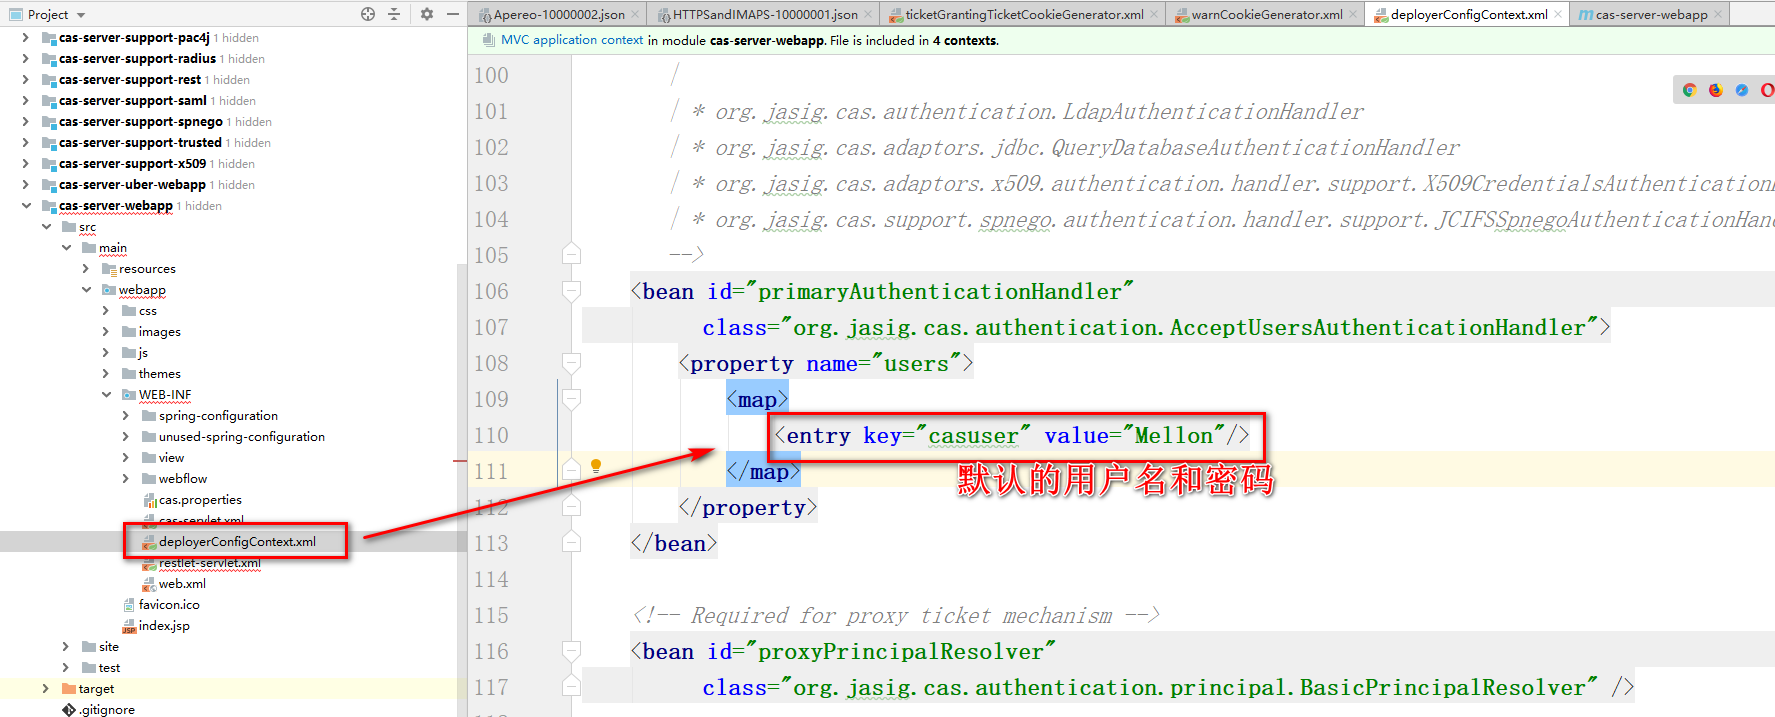
- 默认用户名&密码
- 访问首页测试
 )
)
- 默认用户名&密码
8.2.3 CAS连接数据库认证
注释掉之前采用配置文件内认证的方式,修改为与数据库交互实现
- 导入依赖
1
2
3
4
5
6
7
8
9
10
11
12
13
14
15
16
17
18<!-- mysql驱动-->
<dependency>
<groupId>mysql</groupId>
<artifactId>mysql-connector-java</artifactId>
<version>5.1.47</version>
</dependency>
<!-- druid连接池-->
<dependency>
<groupId>com.alibaba</groupId>
<artifactId>druid</artifactId>
<version>1.1.10</version>
</dependency>
<!-- jdbc的支持-->
<dependency>
<groupId>org.jasig.cas</groupId>
<artifactId>cas-server-support-jdbc</artifactId>
<version>4.1.10</version>
</dependency> - 编写配置
1
2
3
4
5
6
7
8
9
10
11
12<!-- 数据源-->
<bean id="dataSource" class="com.alibaba.druid.pool.DruidDataSource">
<property name="driverClassName" value="com.mysql.jdbc.Driver" />
<property name="url" value="jdbc:mysql:///shiro-web" />
<property name="username" value="root" />
<property name="password" value="root" />
</bean>
<!--配置primaryAuthenticationHandler,QueryDatabaseAuthenticationHandler-->
<bean id="primaryAuthenticationHandler" class="org.jasig.cas.adaptors.jdbc.QueryDatabaseAuthenticationHandler">
<property name="dataSource" ref="dataSource" />
<property name="sql" value="select password from tb_user where username = ?" />
</bean> - 需要将webapp项目进行compile,然后再执行war:war
- 最终经过测试,得知,CAS Server在认证成功后,会给客户端返回一些TGC并写入浏览器的Cookie中,每次客户端携带者正确的TGC来访问时,就会与CAS Server端存储 的TGT进行配对,只要正确,证明认证成功,直接跳转到登录成功页面,否则跳转到登录页面
8.2.4 CAS实现对密码的加密&加盐
在实现CAS与数据库交互时,采用了QueryDatabaseAuthenticationHandler类实现。
同时这个类提供了一个属性passwordEncoder,可以基于passwordEncoder实现对密码进行加密校验。
但是基于咱们的业务,需要对密码进行加密和加盐的操作。
QueryDatabaseAuthenticationHandler无法实现业务需求。
需要参考QueryDatabaseAuthenticationHandler认证处理器去实现可以满足自身业务的认证处理器
需要实现属于自己的认证处理器:
- 需要编写一个MD5HashQueryDatabaseAuthenticationHandler,去继承AbstractJdbcUsernamePasswordAuthenticationHandler
1
2
3
4
5
6
7/**
* @author zjw
* @since 3.0
*/
public class MD5HashQueryDatabaseAuthenticationHandler extends AbstractJdbcUsernamePasswordAuthenticationHandler {
// .....
} - 声明saltSql,需要注入查询盐的SQL语句,在做密码校验时,需要先将用户输入的密码进行加密和加盐,然后再做比较
1
2
3
4
5
6
7
8
9
10
11
12
13
14
15
16
17
18
19
20
21
22
23
24
25
26
27
28
29
30
31
32
33
34
35
36
37
38
39
40
41
42
43
44
45
46
47
48
49
50
51
52
53
54
55
56
57
58
59
60
61
62
63
64
65
66
67
68
69
70
71
72
73
74
75
76
77
78
79
80
81
82
83
84
85
86
87
88
89
90
91
92
93/*
* Licensed to Apereo under one or more contributor license
* agreements. See the NOTICE file distributed with this work
* for additional information regarding copyright ownership.
* Apereo licenses this file to you under the Apache License,
* Version 2.0 (the "License"); you may not use this file
* except in compliance with the License. You may obtain a
* copy of the License at the following location:
*
* http://www.apache.org/licenses/LICENSE-2.0
*
* Unless required by applicable law or agreed to in writing,
* software distributed under the License is distributed on an
* "AS IS" BASIS, WITHOUT WARRANTIES OR CONDITIONS OF ANY
* KIND, either express or implied. See the License for the
* specific language governing permissions and limitations
* under the License.
*/
package org.jasig.cas.adaptors.jdbc;
import org.apache.shiro.crypto.hash.Md5Hash;
import org.jasig.cas.authentication.HandlerResult;
import org.jasig.cas.authentication.PreventedException;
import org.jasig.cas.authentication.UsernamePasswordCredential;
import org.springframework.dao.DataAccessException;
import org.springframework.dao.IncorrectResultSizeDataAccessException;
import javax.security.auth.login.AccountNotFoundException;
import javax.security.auth.login.FailedLoginException;
import javax.validation.constraints.NotNull;
import java.security.GeneralSecurityException;
/**
* @author zjw
* @since 3.0
*/
public class MD5HashQueryDatabaseAuthenticationHandler extends AbstractJdbcUsernamePasswordAuthenticationHandler {
private String sql;
private String saltSql;
private final Integer hashIterations = 1024;
/**
* {@inheritDoc}
*/
protected final HandlerResult authenticateUsernamePasswordInternal(final UsernamePasswordCredential credential)
throws GeneralSecurityException, PreventedException {
// 获取用户输入的用户名
final String username = credential.getUsername();
// 获取用户输入的密码
final String encryptedPassword = this.getPasswordEncoder().encode(credential.getPassword());
try {
// 基于用户名查询数据库的密码
final String dbPassword = getJdbcTemplate().queryForObject(this.sql, String.class, username);
// 基于用户名查询当前用户的salt
final String salt = getJdbcTemplate().queryForObject(this.saltSql, String.class, username);
// 将用户输入的密码进行加密和加盐操作~
final String password = new Md5Hash(encryptedPassword, salt, hashIterations).toString();
// 比较密码
if (!dbPassword.equals(password)) {
throw new FailedLoginException("Password does not match value on record.");
}
} catch (final IncorrectResultSizeDataAccessException e) {
if (e.getActualSize() == 0) {
throw new AccountNotFoundException(username + " not found with SQL query");
} else {
throw new FailedLoginException("Multiple records found for " + username);
}
} catch (final DataAccessException e) {
throw new PreventedException("SQL exception while executing query for " + username, e);
}
return createHandlerResult(credential, this.principalFactory.createPrincipal(username), null);
}
/**
* @param sql The sql to set.
*/
public void setSql(final String sql) {
this.sql = sql;
}
/**
* @param saltSql The sql to set - select salt.
*/
public void setSaltSql(final String saltSql) {
this.saltSql = saltSql;
}
}
回到webapp项目中,采用MD5HashQueryDatabaseAuthenticationHandler作为认证处理器
1 | <!--配置primaryAuthenticationHandler,QueryDatabaseAuthenticationHandler--> |
在第一次重新打包并发布时,出现了ClassNotFountException,需要将JDBC项目进行install操作,然后才可以对webapp重新war:war,然后才可以生效,避免出现ClassNotFountException
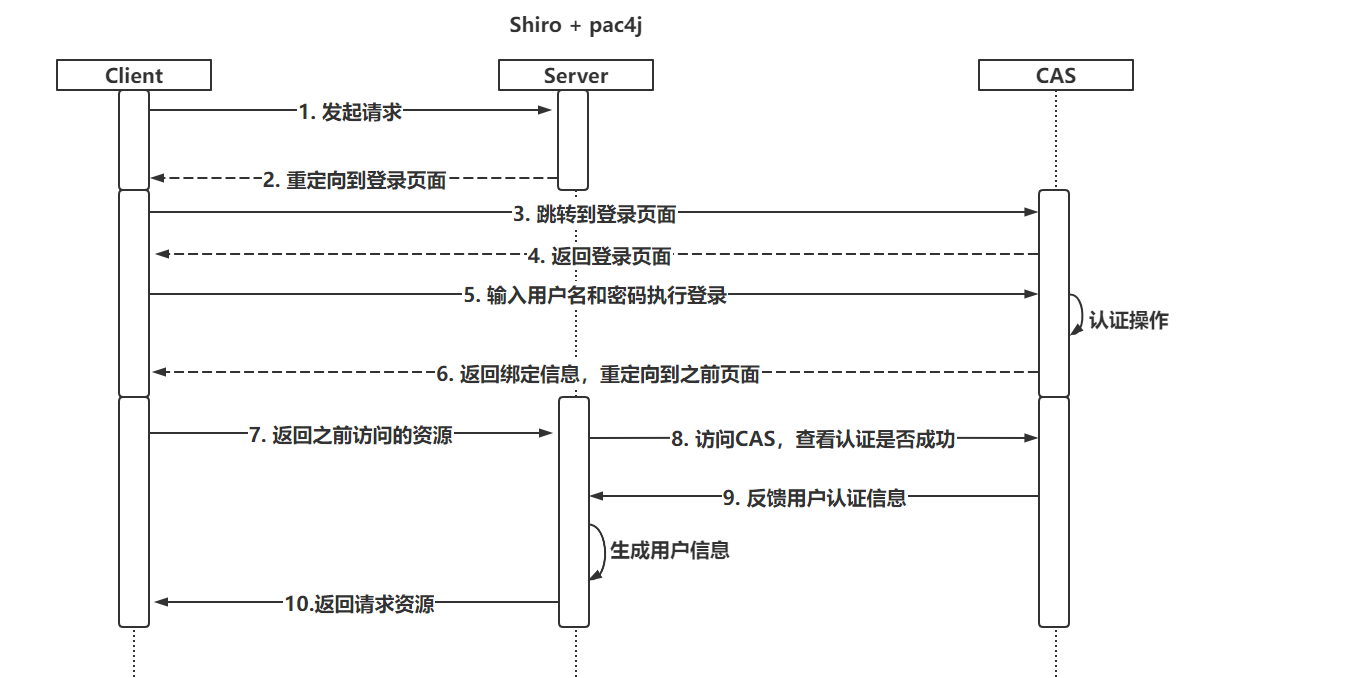
8.3 Shiro + pac4j + CAS
8.3.1 认证流程
本质上和ShiroWeb的流程没有变化,只不过内部使用的一些Realm和过滤器交由pac4j提供
8.3.2 构建项目并设置配置信息
导入依赖
1
2
3
4
5
6
7
8
9
10
11
12
13
14
15
16
17
18
19
20
21
22
23
24<dependencies>
<dependency>
<groupId>org.springframework.boot</groupId>
<artifactId>spring-boot-starter-web</artifactId>
</dependency>
<dependency>
<groupId>org.apache.shiro</groupId>
<artifactId>shiro-spring</artifactId>
<version>1.4.0</version>
</dependency>
<dependency>
<groupId>io.buji</groupId>
<artifactId>buji-pac4j</artifactId>
<version>4.0.0</version>
</dependency>
<dependency>
<groupId>org.pac4j</groupId>
<artifactId>pac4j-cas</artifactId>
<version>3.0.2</version>
</dependency>
</dependencies>配置Realm
1
2
3
4
5
6
7
8
9
10
11
12
13
14
15
16
17
18
19
20
21
22
23
24
25
26
27
28
29
30
31
32
33
34
35
36
public class CasRealm extends Pac4jRealm {
/**
* 授权操作,需要自己编写,并且也可以基于RedisSessionDAO实现缓存……
* @param principals
* @return
*/
protected AuthorizationInfo doGetAuthorizationInfo(PrincipalCollection principals) {
// do something , find DB or Cache
return null;
}
}
```java
* 编写SecurityManager
```java
public class ShiroConfig {
public SubjectFactory subjectFactory(){
return new Pac4jSubjectFactory();
}
public SecurityManager securityManager(CasRealm casRealm,SubjectFactory subjectFactory){
DefaultWebSecurityManager securityManager = new DefaultWebSecurityManager();
securityManager.setRealm(casRealm);
securityManager.setSubjectFactory(subjectFactory);
return securityManager;
}
}配置过滤器
1
2
3
4
5
6
7
8
9
10
11
12
13
14
15
16@Configuration
public class ShiroConfig {
```java
/**
* 配置核心过滤器
* @return
*/
@Bean
public FilterRegistrationBean filterRegistrationBean(){
FilterRegistrationBean filterRegistration =new FilterRegistrationBean();
filterRegistration.setFilter(new DelegatingFilterProxy("shiroFilter"));
filterRegistration.addUrlPatterns("/*");
return filterRegistration;
}}
1
2
3
4
5
6
7
8
9
10
11
12
13
14
15
16
17
18
19
20* 配置ShiroFiler(ShiroConfig)
```java
/**
* shiroFilter核心配置
* @return
*/
public ShiroFilterFactoryBean shiroFilter(SecurityManager securityManager){
ShiroFilterFactoryBean factoryBean = new ShiroFilterFactoryBean();
factoryBean.setSecurityManager(securityManager);
putFilterChain(factoryBean);
return factoryBean;
}
private void putFilterChain(ShiroFilterFactoryBean factoryBean) {
Map<String,String> filterChain = new LinkedHashMap<>();
// 后面在声明好pac4j提供的过滤器后,需要重新设置!
filterChain.put("/**","anon");
factoryBean.setFilterChainDefinitionMap(filterChain);
}设置pac4j对CAS的设置
1
2
3
4
5
6
7
8
9
10
11
12
13
14
15
16
17
18
19
20
21
22
23
24
25
26
27
28
29
30
31
32
33
34
35
36
37
38
39
40
41
42
43
44
45
46
47
48
49
50
51
52
53
54
public class Pac4jConfig {
("${cas.server.url:http://localhost:8080/cas}")
private String casServerUrl;
("${cas.project.url:http://localhost:81}")
private String casProjectUrl;
("${cas.clientName:test}")
private String clientName;
/**
* 核心Config
* @param casClient
* @return
*/
public Config config(CasClient casClient){
Config config = new Config(casClient);
return config;
}
/**
* casClient,主要设置回调
* @param casConfiguration
* @return
*/
public CasClient casClient(CasConfiguration casConfiguration){
CasClient casClient = new CasClient(casConfiguration);
// 设置CAS访问后的回调地址
casClient.setCallbackUrl(casProjectUrl + "/callback?client_name=" + clientName);
casClient.setName(clientName);
return casClient;
}
/**
* CAS服务地址
* @return
*/
public CasConfiguration casConfiguration(){
CasConfiguration casConfiguration = new CasConfiguration();
// 设置CAS登录页面
casConfiguration.setLoginUrl(casServerUrl + "/login");
// 设置CAS协议
casConfiguration.setProtocol(CasProtocol.CAS20);
casConfiguration.setPrefixUrl(casServerUrl + "/");
casConfiguration.setAcceptAnyProxy(true);
return casConfiguration;
}
}ShiroFilter二次配置(ShiroConfig)
1
2
3
4
5
6
7
8
9
10
11
12
13
14
15
16
17
18
19
20
21
22
23
24
25
26
27
28
29
30
31
32
33
34
35
36
37
38
39
40
41
42
43
44/**
* shiroFilter核心配置
* @return
*/
public ShiroFilterFactoryBean shiroFilter(SecurityManager securityManager, Config config){
ShiroFilterFactoryBean factoryBean = new ShiroFilterFactoryBean();
factoryBean.setSecurityManager(securityManager);
putFilterChain(factoryBean);
// 后面在声明好pac4j提供的过滤器后
Map<String, Filter> filters = factoryBean.getFilters();
//1. 准备SecurityFilter
SecurityFilter securityFilter = new SecurityFilter();
securityFilter.setConfig(config);
securityFilter.setClients(clientName);
filters.put("security",securityFilter);
//2. 设置回调的拦截器
CallbackFilter callbackFilter = new CallbackFilter();
callbackFilter.setConfig(config);
callbackFilter.setDefaultUrl(casProjectUrl);
filters.put("callback",callbackFilter);
//3. 退出登录
LogoutFilter logoutFilter = new LogoutFilter();
logoutFilter.setConfig(config);
logoutFilter.setCentralLogout(true);
logoutFilter.setLocalLogout(true);
logoutFilter.setDefaultUrl(casProjectUrl + "/callback?client_name=" + clientName);
filters.put("logout",logoutFilter);
return factoryBean;
}
private void putFilterChain(ShiroFilterFactoryBean factoryBean) {
Map<String,String> filterChain = new LinkedHashMap<>();
// 后面在声明好pac4j提供的过滤器后,需要重新设置!
filterChain.put("/test","security");
filterChain.put("/logout","logout");
filterChain.put("/callback","callback");
filterChain.put("/**","security");
factoryBean.setFilterChainDefinitionMap(filterChain);
}
8.3.3 测试功能
编写了一个Controller,并且要求当前/test地址,必须认证后才可以访问。
- 访问/test资源后,直接跳转到了CAS登录页面
- 在CAS登录页面输入用户名和密码认证成功后,跳转到/test地址
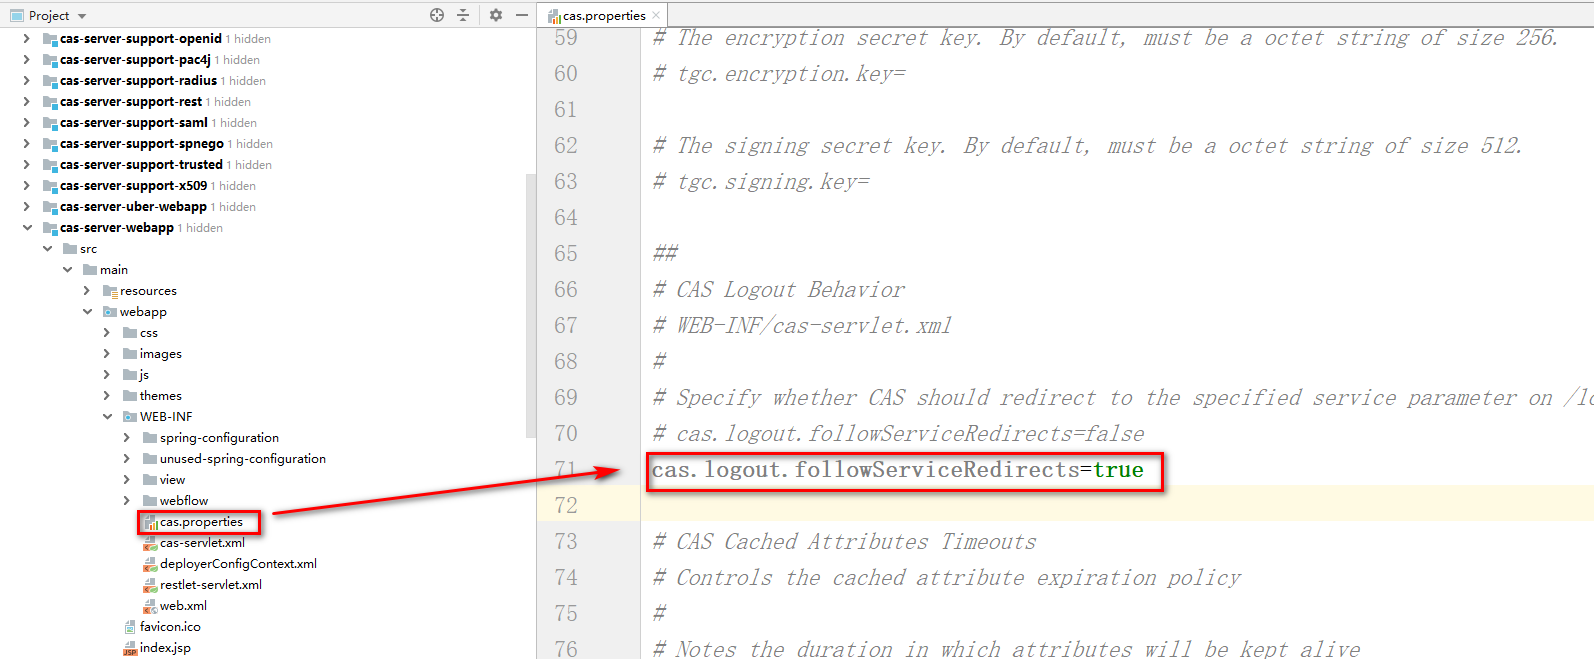
- 再次访问/logout地址,发现退出登录成功后,留在了CAS的退出登录成功页面
希望退出登录后,跳转到登录页面,并且避免出现401问题
需要配置两处位置:
- CASServer需要支持退出登录后的重定向
- 修改CasClient对象,页面在退出登录后,会出现401
1
2
3
4
5
6
7
8
9
10
11
12
13
14
15
16
17
18
19
20
21
22
23
24
25
26
27
28
29
30
31
32
33
34
35
36
37
38
39
40
41
42
43
44
45
46
47
48
49public class CasClient extends org.pac4j.cas.client.CasClient {
public CasClient() {
super();
}
public CasClient(CasConfiguration configuration) {
super(configuration);
}
public RedirectAction getRedirectAction(final WebContext context) {
init();
AjaxRequestResolver ajaxRequestResolver = getAjaxRequestResolver();
RedirectActionBuilder redirectActionBuilder = getRedirectActionBuilder();
// it's an AJAX request -> appropriate action
if (ajaxRequestResolver.isAjax(context)) {
logger.info("AJAX request detected -> returning the appropriate action");
RedirectAction action = redirectActionBuilder.redirect(context);
cleanRequestedUrl(context);
return ajaxRequestResolver.buildAjaxResponse(action.getLocation(), context);
}
// authentication has already been tried -> unauthorized
final String attemptedAuth = (String) context.getSessionStore().get(context, getName() + ATTEMPTED_AUTHENTICATION_SUFFIX);
if (CommonHelper.isNotBlank(attemptedAuth)) {
cleanAttemptedAuthentication(context);
cleanRequestedUrl(context);
// 跑抛出异常,页面401,只修改这个位置!!
// throw HttpAction.unauthorized(context);
return redirectActionBuilder.redirect(context);
}
return redirectActionBuilder.redirect(context);
}
private void cleanRequestedUrl(final WebContext context) {
SessionStore<WebContext> sessionStore = context.getSessionStore();
if (sessionStore.get(context, Pac4jConstants.REQUESTED_URL) != null) {
sessionStore.set(context, Pac4jConstants.REQUESTED_URL, "");
}
}
private void cleanAttemptedAuthentication(final WebContext context) {
SessionStore<WebContext> sessionStore = context.getSessionStore();
if (sessionStore.get(context, getName() + ATTEMPTED_AUTHENTICATION_SUFFIX) != null) {
sessionStore.set(context, getName() + ATTEMPTED_AUTHENTICATION_SUFFIX, "");
}
}
} - 修改Pac4jConfig,将之前使用的默认CasClient更改为修改的这个!
Reference: