本章主要介绍Springboot整合web层, 包括:
JSON处理,静态资源访问,文件上传,@ControllerAdvice用法,全局异常处理封装,自定义异常视图,CORS,加载XML,系统启动任务,web基础组件整合(拦截器, 过滤器,servlet),整合AOP. . .
Springboot 整合Jackson JSON是目前主流的前后端数据传输方式, SpringMVC中使用消息转化器HttpMessageConverter对JSON的转换提供了很好的支持,在SpringBoot中对相关配置做了进一步简化. HttpMessageConverter既可以将服务端返回的对象序列化为JSON串, 也可以将JSON串反序列化为对象.
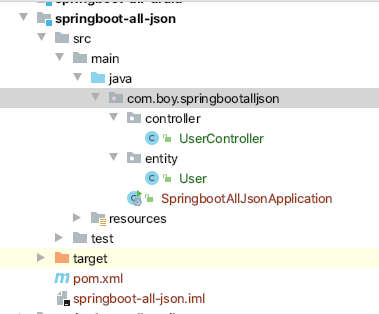
项目目录结构
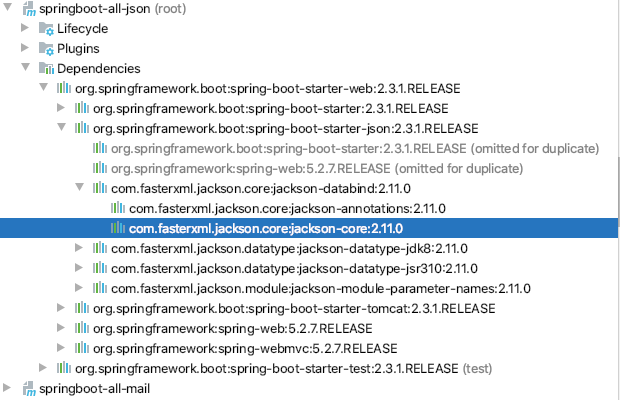
构建过程 新建项目 新建项目导入spring-boot-starter-web即可, 因为该starter内已经有Jackson相关依赖.
准备entity 1 2 3 4 5 6 7 8 9 10 11 12 13 14 15 16 17 18 19 20 21 22 23 24 25 26 27 package com.boy.springbootalljson.entity;import com.fasterxml.jackson.annotation.JsonFormat;import java.util.Date;public class User private Integer id; private String username; private Date birth; @Override public String toString () return "User{" + "id=" + id + ", username='" + username + '\'' + ", birth=" + birth + '}' ; } public Integer getId () return id; } public void setId (Integer id) this .id = id; } public String getUsername () return username; } public void setUsername (String username) this .username = username;} public Date getBirth () return birth; } public void setBirth (Date birth) this .birth = birth; } }
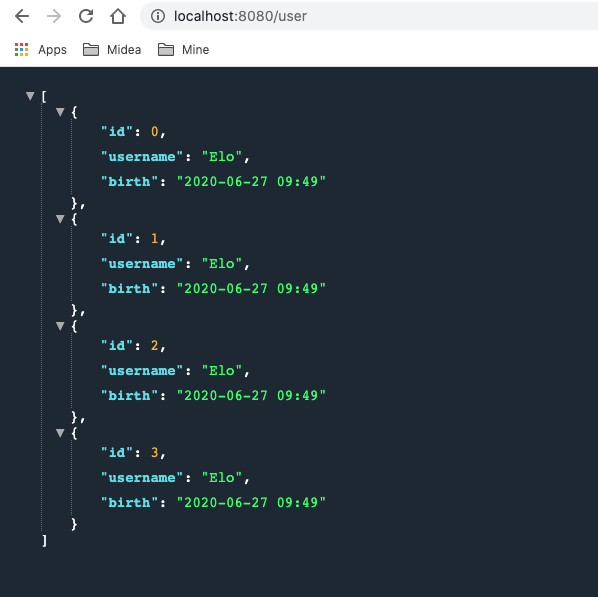
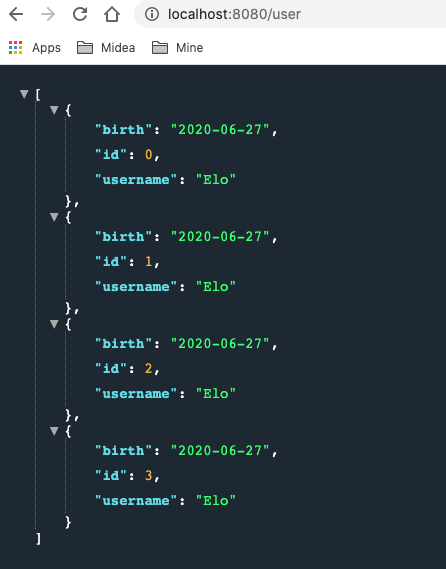
准备controller 1 2 3 4 5 6 7 8 9 10 11 12 13 14 15 16 17 18 19 20 21 22 23 24 25 26 27 28 29 package com.boy.springbootalljson.controller;import com.boy.springbootalljson.entity.User;import org.springframework.stereotype.Controller;import org.springframework.web.bind.annotation.GetMapping;import org.springframework.web.bind.annotation.ResponseBody;import java.util.ArrayList;import java.util.Arrays;import java.util.Date;import java.util.List;@Controller public class UserController @GetMapping ("/user" ) @ResponseBody public List<User> Users () ArrayList<User> users = new ArrayList<User>(); for (int i = 0 ; i <4 ; i++) { User user = new User(); user.setId(i); user.setUsername("Elo" ); user.setBirth(new Date()); users.add(user); } return users; } }
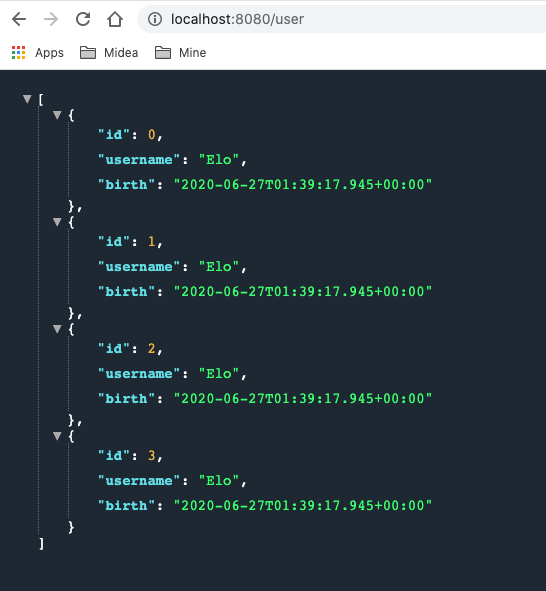
测试
分析 可以看出测试结果中日期是没有被格式化的. 因为Jackson的默认配置中并没有对日期进行特殊处理. 从源码可以看出这一点:
1 org.springframework.boot.autoconfigure.http.JacksonHttpMessageConvertersConfiguration类中有如下代码片段:
1 2 3 4 5 6 7 8 9 10 11 12 13 static class MappingJackson2HttpMessageConverterConfiguration MappingJackson2HttpMessageConverterConfiguration() { } @Bean @ConditionalOnMissingBean ( value = {MappingJackson2HttpMessageConverter.class }, ignoredType = {"org.springframework.hateoas.server.mvc.TypeConstrainedMappingJackson2HttpMessageConverter" , "org.springframework.data.rest.webmvc.alps.AlpsJsonHttpMessageConverter" } ) MappingJackson2HttpMessageConverter mappingJackson2HttpMessageConverter (ObjectMapper objectMapper) { return new MappingJackson2HttpMessageConverter(objectMapper); } }
两种解决方案 有两种方法可以解决这个问题
一种”简单”的方法就是在entity的日期属性上加一个注解,如下:
1 2 3 private Date birth; ...
但是如果有很多实体类中都有日期字段,都需要添加该注解就显得臃肿, 不和适宜.
一种更为简单的方式就是单独的配置日期格式.自己提供一个MappingJackson2HttpMessageConverter类型的bean, 让autoConfiguration默认配置失效, 然后再在自建的bean中进行日期格式化处理.
新建一个config类.
1
2
3
4
5
6
7
8
9
10
11
12
13
14
15
16
17
18
19
20
21
22
23
24
25
26
27
package com.boy.springbootalljson.config;import com.fasterxml.jackson.databind.ObjectMapper;import org.springframework.context.annotation.Bean;import org.springframework.context.annotation.Configuration;import org.springframework.http.converter.HttpMessageConverter;import org.springframework.http.converter.json.MappingJackson2HttpMessageConverter;import java.text.SimpleDateFormat;@Configuration public class MyJsonConfig @Bean public MappingJackson2HttpMessageConverter mappingJackson2HttpMessageConverter () MappingJackson2HttpMessageConverter mappingJackson2HttpMessageConverter = new MappingJackson2HttpMessageConverter(); ObjectMapper objectMapper = new ObjectMapper(); objectMapper.setDateFormat(new SimpleDateFormat("yyyy-MM-dd" )); mappingJackson2HttpMessageConverter.setObjectMapper(objectMapper); return mappingJackson2HttpMessageConverter; } }
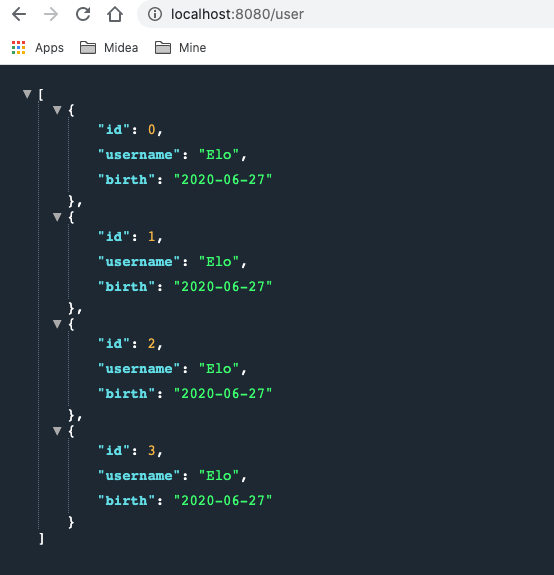
使用配置类处理日期格式后的测试结果:
从源码片段最后的返回语句
1 return new MappingJackson2HttpMessageConverter(objectMapper);
可以看出默认配置中返回的 MappingJackson2HttpMessageConverter bean是有一个new objectMapper的参数的, 该参数是自动注入的.
往上游追可以知道该参数是JacksonAutoConfiguration类提供的, 源码片段 :
1 org.springframework.boot.autoconfigure.jackson.JacksonAutoConfiguration
1 2 3 4 5 6 7 8 9 10 11 12 @Configuration (proxyBeanMethods = false ) @ConditionalOnClass (Jackson2ObjectMapperBuilder.class ) static class JacksonObjectMapperConfiguration { @Bean @Primary @ConditionalOnMissingBean ObjectMapper jacksonObjectMapper (Jackson2ObjectMapperBuilder builder) { return builder.createXmlMapper(false ).build(); } }
也就是说, 可以得出如下结论:
项目中没有自己提供ObjectMapper bean时, MappingJackson2HttpMessageConverter使用的是JacksonAutoConfiguration中提供的objectmapper bean来进行构造bean并返回到容器中的.
基于这样的结论, 以及最终实现日期格式化操作是objectmapper提供的setDateFormat(format) 的这一事实, 所以, 在自动一的MyJsonConfig类中也可以之定义一个objectmapper bean并返回即可. (即: 可以用如下bean替换掉MyJsonConfig类中的 mappingJackson2HttpMessageConverter bean )
1 2 3 4 5 6 7 8 @Bean public ObjectMapper objectMapper () ObjectMapper objectMapper = new ObjectMapper(); objectMapper.setDateFormat(new SimpleDateFormat("yyyy-MM-dd hh:mm" )); return objectMapper; }
测试结果:
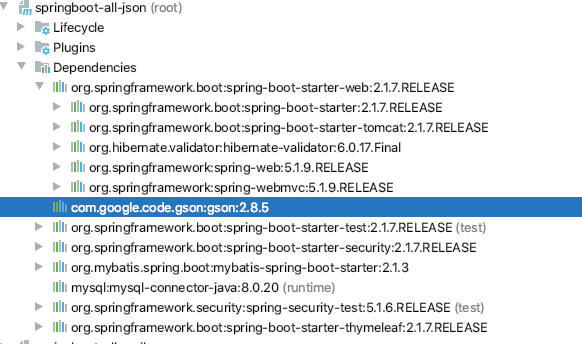
Springboot 整合Gson 引入pom依赖 因为Gson是第三方(Google)提供的json处理方案, 所以pom要先将自身的Jackson依赖进行排除, 然后再添加Gson依赖. 具体操作如下:
1 2 3 4 5 6 7 8 9 10 11 12 13 14 15 <dependency > <groupId > org.springframework.boot</groupId > <artifactId > spring-boot-starter-web</artifactId > <exclusions > <exclusion > <groupId > org.springframework.boot</groupId > <artifactId > spring-boot-starter-json</artifactId > </exclusion > </exclusions > </dependency > <dependency > <groupId > com.google.code.gson</groupId > <artifactId > gson</artifactId > </dependency >
测试依赖引入是否成功 reimport后可以看到, 此时spring-boot-starter-web中已经没有Jackson而是换成了gson
Gson源码解析 从GsonHttpMessageConvertersConfiguration的源码可以看出:
1: 如果pom依赖中提供了gson, 那么GsonHttpMessageConvertersConfiguration配置就会生效, 因为该类有一个注解: @ConditionalOnClass(Gson.class)
2: 如果用户没有提供GsonHttpMessageConverter bean, 那么自动配置的GsonHttpMessageConverter bean就会生效, 其处理逻辑类似Jackson源码,只不过该bean的自动注入参数是gson而非objectmapper.
1 2 3 4 5 6 7 8 9 10 11 12 13 14 15 16 17 18 19 20 21 22 23 24 25 26 27 28 29 30 31 32 33 34 35 36 37 38 package org.springframework.boot.autoconfigure.http;import com.google.gson.Gson;... @Configuration @ConditionalOnClass (Gson.class ) class GsonHttpMessageConvertersConfiguration @Configuration @ConditionalOnBean (Gson.class ) @Conditional (PreferGsonOrJacksonAndJsonbUnavailableCondition .class ) protected static class GsonHttpMessageConverterConfiguration { @Bean @ConditionalOnMissingBean public GsonHttpMessageConverter gsonHttpMessageConverter (Gson gson) GsonHttpMessageConverter converter = new GsonHttpMessageConverter(); converter.setGson(gson); return converter; } } . . . }
自定义GsonHttpMessageConverter bean 在MyJsonConfig类中提供一个GsonHttpMessageConverter bean:
1 2 3 4 5 6 @Bean public GsonHttpMessageConverter gsonHttpMessageConverter (Gson gson) GsonHttpMessageConverter gsonHttpMessageConverter = new GsonHttpMessageConverter(); gsonHttpMessageConverter.setGson(new GsonBuilder().setDateFormat("yyyy/MM/dd hh:mm:ss" ).create()); return gsonHttpMessageConverter; }
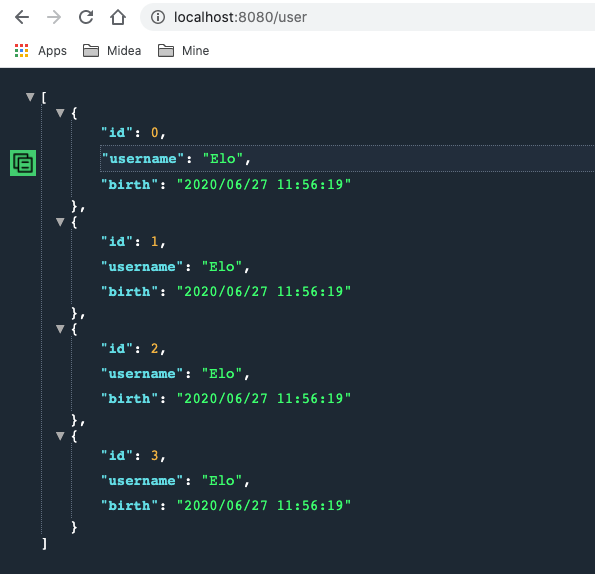
启动项目查看结果(如下图),从日期格式可以看出GsonHttpMessageConverter配置在生效了.
自定义Gson bean 对比Jackson的源码分析思路, 以及日期设置是在Gson参数中设置的, 可以对Gson进行同样的分析. org.springframework.boot.autoconfigure.gson.GsonAutoConfiguration部分源码片段如下:
1 2 3 4 5 6 7 8 9 10 11 12 13 14 15 16 17 18 19 @Configuration @ConditionalOnClass (Gson.class ) @EnableConfigurationProperties (GsonProperties .class ) public class GsonAutoConfiguration @Bean @ConditionalOnMissingBean public GsonBuilder gsonBuilder (List<GsonBuilderCustomizer> customizers) GsonBuilder builder = new GsonBuilder(); customizers.forEach((c) -> c.customize(builder)); return builder; } @Bean @ConditionalOnMissingBean public Gson gson (GsonBuilder gsonBuilder) return gsonBuilder.create(); } ...
可以看出:
1: 只要pom依赖中引入了Gson, GsonAutoConfiguration配置就会会生效, 因为其被注解 @ConditionalOnClass(Gson.class)修饰
2: GsonHttpMessageConverter bean中的gson参数是从此处的Gson构造引入的,
所以类比整合Jackson时可以只在配置文件中提供一个objectmapper bean的情况, 可以推断, 整合gson也可以在MyJsonConfig类中只提供一个Gson bean, 应该也能实现同样的整合配合.
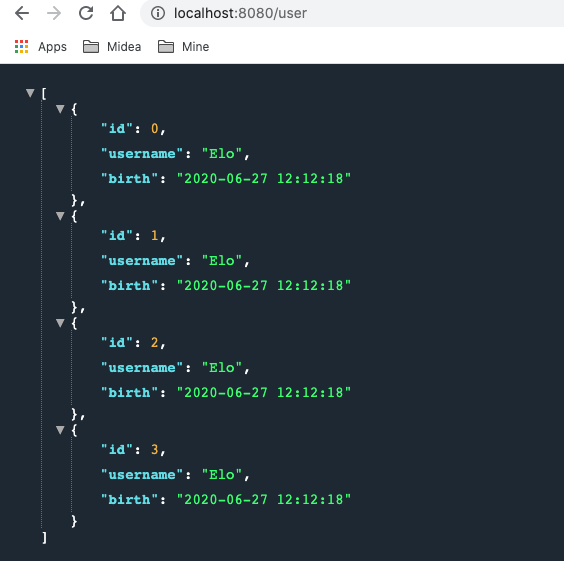
在MyJsonConfig注释掉GsonHttpMessageConverter bean, 然后 提供如下bean后重启项目测试:
1 2 3 4 @Bean public Gson gson (GsonBuilder gsonBuilder) return gsonBuilder.setDateFormat("yyyy-MM-dd" ).create(); }
测试结果:
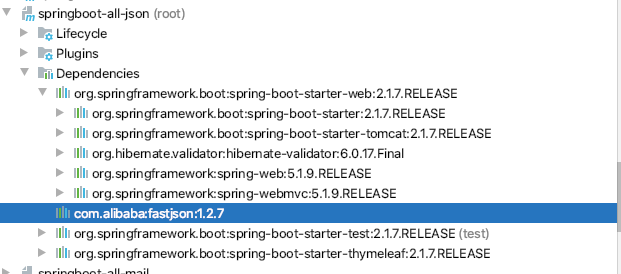
整合FastJson 引入依赖 因为Fastjson是第三方(阿里)提供的json处理方案, 所以pom要先将自身的Jackson依赖进行排除, 但你果然也要将志气啊添加的Gson排除, 然后再添加fastjson依赖. 具体操作如下:
1 2 3 4 5 6 7 8 9 10 11 12 13 14 15 16 17 18 19 20 21 <dependency > <groupId > org.springframework.boot</groupId > <artifactId > spring-boot-starter-web</artifactId > <exclusions > <exclusion > <groupId > org.springframework.boot</groupId > <artifactId > spring-boot-starter-json</artifactId > </exclusion > </exclusions > </dependency > <dependency > <groupId > com.alibaba</groupId > <artifactId > fastjson</artifactId > <version > 1.2.49</version > </dependency >
测试依赖引入是否成功 reimport后可以看出只存在fastjson依赖相关的jar包了
源码分析 与Jackson和Gson不同的是, 要整合fastjson, 则必须引入FastJsonHttpMessageConverter bean, 因为没有starter中并没有相关的autoconfiguration.
源码:
1 2 3 4 5 6 7 8 9 public class FastJsonHttpMessageConverter extends AbstractHttpMessageConverter <Object > public final static Charset UTF8 = Charset.forName("UTF-8" ); private Charset charset = UTF8; private SerializerFeature[] features = new SerializerFeature[0 ]; public FastJsonHttpMessageConverter () super (new MediaType("application" , "json" , UTF8), new MediaType("application" , "*+json" , UTF8)); } ... }
可以看见,
1: FastJsonHttpMessageConverter 类和其构造方法并没有被任何@ConditionalOnMissingBean(…)或@ConditionalOnBean(…)之类的注解修饰,
2: 构造方法为空参构造, 也就是说只能提供FastJsonHttpMessageConverter bean进行自定义配置, 而不能像Gson只提供gson bean或者Jackson只提供objectmapper bean那样进行配置.
自定义FastJsonHttpMessageConverter 在MyJsonConfig类中提供一个FastJsonHttpMessageConverter bean后重启项目; (注意fastjson的配置是在FastJsonConfig中设置的, 这一点与Gson和jackson稍有不同)
1 2 3 4 5 6 7 8 9 @Bean public FastJsonHttpMessageConverter fastJsonHttpMessageConverter () FastJsonHttpMessageConverter fastJsonHttpMessageConverter = new FastJsonHttpMessageConverter(); FastJsonConfig fastJsonConfig = new FastJsonConfig(); fastJsonConfig.setDateFormat("yyyy-MM-dd" ); fastJsonHttpMessageConverter.setFastJsonConfig(fastJsonConfig); return fastJsonHttpMessageConverter; }
测试结果 测试结果如下图:
静态资源访问 在 Spring Boot 中,如果我们是从 https://start.spring.io 这个网站上创建的项目,或者使用 IntelliJ IDEA 中的 Spring Boot 初始化工具创建的项目,默认都会存在 resources/static 目录,很多小伙伴也知道静态资源只要放到这个目录下,就可以直接访问,除了这里还有没有其他可以放静态资源的位置呢?为什么放在这里就能直接访问了呢?
整体规划 在 Spring Boot 中,默认情况下,一共有5个位置可以放静态资源,五个路径分别是如下5个:
classpath:/META-INF/resources/
classpath:/resources/
classpath:/static/
classpath:/public/
/
前四个目录好理解,分别对应了resources目录下不同的目录,第5个 / 是啥意思呢?我们知道,在 Spring Boot 项目中,默认是没有 webapp 这个目录的,当然我们也可以自己添加(例如在需要使用JSP的时候),这里第5个 / 其实就是表示 webapp 目录中的静态资源也不被拦截。如果同一个文件分别出现在五个目录下,那么优先级也是按照上面列出的顺序。
不过,虽然有5个存储目录,除了第5个用的比较少之外,其他四个,系统默认创建了 classpath:/static/ , 正常情况下,我们只需要将我们的静态资源放到这个目录下即可,也不需要额外去创建其他静态资源目录,例如我在 classpath:/static/ 目录下放了一张名为A.png 的图片,那么我的访问路径是:
1 http://localhost:8080/1.png
1 **注意,请求地址中并不需要 static,加上static反而多此一举会报404错误。那为什么不需要添加 static呢?资源明明放在 static 目录下。**
源码分析: 1 2 3 4 5 6 7 8 9 10 11 12 13 14 15 16 17 18 19 20 21 22 23 24 25 26 27 28 29 30 31 32 33 34 35 36 37 38 39 40 41 42 43 44 45 46 47 48 49 50 51 52 @Configuration (proxyBeanMethods = false )@ConditionalOnWebApplication (type = Type.SERVLET)@ConditionalOnClass ({ Servlet.class , DispatcherServlet .class , WebMvcConfigurer .class }) @ConditionalOnMissingBean (WebMvcConfigurationSupport .class ) @AutoConfigureOrder (Ordered .HIGHEST_PRECEDENCE + 10) @AutoConfigureAfter ( { DispatcherServletAutoConfiguration.class , TaskExecutionAutoConfiguration .class , ValidationAutoConfiguration .class }) public class WebMvcAutoConfiguration private static final String[] SERVLET_LOCATIONS = { "/" }; static String[] getResourceLocations(String[] staticLocations) { String[] locations = new String[staticLocations.length + SERVLET_LOCATIONS.length]; System.arraycopy(staticLocations, 0 , locations, 0 , staticLocations.length); System.arraycopy(SERVLET_LOCATIONS, 0 , locations, staticLocations.length, SERVLET_LOCATIONS.length); return locations; } static String[] getResourceLocations(String[] staticLocations) { String[] locations = new String[staticLocations.length + SERVLET_LOCATIONS.length]; System.arraycopy(staticLocations, 0 , locations, 0 , staticLocations.length); System.arraycopy(SERVLET_LOCATIONS, 0 , locations, staticLocations.length, SERVLET_LOCATIONS.length); return locations; } @Override public void addResourceHandlers (ResourceHandlerRegistry registry) if (!this .resourceProperties.isAddMappings()) { logger.debug("Default resource handling disabled" ); return ; } Duration cachePeriod = this .resourceProperties.getCache().getPeriod(); CacheControl cacheControl = this .resourceProperties.getCache().getCachecontrol().toHttpCacheControl(); if (!registry.hasMappingForPattern("/webjars/**" )) { customizeResourceHandlerRegistration(registry.addResourceHandler("/webjars/**" ) .addResourceLocations("classpath:/META-INF/resources/webjars/" ) .setCachePeriod(getSeconds(cachePeriod)).setCacheControl(cacheControl)); } String staticPathPattern = this .mvcProperties.getStaticPathPattern(); if (!registry.hasMappingForPattern(staticPathPattern)) { customizeResourceHandlerRegistration(registry.addResourceHandler(staticPathPattern) .addResourceLocations(getResourceLocations(this .resourceProperties.getStaticLocations())) .setCachePeriod(getSeconds(cachePeriod)).setCacheControl(cacheControl)); } } }
从上述源码逻辑可以看出:
这里静态资源的定义和我们前面提到的Java配置SSM中的配置非常相似,其中,,this.resourceProperties.getStaticLocations()方法返回了四个位置,分别是:
1 2 3 4 classpath:/META-INF/resources/ classpath:/resources/ classpath:/static/ classpath:/public/
然后在getResourceLocations方法中,又添加了“/”,因此这里返回值一共有5个。
其中,/表示webapp目录,即webapp中的静态文件也可以直接访问。静态资源的匹配路径按照定义路径优先级依次降低 。因此这里的配置和我们前面提到的如出一辙。这样大伙就知道了为什么Spring Boot 中支持5个静态资源位置,同时也明白了为什么静态资源请求路径中不需要/static,因为在路径映射中已经自动的添加上了/static了。
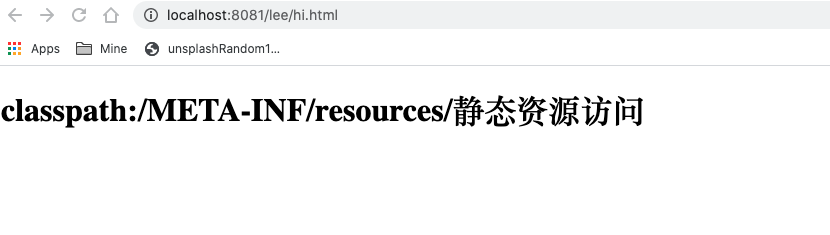
测试求证 新建一个项目, 在如下目录下新建一个hi.html文件, 请求:
1 http://localhost:8081/lee/hi.html
前端返回:
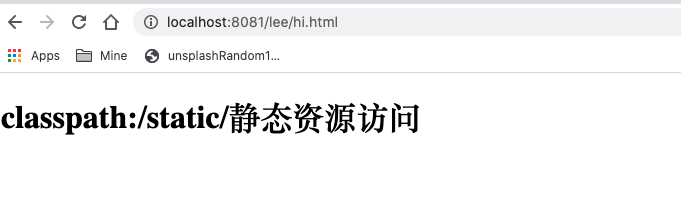
也就是说: classpath:/META-INF/resources/ 具有最高优先级, 然后将该目录下的hi.html重命名或删掉再次请求
1 http://localhost:8081/lee/hi.html
这次前端返回:
重复上述步骤 可以得知优先级如下:
1 2 3 4 classpath:/META-INF/resources/ classpath:/static / classpath:/public / classpath:/resources/
自定义静态资源访问路径 当然,这个是系统默认配置,如果我们并不想将资源放在系统默认的这五个位置上,也可以自定义静态资源位置和映射,自定义的方式也有两种,可以通过 application.properties 来定义,也可以在 Java 代码中来定义,下面分别来看。
方法一:配置文件properties 在配置文件application.properties中定义的方式比较简单,如下:
1 2 spring.resources.static -locations=classpath:/ spring.mvc.static -path-pattern=
方法二:配置类config 1 2 3 4 5 6 7 @Configuration public class WebMVCConfig implements WebMvcConfigurer @Override public void addResourceHandlers (ResourceHandlerRegistry registry) registry.addResourceHandler("/**" ).addResourceLocations("classpath:/aaa/" ); } }
1 2 ** 注意:** 整合了 Thymeleaf 的springboot项目,会将静态资源也放在 resources/templates 目录下,**但是 templates 目录并不是静态资源目录** ,它是一个放页面模板的位置(你看到的 Thymeleaf 模板虽然后缀为 .html,其实并不是静态资源).
异常处理 默认现象 a)浏览器 b) 其他客户端(postman) 原理分析: 相关配置类 1 2 3 4 5 6 7 8 9 10 11 12 13 14 15 16 17 18 19 20 21 22 23 24 25 26 27 28 29 30 31 32 33 34 35 36 37 38 39 40 41 42 43 44 45 46 47 48 49 50 51 52 53 54 55 56 57 58 59 60 61 62 63 64 65 66 67 68 69 70 71 72 73 74 75 76 77 78 79 帮我们在页面共享信息; @Override public Map<String, Object> getErrorAttributes (RequestAttributes requestAttributes, boolean includeStackTrace) Map<String, Object> errorAttributes = new LinkedHashMap<String, Object>(); errorAttributes.put("timestamp" , new Date()); addStatus(errorAttributes, requestAttributes); addErrorDetails(errorAttributes, requestAttributes, includeStackTrace); addPath(errorAttributes, requestAttributes); return errorAttributes; } @Controller @RequestMapping ("${server.error.path:${error.path:/error}}" )public class BasicErrorController extends AbstractErrorController @RequestMapping (produces = "text/html" ) public ModelAndView errorHtml (HttpServletRequest request, HttpServletResponse response) HttpStatus status = getStatus(request); Map<String, Object> model = Collections.unmodifiableMap(getErrorAttributes( request, isIncludeStackTrace(request, MediaType.TEXT_HTML))); response.setStatus(status.value()); ModelAndView modelAndView = resolveErrorView(request, response, status, model); return (modelAndView == null ? new ModelAndView("error" , model) : modelAndView); } @RequestMapping @ResponseBody public ResponseEntity<Map<String, Object>> error(HttpServletRequest request) { Map<String, Object> body = getErrorAttributes(request, isIncludeStackTrace(request, MediaType.ALL)); HttpStatus status = getStatus(request); return new ResponseEntity<Map<String, Object>>(body, status); } @Value ("${error.path:/error}" ) private String path = "/error" ; 系统出现错误以后来到error请求进行处理;(web.xml注册的错误页面规则) @Override public ModelAndView resolveErrorView (HttpServletRequest request, HttpStatus status, Map<String, Object> model) ModelAndView modelAndView = resolve(String.valueOf(status), model); if (modelAndView == null && SERIES_VIEWS.containsKey(status.series())) { modelAndView = resolve(SERIES_VIEWS.get(status.series()), model); } return modelAndView; } private ModelAndView resolve (String viewName, Map<String, Object> model) String errorViewName = "error/" + viewName; TemplateAvailabilityProvider provider = this .templateAvailabilityProviders .getProvider(errorViewName, this .applicationContext); if (provider != null ) { return new ModelAndView(errorViewName, model); } return resolveResource(errorViewName, model); } protected ModelAndView resolveErrorView (HttpServletRequest request, HttpServletResponse response, HttpStatus status, Map<String, Object> model) for (ErrorViewResolver resolver : this .errorViewResolvers) { ModelAndView modelAndView = resolver.resolveErrorView(request, status, model); if (modelAndView != null ) { return modelAndView; } } return null ; }
定制Error信息 定制错误页面Page: 如果项目有整合模板引擎thymeleaf, 那么直接在templates目录下添加error目录, 并在里面定制404.html, 405.html,4xx.html这样的模板页面即可, 注意错误发生时, 会按照view的code先精确匹配, 无法精确匹配的情况下才模糊匹配(如找不到503错误, 则会找5XX):
1 2 3 4 5 6 7 8 9 10 11 12 13 14 15 16 17 18 19 20 <!DOCTYPE html > <html lang ="en" xmlns:th ="http://www.thymeleaf.org" > <head > <meta charset ="UTF-8" > <title > 5XX</title > </head > <body > <h1 > 5**, yet not 503!</h1 > <p > 状态码status: [[${status}]]</p > <p > 时间timestamp: [[${timestamp}]]</p > <p > 错误信息error: [[${error}]]</p > <p > exception: [[${exception}]]</p > <p > 异常信息: [[${message}]]</p > <p > 异常信息errors: [[${errors}]]</p > <p > parameter: [[${parameter}]]</p > </body > </html >
有模板引擎 没有模板引擎, 但静态资源目录下有error 什么都没有 定制错误数据Json: a. 封装Exception:
1 2 3 4 5 6 7 8 package com.lee.exception.exception;public class UserNotFoundException extends RuntimeException public UserNotFoundException () super ("用户不存在 !" ); } }
定义全局异常处理类, 在全局异常处理类里面进行数据封装返回:
方式一:
代码:
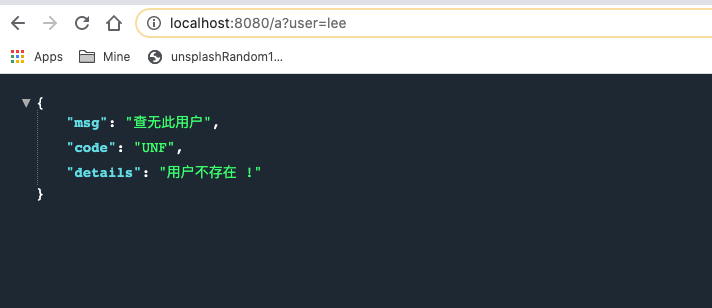
1 2 3 4 5 6 7 8 9 10 11 12 13 14 15 16 17 18 19 20 21 22 23 24 25 package com.lee.exception.exp;import com.lee.exception.exception.UserNotFoundException;import org.springframework.web.bind.annotation.ControllerAdvice;import org.springframework.web.bind.annotation.ExceptionHandler;import org.springframework.web.bind.annotation.ResponseBody;import java.util.HashMap;import java.util.Map;@ControllerAdvice public class MyGlobalExceptionHandler @ResponseBody @ExceptionHandler (UserNotFoundException.class ) public Map <String ,Object > userNotFoundHandler (Exception e ) { Map<String, Object> map = new HashMap<>(); map.put("code" ,"UNF" ); map.put("msg" ,"查无此用户" ); map.put("details" ,e.getMessage()); return map; } }
现象:
说明:
1 方式一是JSON数据直接返回, 但是没有自适应效果, 因为指定了@ResponseBody, 所以无论浏览器还是其他客户端(postman等)都是返回的JSON数据
方式二:
代码:
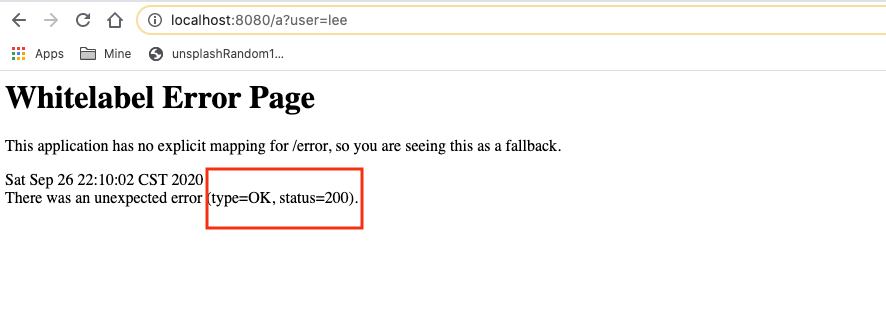
1 2 3 4 5 6 7 8 @ExceptionHandler (UserNotFoundException.class ) public String userNotFoundHandler (Exception e ) { Map<String, Object> map = new HashMap<>(); map.put("code" ,"UNF" ); map.put("msg" ,"查无此用户" ); map.put("details" ,e.getMessage()); return "forward:/error" ; }
现象:
说明:
1 虽然有自适应效果, 但是状态码确是200, 所以也不会进入我们自定义的页面, 而是进入springboot准备的默认页面.
方式三:
代码:
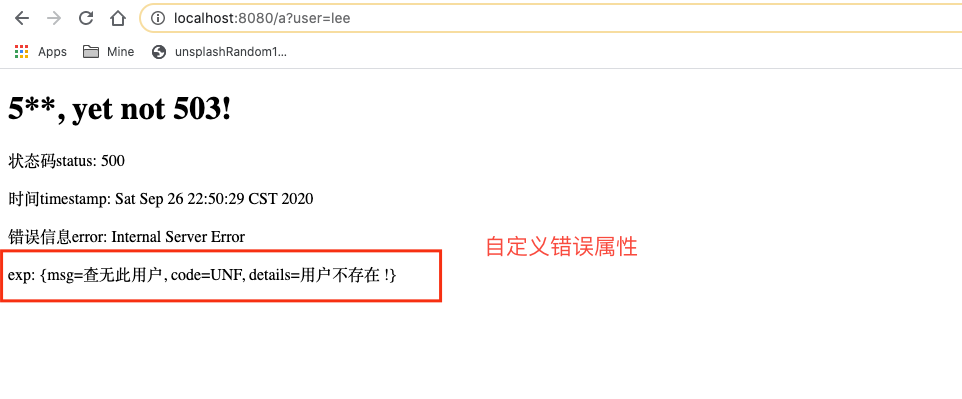
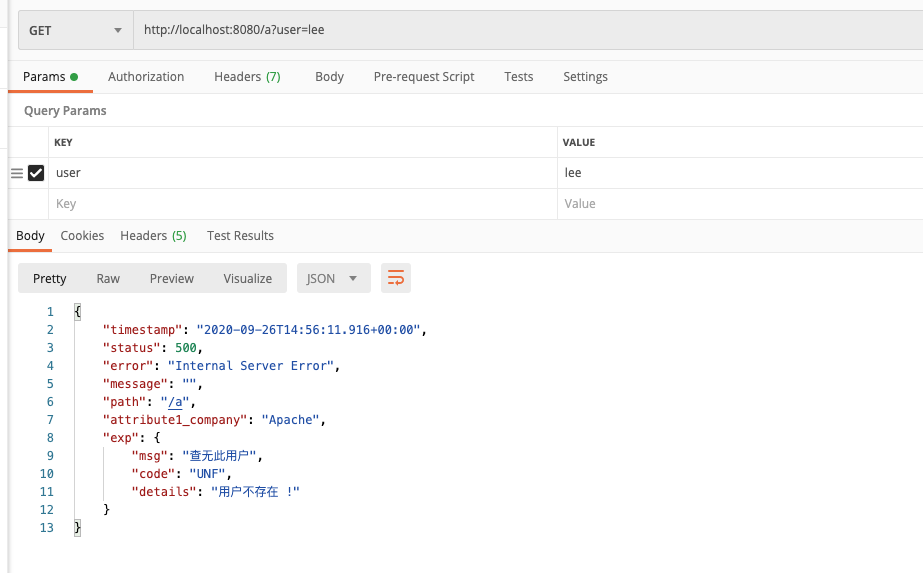
1 2 3 4 5 6 7 8 9 10 @ExceptionHandler (UserNotFoundException.class ) public String userNotFoundHandler (Exception e , HttpServletRequest request ) { Map<String, Object> map = new HashMap<>(); request.setAttribute("javax.servlet.error.status_code" ,500 ); map.put("code" ,"UNF" ); map.put("msg" ,"查无此用户" ); map.put("details" ,e.getMessage()); request.setAttribute("myErrorInfo" ,map); return "forward:/error" ; }
这种方式在写好全局异常处理方法userNotFoundHandler后, 还需要一个自定义的错误属性封装类, 继承自DefaultErrorAttributes, 具体代码如下:
1 2 3 4 5 6 7 8 9 10 11 12 13 14 15 16 17 18 19 20 package com.lee.exception.component;import org.springframework.boot.web.error.ErrorAttributeOptions;import org.springframework.boot.web.servlet.error.DefaultErrorAttributes;import org.springframework.stereotype.Component;import org.springframework.web.context.request.WebRequest;import java.util.Map;@Component public class MyErrorAttributes extends DefaultErrorAttributes @Override public Map<String, Object> getErrorAttributes (WebRequest webRequest, ErrorAttributeOptions options) Map<String, Object> errorAttributes = super .getErrorAttributes(webRequest, options); errorAttributes.put("attribute1_company" ,"Apache" ); Map<String,Object> exp= (Map<String,Object>) webRequest.getAttribute("myErrorInfo" ,0 ); errorAttributes.put("exp" ,exp); return errorAttributes; } }
然后再前端模板error/5xx.html取出展示
1 2 3 4 5 6 7 8 9 10 11 12 13 14 15 16 17 <!DOCTYPE html > <html lang ="en" xmlns:th ="http://www.thymeleaf.org" > <head > <meta charset ="UTF-8" > <title > 5XX</title > </head > <body > <h1 > 5**, yet not 503!</h1 > <p > 状态码status: [[${status}]]</p > <p > 时间timestamp: [[${timestamp}]]</p > <p > 错误信息error: [[${error}]]</p > <p > exp: [[${exp}]]</p > </body > </html >
现象:
说明:
1 必须要通过request.setAttribute("javax.servlet.error.status_code",500);设置自定义的错误状态码, 才会进入响应的错误页面, 如果需要自定义封装错误信息, 需要首先将自定义通过request.setAttribute("myErrorInfo",map);的方式放到域中, 然后再在容器中定义一个错误属性类, 获取域中的错误属性并返回
@ControllerAdvice补充
除了上面介绍的全局异常处理外, @ControllerAdvice 注解还有两外两种用法.
a). 参数预处理
b).