本章节将关注SpringBoot整合持久层和NoSQL.
SpringBoot 整合持久层 整合 Mybatis Spring Boot 中最广泛使用的数据持久化方案当属MyBatis,在传统 SSM项目中Mybatis的整合步骤还是有点复杂的,但在Spring Boot 中对此做了进一步的简化,使 MyBatis 基本上可以做到开箱即用,本文就来看看在 Spring Boot 中 MyBatis 要如何使用。
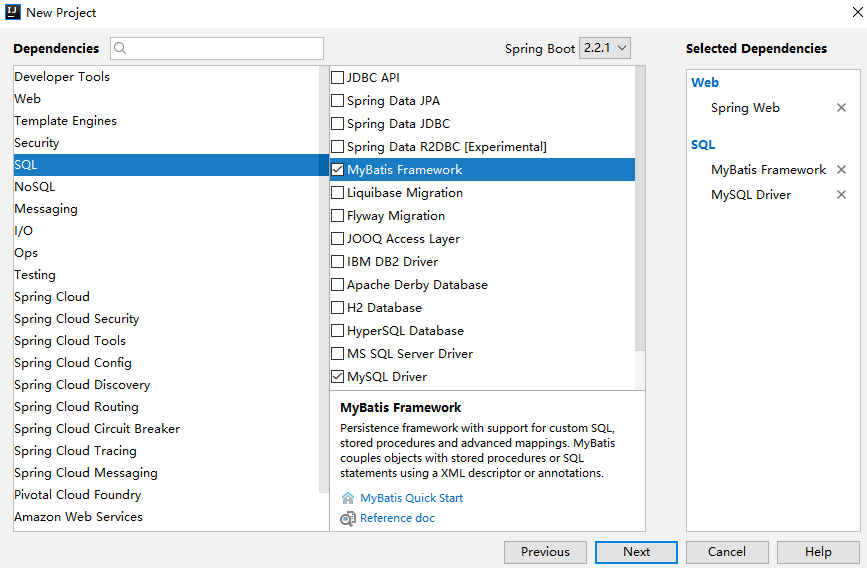
工程创建 首先创建一个基本的 Spring Boot 工程,添加 Web 依赖,MyBatis 依赖以及 MySQL 驱动依赖,如下:
pom.xml :
1 2 3 4 5 6 7 8 9 10 11 12 13 14 15 16 17 18 19 20 21 <dependency > <groupId > org.springframework.boot</groupId > <artifactId > spring-boot-starter-web</artifactId > </dependency > <dependency > <groupId > org.mybatis.spring.boot</groupId > <artifactId > mybatis-spring-boot-starter</artifactId > <version > 2.0.0</version > </dependency > <dependency > <groupId > com.alibaba</groupId > <artifactId > druid-spring-boot-starter</artifactId > <version > 1.1.10</version > </dependency > <dependency > <groupId > mysql</groupId > <artifactId > mysql-connector-java</artifactId > <version > 5.1.28</version > <scope > runtime</scope > </dependency >
application.properties 在application.properties配置JDBC信息
1
2
3
4
5
spring.datasource.username =root spring.datasource.url =jdbc:mysql:///a?useUnicode=true&characterEncoding=utf-8&serverTimezone=UTC spring.datasource.driver-class-name =com.mysql.cj.jdbc.Driver spring.datasource.type =com.alibaba.druid.pool.DruidDataSource spring.datasource.druid.password =root
Mapper配置 以上配置完成之后,MyBatis 就可以创建 Mapper 来使用了.
方式一: 直接在Mapper中使用注解指明要执行的SQL, 不需要单独xml文件.
1
2
3
4
5
6
7
8
9
10
11
12
13
14
15
16
17
18
19
20
21
22
23
24
25
public interface UserMapper2 @Select ("select * from user" ) List<User> getAllUsers () ; @Results ({ @Result (property = "id" , column = "id" ), @Result (property = "username" , column = "u" ), @Result (property = "address" , column = "a" ) }) @Select ("select username as u,address as a,id as id from user where id=#{id}" ) User getUserById (Long id) ; @Select ("select * from user where username like concat('%',#{name},'%')" ) List<User> getUsersByName (String name) ; @Insert ({"insert into user(username,address) values(#{username},#{address})" }) @SelectKey (statement = "select last_insert_id()" , keyProperty = "id" , before = false , resultType = Integer.class ) Integer addUser (User user ) ; @Update ("update user set username=#{username},address=#{address} where id=#{id}" ) Integer updateUserById (User user) ; @Delete ("delete from user where id=#{id}" ) Integer deleteUserById (Integer id) ; }
以上写法中, 注意了解下@Result 注解的使用方式,
另外使用 @SelectKey 注解可以实现主键回填的功能,即当数据插入成功后,插入成功的数据 id 会赋值到 user 对象的id 属性上。
UserMapper2 创建好之后,还要配置 mapper 扫描,也有两种方式,
a: 直接在 UserMapper2 上面添加 @Mapper 注解,这种方式有一个弊端就是所有的 Mapper 都要手动添加,要是落下一个就会报错,
b: 直接在启动类上添加 Mapper 扫描,如下:
1
2
3
4
5
6
7
@SpringBootApplication @MapperScan (basePackages = "com.lee.mybatis.mapper" )public class MybatisApplication public static void main (String[] args) SpringApplication.run(MybatisApplication.class , args ) ; } }
但是实际开发中的查询语句往往都很复杂, 纯注解零XML的配置方式写起来很难实现, 臃肿且不便于排错, 所以更常用的是:
方式二:
先新建`UserMapper.xml`来存放SQL映射文件1 2 3 4 5 6 7 8 9 <?xml version="1.0" encoding="UTF-8" ?> <!DOCTYPE mapper PUBLIC "-//mybatis.org//DTD Mapper 3.0//EN" "http://mybatis.org/dtd/mybatis-3-mapper.dtd" > <mapper namespace ="com.lee.mybatis.mapper.UserMapper" > <select id ="getAllUsers" resultType ="com.lee.mybatis.pojo.User" > select * from a.user; </select > </mapper >
然后创建UserMapper接口1 2 3 4 5 6 7 8 9 10 11 package com.lee.mybatis.mapper;import com.lee.mybatis.pojo.User;import org.springframework.stereotype.Repository;import java.util.List;@Repository public interface UserMapper List<User> getAllUsers () ; }
然后创建pojo
1 2 3 4 5 6 7 8 9 10 11 12 13 14 15 16 17 18 19 20 21 22 23 24 25 26 27 28 29 30 31 32 33 34 35 36 37 38 39 40 41 42 43 44 45 46 47 48 49 50 51 52 53 54 55 56 57 58 59 package com.lee.mybatis.pojo;public class User private String name; private Integer age; private String subject; private Integer grade; @Override public String toString () return "User{" + "name='" + name + '\'' + ", age=" + age + ", subject='" + subject + '\'' + ", grade=" + grade + '}' ; } public User (String name, Integer age, String subject, Integer grade) this .name = name; this .age = age; this .subject = subject; this .grade = grade; } public String getName () return name; } public void setName (String name) this .name = name; } public Integer getAge () return age; } public void setAge (Integer age) this .age = age; } public String getSubject () return subject; } public void setSubject (String subject) this .subject = subject; } public Integer getGrade () return grade; } public void setGrade (Integer grade) this .grade = grade; } }
至此, 配置完毕.
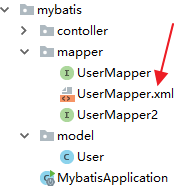
但是, 有一点要注意的就是UserMapper.xml到底放在哪里呢?有两个位置可以放.
第一个是直接放在 UserMapper 所在的包下面:
放在这里的 UserMapper.xml 会被自动扫描到,但是有另外一个 Maven 带来的问题,就是 java 目录下的 xml 资源在项目打包时会被忽略掉,所以,如果 UserMapper.xml 放在包下,需要在 pom.xml 文件中再添加如下配置,避免打包时 java 目录下的 XML 文件被自动忽略掉:
1 2 3 4 5 6 7 8 9 10 11 12 13 <build > <resources > <resource > <directory > src/main/java</directory > <includes > <include > **/*.xml</include > </includes > </resource > <resource > <directory > src/main/resources</directory > </resource > </resources > </build >
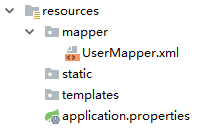
当然,UserMapper.xml 也可以直接放在 resources 目录下,这样就不用担心打包时被忽略了,但是放在 resources 目录下,必须创建和 Mapper 接口包目录相同的目录层级 ,这样才能确保打包后 XML 和 Mapper 接口又处于在一起,否则 XML 文件将不能被自动扫描,这个时候就需要添加额外配置。例如我在 resources 目录下创建 mapper 目录用来放 mapper 文件,
方式二:
此时在 application.properties 中需要告诉 mybatis 去哪里扫描 mapper:
1 mybatis.mapper-locations =classpath:mapper/*.xml
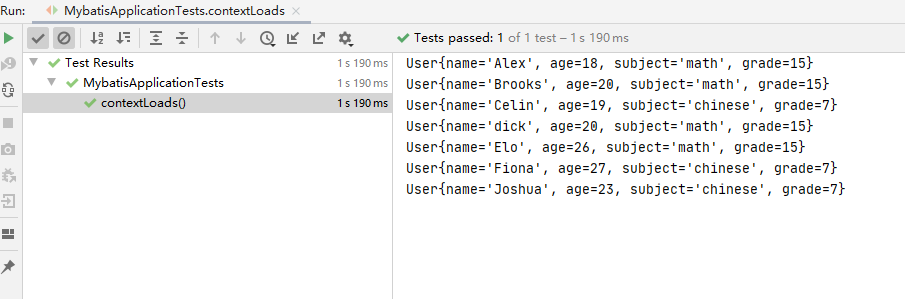
最后在测试类中测试
1 2 3 4 5 6 7 8 9 10 11 12 13 14 15 16 17 18 19 20 21 22 23 24 25 package com.lee.mybatis;import com.lee.mybatis.mapper.UserMapper;import com.lee.mybatis.pojo.User;import org.junit.jupiter.api.Test;import org.springframework.beans.factory.annotation.Autowired;import org.springframework.boot.test.context.SpringBootTest;import java.util.Iterator;import java.util.List;@SpringBootTest public class MybatisApplicationTests @Autowired UserMapper userMapper; @Test public void contextLoads () List<User> allUsers = userMapper.getAllUsers(); Iterator<User> iterator = allUsers.iterator(); while (iterator.hasNext()){ System.out.println(iterator.next().toString()); } } }
可以看到输出结果如下:
原理分析 在 SSM 整合中,开发者需要自己提供两个 Bean,一个SqlSessionFactoryBean ,还有一个是 MapperScannerConfigurer,在 Spring Boot 中,这两个东西虽然不用开发者自己提供了,但是并不意味着这两个 Bean 不需要了,在 org.mybatis.spring.boot.autoconfigure.MybatisAutoConfiguration 类中,我们可以看到 Spring Boot 提供了这两个 Bean,部分源码如下:
1 2 3 4 5 6 7 8 9 10 11 12 13 14 15 16 17 18 19 20 21 22 23 24 25 26 27 28 29 30 31 32 33 34 35 @org .springframework.context.annotation.Configuration@ConditionalOnClass ({ SqlSessionFactory.class , SqlSessionFactoryBean .class }) @ConditionalOnSingleCandidate (DataSource .class ) @EnableConfigurationProperties (MybatisProperties .class ) @AutoConfigureAfter (DataSourceAutoConfiguration .class ) public class MybatisAutoConfiguration implements InitializingBean @Bean @ConditionalOnMissingBean public SqlSessionFactory sqlSessionFactory (DataSource dataSource) throws Exception SqlSessionFactoryBean factory = new SqlSessionFactoryBean(); factory.setDataSource(dataSource); return factory.getObject(); } @Bean @ConditionalOnMissingBean public SqlSessionTemplate sqlSessionTemplate (SqlSessionFactory sqlSessionFactory) ExecutorType executorType = this .properties.getExecutorType(); if (executorType != null ) { return new SqlSessionTemplate(sqlSessionFactory, executorType); } else { return new SqlSessionTemplate(sqlSessionFactory); } } @org .springframework.context.annotation.Configuration @Import ({ AutoConfiguredMapperScannerRegistrar.class }) @ConditionalOnMissingBean (MapperFactoryBean .class ) public static class MapperScannerRegistrarNotFoundConfiguration implements InitializingBean { @Override public void afterPropertiesSet () logger.debug("No {} found." , MapperFactoryBean.class .getName ()) ; } } }
从类上的注解可以看出,当当前类路径下不存在 SqlSessionFactory、 SqlSessionFactoryBean 以及 DataSource 时,这里的配置才会生效,SqlSessionFactory 和 SqlTemplate 都被提供了。
DB加密 数据库密码直接写在配置中,对运维安全来说,是一个很大的挑战。Druid为此提供一种给数据库密码加密的手段ConfigFilter。
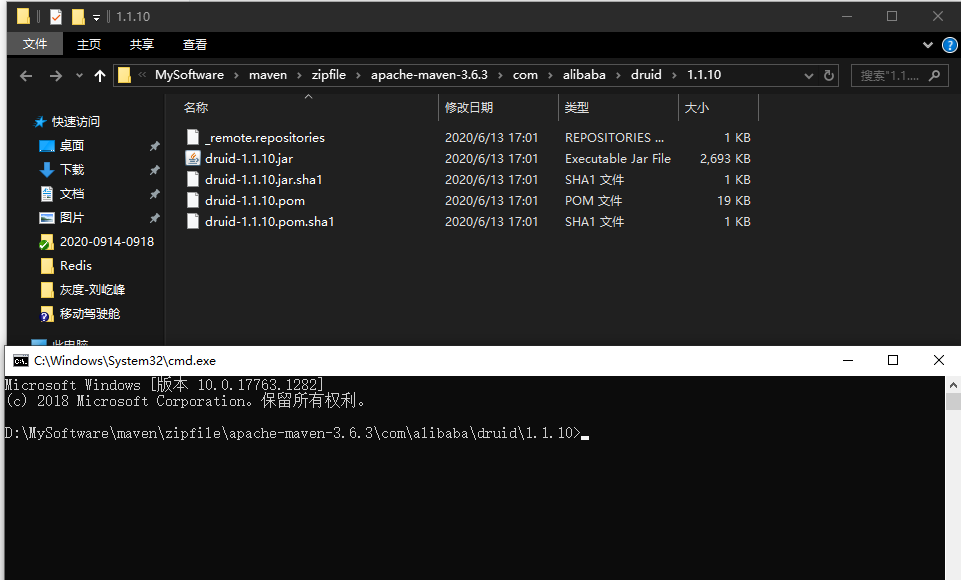
首先定位到druid依赖所在路径, 并在CMD打开:
在终端执行: 来对明文密码加密
1 java -cp druid-1.1 .10 .jar com.alibaba.druid.filter.config.ConfigTools DB明文密码
然后修改application.properties里的密码spring.datasource.druid.password, 并添加公钥信息:
1 2 3 4 5 6 spring.datasource.druid.password =WXPVkyQ3hxJe4du/IyePr3urPJLDBr82f5aMlZVUZ5HvUoL5O6zF/JoyTo3WW81d3aPJnv+vUGpVrH07VdXDQw== publickey =MFwwDQYJKoZIhvcNAQEBBQADSwAwSAJBAJjGOYy+SgIPpuoBSJBbmuGpJ0PnB7egQ07HGn346BH/XhO4DgXCD4VLp3V8JnhrE5AL4ngEC/Kq046WEaAa5TkCAwEAAQ== spring.datasource.druid.connection-properties =config.decrypt=true;config.decrypt.key=${publickey} spring.datasource.druid.filter.config.enabled =true
至此, 对数据库密码加密的动作也已完成. 启动项目测试也成功:
MyBatis 多数据源 项目中不少场景会需要从不同数据源出数,简单一点就是利用Mybatis多数据源。 如果业务场景更复杂, 要求更高, 则需要使用分布式数据库中间件, 此处不做讨论, 后续会涉及.
工程创建 首先需要创建 MyBatis 项目,项目创建和前文的一样,添加 MyBatis、 MySQL 以及 Web 依赖:
项目创建完成后,添加 Druid 依赖,这里添加 Druid 依赖也必须是专为 Spring Boot 打造的 Druid starter,不能使用传统的 Druid。完整的依赖如下:
1 2 3 4 5 6 7 8 9 10 11 12 13 14 15 16 17 18 19 20 <dependency > <groupId > org.springframework.boot</groupId > <artifactId > spring-boot-starter-web</artifactId > </dependency > <dependency > <groupId > org.mybatis.spring.boot</groupId > <artifactId > mybatis-spring-boot-starter</artifactId > <version > 2.1.3</version > </dependency > <dependency > <groupId > mysql</groupId > <artifactId > mysql-connector-java</artifactId > <scope > runtime</scope > <version > 8.0.21</version > </dependency > <dependency > <groupId > com.alibaba</groupId > <artifactId > druid-spring-boot-starter</artifactId > <version > 1.1.10</version > </dependency >
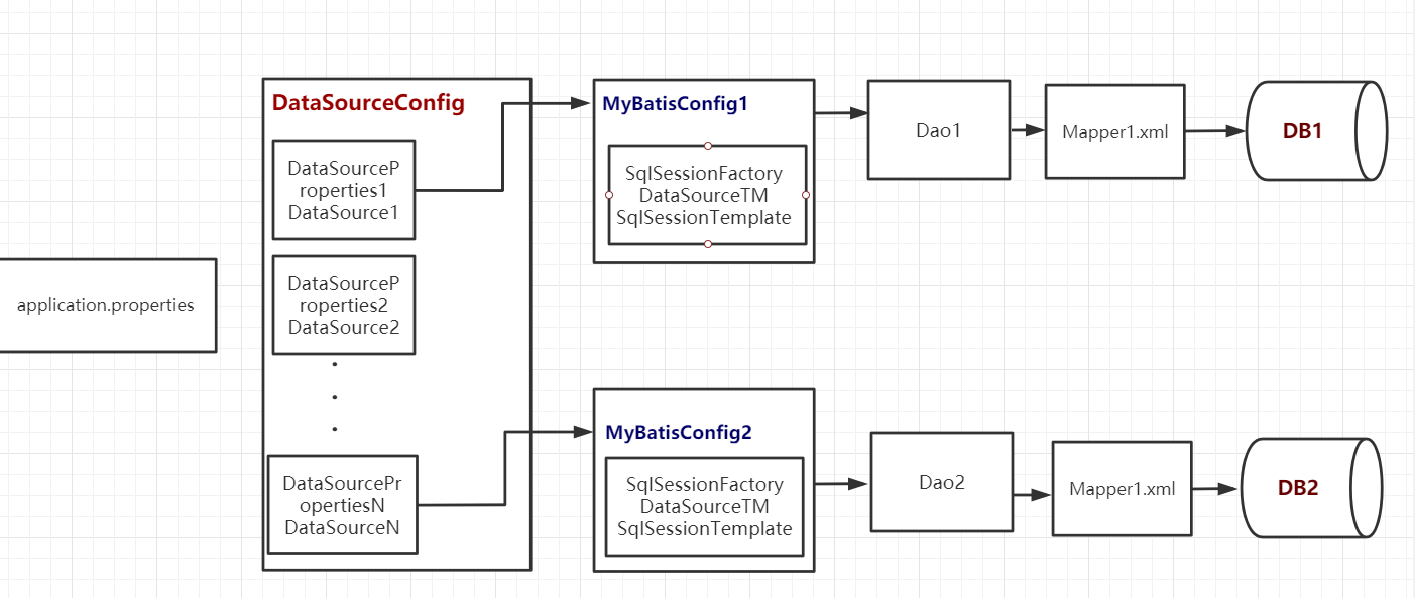
application.properties 在application.properties配置两个数据源
1 2 3 4 5 6 7 8 9 10 11 12 13 14 15 spring.datasource.one.username =root spring.datasource.one.druid.password =root spring.datasource.one.url =jdbc:mysql:///a?useUnicode=true&characterEncoding=utf-8&serverTimezone=UTC spring.datasource.one.driver-class-name =com.mysql.jdbc.Driver spring.datasource.one.type =com.alibaba.druid.pool.DruidDataSource spring.datasource.two.username =root spring.datasource.two.druid.password =root spring.datasource.two.url =jdbc:mysql:///a?useUnicode=true&characterEncoding=utf-8&serverTimezone=UTC spring.datasource.two.driver-class-name =com.mysql.jdbc.Driver spring.datasource.two.type =com.alibaba.druid.pool.DruidDataSource mybatis.mapper-locations =classpath:mapper/*.xml
DataSourceConfig配置 然后再提供两个 DataSource,如下:
1 2 3 4 5 6 7 8 9 10 11 12 13 14 15 16 17 18 19 20 21 22 23 24 25 26 27 28 29 30 31 32 33 34 35 36 37 38 39 40 41 42 43 44 45 46 47 48 49 package com.lee.multimybatis.config;import com.alibaba.druid.pool.DruidDataSource;import com.alibaba.druid.spring.boot.autoconfigure.DruidDataSourceBuilder;import org.springframework.beans.factory.annotation.Qualifier;import org.springframework.boot.autoconfigure.jdbc.DataSourceProperties;import org.springframework.boot.context.properties.ConfigurationProperties;import org.springframework.context.annotation.Bean;import org.springframework.context.annotation.Configuration;import org.springframework.context.annotation.Primary;import javax.sql.DataSource;@Configuration public class DataSourceConfig @Primary @Bean (name = "ds1DataSourceProperties" ) @ConfigurationProperties (prefix = "spring.datasource.one" ) public DataSourceProperties ds1DataSourceProperties () return new DataSourceProperties(); } @Primary @Bean (name = "ds1DataSource" ) public DataSource ds1DataSource (@Qualifier("ds1DataSourceProperties" ) DataSourceProperties dataSourceProperties) return (DruidDataSource) dataSourceProperties.initializeDataSourceBuilder().type(DruidDataSource.class ).build () ; } @Bean (name = "ds2DataSourceProperties" ) @ConfigurationProperties (prefix = "spring.datasource.two" ) public DataSourceProperties ds2DataSourceProperties () return new DataSourceProperties(); } @Bean ("ds2DataSource" ) public DataSource ds2DataSource (@Qualifier("ds2DataSourceProperties" ) DataSourceProperties dataSourceProperties) return (DruidDataSource) dataSourceProperties.initializeDataSourceBuilder().type(DruidDataSource.class ).build () ; } }
MyBatis配置 接下来则是 MyBatis 的配置,因为要提供两个 Bean,因此这里两个数据源在两个类中分开来配置
MyBatisConfig1
1 2 3 4 5 6 7 8 9 10 11 12 13 14 15 16 17 18 19 20 21 22 23 24 25 26 27 28 29 30 31 32 33 34 35 36 37 38 39 40 41 42 43 44 45 46 47 48 49 50 51 52 53 54 55 56 57 58 59 60 package com.lee.multimybatis.config;import org.apache.ibatis.session.SqlSessionFactory;import org.mybatis.spring.SqlSessionFactoryBean;import org.mybatis.spring.SqlSessionTemplate;import org.mybatis.spring.annotation.MapperScan;import org.springframework.beans.factory.annotation.Qualifier;import org.springframework.context.annotation.Bean;import org.springframework.context.annotation.Configuration;import org.springframework.context.annotation.Primary;import org.springframework.core.io.support.PathMatchingResourcePatternResolver;import org.springframework.jdbc.datasource.DataSourceTransactionManager;import org.springframework.stereotype.Repository;import javax.annotation.Resource;import javax.sql.DataSource;@Configuration @MapperScan (basePackages ="com.lee.**.mapper1" , sqlSessionTemplateRef = "ds1SqlSessionTemplate" , sqlSessionFactoryRef = "ds1SqlSessionFactory" ,annotationClass = Repository.class ) public class MyBatisConfig1 @Primary @Bean ("ds1SqlSessionFactory" ) public SqlSessionFactory ds1SqlSessionFactory (@Qualifier("ds1DataSource" ) DataSource dataSource) throws Exception SqlSessionFactoryBean sqlSessionFactory = new SqlSessionFactoryBean(); sqlSessionFactory.setDataSource(dataSource); ClassPathResource mybatisConfig = new ClassPathResource("mybatis-config.xml" ); sqlSessionFactory.setConfigLocation(mybatisConfig); sqlSessionFactory.setMapperLocations(new PathMatchingResourcePatternResolver(). getResources("classpath:mappers1/*.xml" )); return sqlSessionFactory.getObject(); } @Primary @Bean (name = "ds1TransactionManager" ) public DataSourceTransactionManager ds1TransactionManager (@Qualifier("ds1DataSource" ) DataSource dataSource) return new DataSourceTransactionManager(dataSource); } @Primary @Bean (name = "ds1SqlSessionTemplate" ) public SqlSessionTemplate ds1SqlSessionTemplate (@Qualifier("ds1SqlSessionFactory" ) SqlSessionFactory sqlSessionFactory) return new SqlSessionTemplate(sqlSessionFactory); } }
MyBatisConfig2:
1 2 3 4 5 6 7 8 9 10 11 12 13 14 15 16 17 18 19 20 21 22 23 24 25 26 27 28 29 30 31 32 33 34 35 36 37 38 39 40 41 42 43 44 45 46 47 48 49 50 package com.lee.multimybatis.config;import org.apache.ibatis.session.SqlSessionFactory;import org.mybatis.spring.SqlSessionFactoryBean;import org.mybatis.spring.SqlSessionTemplate;import org.mybatis.spring.annotation.MapperScan;import org.springframework.beans.factory.annotation.Qualifier;import org.springframework.context.annotation.Bean;import org.springframework.context.annotation.Configuration;import org.springframework.context.annotation.Primary;import org.springframework.core.io.support.PathMatchingResourcePatternResolver;import org.springframework.jdbc.datasource.DataSourceTransactionManager;import javax.annotation.Resource;import javax.sql.DataSource;@Configuration @MapperScan (basePackages ="com.lee.**.mapper2" , sqlSessionTemplateRef = "ds2SqlSessionTemplate" , sqlSessionFactoryRef = "ds2SqlSessionFactory" , annotationClass = com.lee.multimybatis.annotation.AuthRepository.class ) public class MyBatisConfig2 @Bean ("ds2SqlSessionFactory" ) public SqlSessionFactory ds2SqlSessionFactory (@Qualifier("ds2DataSource" ) DataSource dataSource) throws Exception SqlSessionFactoryBean sqlSessionFactory = new SqlSessionFactoryBean(); sqlSessionFactory.setDataSource(dataSource); ClassPathResource mybatisConfig = new ClassPathResource("mybatis-config.xml" ); sqlSessionFactory.setConfigLocation(mybatisConfig); sqlSessionFactory.setMapperLocations(new PathMatchingResourcePatternResolver(). getResources("classpath:mappers2/*.xml" )); return sqlSessionFactory.getObject(); } @Bean (name = "ds2TransactionManager" ) public DataSourceTransactionManager ds2TransactionManager (@Qualifier("ds2DataSource" ) DataSource dataSource) return new DataSourceTransactionManager(dataSource); } @Bean (name = "ds2SqlSessionTemplate" ) public SqlSessionTemplate ds2SqlSessionTemplate (@Qualifier("ds2SqlSessionFactory" ) SqlSessionFactory sqlSessionFactory) return new SqlSessionTemplate(sqlSessionFactory); } }
创建Mapper接口和映射文件 在mapper1和mapper2包下分别创建2个Mapper接口:
UserMapper1 (@Repository修饰)
1 2 3 4 5 6 7 8 9 10 11 12 13 package com.lee.multimybatis.mapper1;import com.lee.multimybatis.bean.User;import org.springframework.stereotype.Repository;import org.springframework.web.bind.annotation.ResponseBody;import java.util.List;@Repository public interface UserMapper1 List<User> get () ; }
UserMapper2 (@AuthRepository修饰)
1 2 3 4 5 6 7 8 9 10 11 12 13 14 package com.lee.multimybatis.mapper2;import com.lee.multimybatis.annotation.AuthRepository;import com.lee.multimybatis.bean.User;import org.springframework.stereotype.Repository;import javax.annotation.Resource;import java.util.List;@AuthRepository public interface UserMapper2 List<User> get () ; }
然后在classpath: resources/mappers1/ 和classpath: resources/mappers2/ 下分别创建两个mapper.xml文件UserMapper1.xml:
1 2 3 4 5 6 7 8 9 <?xml version="1.0" encoding="UTF-8" ?> <!DOCTYPE mapper PUBLIC "-//mybatis.org//DTD Mapper 3.0//EN" "http://mybatis.org/dtd/mybatis-3-mapper.dtd" > <mapper namespace ="com.lee.multimybatis.mapper1.UserMapper1" > <select id ="get" resultType ="com.lee.multimybatis.bean.User" > select * from `user` where age < = 20 </select > </mapper >
UserMapper2.xml:
1 2 3 4 5 6 7 8 9 <?xml version="1.0" encoding="UTF-8" ?> <!DOCTYPE mapper PUBLIC "-//mybatis.org//DTD Mapper 3.0//EN" "http://mybatis.org/dtd/mybatis-3-mapper.dtd" > <mapper namespace ="com.lee.multimybatis.mapper2.UserMapper2" > <select id ="get" resultType ="com.lee.multimybatis.bean.User" > select * from `user` where age > 20 </select > </mapper >
测试 最后在测试类中, 注入mapper接口, 并创建测试方法
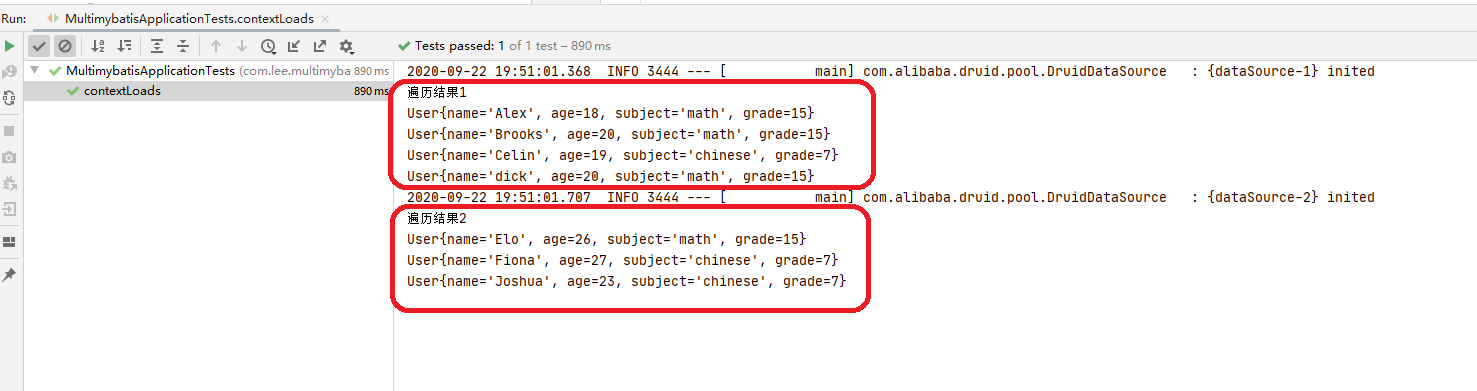
1 2 3 4 5 6 7 8 9 10 11 12 13 14 15 16 17 18 19 20 21 22 23 24 25 26 27 28 29 30 31 32 33 34 35 36 37 38 package com.lee.multimybatis;import com.lee.multimybatis.bean.User;import com.lee.multimybatis.mapper1.UserMapper1;import com.lee.multimybatis.mapper2.UserMapper2;import org.junit.Test;import org.junit.runner.RunWith;import org.springframework.beans.factory.annotation.Autowired;import org.springframework.boot.test.context.SpringBootTest;import org.springframework.test.context.junit4.SpringRunner;import java.util.Iterator;import java.util.List;@RunWith (SpringRunner.class ) @SpringBootTest public class MultimybatisApplicationTests @Autowired UserMapper1 userMapper1; @Autowired UserMapper2 userMapper2; @Test public void testMultiDataSourceMyBatisVersion () List<User> allUser1 = userMapper1.get(); Iterator<User> iterator1 = allUser1.iterator(); System.out.println("遍历结果1" ); while (iterator1.hasNext()){ System.out.println(iterator1.next()); } List<User> allUser2 = userMapper2.get(); Iterator<User> iterator2 = allUser2.iterator(); System.out.println("遍历结果2" ); while (iterator2.hasNext()){ System.out.println(iterator2.next()); } } }
测试结果如下:
1 2 3 4 5 6 7 8 ** 总结 1: 注意`application.properties` 配置里的两个数据源按照不同前缀区分 2: 注意`DataSourceConfig` 配置中的`@Primary` 和`@ConfigurationProperties` 的用法. 3: 注意`MyBatisConfig1(2)` 的`SqlSessionFactory` 方法中配置`mybatis-config.xml` 和 `mapperLocations` 的方式. 4: 注意@Qualifier的使用. 5: 注意`MyBatisConfig1(2)` 的`@MapperScan` 注解的`annotationClass` 属性的区分. **
目录结构
流程总结
SpringBoot 整合NoSQL [参考列表]
http://www.itboyhub.com/2019/1210/springboot-mybatis.html
http://www.itboyhub.com/2019/1211/springboot-mybatis.html
https://github.com/alibaba/druid/wiki/%E4%BD%BF%E7%94%A8ConfigFilter
https://github.com/alibaba/druid/wiki/%E5%A6%82%E4%BD%95%E5%9C%A8Spring-Boot%E4%B8%AD%E9%85%8D%E7%BD%AE%E6%95%B0%E6%8D%AE%E5%BA%93%E5%AF%86%E7%A0%81%E5%8A%A0%E5%AF%86%EF%BC%9F
仅供本人学习, 非商业化使用, 如有侵权请联系删除, 感谢 !