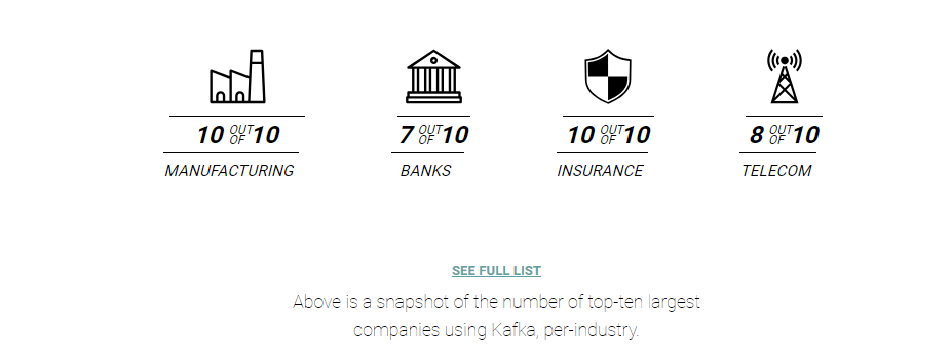
More than 80% of all Fortune 100 companies trust, and use Kafka .Apache Kafka is an open-source distributed event streaming platform used by thousands of companies for high-performance data pipelines, streaming analytics, data integration, and mission-critical applications. 相关代码GIT地址()
开始 简介 引言
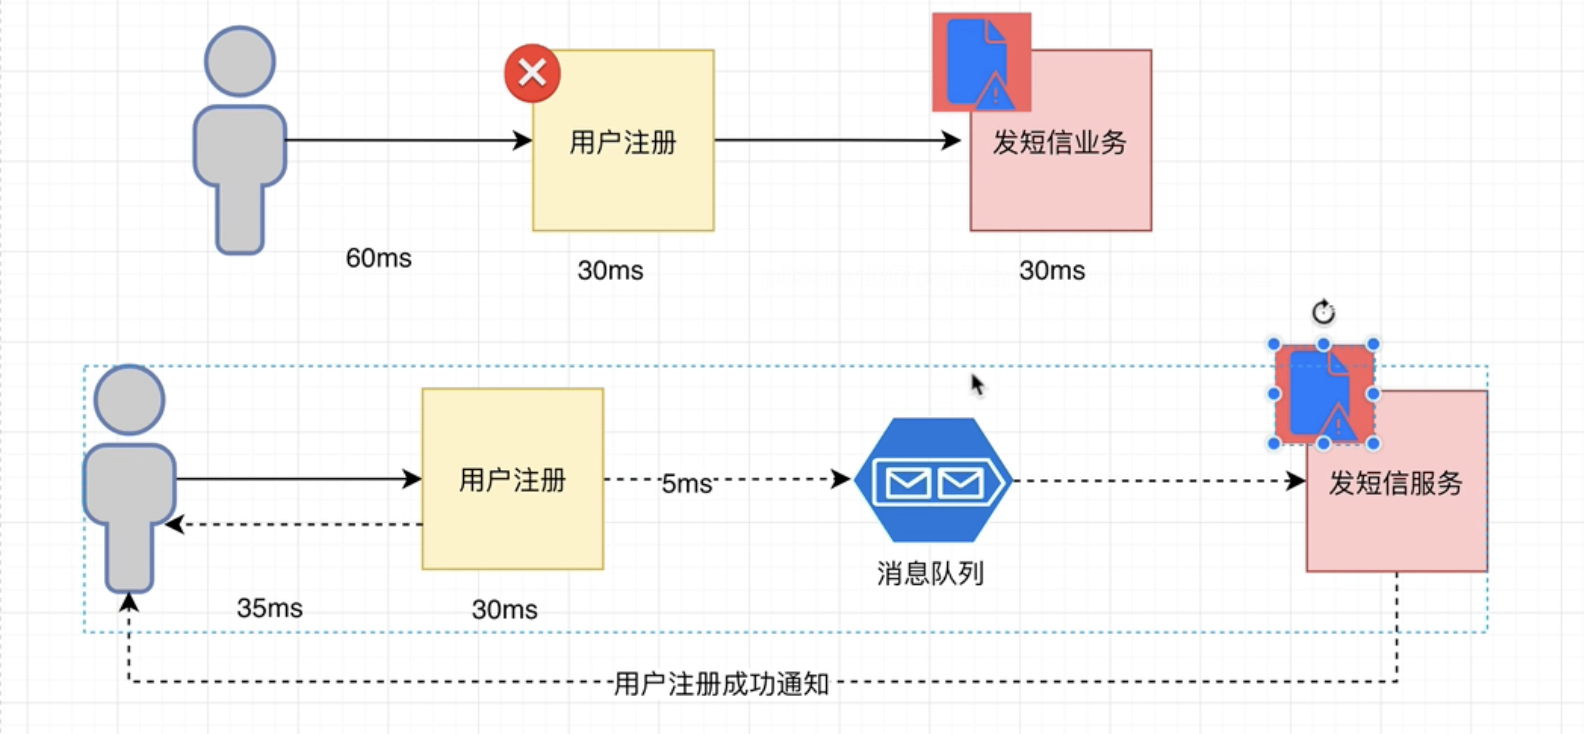
业务场景介绍 解藕 下图中上下分别为两种解决方案(姑且称上面的A, 下面的为B,B引入了MQ), 如果用户注册成功后,往DB写入注册成功信息的过程出现故障,那么B可以隔一段时间后重新消费消息即可, 而A却不行。 所以解藕了
异步通信 同样是上面的例子, 从用户发起注册到收到注册成功的反馈信息, A用了60ms , 而B只用了35ms。
削峰填谷 因为MQ的存在, 为流计算和DB提供了很好的缓冲, 降低了DB和计算压力。
总结: kafka作为一款出色的MQ中间件, 其最主要的应用场景就是解藕,异步通信,和削峰填谷
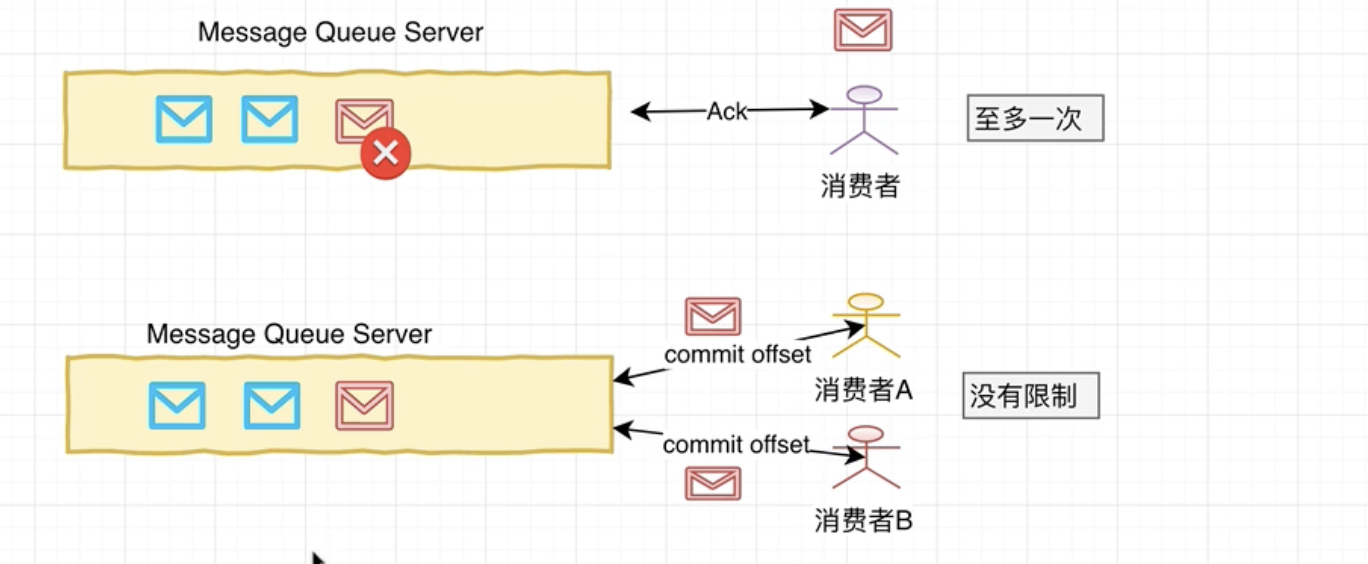
MQ工作模式 至多一次:(一般只被一个消费者消费,ActiveMQ )
1. 生产者写入消息到服务器
1. 消费者去拉取消息消费
1. 一旦消费成功, 并收到确认信息Ack。 消息服务器会主动删除该条消息。
没有限制:(可以有多个消费者, Kafka )
消息被消费后不会被删除, 而是当前消费者消费记录的offset。消息服务器可以长时间存储海量消息。
图解:
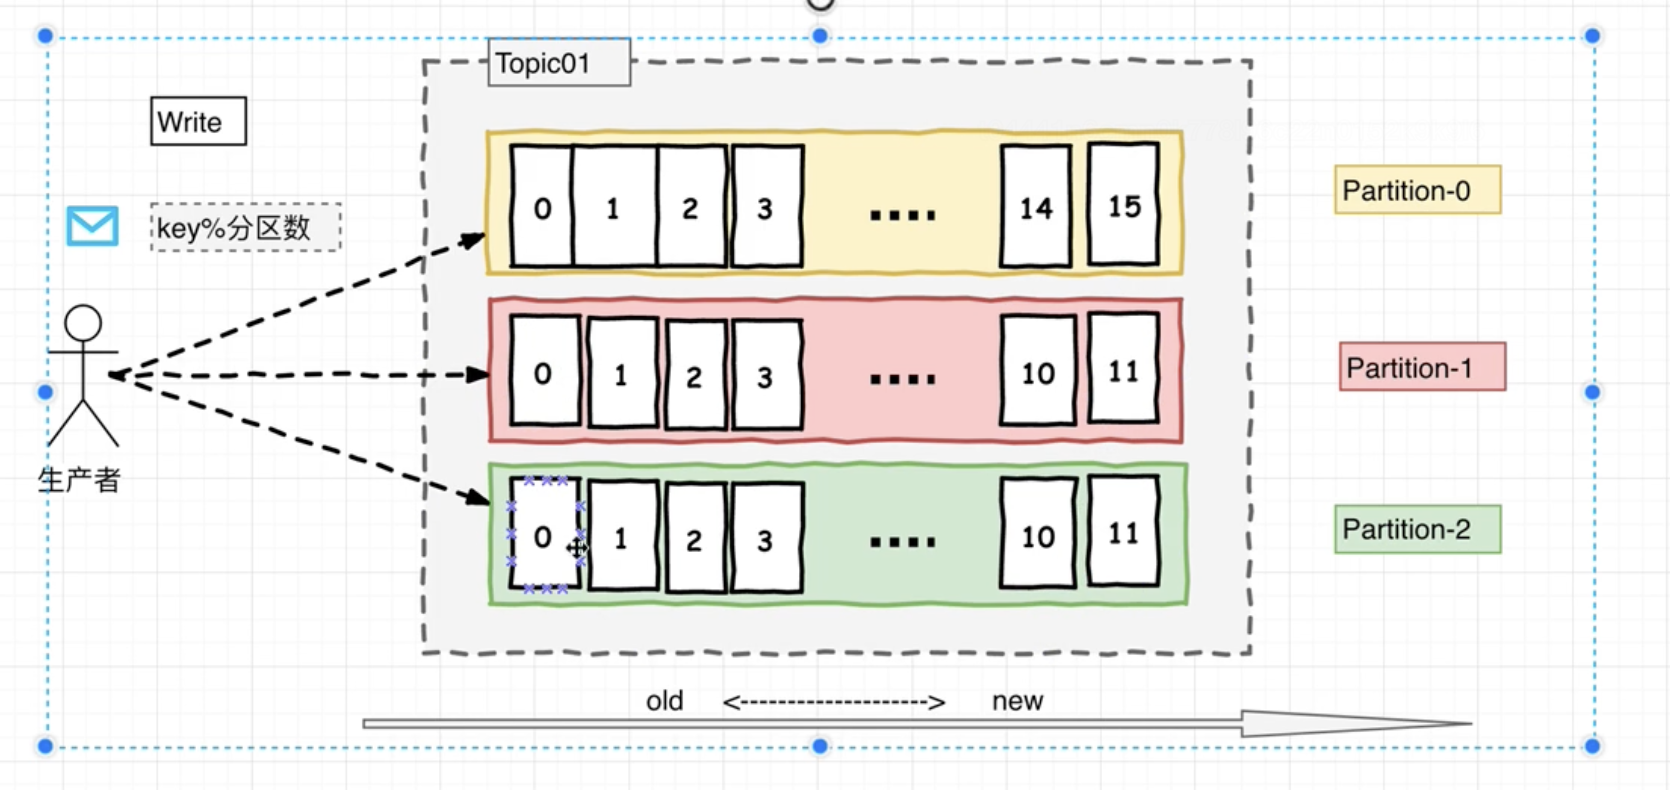
分发策略 生产者按照消息key的hash模上分区数来决定向哪个分区写入。
broker-0 是 partition0的主节点Leader, broker-1和broker-2是partition0的副本节点 Follower。
当broker-0宕机时, zookeeper发现并通知其对应的副本节点重新选举出新的主节点。

分区&日志 只能保证分区内部的有序, 分区间无序。该特性也称之为局部FIFO 。
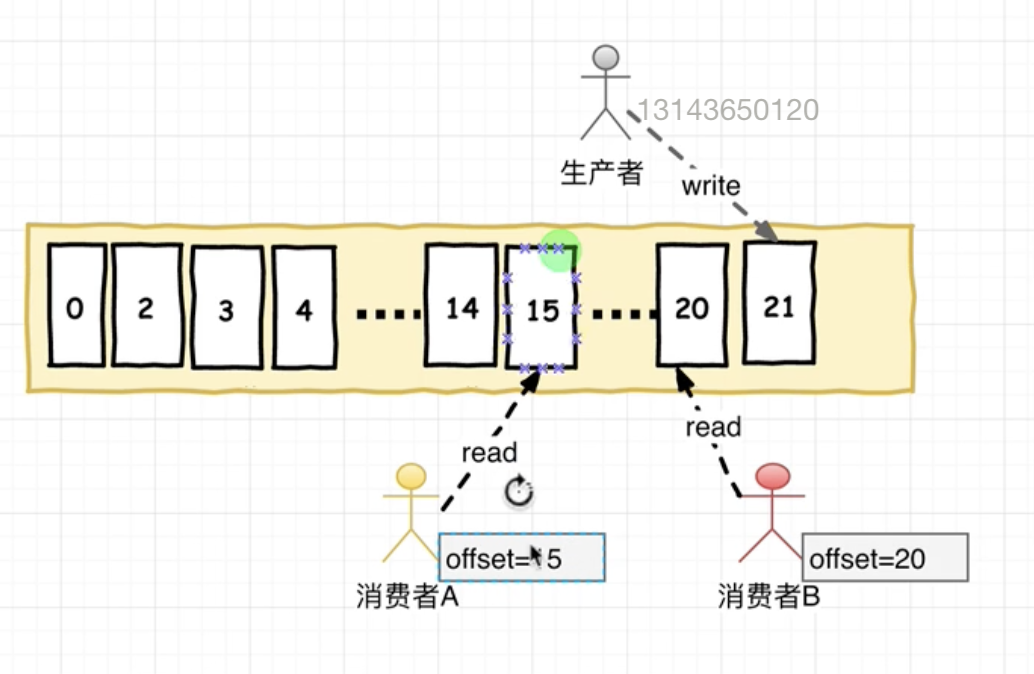
offset 在消费者消费topic中的数据的时候 每个消费者会维护本次消费对应分区的偏移量,消费者会在消费完一个批次的数据周, 会将本次消费的偏移量提交给Kafka集群,因为此对于每个消费者而言可以随意的控制该消费者的偏移量。 因此在Kafka中,消费者可以从一个topic分区中的任意位置读取队列数据,由于每个消费者控制了自己的消费偏移量。 因此多个消费者之间彼此相互独立。
消费者和消费者组
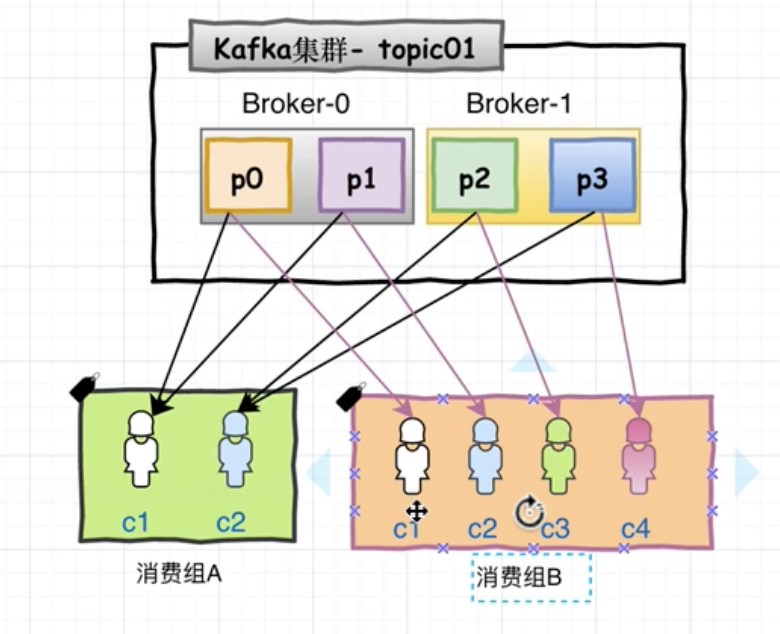
每一个消费者Consumer必须隶属于一个消费者组ConsumerGroup。
同一消息分区里的消息, 会均分给同一消费者组下的不同消费者, 但是同时可以广播给多个消费者组。(例如P0分区不能同时被消费组A里的c1和c2消费, 但是可以被消费组A里的c1和消费组B里的c1消费)
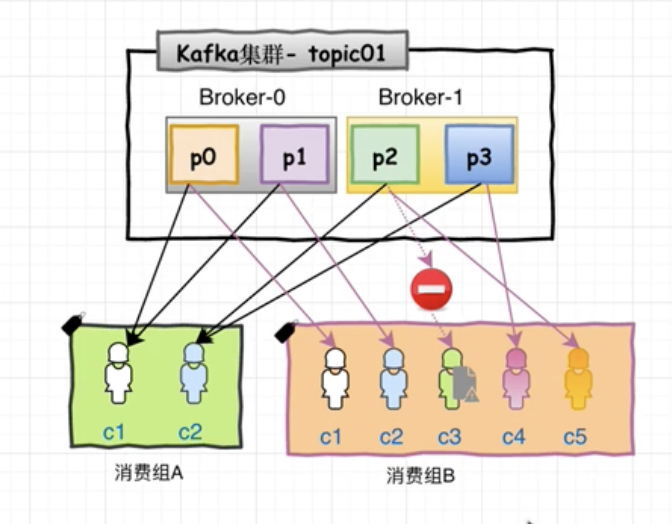
假设消费者组2 有5个消费者, 当其中某一个消费者断链时, 则会重新进行均发。
从某种程度上讲, 分区数越大,Kafka并行度越高。
高性能之道 Kafka的特性之一是高吞吐率(high throughput), 但是Kafka的消息是保存或缓存在磁盘上的。一般认为磁盘的读写数据是会降低性能的, 但是Kafka即使是普通的服务器,也可以轻松支持每秒百万级M/s的写入请求。超过了大部分的MQ中间件。 这也是Kafka被广泛应用的原因之一。写入磁盘是为了防止数据丢失。 而起性能高主要是因为采用了: 顺序写入和MMFile。
顺序写入 因为硬盘是机械结构, 每次读写都会寻址–>写入, 其中寻址是最耗时的操作, 所以硬盘最讨厌随机I/O, 喜欢顺序I/O。 为了提高读写硬盘的速度, Kafka就采用了顺序I/O。这样省去了大量的内存开销和寻址时间。但是丹村的顺序写入也不可能做到内存级别的I/O速度, 因此Kafka的数据并不是实时写到硬盘的。
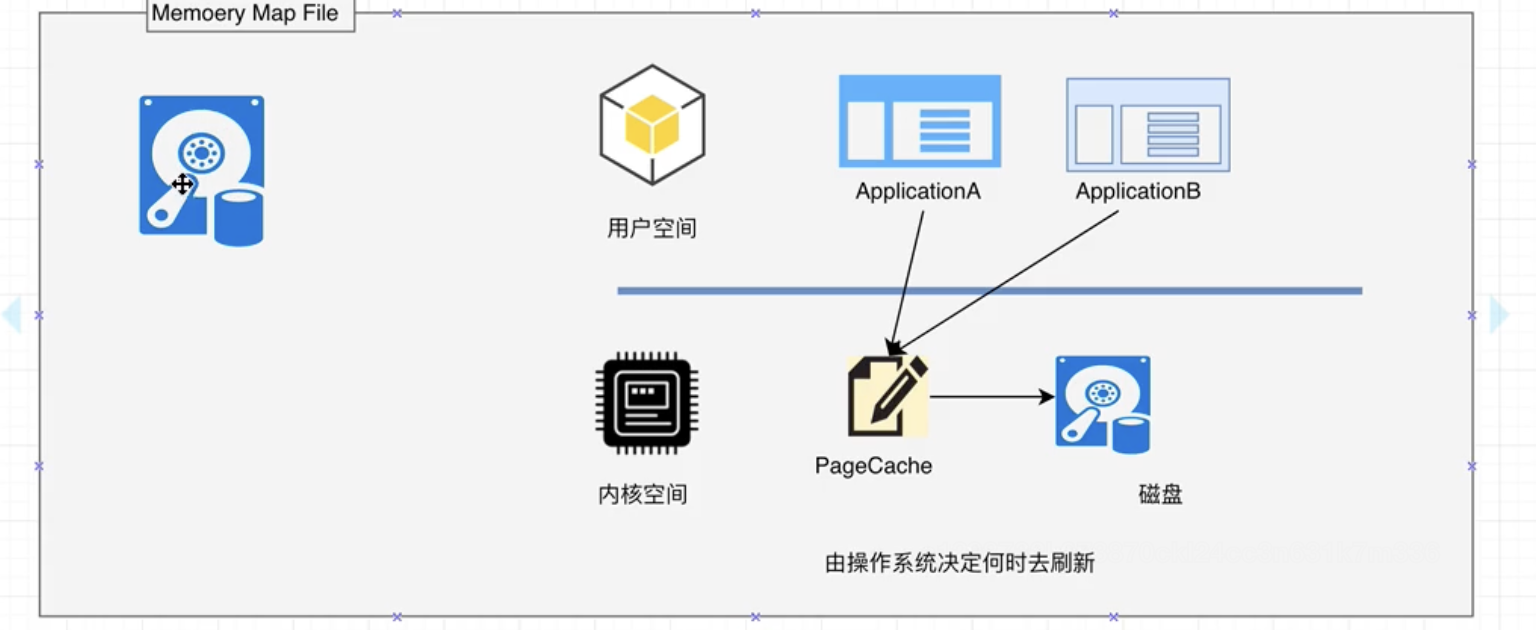
MMFile Kafka充分利用了现代操作系统分页存储来利用内存提高I/O效率。 Memory Mapped File(MMFile,内存映射文件) 在64位操作系统中一般表示20G的数据文件, 他的工作原理是直接利用操作系统Page实现文件到物理内存的直接映射, 完成MMP映射后, 用户对内存的所有操作会被操作系统自动刷新到磁盘上。极大降低了I/O 使用率。
零拷贝(ZeroCopy) Kafka服务器在响应客户端读取的时候, 底层使用了ZeroCopy技术。直接讲磁盘无需拷贝到用户空间, 而是直接讲数据通过内核空间传递输出, 数据并没有抵达用户空间。
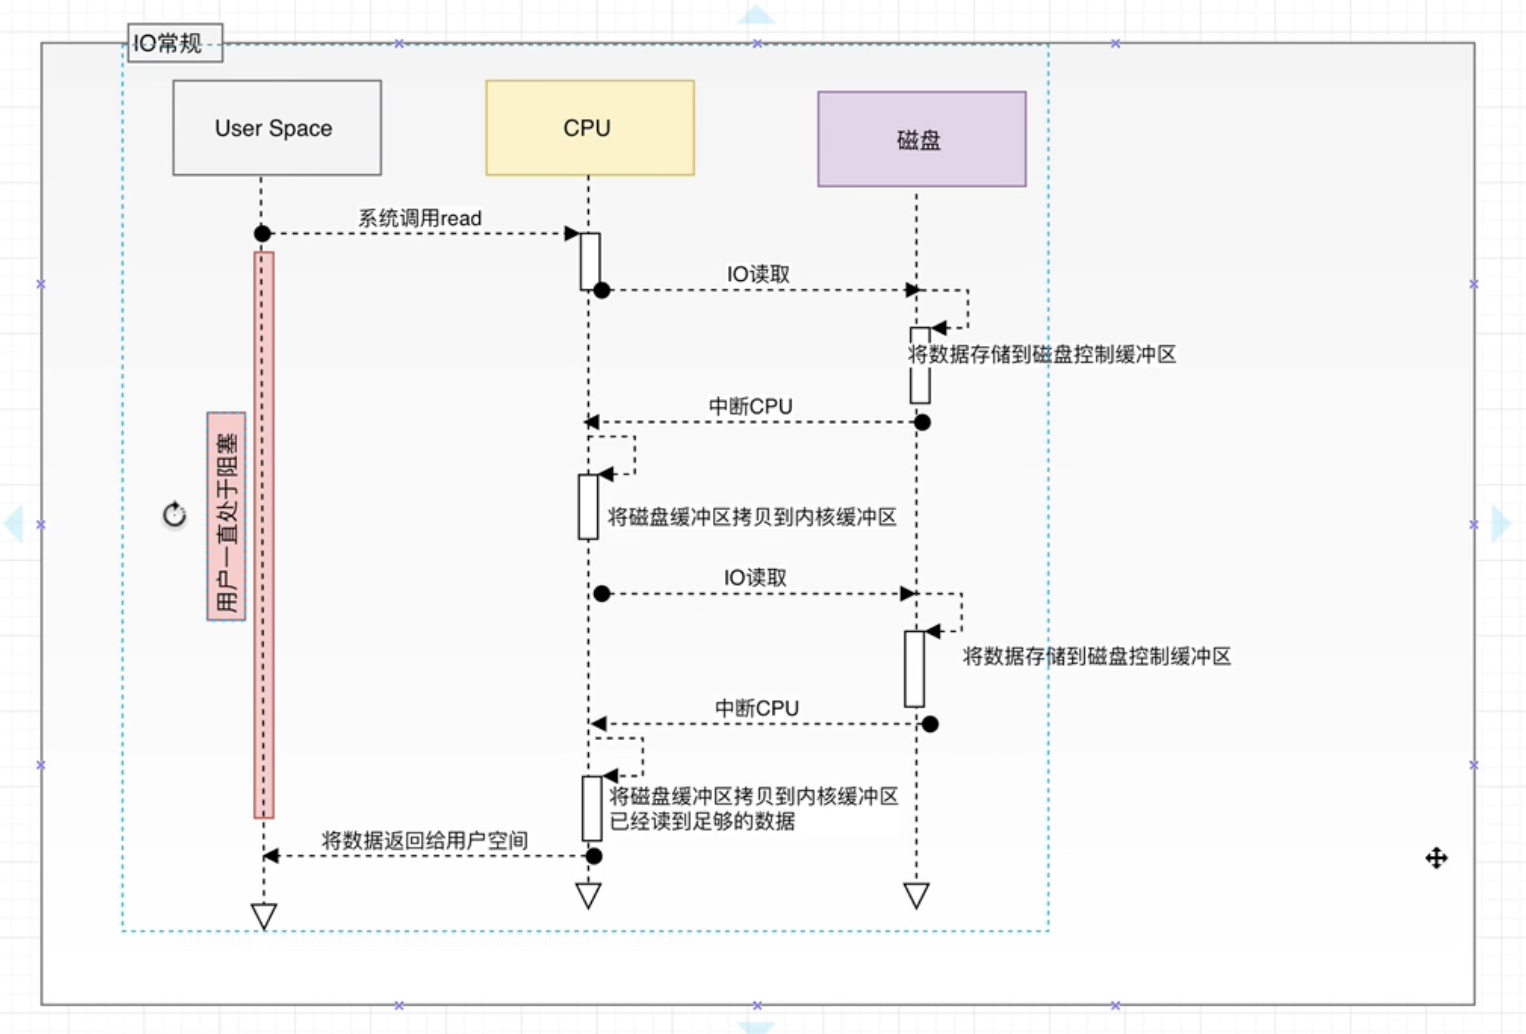
传统I/O:
用户进程调用read等系统调用向操作系统发起IO请求,请求读取数据到自己的内存缓冲区中。自己进入阻塞状态
操作系统收到请求后, 进一步将IO请求发送到磁盘。
磁盘驱动器收到内核的IO请求, 把数据从磁盘读取到驱动器的缓冲中,此时不占用CPU, 当驱动器的缓冲区被读满后向内核发起中段信号告知自己的缓冲区已满。
内核收到磁盘的中断信号, 使用CPU时间将磁盘驱动器的缓冲中的数据拷贝到内核缓冲区中。
如果内核缓冲区的数据少于用户请求读的数据, 重复3-4, 知道内核缓冲区中的数据足够多为止。
将数据从内核缓冲区拷贝到用户缓冲区, 同时从系统调用中返回, 完成任务。
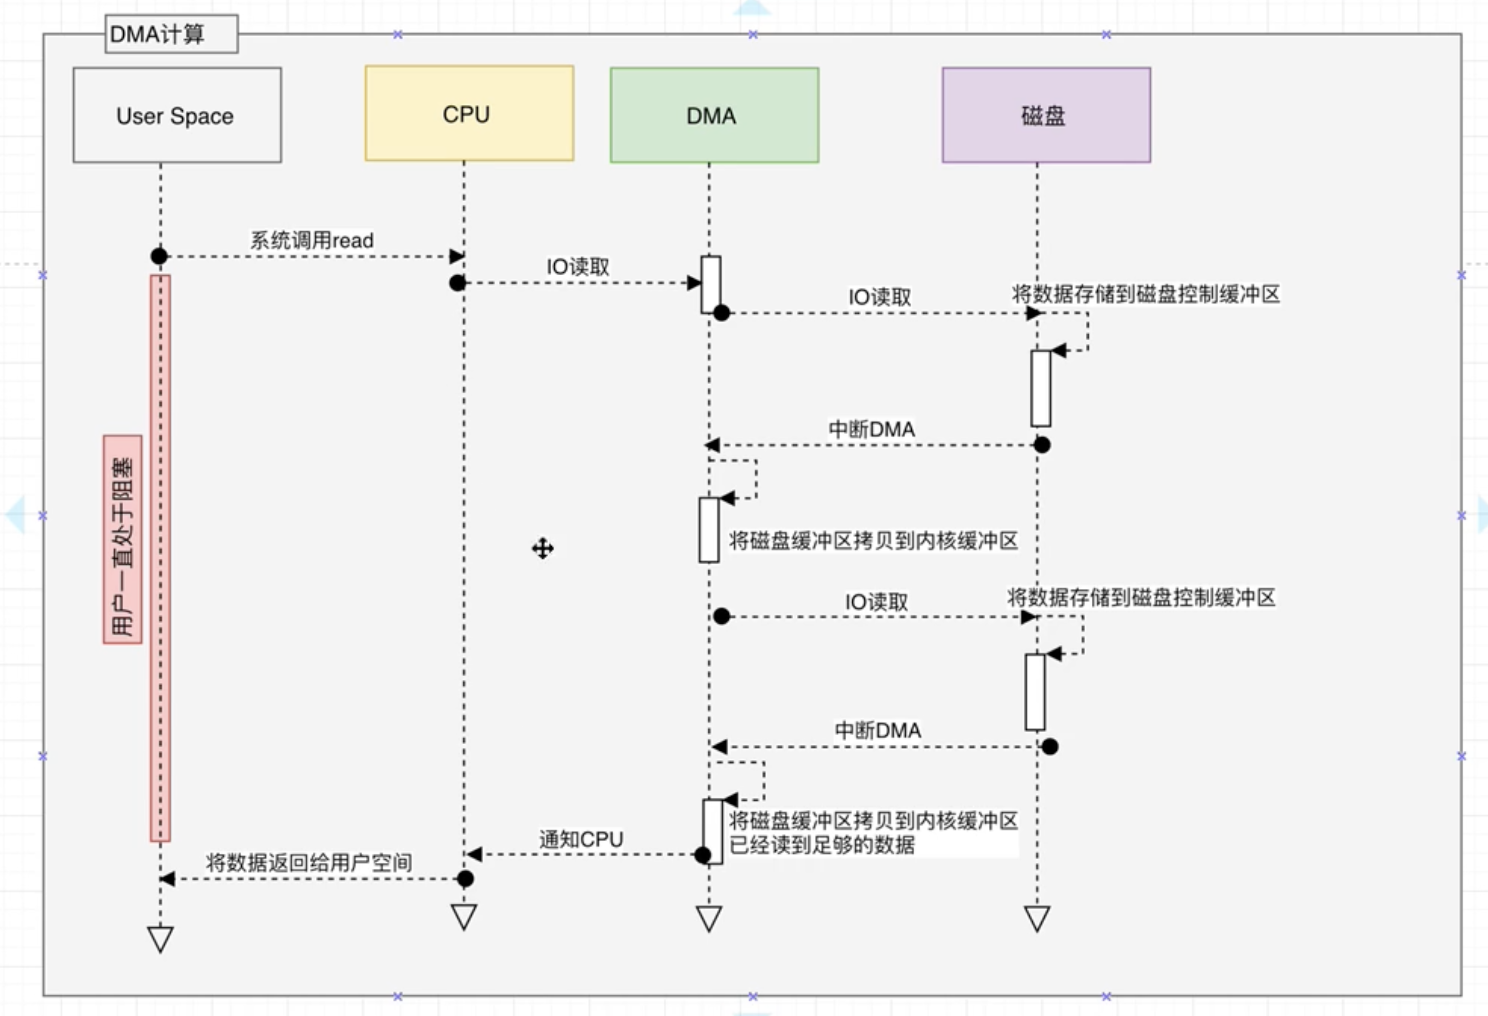
协处理器的引入降低了CPU的压力。

What –>何为事件流?事件流(Event Streming )是”数字化”的人体中枢神经系统. 是商业业务日益软件化和自动化的切持续不断运作的现实世界技术基础.
Where –>事件流用在何处?事件流在各行各业都有则广泛的应用, 如下:
在股票, 银行,保险等行业即时处理转账和交易数据
在物流和自动化产业跟踪监控车辆,船舰等的实时数据
在工厂持续从IoT设备获取并分析数据
在零售,酒店,旅游业以及移动应用场景中, 采集并立即响应顾客的数据请求
在医疗领域, 持续监控病人的健康数据并做出高效准确的预测以尽早寻求追加治疗方案
连接并存储同一公司不同业务分支的数据并确保其可用性
充当数据平台, 事件驱动架构, 微服务 等应用场景的基石.
Why –>Kafka如何支撑业务数据? kafka具有如下三种能力以确保任何想要在业务场景中实现端对端的事件流处理的用户能够应用一种经过实战检验的方式实现自己的业务:
发布和订阅事件流, 即: 持续写入数据到外部系统/读取外部系统该数据
按业务需求和用户意愿持久,可靠地存储事件流
在事件流到达的即刻处理事件流数据(也可以是回溯的方式)
所有以上功能在分布式, 高扩展, 弹性, 容错的环境中都是得以保障的. Kafka能部署在物理机, 虚拟机, 容器,本地应用和云应用中. 用户可以根据自身需要和业务场景选择自行管理或者是托管服务(由供应商提供)来管理自己的Kafka环境.
How–>Kafka是如何运作的? Kafka是一个由客户端和服务端组成的分布式系统. 这些服务端和客户端之间通过高效的TCP网络协议进行通信. 他能被能部署在物理机, 虚拟机, 容器,本地应用和云应用中.
服务端: Kafka集群能运行在由多个数据中心或云基站的环境中. 这些被称之为(broker )服务器组成了数据存储层. 另外一部分服务器负责运行Kafka连接器持续从事件流导入/导出数据以与其他系统(数据库或其他Kafka集群)进行整合. 同时, 为了方便用户实现关键用例, Kafka
客户端: 客户端保证用户能往那些读/写以及并行处理事件流的分布式应用或微服务中写入数据, 即使是在网络瘫痪或硬件故障的情况下.Kafka提供了大量的客户端API库, 其中对Java和Scala语言支持的最好.
Terminologies 1. Event
1
2
3
4

Event key: "Alice"
Event value: "Made a payment of $200 to Bob"
Event timestamp: "Jun. 25, 2020 at 2:06 p.m."
2. 生产者
3. 消费者
4. 主题
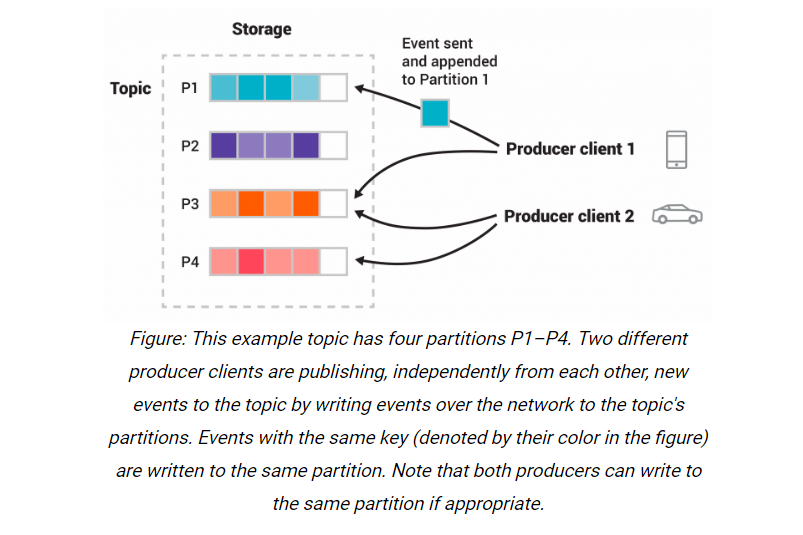
5. 分区
如上图, 一种颜色代表了一个分区, 消费者A: 手机 和消费者B: 小车 分别向主题: T的分区(P1,P3)和(P3,P4)发布消息.
6. 副本
Kafka中生产者和消费者是完全解耦的, 该设计保证了高扩展性. 例如, 生产者永远不必等待消费者, 事件会被处理有且一次(exactly-once).
用例 消息代理 Kafka作为传统消息代理的替代品有着出色的表现. 拥有更高的吞吐量的同时也兼具内置分区, 副本机制,容错以及易扩展,低延时等高级特性. 因此, kafka丝毫不逊色于ActiveMQ和RabbitMQ.
网页动态跟踪 Kafka最早被应用于网页活动的跟踪监控. 这也就意味着诸如页面浏览, 搜索等网页活动被按照特定规律发布到特定主题. 后续会被HDFS或者离线数据仓库订阅消费.
日志整合 很多人会将Kafka用作日志整合的解决方案. 典型的日志整合流程是从物理服务器采集日志文件然后放到文件服务器或者HDFS中以供后续处理. Kafka抽取出日志文件的细节并将其抽象成一个更简洁的消息流. 这也就保障了低延时和分布式数据消费.
Kafka还可以用于流处理, 事件溯源, 提交日志记录等场景, 此处不做详细讨论, 可参考官网 .
快速入门 Kafka是java语言开发的, 运行需要JDK支持. 而作为服务监控,同时也需要zookeeper的支持.
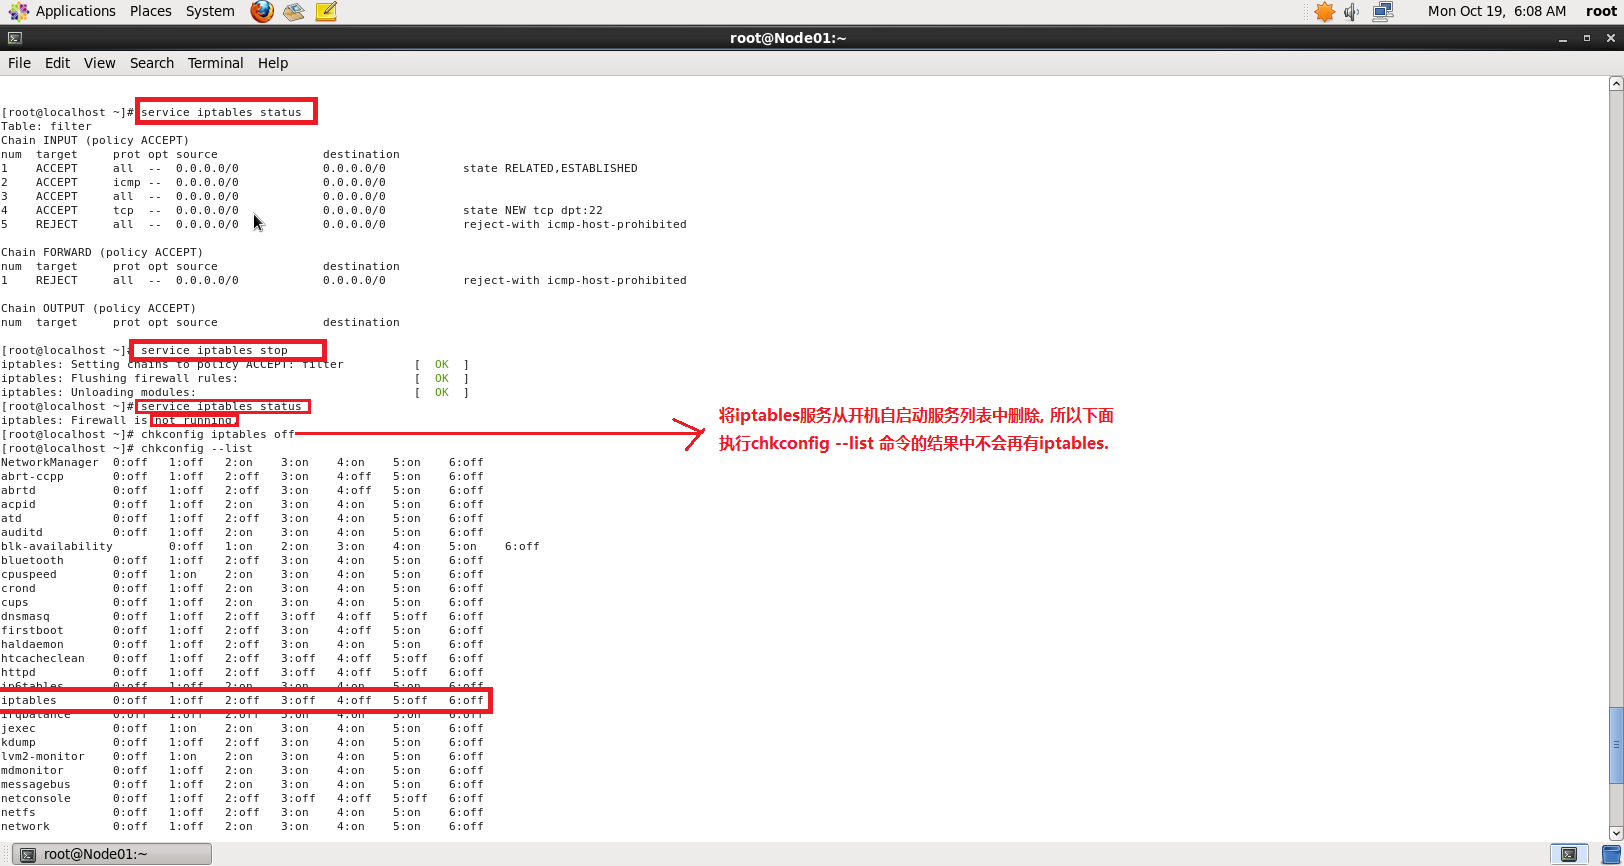
Step 1 关闭防火墙 关闭Linux防火墙. 然后检查确认是否已关闭成功.shell script
service iptables stop # 关闭防火墙
service iptables status # 查看服务状态
chkconfig iptables off #停用开机自启动防火墙服务
chkconfig --list # 检查
注意: CentOS系统版本不同, 关闭防火墙的命令也不一样.
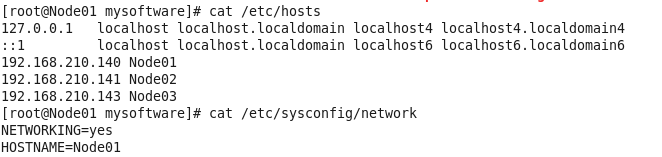
Step 2 配置域名解析 执行:shell script
vim /etc/hosts
执行:shell script
vim /etc/sysconfig/network
然后执行shell script
reboot
Step 3 JDK配置 解压JDK rpm文件到指定目录shell script
rpm -ivh jdk-8u261-linux-x64.rpm /usr/ -C
shell script
vim ~/.bashrc
shell script
JAVA_HOME=/usr/java/latest
PATH=$PATH:$JAVA_HOME/bin
CLASSPATH=.
export JAVA_HOME
export PATH
export CLASSPATH
shell script
source ~/.bashrc
shell script
java -version
echo $JAVA_HOME
Step 4 zookeeper配置 下载zookeeper 压缩包tar包, 上传到Linux,并执行如下代码解压到指定目录/usr/下:shell script
tar -zxf zookeeper-3.4.6.tar.gz -C /usr/
shell script
cd /usr/zookeeper-3.4.6/conf/
cp zoo_sample.cfg zk.cfg
shell script
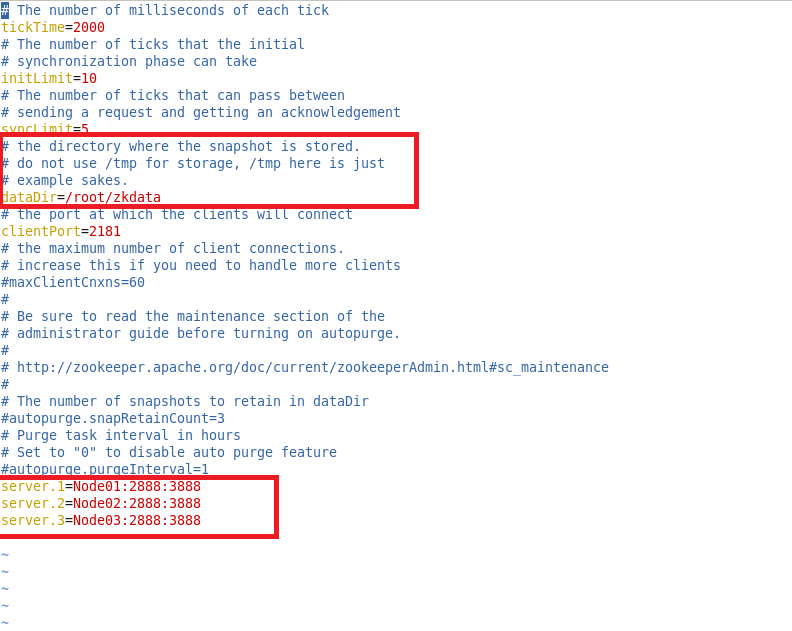
vim zk.cfg
然后按刚才的修改创建zookeeper快照数据的存储目录:shell script
mkdir /root/zkdata
shell script
vim /root/zkdata/myid
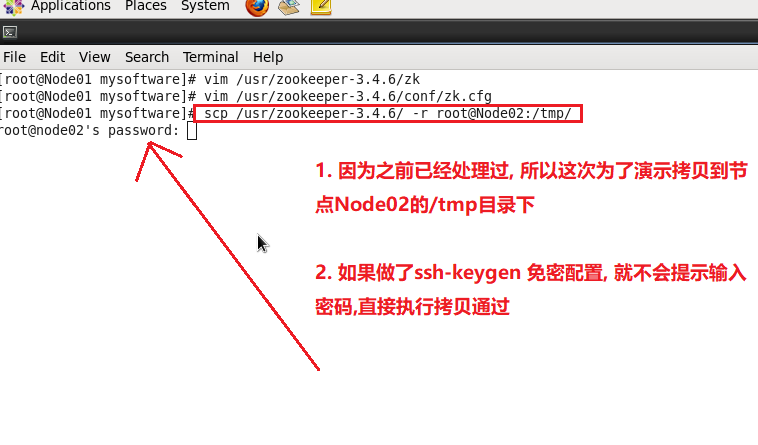
然后将zookeeper安装目录及其所有子目录,子文件拷贝到集群其他节点.shell script
scp -r /usr/zookeeper-3.4.6/ root@Node02:/usr
免密配置 , 则输入指定目标节点的root密码即可拷贝. 如果做过免密配置, 则会直接拷贝.免密配置 zookeeper-3.4.6目录. 同样的方法, 将目录也拷贝到Node03节点指定目录.shell script
cd /root
mkdir zkdata
vim zkdata/myid
shell script
cd /usr/zookeeper-3.4.6/bin/
./zkServer.sh start ../conf/zk.cfg # 启动服务, ../conf/zk.cfg表示启动当前zookeeper服务要使用的配置文件
shell script
./zkServer.sh status ../conf/zk.cfg
如果要关闭zookeeper服务可以执行:shell script
./zkServer.sh stop ../conf/zk.cfg
step 5 kafka集群搭建 解压shell script
tar -zxf kafka_2.11-2.2.0.tgz -C /usr/
shell script
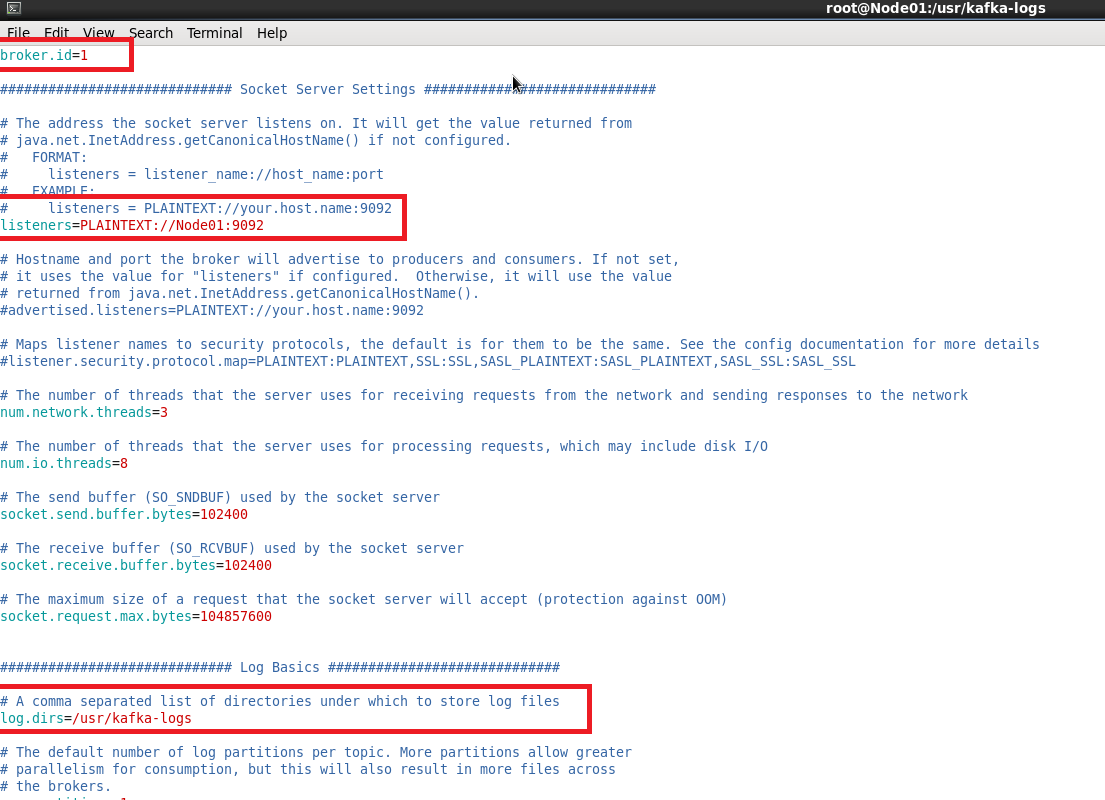
vim /usr/kafka_2.11-2.2.0/config/server.properties
server.properties里配置的log.dirs配置项的值创建kafka日志目录shell script
cd /usr/
mkdir kafka-logs
shell script
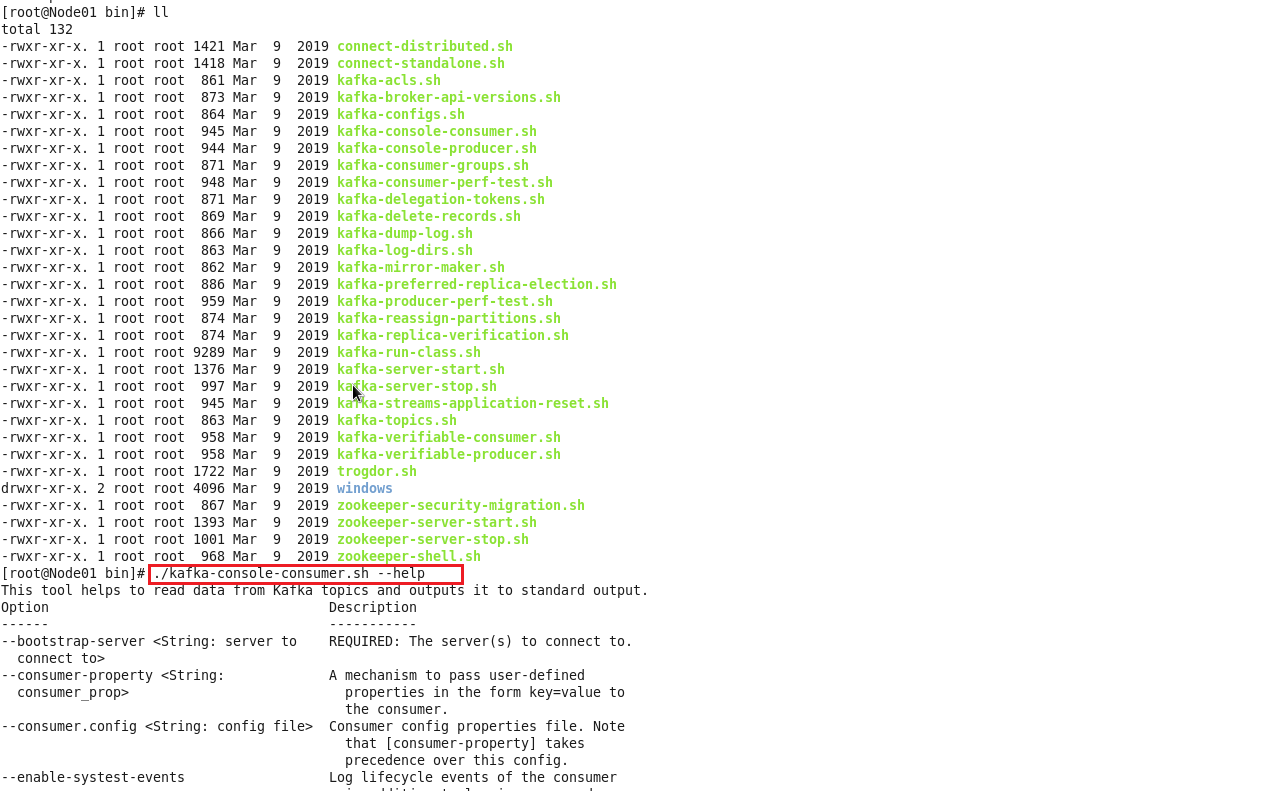
cd /usr/kafka_2.11-2.2.0/bin/
shell script
./kafka-console-consumer.sh --help
shell script
./kafka-server-start.sh -daemon ../config/server.properties # -daemon表示以守护/后台进程启动kafka服务, 敞口关闭进程也会继续. 后面则是指明具体的启动配置文件
shell script
jps
/usr/kafka_2.11-2.2.0/config/server.properties里的broker.id的值要和当前节点的/usr/kafka-logs/meta.properties里的’broker.id’要保持一致. 否则kafka会在启动后秒退.
按照同样的方法配置集群中其他节点的kafka.
server.properties配置文件详解 1 2 3 4 5 6 7 8 9 10 11 12 13 14 15 16 17 18 19 20 21 22 23 24 25 26 27 28 29 30 31 32 33 34 35 36 37 38 39 40 41 42 43 44 45 46 47 48 49 50 51 52 53 54 55 56 57 58 59 60 61 62 63 64 65 66 67 68 69 70 71 72 73 74 75 76 77 78 79 80 81 82 83 84 85 86 87 88 89 90 91 92 93 94 95 96 97 98 99 100 101 102 103 104 105 106 107 108 109 110 111 112 113 114 115 116 117 118 119 120 121 122 123 124 broker.id =0 num.network.threads =3 num.io.threads =8 socket.send.buffer.bytes =102400 socket.receive.buffer.bytes =102400 socket.request.max.bytes =104857600 log.dirs =/tmp/kafka-logs num.partitions =1 num.recovery.threads.per.data.dir =1 offsets.topic.replication.factor =1 transaction.state.log.replication.factor =1 transaction.state.log.min.isr =1 log.retention.hours =168 log.segment.bytes =1073741824 log.retention.check.interval.ms =300000 zookeeper.connect =localhost:2181 zookeeper.connection.timeout.ms =6000 group.initial.rebalance.delay.ms =0
关闭Kafka就直接执行, 不用带参数
不管是单机模式, 还是集群模式都会优雅 关闭。优雅是有一定的延时, 数据存储。如果是集群每一个节点都会关闭。
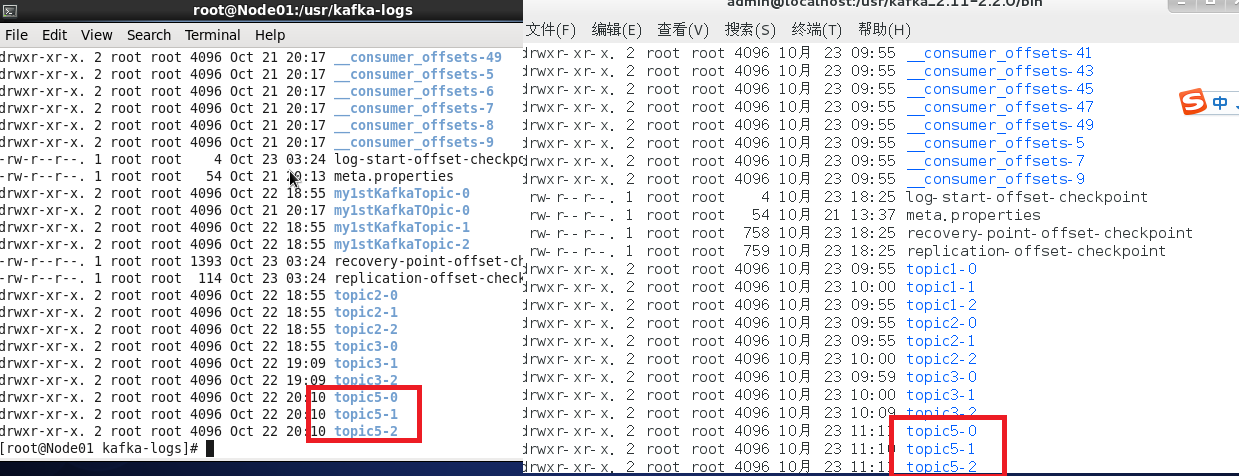
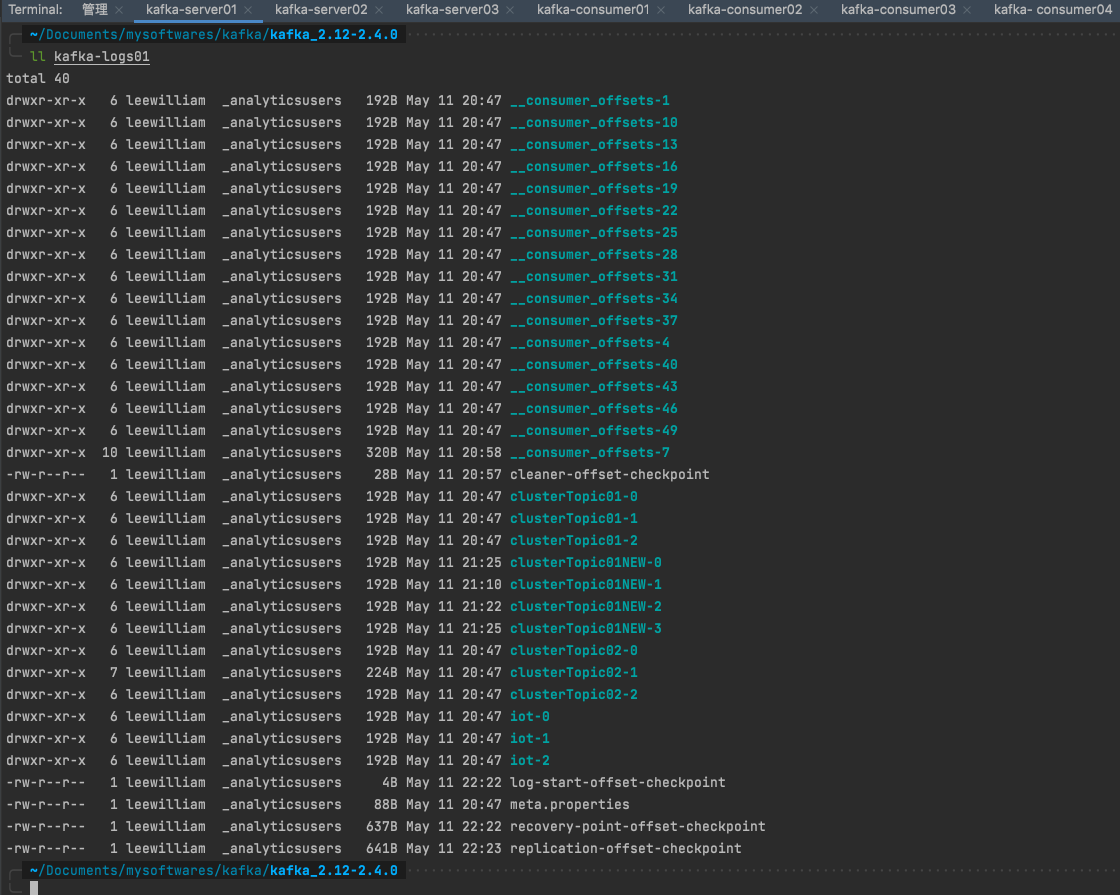
topic 操作 查看手册 通过执行可以查看topic管理相关的操作方法
1 ./kafka-topics.sh --help
返回:
1 2 3 4 5 6 7 8 9 10 11 12 13 14 15 16 17 18 19 20 21 22 23 24 25 26 27 28 29 30 31 32 33 34 35 36 37 38 39 40 41 42 43 44 45 46 47 48 49 50 51 52 53 54 55 56 57 58 59 60 61 62 63 64 65 66 67 68 69 70 71 72 73 74 75 76 77 78 79 80 81 82 83 84 85 86 87 88 89 90 91 92 93 94 95 96 97 98 99 100 101 102 103 104 105 106 107 108 109 110 111 112 113 114 115 116 117 118 119 120 121 122 123 124 This tool helps to create, delete, describe, or change a topic. Option Description ------ ----------- --alter Alter the number of partitions, replica assignment, and/or configuration for the topic. --at-min-isr-partitions if set when describing topics, only show partitions whose isr count is equal to the configured minimum. Not supported with the --zookeeper option. --bootstrap-server <String: server to REQUIRED: The Kafka server to connect connect to> to. In case of providing this, a direct Zookeeper connection won't be required. --command-config <String: command Property file containing configs to be config property file> passed to Admin Client. This is used only with --bootstrap-server option for describing and altering broker configs. --config <String: name=value> A topic configuration override for the topic being created or altered.The following is a list of valid configurations: cleanup.policy compression.type delete.retention.ms file.delete.delay.ms flush.messages flush.ms follower.replication.throttled. replicas index.interval.bytes leader.replication.throttled.replicas max.compaction.lag.ms max.message.bytes message.downconversion.enable message.format.version message.timestamp.difference.max.ms message.timestamp.type min.cleanable.dirty.ratio min.compaction.lag.ms min.insync.replicas preallocate retention.bytes retention.ms segment.bytes segment.index.bytes segment.jitter.ms segment.ms unclean.leader.election.enable See the Kafka documentation for full details on the topic configs.It is supported only in combination with -- create if --bootstrap-server option is used. --create Create a new topic. --delete Delete a topic --delete-config <String: name> A topic configuration override to be removed for an existing topic (see the list of configurations under the --config option). Not supported with the --bootstrap-server option. --describe List details for the given topics. --disable-rack-aware Disable rack aware replica assignment --exclude-internal exclude internal topics when running list or describe command. The internal topics will be listed by default --force Suppress console prompts --help Print usage information. --if-exists if set when altering or deleting or describing topics, the action will only execute if the topic exists. Not supported with the --bootstrap- server option. --if-not-exists if set when creating topics, the action will only execute if the topic does not already exist. Not supported with the --bootstrap- server option. --list List all available topics. --partitions <Integer: # of partitions> The number of partitions for the topic being created or altered (WARNING: If partitions are increased for a topic that has a key, the partition logic or ordering of the messages will be affected). If not supplied for create, defaults to the cluster default. --replica-assignment <String: A list of manual partition-to-broker broker_id_for_part1_replica1 : assignments for the topic being broker_id_for_part1_replica2 , created or altered. broker_id_for_part2_replica1 : broker_id_for_part2_replica2 , ...> --replication-factor <Integer: The replication factor for each replication factor> partition in the topic being created. If not supplied, defaults to the cluster default. --topic <String: topic> The topic to create, alter, describe or delete. It also accepts a regular expression, except for --create option. Put topic name in double quotes and use the ' \' prefix to escape regular expression symbols; e. g. "test\.topic". --topics-with-overrides if set when describing topics, only show topics that have overridden configs --unavailable-partitions if set when describing topics, only show partitions whose leader is not available --under-min-isr-partitions if set when describing topics, only show partitions whose isr count is less than the configured minimum. Not supported with the --zookeeper option. --under-replicated-partitions if set when describing topics, only show under replicated partitions --version Display Kafka version. --zookeeper <String: hosts> DEPRECATED, The connection string for the zookeeper connection in the form host:port. Multiple hosts can be given to allow fail-over.
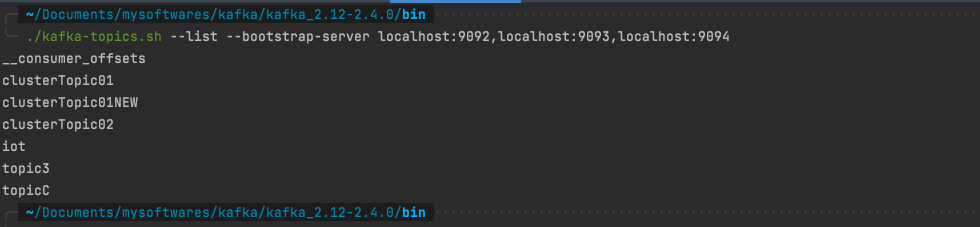
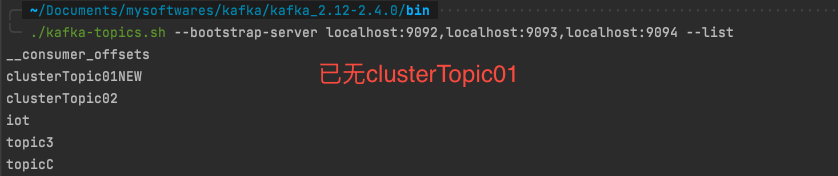
查看topic列表 1 ./kafka-topics.sh --list --bootstrap-server localhost:9092,localhost:9093,localhost:9094
查看topic存储分区信息 1 ./kafka-topics.sh --bootstrap-server localhost:9092,localhost:9093,localhost:9094 --describe --topic clusterTopic01
分析上图: clusterTopic01 分区数也是3, 副本因子也是3. 其中Partition0 的主节点Leader是2。
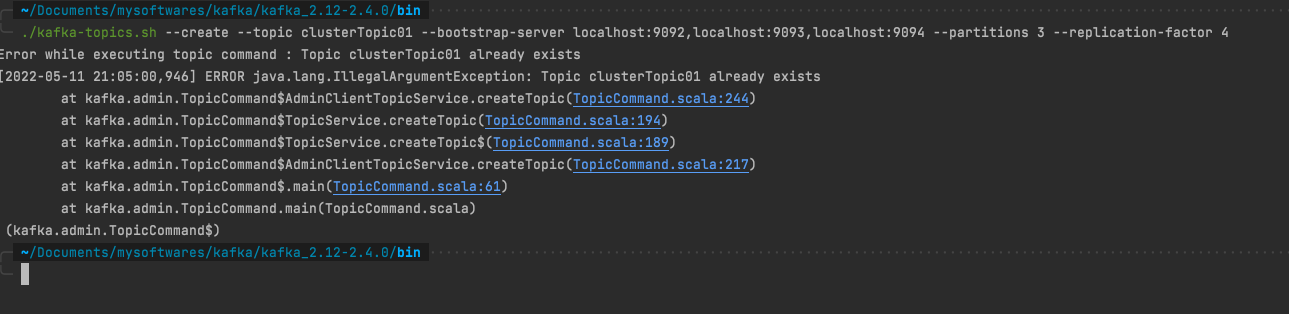
创建topic 1 ./kafka-topics.sh --create --topic clusterTopic01 --bootstrap-server localhost:9092,localhost:9093,localhost:9094 --partitions 3 --replication-factor 4
创建的topic名称已经存在时会报错IllegalArguementException:Topic Already Exist
修改topic名称后执行:
1 ./kafka-topics.sh --create --topic clusterTopic01NEW --bootstrap-server localhost:9092,localhost:9093,localhost:9094 --partitions 3 --replication-factor 4
副本因子数不能大于brokers数量, 否则 InvalidReplicationFactorException: Replication factor: 4 larger than available brokers: 3.
再修改副本因子数后再执行
1 ./kafka-topics.sh --create --topic clusterTopic01NEW --bootstrap-server localhost:9092,localhost:9093,localhost:9094 --partitions 4 --replication-factor 3
查看topic副本存储信息
修改topic分区数(只增不减) 1 ./kafka-topics.sh --bootstrap-server localhost:9092,localhost:9093,localhost:9094 --alter --topic clusterTopic01 --partitions 1
发现报错 InvalidPartitionsException: Topic currently has 3 partitions, which is higher than the requested 1.
然后修改partitions 为4 则执行成功。
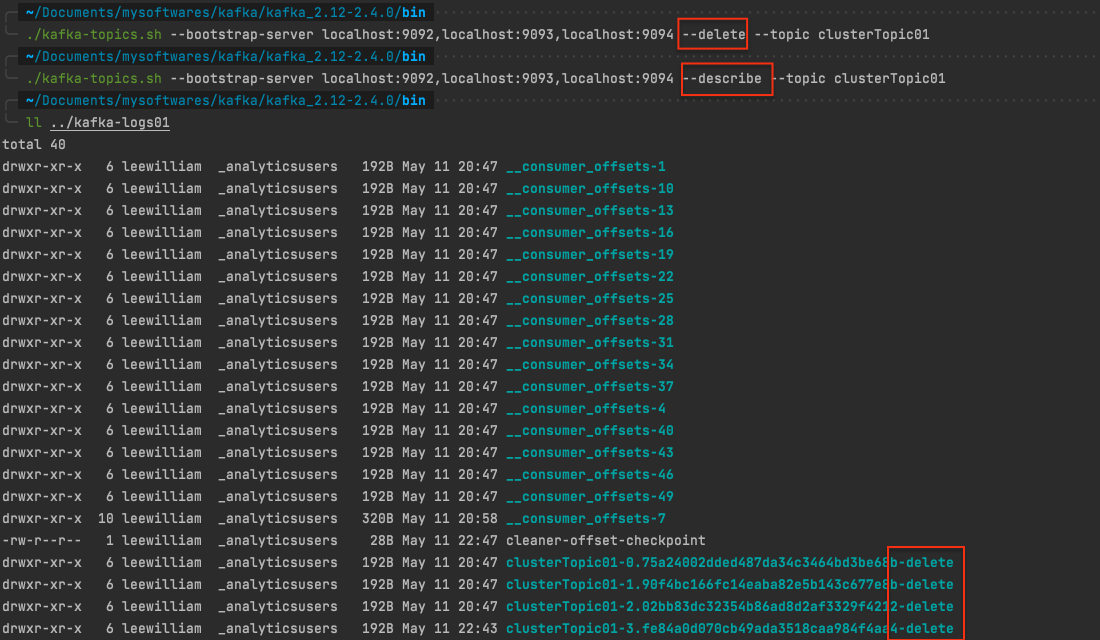
删除topic 1 ./kafka-topics.sh --bootstrap-server localhost:9092,localhost:9093,localhost:9094 --delete --topic clusterTopic01
执行完, 删除成功, 再去看topic列表已经没有clusterTopic01 这个topic了。
另外再去看分区详情也不会有返回。 而且日志里面clusterTopic01的副本目录名称都加了一个-delete后缀。
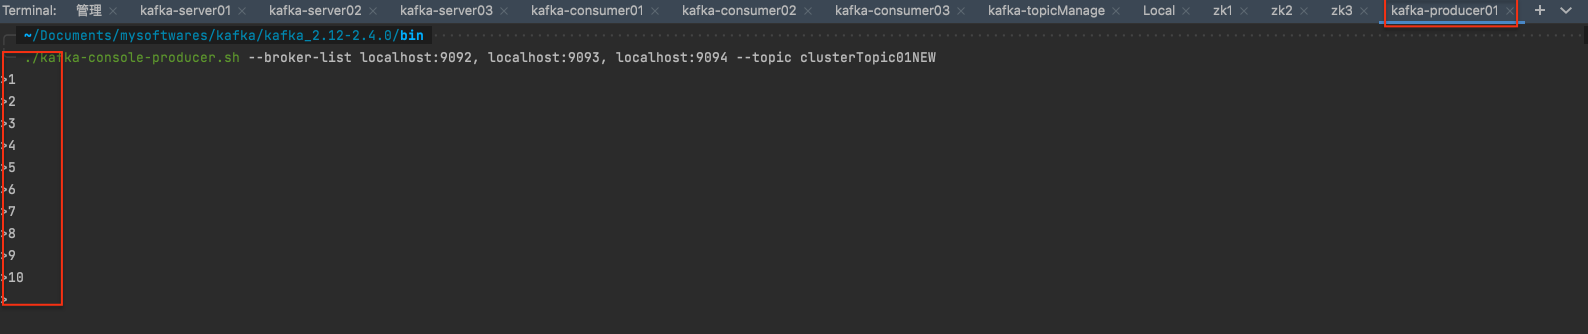
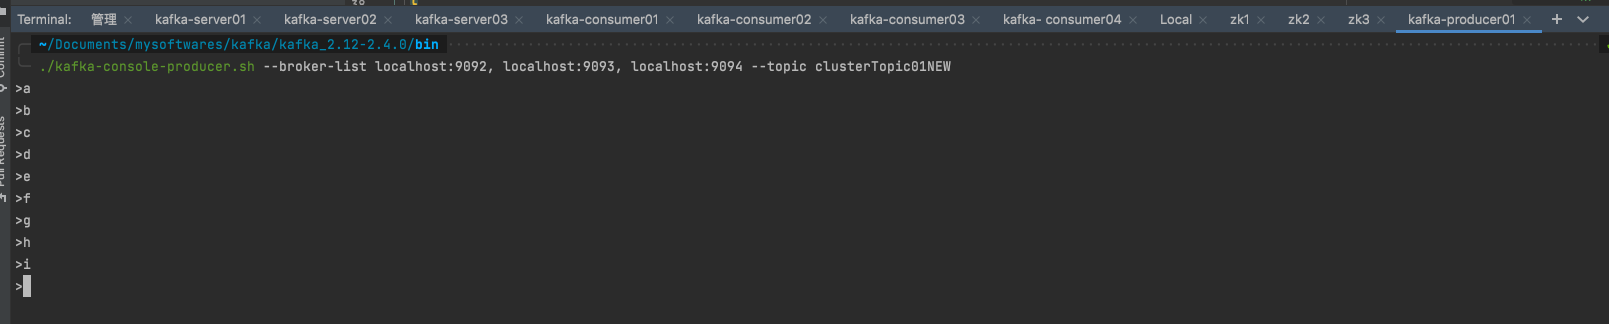
producer 操作 往指定topic发布消息 1 ./kafka-console-producer.sh --broker-list localhost:9092, localhost:9093, localhost:9094 --topic clusterTopic01NEW
注意⚠️consumer里叫: –bootstrap-server , producer里叫: –broker-list
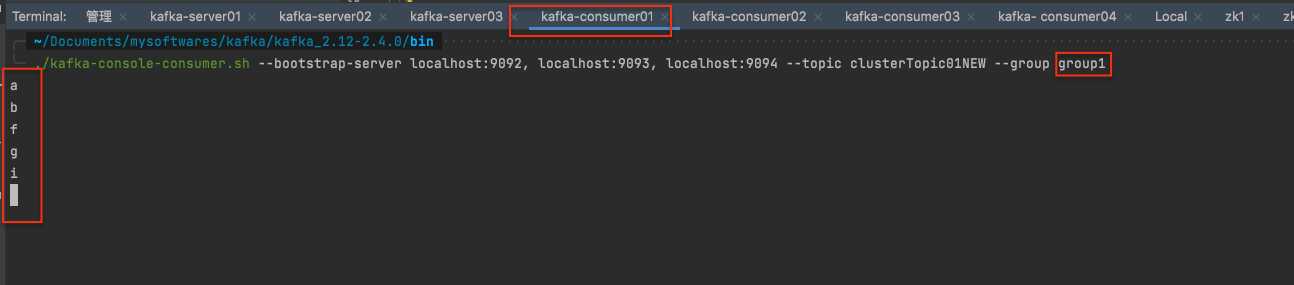
如果只启动了一个消费者, 那么全部都被这一个消费者消费 。
如果一个消费者组有多个消费者订阅了该topic,则多个消费者均分消费该topic中的消息
如果多个消费者组有多个消费者订阅了该topic, 则组内均分, 组间广播。

consumer 操作 订阅指定topic的消息 1 ./kafka-console-consumer.sh --bootstrap-server localhost:9092, localhost:9093, localhost:9094 --topic clusterTopic01NEW --group group1
Kafka-Eagle安装 确保ke.sh有可执行权限shell script
chmod u+x /usr/kafka-eagle-web-2.0.2/bin/ke.sh
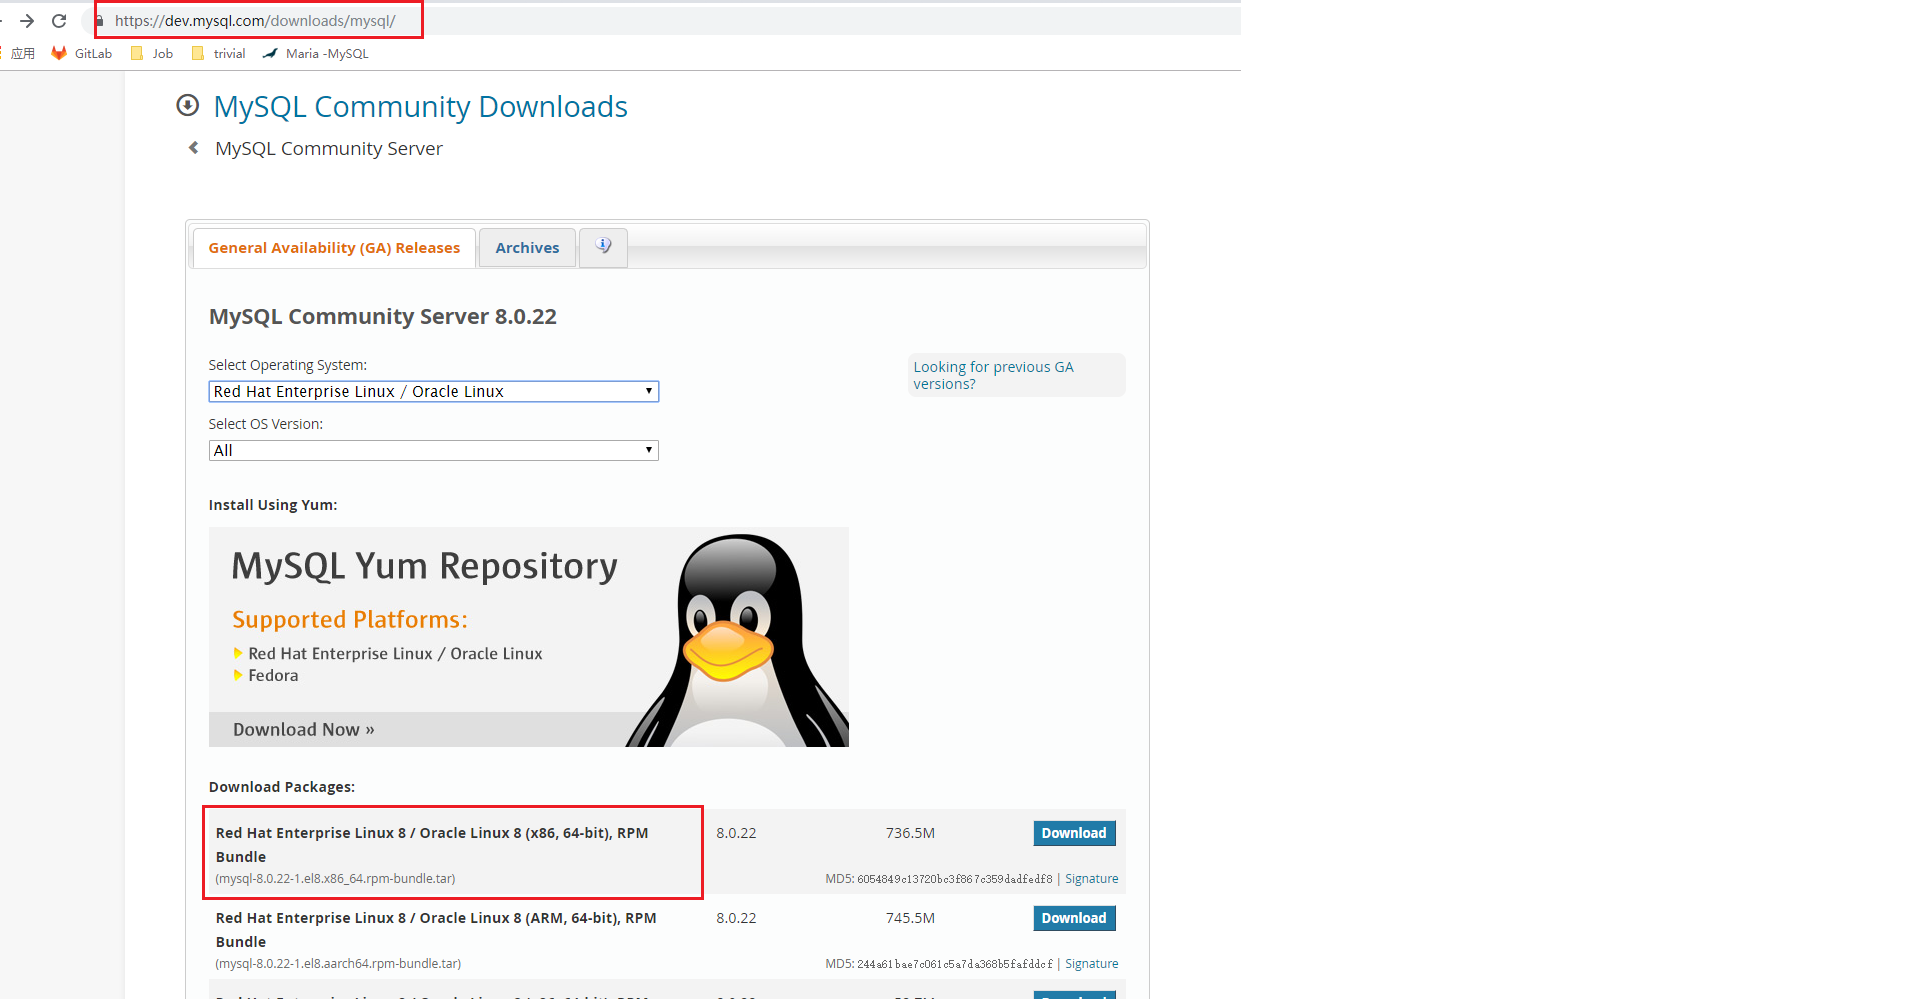
Linux系统安装MySQL步骤:MySQL官网 下载MySQL安装包:
step2: 上传包
step3: 解压shell script
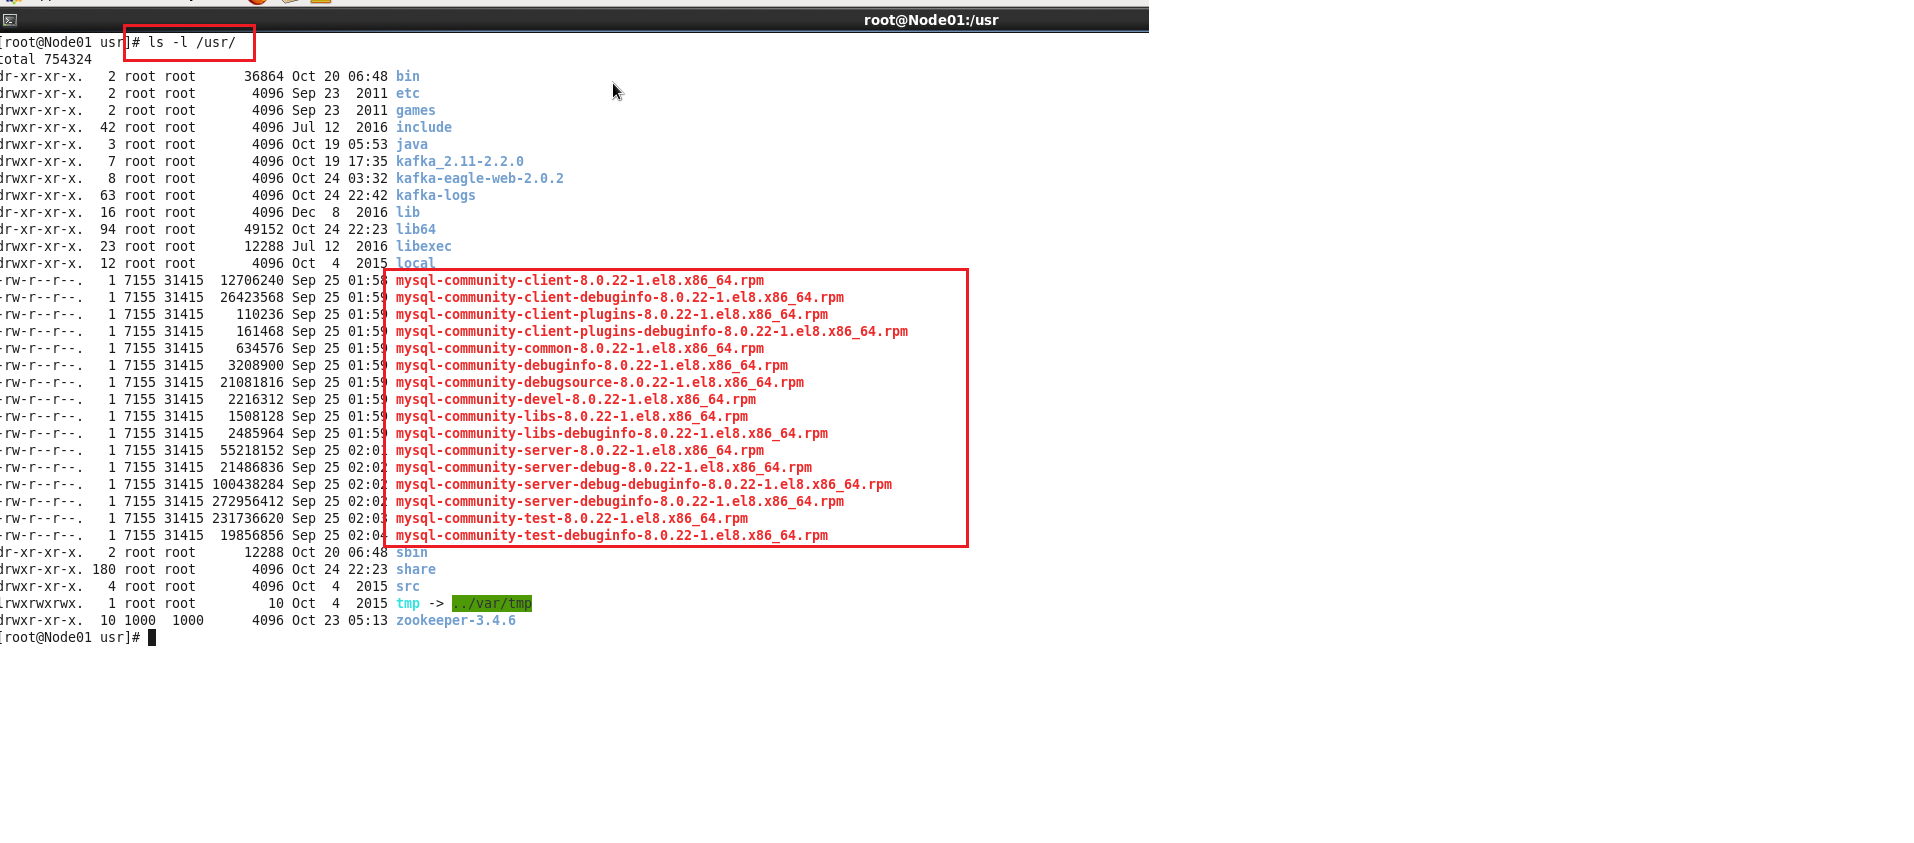
cd /mysoftware
tar -xvf mysql-8.0.22-1.el8.x86_64.rpm-bundle.tar -C /usr/
shell script
ls -l /usr/
step5: 确认系统之前是否装过MySQLshell script
rpm -qa | grep mysql
shell script
rpm -e --nodeps mysql-libs-5.1.71-1.el6.x86_64
shell script
rpm -qa | grep mysql
step5 : 依次安装shell script
rpm -ivh
注:ivh中, i-install安装;v-verbose进度条;h-hash哈希校验
安装成功提示:
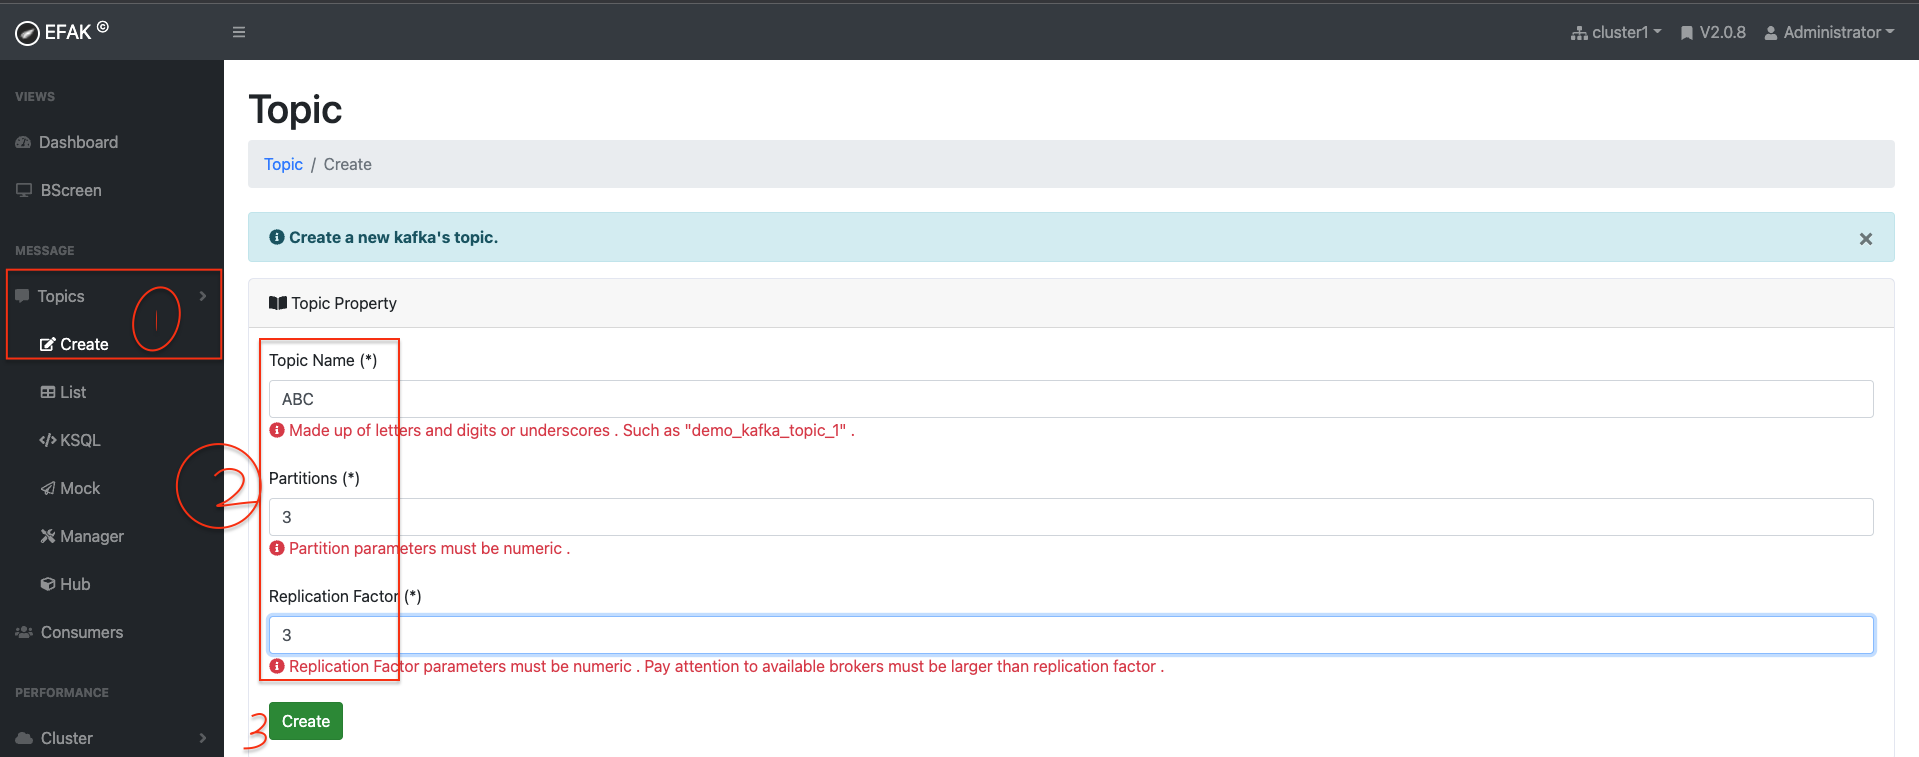
KafkaEagle 使用 新建topic
生态 升级 APIs 环境准备 创建maven项目引入依赖
1
2
3
4
5
6
7
8
9
10
11
12
13
14
15
16
17
18
19
20
21
22
23
24
25
26
27
28
29
30
31
32
33
34
35
36
37
38
39
40
41
42
43
44
45
46
<?xml version="1.0" encoding="UTF-8"?> <project xmlns ="http://maven.apache.org/POM/4.0.0" xmlns:xsi ="http://www.w3.org/2001/XMLSchema-instance" xsi:schemaLocation ="http://maven.apache.org/POM/4.0.0 http://maven.apache.org/xsd/maven-4.0.0.xsd" > <modelVersion > 4.0.0</modelVersion > <properties > <maven.compiler.source > 1.8</maven.compiler.source > <maven.compiler.target > 1.8</maven.compiler.target > </properties > <groupId > org.example</groupId > <artifactId > kafkaconsumer</artifactId > <version > 1.0-SNAPSHOT</version > <dependencies > <dependency > <groupId > org.apache.commons</groupId > <artifactId > commons-lang3</artifactId > <version > 3.9</version > </dependency > <dependency > <groupId > log4j</groupId > <artifactId > log4j</artifactId > <version > 1.2.17</version > </dependency > <dependency > <groupId > org.slf4j</groupId > <artifactId > slf4j-log4j12</artifactId > <version > 1.7.26</version > </dependency > <dependency > <groupId > org.slf4j</groupId > <artifactId > slf4j-api</artifactId > <version > 1.7.26</version > </dependency > <dependency > <groupId > org.apache.kafka</groupId > <artifactId > kafka_2.13</artifactId > <version > 2.6.0</version > </dependency > </dependencies > </project >
创建日志配置文件log4j.properties
1 2 3 4 5 6 7 8 log4j.rootLogger = info,console log4j.appender.console = org.apache.log4j.ConsoleAppender log4j.appender.console.Target = System.out log4j.appender.console.layout = org.apache.log4j.PatternLayout log4j.appender.concole.layout.ConversionPattern = [%-5p] %d{yyyy-MM-dd HH:mm:ss,SSS} method:%l%n%m%n
topic 管理API 1 2 3 4 5 6 7 8 9 10 11 12 13 14 15 16 17 18 19 20 21 22 23 24 25 26 27 28 29 30 31 32 33 34 35 36 37 38 39 40 41 42 43 44 45 46 47 48 49 50 51 52 53 54 55 56 57 58 59 60 61 62 63 64 65 66 67 68 69 70 71 72 73 74 75 76 77 78 79 80 81 82 83 84 85 86 87 88 89 90 91 92 93 94 95 96 97 98 99 100 101 102 103 104 105 package main.core1;import org.apache.kafka.clients.admin.*;import java.util.Arrays;import java.util.Map;import java.util.Properties;import java.util.Set;import java.util.concurrent.ExecutionException;public class TopicManagement private static AdminClient adminClient; public static void main (String[] args) throws ExecutionException, InterruptedException Properties properties = prepareEnvironment(); adminClient = KafkaAdminClient.create(properties); createTopicByMe(adminClient, "Joshua" ); deleteTopicByMe(adminClient,"Joshua" ); listAllMyTopics(adminClient, properties); adminClient.close(); } private static void deleteTopicByMe (AdminClient adminClient, String topic2Bdeleted) throws ExecutionException, InterruptedException DeleteTopicsResult deleTopicsResult = adminClient.deleteTopics(Arrays.asList(topic2Bdeleted)); deleTopicsResult.all().get(); } private static void createTopicByMe (AdminClient adminClient, String topic2BCreated) throws ExecutionException, InterruptedException CreateTopicsResult createTopicsResult = adminClient.createTopics(Arrays.asList(new NewTopic(topic2BCreated, 3 , (short ) 3 ))); createTopicsResult.all().get(); } private static void listAllMyTopics (AdminClient adminClient, Properties properties) throws ExecutionException, InterruptedException ListTopicsResult listTopicsResult = adminClient.listTopics(); Set<String> topicNames = listTopicsResult.names().get(); if (topicNames == null ) { System.out.println(properties.getProperty(AdminClientConfig.BOOTSTRAP_SERVERS_CONFIG) + "is empty now, you can publish topic-partitions to it l8r." ); return ; } StringBuilder stringBuilder = new StringBuilder(); for (String topic : topicNames) { stringBuilder.append(topic + "," ); } String s = stringBuilder.toString(); String substring = s.substring(0 , s.length()); String[] split = substring.split("," ); DescribeTopicsResult describeTopics = adminClient.describeTopics(Arrays.asList(split)); Map<String, TopicDescription> descMap = describeTopics.all().get(); for (Map.Entry<String, TopicDescription> entry : descMap.entrySet()) { System.out.println("key:\t" + entry.getKey()); System.out.println("value:\t" + entry.getValue()); } } private static Properties prepareEnvironment () Properties properties = new Properties(); properties.setProperty(AdminClientConfig.BOOTSTRAP_SERVERS_CONFIG, "localhost:9092,localhost:9093,localhost:9094" ); return properties; } }
首先看Kafka集群的AdminClientConfig信息:
1
2
3
4
5
6
7
8
9
10
11
12
13
14
15
16
17
18
19
20
21
22
23
24
25
26
27
28
29
30
31
32
33
34
35
36
37
38
39
40
41
42
43
44
45
46
47
48
49
50
AdminClientConfig values: bootstrap.servers = [localhost:9092, localhost:9093, localhost:9094] client.dns.lookup = use_all_dns_ips client.id = connections.max.idle.ms = 300000 default.api.timeout.ms = 60000 metadata.max.age.ms = 300000 metric.reporters = [] metrics.num.samples = 2 metrics.recording.level = INFO metrics.sample.window.ms = 30000 receive.buffer.bytes = 65536 reconnect.backoff.max.ms = 1000 reconnect.backoff.ms = 50 request.timeout.ms = 30000 retries = 2147483647 retry.backoff.ms = 100 sasl.client.callback.handler.class = null sasl.jaas.config = null sasl.kerberos.kinit.cmd = /usr/bin/kinit sasl.kerberos.min.time.before.relogin = 60000 sasl.kerberos.service.name = null sasl.kerberos.ticket.renew.jitter = 0.05 sasl.kerberos.ticket.renew.window.factor = 0.8 sasl.login.callback.handler.class = null sasl.login.class = null sasl.login.refresh.buffer.seconds = 300 sasl.login.refresh.min.period.seconds = 60 sasl.login.refresh.window.factor = 0.8 sasl.login.refresh.window.jitter = 0.05 sasl.mechanism = GSSAPI security.protocol = PLAINTEXT security.providers = null send.buffer.bytes = 131072 ssl.cipher.suites = null ssl.enabled.protocols = [TLSv1.2] ssl.endpoint.identification.algorithm = https ssl.engine.factory.class = null ssl.key.password = null ssl.keymanager.algorithm = SunX509 ssl.keystore.location = null ssl.keystore.password = null ssl.keystore.type = JKS ssl.protocol = TLSv1.2 ssl.provider = null ssl.secure.random.implementation = null ssl.trustmanager.algorithm = PKIX ssl.truststore.location = null ssl.truststore.password = null ssl.truststore.type = JKS
在看打印结果:
看上面的结果发现,没找到新建的topic Joshua。 这是因为Kafka的topic操作是异步的, 下次注释掉create操作, 直接列出来发现就有了。 当然也有方式就是显示触发同步操作。
1 createTopicsResult.all().get();
生产者 & 消费者API Producer 1 2 3 4 5 6 7 8 9 10 11 12 13 14 15 16 17 18 19 20 21 22 23 24 25 26 27 28 29 30 31 32 33 34 35 36 37 38 39 40 41 42 43 44 45 package main.core1;import org.apache.kafka.clients.producer.KafkaProducer;import org.apache.kafka.clients.producer.ProducerConfig;import org.apache.kafka.clients.producer.ProducerRecord;import org.apache.kafka.common.serialization.StringSerializer;import java.util.Properties;public class Producer public static void main (String[] args) throws InterruptedException produce(); } private static void produce () throws InterruptedException Properties properties = new Properties(); properties.setProperty(ProducerConfig.BOOTSTRAP_SERVERS_CONFIG, "localhost:9092,localhost:9093,localhost:9094" ); properties.setProperty(ProducerConfig.KEY_SERIALIZER_CLASS_CONFIG, StringSerializer.class .getName ()) ; properties.setProperty(ProducerConfig.VALUE_SERIALIZER_CLASS_CONFIG, StringSerializer.class .getName ()) ; KafkaProducer<String, String> producer = new KafkaProducer<>(properties); for (int i = 1 ; i <= 1000 ; i++) { ProducerRecord<String, String> producerRecord = new ProducerRecord<>("ABC" , 0 , i + "" , i + "Par0 ONLY" ); producer.send(producerRecord); } producer.close(); } }
执行上述生产者代码结果(注意要在offset explorer客户端修改topic的key- value的序列化器):
Consumer 1 2 3 4 5 6 7 8 9 10 11 12 13 14 15 16 17 18 19 20 21 22 23 24 25 26 27 28 29 30 31 32 33 34 35 36 37 38 39 40 41 42 43 44 45 46 47 48 49 50 51 52 53 54 55 56 57 58 59 60 61 62 63 64 65 66 67 68 69 70 71 72 73 74 75 76 77 78 79 80 81 82 83 84 85 package main.core1;import org.apache.kafka.clients.consumer.ConsumerConfig;import org.apache.kafka.clients.consumer.ConsumerRecord;import org.apache.kafka.clients.consumer.ConsumerRecords;import org.apache.kafka.clients.consumer.KafkaConsumer;import org.apache.kafka.common.header.Headers;import org.apache.kafka.common.record.TimestampType;import org.apache.kafka.common.serialization.StringDeserializer;import java.time.Duration;import java.util.Iterator;import java.util.Optional;import java.util.Properties;import java.util.regex.Pattern;public class Consumer public static void main (String[] args) throws InterruptedException consume(); } private static void consume () Properties properties = new Properties(); properties.setProperty( ConsumerConfig.BOOTSTRAP_SERVERS_CONFIG, "localhost:9092,localhost:9093,localhost:9094" ); properties.setProperty(ConsumerConfig.KEY_DESERIALIZER_CLASS_CONFIG, StringDeserializer.class .getName ()) ; properties.setProperty(ConsumerConfig.VALUE_DESERIALIZER_CLASS_CONFIG, StringDeserializer.class .getName ()) ; properties.put(ConsumerConfig.GROUP_ID_CONFIG, "g1" ); properties.setProperty(ConsumerConfig.AUTO_OFFSET_RESET_CONFIG, "latest" ); KafkaConsumer<String, String> consumer = new KafkaConsumer<String, String>(properties); consumer.subscribe(Pattern.compile("ABC" )); while (true ) { ConsumerRecords<String, String> consumerRecords = consumer.poll(Duration.ofSeconds(1 )); if (!consumerRecords.isEmpty()) { Iterator<ConsumerRecord<String, String>> iterator = consumerRecords.iterator(); while (iterator.hasNext()) { ConsumerRecord<String, String> next = iterator.next(); String topic = next.topic(); int partition = next.partition(); String key = next.key(); String value = next.value(); long offset = next.offset(); long timestamp = next.timestamp(); TimestampType timestampType = next.timestampType(); Headers headers = next.headers(); Optional<Integer> leaderEpoch = next.leaderEpoch(); int serializedKeySize = next.serializedKeySize(); int serializedValueSize = next.serializedValueSize(); System.out.println( "topic:\t" + topic + "\t" + "key:\t" + key + "\t" + "value:\t" + value + "\t" + "offset:\t" + offset + "\t" + "partition:\t" + partition + "\t" + "timestamp:\t" + timestamp + "\t" + "timestampType:\t" + timestampType + "\t" ); } } } } }
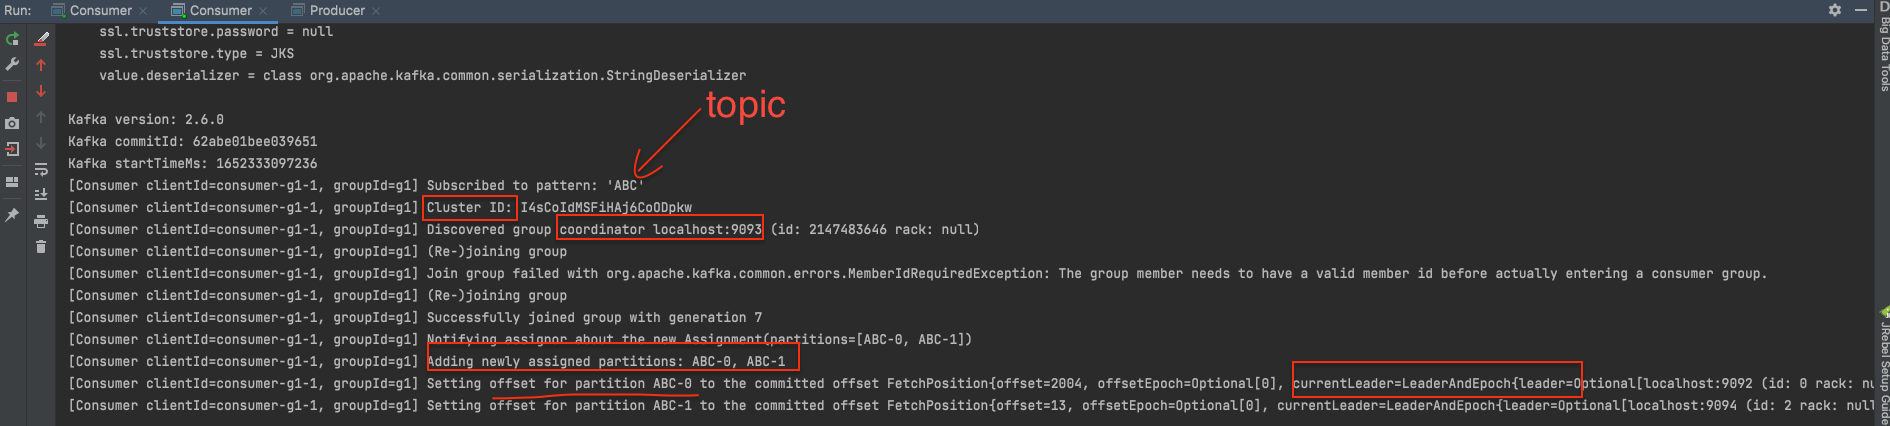
上面的代码实现功能: 订阅消费 topic名称为 “ABC”的消息, 并打印消息六要素(TP,KV,OT)。
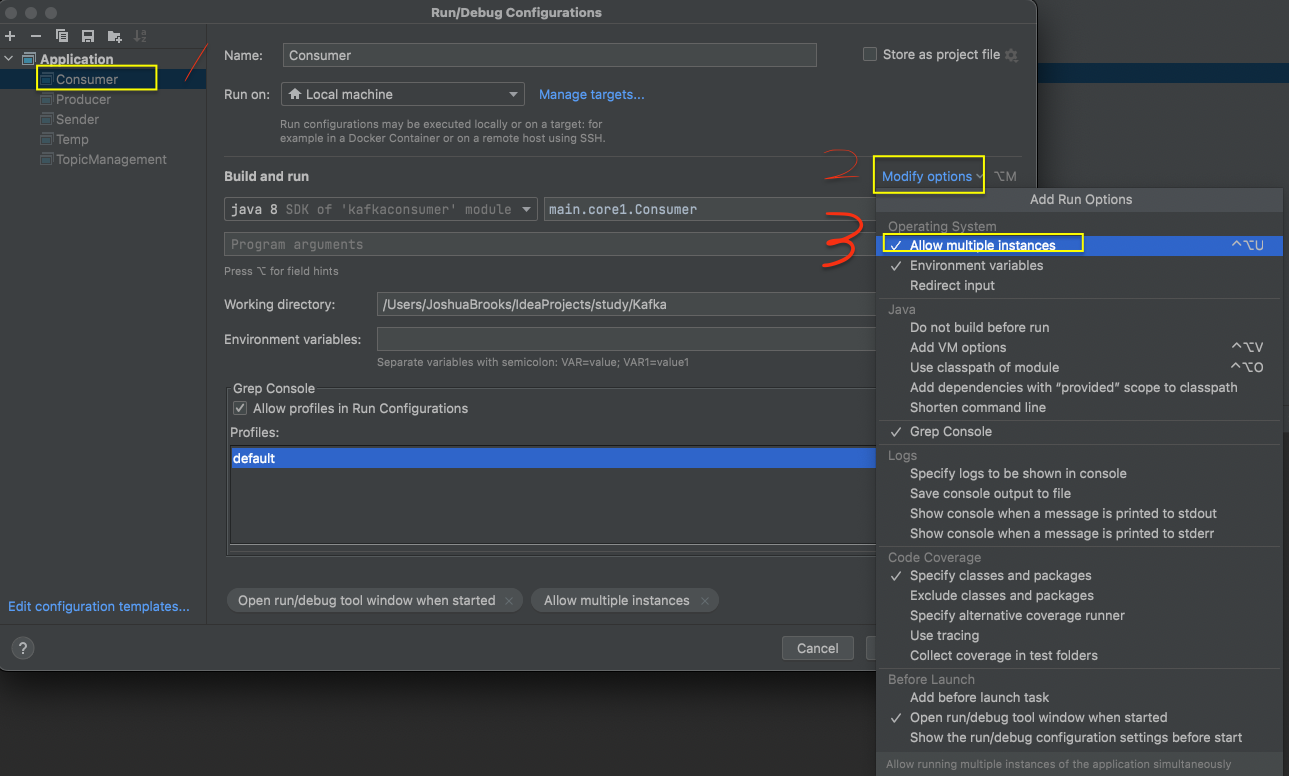
开启Consumer的并行模式,然后启动两次。
为了演示验证消费者消费的顺序特点, 将上述生产者代码中的消费者记录行改为下面这行再运行一遍:
1 ProducerRecord<String, String> producerRecord = new ProducerRecord<>("ABC" , i + "" , "V-" +i);
然后观察Consumer消费的结果:
可见 分区0: 1, 5,7, 8 分区1: 4, 6, 10 分区2: 2,3, 9.
所以验证了前面说的:只能保证分区内部的有序, 分区间无序。该特性也称之为局部FIFO 。
另外consumer的启动窗口会有一些日志信息显示:
1 2 3 4 5 6 7 8 9 10 11 [Consumer clientId=consumer-g1-1, groupId=g1] Subscribed to pattern: 'ABC' [Consumer clientId=consumer-g1-1, groupId=g1] Cluster ID: I4sCoIdMSFiHAj6CoODpkw [Consumer clientId=consumer-g1-1, groupId=g1] Discovered group coordinator localhost:9093 (id: 2147483646 rack: null) [Consumer clientId=consumer-g1-1, groupId=g1] (Re-)joining group [Consumer clientId=consumer-g1-1, groupId=g1] Join group failed with org.apache.kafka.common.errors.MemberIdRequiredException: The group member needs to have a valid member id before actually entering a consumer group. [Consumer clientId=consumer-g1-1, groupId=g1] (Re-)joining group [Consumer clientId=consumer-g1-1, groupId=g1] Successfully joined group with generation 7 [Consumer clientId=consumer-g1-1, groupId=g1] Notifying assignor about the new Assignment(partitions=[ABC-0, ABC-1]) [Consumer clientId=consumer-g1-1, groupId=g1] Adding newly assigned partitions: ABC-0, ABC-1 [Consumer clientId=consumer-g1-1, groupId=g1] Setting offset for partition ABC-0 to the committed offset FetchPosition{offset=2004, offsetEpoch=Optional[0], currentLeader=LeaderAndEpoch{leader=Optional[localhost:9092 (id: 0 rack: null)], epoch=0}} [Consumer clientId=consumer-g1-1, groupId=g1] Setting offset for partition ABC-1 to the committed offset FetchPosition{offset=13, offsetEpoch=Optional[0], currentLeader=LeaderAndEpoch{leader=Optional[localhost:9094 (id: 2 rack: null)], epoch=0}}
如果其中一个消费者宕机, 那么会引发分区间的重新分配:
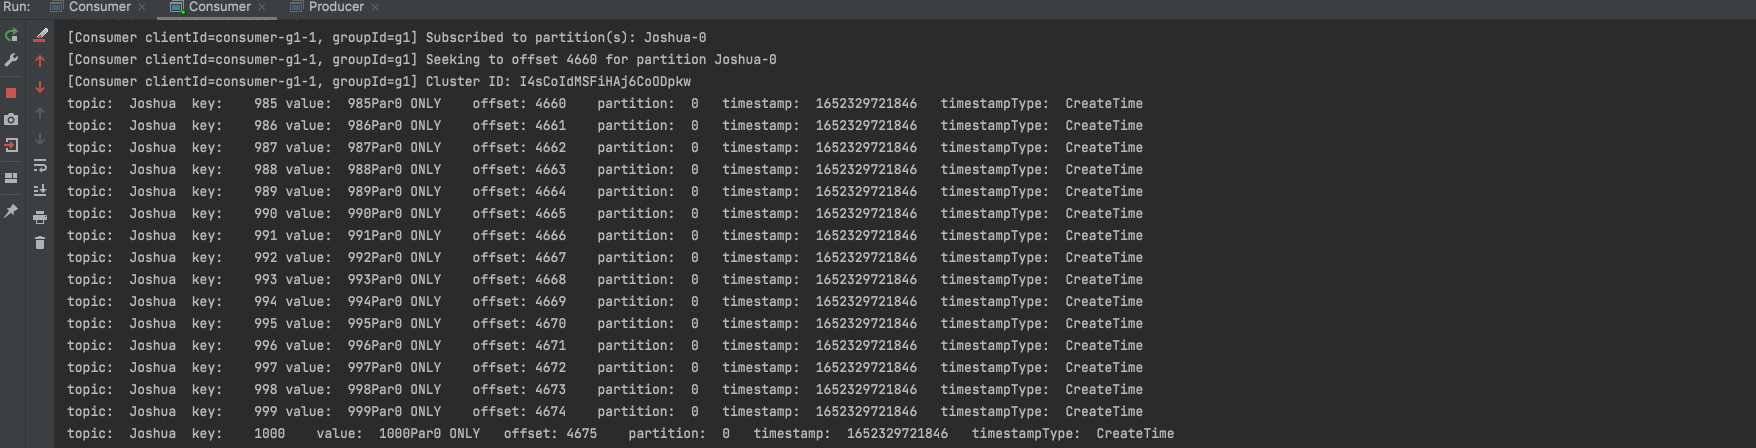
自定义分区 自定义消费者消费分区 1 2 3 4 5 6 7 8 9 10 11 12 13 14 15 16 17 18 19 20 21 22 23 24 25 26 27 28 29 30 31 32 33 34 35 36 37 38 39 40 41 42 43 44 45 46 47 48 49 50 51 52 53 54 55 56 57 58 59 60 61 62 63 64 65 66 67 68 69 70 71 72 73 74 75 76 77 78 79 80 81 82 83 84 85 86 87 88 89 90 91 92 93 94 95 package main.core1;import org.apache.kafka.clients.consumer.ConsumerConfig;import org.apache.kafka.clients.consumer.ConsumerRecord;import org.apache.kafka.clients.consumer.ConsumerRecords;import org.apache.kafka.clients.consumer.KafkaConsumer;import org.apache.kafka.common.TopicPartition;import org.apache.kafka.common.header.Headers;import org.apache.kafka.common.record.TimestampType;import org.apache.kafka.common.serialization.StringDeserializer;import java.time.Duration;import java.util.*;import java.util.regex.Pattern;public class Consumer public static void main (String[] args) throws InterruptedException consume(); } private static void consume () Properties properties = new Properties(); properties.setProperty( ConsumerConfig.BOOTSTRAP_SERVERS_CONFIG, "localhost:9092,localhost:9093,localhost:9094" ); properties.setProperty(ConsumerConfig.KEY_DESERIALIZER_CLASS_CONFIG, StringDeserializer.class .getName ()) ; properties.setProperty(ConsumerConfig.VALUE_DESERIALIZER_CLASS_CONFIG, StringDeserializer.class .getName ()) ; properties.put(ConsumerConfig.GROUP_ID_CONFIG, "g1" ); properties.setProperty(ConsumerConfig.AUTO_OFFSET_RESET_CONFIG, "latest" ); KafkaConsumer<String, String> consumer = new KafkaConsumer<String, String>(properties); List<TopicPartition> p0 = Arrays.asList(new TopicPartition("Joshua" ,0 )); consumer.assign(p0); consumer.seek(p0.get(0 ),(long )4660 ); while (true ) { ConsumerRecords<String, String> consumerRecords = consumer.poll(Duration.ofSeconds(1 )); if (!consumerRecords.isEmpty()) { Iterator<ConsumerRecord<String, String>> iterator = consumerRecords.iterator(); while (iterator.hasNext()) { ConsumerRecord<String, String> next = iterator.next(); String topic = next.topic(); int partition = next.partition(); String key = next.key(); String value = next.value(); long offset = next.offset(); long timestamp = next.timestamp(); TimestampType timestampType = next.timestampType(); Headers headers = next.headers(); Optional<Integer> leaderEpoch = next.leaderEpoch(); int serializedKeySize = next.serializedKeySize(); int serializedValueSize = next.serializedValueSize(); System.out.println( "topic:\t" + topic + "\t" + "key:\t" + key + "\t" + "value:\t" + value + "\t" + "offset:\t" + offset + "\t" + "partition:\t" + partition + "\t" + "timestamp:\t" + timestamp + "\t" + "timestampType:\t" + timestampType + "\t" ); } } } } }
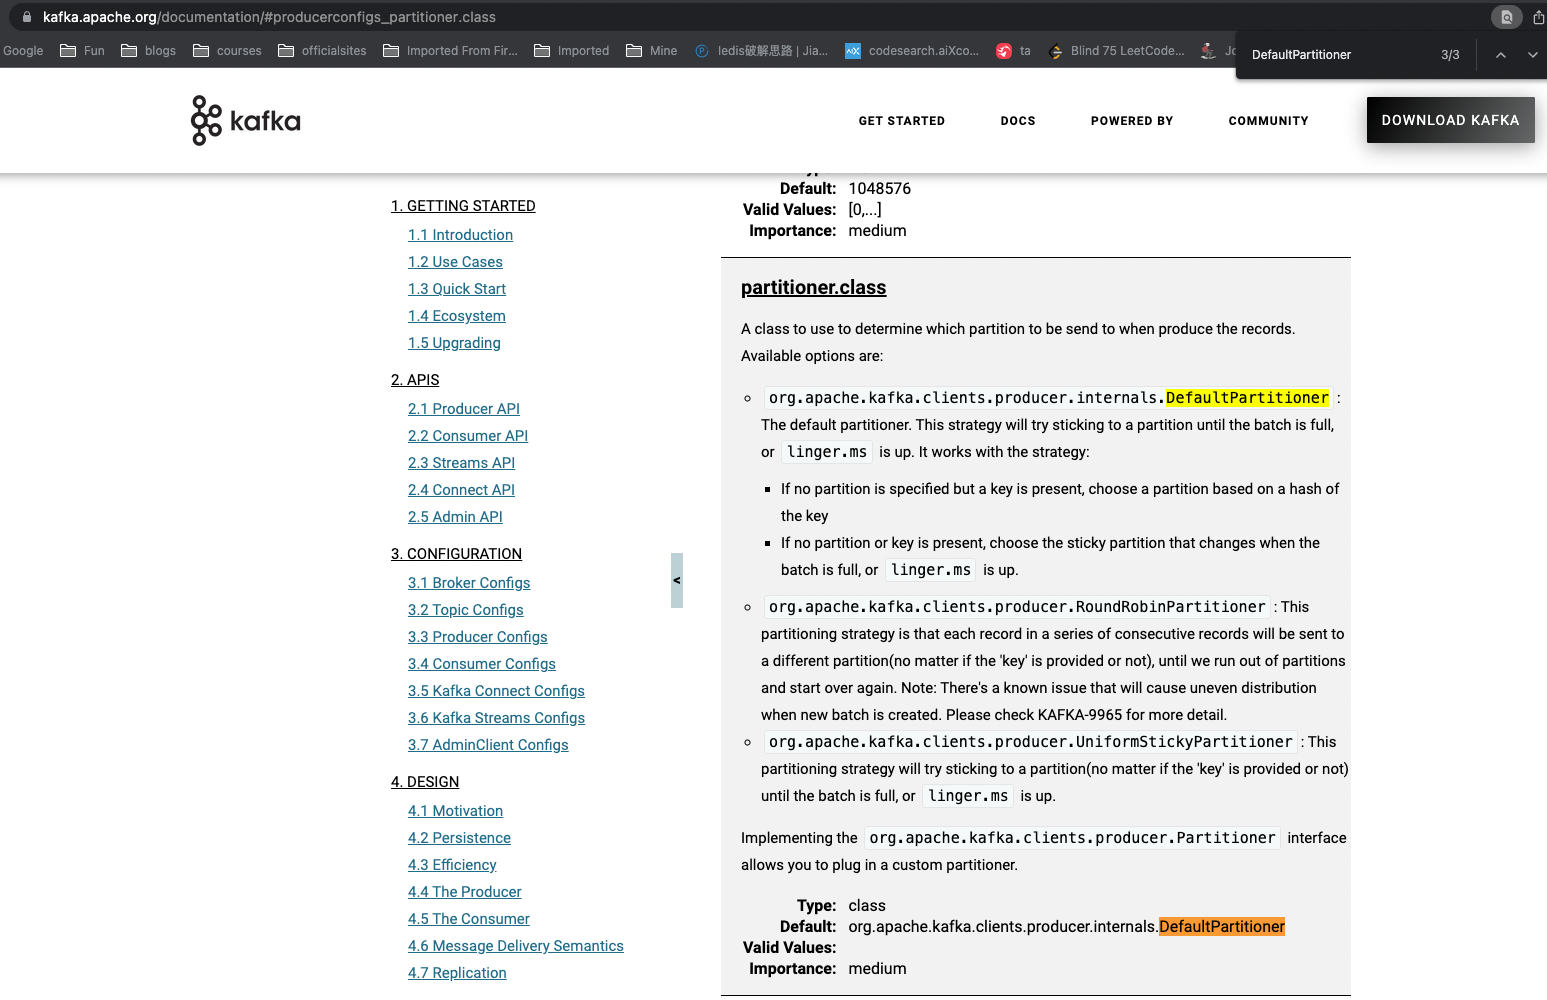
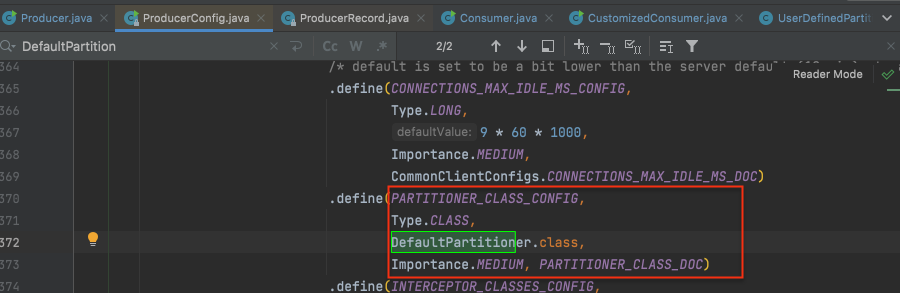
生产者默认分区策略查看 从官网文档 或者API源码都能看出 生产者生产的消息决定分给某个分区是采取的默认的分区策略org.apache.kafka.clients.producer.internals.DefaultPartitioner里指定的逻辑。
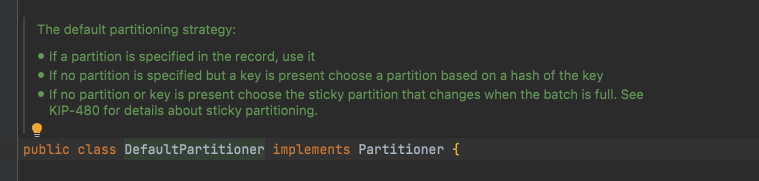
而从DefaultPartitioner类注释可以看出其逻辑是:
有指定Partition策略, 就用它
1不成立, 但是有key, 则按key的hash值决定
1,2都不成立就按“sticky partitioning”策略。(老版本此处是轮询 round robin策略)
生产者使用自定义分区策略 step1: 自定义分区策略 新建类UserDefinedPartitioner 实现接口: Partitioner
1 2 3 4 5 6 7 8 9 10 11 12 13 14 15 16 17 18 19 20 21 22 23 24 25 26 27 28 29 30 31 32 33 34 35 36 37 38 39 40 41 42 43 44 package main.partition2;import org.apache.commons.lang3.SerializationUtils;import org.apache.kafka.clients.producer.Partitioner;import org.apache.kafka.common.Cluster;import org.apache.kafka.common.PartitionInfo;import org.apache.kafka.common.utils.Utils;import java.util.List;import java.util.Map;import java.util.concurrent.atomic.AtomicInteger;public class UserDefinedPartitioner implements Partitioner private AtomicInteger counter=new AtomicInteger(0 ); @Override public int partition (String topic, Object key, byte [] keyBytes, Object value, byte [] valueBytes, Cluster cluster) List<PartitionInfo> partitionInfos = cluster.partitionsForTopic(topic); int partitionSize = partitionInfos.size(); if (keyBytes==null ){ int andIncrement = counter.getAndIncrement(); return Utils.toPositive(andIncrement) % partitionSize; }else { return (Integer.parseInt((String) key) % partitionSize) ; } } @Override public void close () System.out.println("self partition closing" ); } @Override public void configure (Map<String, ?> configs) System.out.println("configure" ); } }
step2: producer中指定配置: properties.setProperty(ProducerConfig.PARTITIONER_CLASS_CONFIG, UserDefinedPartitioner.class.getName());
1 2 3 4 5 6 7 8 9 10 11 12 13 14 15 16 17 18 19 20 21 22 23 24 25 26 27 28 29 30 31 32 33 34 35 36 37 38 39 40 41 42 43 44 45 46 47 48 49 50 51 52 package main.core1;import main.partition.UserDefinedPartitioner;import org.apache.kafka.clients.producer.KafkaProducer;import org.apache.kafka.clients.producer.ProducerConfig;import org.apache.kafka.clients.producer.ProducerRecord;import org.apache.kafka.common.serialization.StringSerializer;import java.util.Properties;public class Producer public static void main (String[] args) throws InterruptedException produce(); } private static void produce () throws InterruptedException Properties properties = new Properties(); properties.setProperty(ProducerConfig.BOOTSTRAP_SERVERS_CONFIG, "localhost:9092,localhost:9093,localhost:9094" ); properties.setProperty(ProducerConfig.KEY_SERIALIZER_CLASS_CONFIG, StringSerializer.class .getName ()) ; properties.setProperty(ProducerConfig.VALUE_SERIALIZER_CLASS_CONFIG, StringSerializer.class .getName ()) ; properties.setProperty(ProducerConfig.PARTITIONER_CLASS_CONFIG, UserDefinedPartitioner.class .getName ()) ; KafkaProducer<String, String> producer = new KafkaProducer<>(properties); for (int i = 31 ; i <= 40 ; i++) { ProducerRecord<String, String> producerRecord = new ProducerRecord<>("ABC" , i + "" , "VV-" +i); producer.send(producerRecord); } producer.close(); } }
执行上述代码将消息写到“ABC” topic。
自定义(反)序列化器 step1: 新建序列化器 1 2 3 4 5 6 7 8 9 10 11 12 13 14 15 16 17 18 19 20 21 22 23 24 25 26 27 28 29 package main.serialize3;import org.apache.commons.lang3.SerializationUtils;import org.apache.kafka.common.serialization.Serializer;import java.io.Serializable;import java.util.Map;public class UserDefinedSerializer implements Serializer <Object > @Override public void configure (Map<String, ?> configs, boolean isKey) System.out.println("configured" ); } @Override public void close () System.out.println("closed" ); } @Override public byte [] serialize(String topic, Object data) { return SerializationUtils.serialize((Serializable) data); } }
step2: 新建反序列化器 1 2 3 4 5 6 7 8 9 10 11 12 13 14 15 16 17 18 19 20 21 22 23 24 25 26 27 28 29 package main.serialize3;import org.apache.commons.lang3.SerializationUtils;import org.apache.kafka.common.serialization.Deserializer;import java.util.Map;public class UserDefinedDeSerializer implements Deserializer <Object > @Override public void configure (Map<String, ?> configs, boolean isKey) System.out.println("configuring De" ); } @Override public void close () System.out.println("closing De" ); } @Override public Object deserialize (String topic, byte [] data) return SerializationUtils.deserialize(data); } }
step3: 新建测试实体类 1 2 3 4 5 6 7 8 9 10 11 12 13 14 15 16 17 18 19 20 21 22 23 24 25 26 27 28 29 30 31 32 33 34 35 36 37 38 39 40 41 42 43 44 45 46 47 48 49 50 51 52 53 54 55 56 57 package main.serialize3;import java.io.Serializable;import java.util.Date;public class User implements Serializable private Integer id; private String name; private Date bod; @Override public String toString () return "User{" + "id=" + id + ", name='" + name + '\'' + ", bod=" + bod + '}' ; } public User () super (); } public User (Integer id, String name, Date bod) this .id = id; this .name = name; this .bod = bod; } public Integer getId () return id; } public void setId (Integer id) this .id = id; } public String getName () return name; } public void setName (String name) this .name = name; } public Date getBod () return bod; } public void setBod (Date bod) this .bod = bod; } }
step4: 新建测试类 先生产者消息发送Sender:
1 2 3 4 5 6 7 8 9 10 11 12 13 14 15 16 17 18 19 20 21 22 23 24 25 26 27 28 29 30 31 32 33 34 35 package main.serialize3;import main.partition2.UserDefinedPartitioner;import org.apache.kafka.clients.producer.KafkaProducer;import org.apache.kafka.clients.producer.ProducerConfig;import org.apache.kafka.clients.producer.ProducerRecord;import org.apache.kafka.common.serialization.StringSerializer;import java.util.Date;import java.util.Properties;public class Sender public static void main (String[] args) Properties properties = new Properties(); properties.setProperty(ProducerConfig.BOOTSTRAP_SERVERS_CONFIG,"localhost:9092,localhost:9093,localhost:9094" ); properties.setProperty(ProducerConfig.VALUE_SERIALIZER_CLASS_CONFIG,UserDefinedSerializer.class .getName ()) ; properties.setProperty(ProducerConfig.KEY_SERIALIZER_CLASS_CONFIG, StringSerializer.class .getName ()) ; properties.setProperty(ProducerConfig.PARTITIONER_CLASS_CONFIG, UserDefinedPartitioner.class .getName ()) ; KafkaProducer<String, User> sender = new KafkaProducer<String, User>(properties); for (int i = 1 ; i <= 10 ; i++) { User user = new User(i, "大黄" + i, new Date()); System.out.println(user); ProducerRecord<String, User> msg = new ProducerRecord<String, User>("AAA" ,String.valueOf(i),user); System.out.println("User" +i+"\t was just sent...." ); sender.send(msg); } sender.close(); } }
查看是否写进去:
再新建消费者并启动
1 2 3 4 5 6 7 8 9 10 11 12 13 14 15 16 17 18 19 20 21 22 23 24 25 26 27 28 29 30 31 32 33 34 35 36 37 38 39 40 41 42 43 44 45 46 47 48 49 50 51 52 53 54 55 56 57 58 59 package main.serialize3;import org.apache.kafka.clients.consumer.ConsumerConfig;import org.apache.kafka.clients.consumer.ConsumerRecord;import org.apache.kafka.clients.consumer.ConsumerRecords;import org.apache.kafka.clients.consumer.KafkaConsumer;import org.apache.kafka.common.header.Headers;import org.apache.kafka.common.record.TimestampType;import org.apache.kafka.common.serialization.StringDeserializer;import java.time.Duration;import java.util.Arrays;import java.util.Iterator;import java.util.Optional;import java.util.Properties;public class Receiver public static void main (String[] args) Properties properties = new Properties(); properties.setProperty(ConsumerConfig.BOOTSTRAP_SERVERS_CONFIG,"localhost:9092,localhost:9093,localhost:9094" ); properties.setProperty(ConsumerConfig.VALUE_DESERIALIZER_CLASS_CONFIG,UserDefinedDeSerializer.class .getName ()) ; properties.setProperty(ConsumerConfig.KEY_DESERIALIZER_CLASS_CONFIG, StringDeserializer.class .getName ()) ; properties.put(ConsumerConfig.AUTO_OFFSET_RESET_CONFIG,"earliest" ); properties.put(ConsumerConfig.GROUP_ID_CONFIG,"g1" ); KafkaConsumer<String, User> receiver = new KafkaConsumer<>(properties); receiver.subscribe(Arrays.asList("AAA" )); while (true ){ ConsumerRecords<String, User> records = receiver.poll(Duration.ofSeconds(1 )); if (!records.isEmpty()){ Iterator<ConsumerRecord<String, User>> iterator = records.iterator(); while (iterator.hasNext()){ ConsumerRecord<String, User> next = iterator.next(); String topic = next.topic(); int partition = next.partition(); String key = next.key(); User value = next.value(); long offset = next.offset(); long timestamp = next.timestamp(); TimestampType timestampType = next.timestampType(); Headers headers = next.headers(); Optional<Integer> leaderEpoch = next.leaderEpoch(); int serializedKeySize = next.serializedKeySize(); int serializedValueSize = next.serializedValueSize(); System.out.println( "topic:\t" +topic+ "\t" + "key:\t" +key+"\t" + "value:\t" +value+"\t" + "offset:\t" +offset+"\t" + "partition:\t" +partition+"\t" + "timestamp:\t" +timestamp+"\t" ); } } } } }
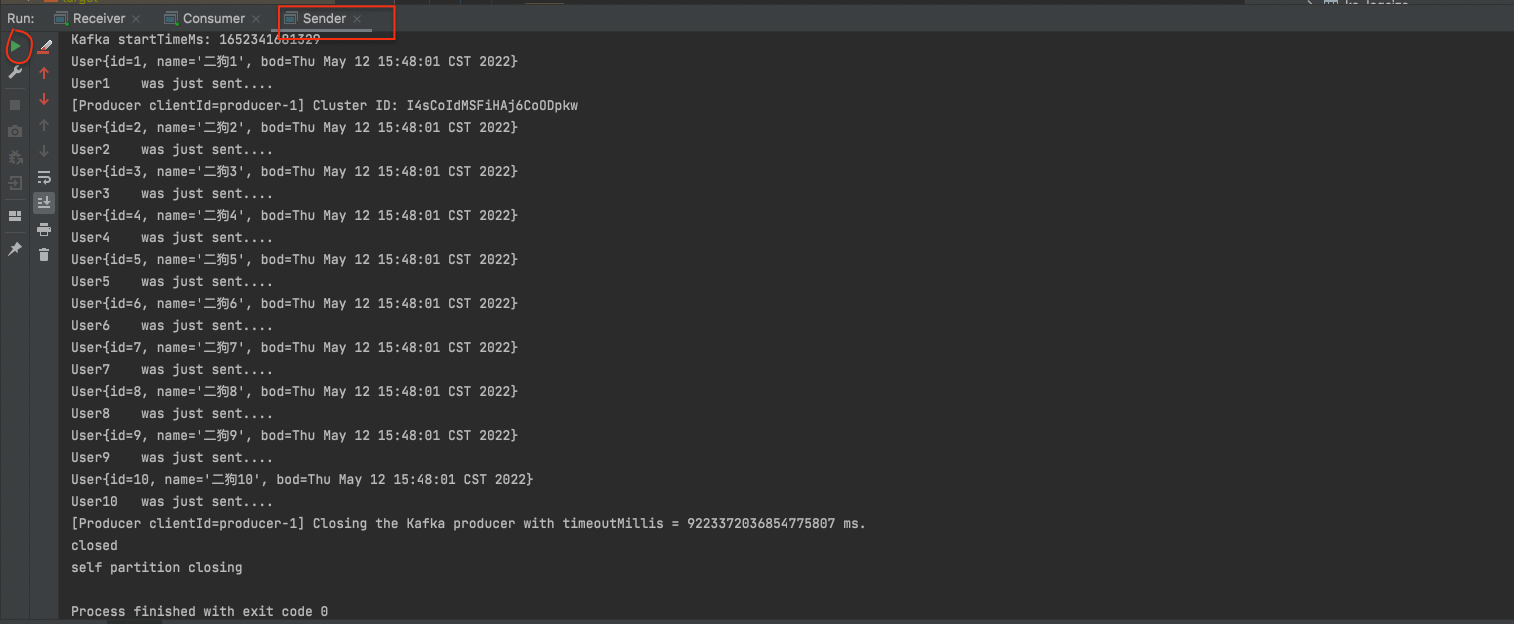
然后将sender里name前缀从“大黄”改成“二狗”,重新启动producer。
看测试结果:
自定义interceptor拦截器 新建拦截器类
1 2 3 4 5 6 7 8 9 10 11 12 13 14 15 16 17 18 19 20 21 22 23 24 25 26 27 28 29 30 31 32 33 34 package main.interceptor4;import org.apache.kafka.clients.producer.ProducerInterceptor;import org.apache.kafka.clients.producer.ProducerRecord;import org.apache.kafka.clients.producer.RecordMetadata;import java.util.Map;import java.util.Random;public class UserDeinedInterceptor implements ProducerInterceptor @Override public ProducerRecord onSend (ProducerRecord record) return new ProducerRecord(record.topic(), record.key(), record.value() + "追加_" + new Random().nextInt(10 )); } @Override public void onAcknowledgement (RecordMetadata metadata, Exception exception) System.out.println("metadata:\t" + "{topic:" + metadata.topic() + ",partition:" + metadata.partition() + ",offset:" + metadata.offset() + ",时间戳:" + metadata.timestamp() + ",异常:" + exception + "}" ); } @Override public void close () System.out.println("closing..." ); } @Override public void configure (Map<String, ?> configs) } }
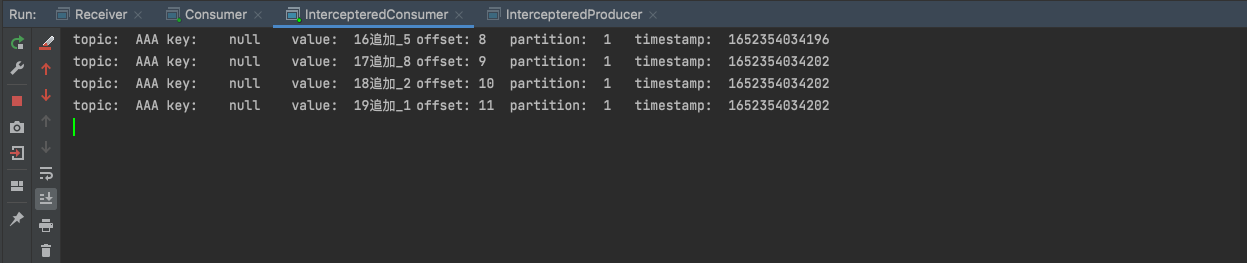
先 启动一个Consumer订阅“AAA” topic的消息。
1 2 3 4 5 6 7 8 9 10 11 12 13 14 15 16 17 18 19 20 21 22 23 24 25 26 27 28 29 30 31 32 33 34 35 36 37 38 39 40 41 42 43 44 45 46 47 48 49 50 51 52 53 54 55 56 57 58 59 60 61 62 63 64 65 66 67 68 69 70 71 package main.interceptor4;import main.serialize3.UserDefinedDeSerializer;import org.apache.kafka.clients.consumer.ConsumerConfig;import org.apache.kafka.clients.consumer.ConsumerRecord;import org.apache.kafka.clients.consumer.ConsumerRecords;import org.apache.kafka.clients.consumer.KafkaConsumer;import org.apache.kafka.common.header.Headers;import org.apache.kafka.common.record.TimestampType;import org.apache.kafka.common.serialization.StringDeserializer;import java.time.Duration;import java.util.Iterator;import java.util.Optional;import java.util.Properties;import java.util.regex.Pattern;public class IntercepteredConsumer public static void main (String[] args) throws InterruptedException consume(); } private static void consume () Properties properties = new Properties(); properties.setProperty(ConsumerConfig.BOOTSTRAP_SERVERS_CONFIG, "localhost:9092,localhost:9093,localhost:9094" ); properties.setProperty(ConsumerConfig.KEY_DESERIALIZER_CLASS_CONFIG, StringDeserializer.class .getName ()) ; properties.setProperty(ConsumerConfig.VALUE_DESERIALIZER_CLASS_CONFIG, StringDeserializer.class .getName ()) ; properties.put(ConsumerConfig.GROUP_ID_CONFIG,"g1" ); KafkaConsumer<String, String> consumer = new KafkaConsumer<String, String>(properties); consumer.subscribe(Pattern.compile("AAA" )); while (true ){ ConsumerRecords<String, String> consumerRecords = consumer.poll(Duration.ofSeconds(1 )); if (!consumerRecords.isEmpty()){ Iterator<ConsumerRecord<String, String>> iterator = consumerRecords.iterator(); while (iterator.hasNext()){ ConsumerRecord<String, String> next = iterator.next(); String topic = next.topic(); int partition = next.partition(); String key = next.key(); String value = next.value(); long offset = next.offset(); long timestamp = next.timestamp(); TimestampType timestampType = next.timestampType(); Headers headers = next.headers(); Optional<Integer> leaderEpoch = next.leaderEpoch(); int serializedKeySize = next.serializedKeySize(); int serializedValueSize = next.serializedValueSize(); System.out.println( "topic:\t" +topic+ "\t" + "key:\t" +key+"\t" + "value:\t" +value+"\t" + "offset:\t" +offset+"\t" + "partition:\t" +partition+"\t" + "timestamp:\t" +timestamp+"\t" ); } } } } }
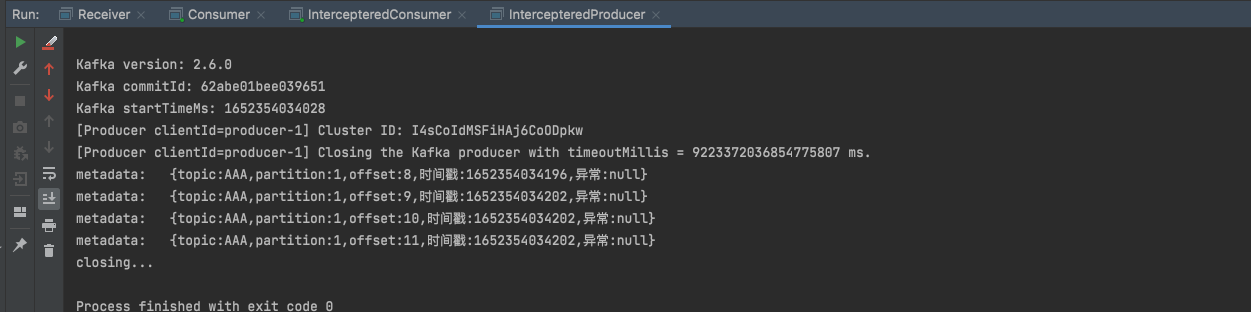
然后新建生产者往“AAA” topic发布消息, 在生产者的配置中指定自定义的interceptor类。
1 2 3 4 5 6 7 8 9 10 11 12 13 14 15 16 17 18 19 20 21 22 23 24 25 26 27 28 29 30 31 32 33 34 35 36 37 38 39 40 41 42 43 package main.interceptor4;import org.apache.kafka.clients.consumer.ConsumerConfig;import org.apache.kafka.clients.producer.KafkaProducer;import org.apache.kafka.clients.producer.ProducerConfig;import org.apache.kafka.clients.producer.ProducerRecord;import org.apache.kafka.common.serialization.StringSerializer;import java.util.Properties;public class IntercepteredProducer public static void main (String[] args) throws InterruptedException produce(); } private static void produce () throws InterruptedException Properties properties = new Properties(); properties.setProperty(ProducerConfig.BOOTSTRAP_SERVERS_CONFIG, "localhost:9092,localhost:9093,localhost:9094" ); properties.setProperty(ProducerConfig.KEY_SERIALIZER_CLASS_CONFIG, StringSerializer.class .getName ()) ; properties.setProperty(ProducerConfig.VALUE_SERIALIZER_CLASS_CONFIG, StringSerializer.class .getName ()) ; properties.setProperty(ConsumerConfig.INTERCEPTOR_CLASSES_CONFIG, UserDeinedInterceptor.class .getName ()) ; KafkaProducer<String, String> producer = new KafkaProducer<>(properties); for (int i = 6 ; i < 10 ; i++) { ProducerRecord<String, String> producerRecord = new ProducerRecord<>("AAA" , String.valueOf(i)); producer.send(producerRecord); } producer.close(); } }
启动生产者后查看生产者和消费者terminal的输出:
Offset控制 ConsumerConfig.AUTO_OFFSET_RESET_CONFIG配置 在消费者consumerA首次订阅某主题消息topicB的时候, topicB是没有维护consumerA的offset信息的. 那么首次订阅该从什么offset位置开始消费呢? 该offset是有三种策略可选的:
latest: [默认]配置, 表示consumerA会从topicB的最新offset位置开始消费, 即从consumerA订阅topicB开始后, 新进入topicB的消息才会被consumerA消费.
earlist: 表示consumerA会从topicB的最开始的offset位置开始消费, 即包括consumerA订阅topicB之前的所有消息都会被消费
none: 如果没找到当前消费者组之前提交的offset值, 会向调用者(消费者)抛异常.
**值得注意的是: **offset**配置只会在消费者首次订阅消息的时候生效, 因为一旦开始订阅并消费消息后, 主题topicB 就会维护当前消费者consumerA 的消费的offsset信息, 下次再消费时会从维护的日志中获取consumerA的消费offset位置比如: O1,然后再继续从O1开始消费. **
该配置在JAVA API中由 `ConsumerConfig.AUTO_OFFSET_RESET_CONFIG` 配置项配置.
ConsumerConfig.AUTO_OFFSET_RESET_CONFIG 测试 为了检测上面的结论, 我们按照如下步骤进行测试:
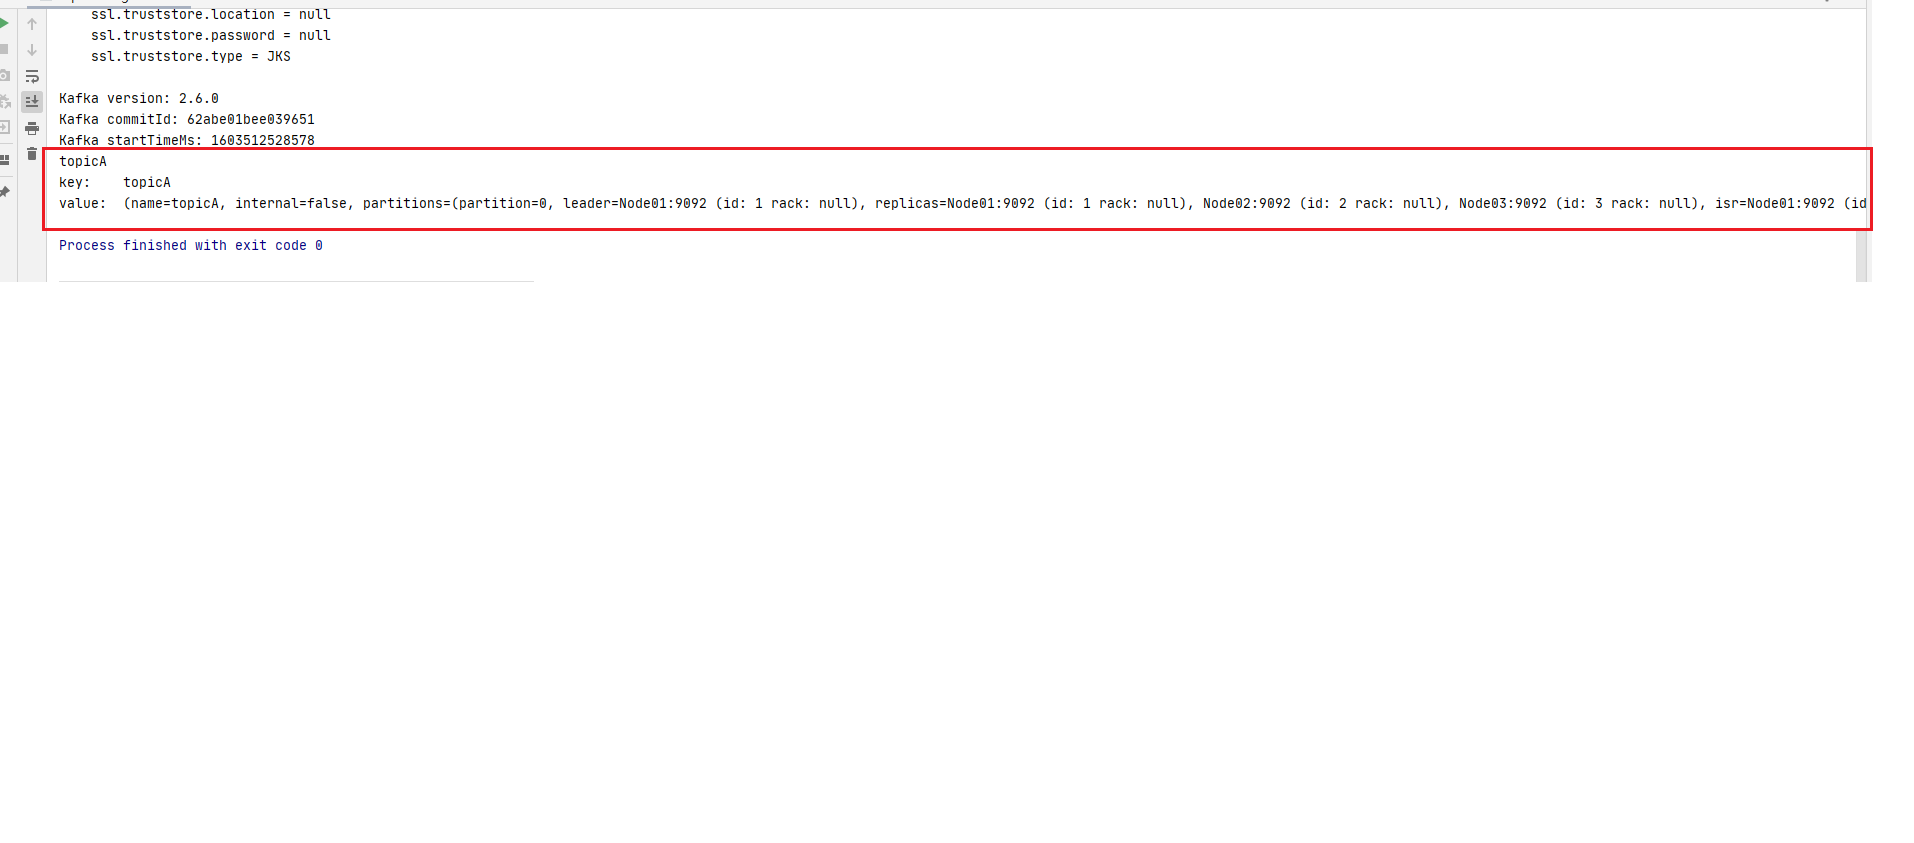
step1: 首先新建一个主题topicA 1 2 3 4 5 6 7 8 9 10 11 12 13 14 15 16 17 18 19 20 21 22 23 24 25 26 27 28 29 30 31 32 33 34 35 36 37 38 39 40 41 42 43 44 45 46 47 48 49 50 51 52 53 54 55 56 57 package main.core;import org.apache.kafka.clients.admin.*;import java.util.Arrays;import java.util.Map;import java.util.Properties;import java.util.Set;import java.util.concurrent.ExecutionException;public class topicManagement private static AdminClient adminClient; public static void main (String[] args) throws ExecutionException, InterruptedException Properties properties = prepareEnvironment(); adminClient = KafkaAdminClient.create(properties); createTopicByMe(adminClient,"topicA" ); listAllMyTopics(adminClient); adminClient.close(); } private static void createTopicByMe (AdminClient adminClient,String topic2BCreated) throws ExecutionException, InterruptedException CreateTopicsResult createTopicsResult = adminClient.createTopics(Arrays.asList(new NewTopic(topic2BCreated, 3 , (short ) 3 ))); createTopicsResult.all().get(); } private static void listAllMyTopics (AdminClient adminClient) throws ExecutionException, InterruptedException ListTopicsResult listTopicsResult = adminClient.listTopics(); Set<String> topicNames = listTopicsResult.names().get(); StringBuilder stringBuilder = new StringBuilder(); for (String topic : topicNames) { stringBuilder.append(topic+"," ); } String s = stringBuilder.toString(); String substring = s.substring(0 , s.length()); String[] split = substring.split("," ); DescribeTopicsResult describeTopics = adminClient.describeTopics(Arrays.asList(split)); Map<String, TopicDescription> descMap = describeTopics.all().get(); for (Map.Entry<String, TopicDescription> entry : descMap.entrySet()) { System.out.println("key:\t" + entry.getKey()); System.out.println("value:\t" + entry.getValue()); } } private static Properties prepareEnvironment () Properties properties = new Properties(); properties.setProperty(AdminClientConfig.BOOTSTRAP_SERVERS_CONFIG, "Node01:9092,Node02:9092,Node03:9092" ); return properties; } }
从控制台输出可以看到topicA创建成功:
step2: 然后启动一个producer往往topicA里写入5条数据; 1 2 3 4 5 6 7 8 9 10 11 12 13 14 15 16 17 18 19 20 21 22 23 24 25 26 27 28 29 30 31 package main.core;import org.apache.kafka.clients.producer.KafkaProducer;import org.apache.kafka.clients.producer.ProducerConfig;import org.apache.kafka.clients.producer.ProducerRecord;import org.apache.kafka.common.serialization.StringSerializer;import java.util.Properties;public class Producer public static void main (String[] args) throws InterruptedException produce(); } private static void produce () throws InterruptedException Properties properties = new Properties(); properties.setProperty(ProducerConfig.BOOTSTRAP_SERVERS_CONFIG, "Node01:9092,Node02:9092,Node03:9092" ); properties.setProperty(ProducerConfig.KEY_SERIALIZER_CLASS_CONFIG, StringSerializer.class .getName ()) ; properties.setProperty(ProducerConfig.VALUE_SERIALIZER_CLASS_CONFIG, StringSerializer.class .getName ()) ; KafkaProducer<String, String> producer = new KafkaProducer<>(properties); for (int i = 1 ; i <= 5 ; i++) { ProducerRecord<String, String> producerRecord = new ProducerRecord<>("topicA" , String.valueOf(i)); producer.send(producerRecord); } producer.close(); } }
step3: 启动两个consumer 然后分别启动consumer1(offset配置为latest)和consumer2(offset配置为earliest)订阅topicA. 注意此时是两个消费者首次消费topicA
1 2 3 4 5 6 7 8 9 10 11 12 13 14 15 16 17 18 19 20 21 22 23 24 25 26 27 28 29 30 31 32 33 34 35 36 37 38 39 40 41 42 43 44 45 46 47 48 49 50 51 52 53 54 55 56 57 58 59 60 61 62 63 64 package advanced.offset;import org.apache.kafka.clients.consumer.ConsumerConfig;import org.apache.kafka.clients.consumer.ConsumerRecord;import org.apache.kafka.clients.consumer.ConsumerRecords;import org.apache.kafka.clients.consumer.KafkaConsumer;import org.apache.kafka.common.header.Headers;import org.apache.kafka.common.record.TimestampType;import org.apache.kafka.common.serialization.StringDeserializer;import java.time.Duration;import java.util.Iterator;import java.util.Optional;import java.util.Properties;import java.util.regex.Pattern;public class ControlleredOffset1 public static void main (String[] args) throws InterruptedException consume(); } private static void consume () Properties properties = new Properties(); properties.setProperty( ConsumerConfig.BOOTSTRAP_SERVERS_CONFIG, "Node01:9092,Node02:9092,Node03:9092" ); properties.setProperty(ConsumerConfig.KEY_DESERIALIZER_CLASS_CONFIG, StringDeserializer.class .getName ()) ; properties.setProperty(ConsumerConfig.VALUE_DESERIALIZER_CLASS_CONFIG, StringDeserializer.class .getName ()) ; properties.put(ConsumerConfig.GROUP_ID_CONFIG,"g1" ); properties.setProperty(ConsumerConfig.AUTO_OFFSET_RESET_CONFIG,"latest" ); KafkaConsumer<String, String> consumer = new KafkaConsumer<String, String>(properties); consumer.subscribe(Pattern.compile("topicA" )); while (true ){ ConsumerRecords<String, String> consumerRecords = consumer.poll(Duration.ofSeconds(1 )); if (!consumerRecords.isEmpty()){ Iterator<ConsumerRecord<String, String>> iterator = consumerRecords.iterator(); while (iterator.hasNext()){ ConsumerRecord<String, String> next = iterator.next(); String topic = next.topic(); int partition = next.partition(); String key = next.key(); String value = next.value(); long offset = next.offset(); long timestamp = next.timestamp(); TimestampType timestampType = next.timestampType(); Headers headers = next.headers(); Optional<Integer> leaderEpoch = next.leaderEpoch(); int serializedKeySize = next.serializedKeySize(); int serializedValueSize = next.serializedValueSize(); System.out.println( "topic:\t" +topic+ "\t" + "key:\t" +key+"\t" + "value:\t" +value+"\t" + "offset:\t" +offset+"\t" + "partition:\t" +partition+"\t" + "timestamp:\t" +timestamp+"\t" ); } } } } }
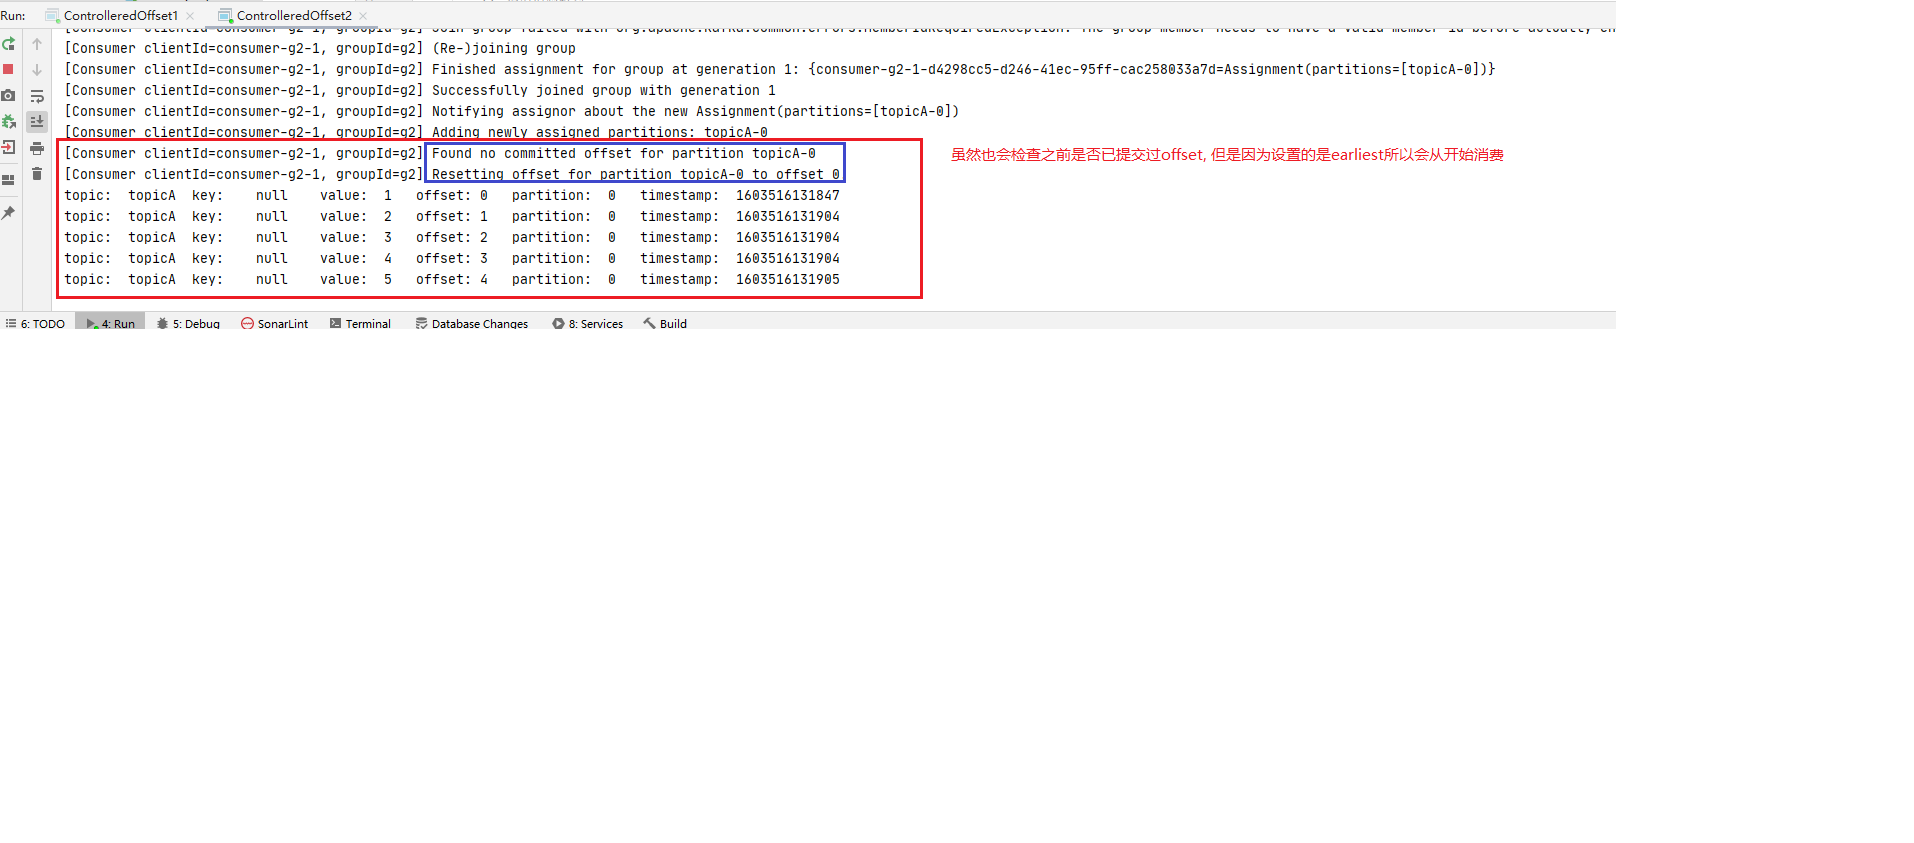
conmuser2 (offset设置earliest):
1 2 3 4 5 6 7 8 9 10 11 12 13 14 15 16 17 18 19 20 21 22 23 24 25 26 27 28 29 30 31 32 33 34 35 36 37 38 39 40 41 42 43 44 45 46 47 48 49 50 51 52 53 54 55 56 57 58 59 60 61 62 63 64 package advanced.offset;import org.apache.kafka.clients.consumer.ConsumerConfig;import org.apache.kafka.clients.consumer.ConsumerRecord;import org.apache.kafka.clients.consumer.ConsumerRecords;import org.apache.kafka.clients.consumer.KafkaConsumer;import org.apache.kafka.common.header.Headers;import org.apache.kafka.common.record.TimestampType;import org.apache.kafka.common.serialization.StringDeserializer;import java.time.Duration;import java.util.Iterator;import java.util.Optional;import java.util.Properties;import java.util.regex.Pattern;public class ControlleredOffset2 public static void main (String[] args) throws InterruptedException consume(); } private static void consume () Properties properties = new Properties(); properties.setProperty( ConsumerConfig.BOOTSTRAP_SERVERS_CONFIG, "Node01:9092,Node02:9092,Node03:9092" ); properties.setProperty(ConsumerConfig.KEY_DESERIALIZER_CLASS_CONFIG, StringDeserializer.class .getName ()) ; properties.setProperty(ConsumerConfig.VALUE_DESERIALIZER_CLASS_CONFIG, StringDeserializer.class .getName ()) ; properties.put(ConsumerConfig.GROUP_ID_CONFIG,"g2" ); properties.setProperty(ConsumerConfig.AUTO_OFFSET_RESET_CONFIG,"earliest" ); KafkaConsumer<String, String> consumer = new KafkaConsumer<String, String>(properties); consumer.subscribe(Pattern.compile("topicA" )); while (true ){ ConsumerRecords<String, String> consumerRecords = consumer.poll(Duration.ofSeconds(1 )); if (!consumerRecords.isEmpty()){ Iterator<ConsumerRecord<String, String>> iterator = consumerRecords.iterator(); while (iterator.hasNext()){ ConsumerRecord<String, String> next = iterator.next(); String topic = next.topic(); int partition = next.partition(); String key = next.key(); String value = next.value(); long offset = next.offset(); long timestamp = next.timestamp(); TimestampType timestampType = next.timestampType(); Headers headers = next.headers(); Optional<Integer> leaderEpoch = next.leaderEpoch(); int serializedKeySize = next.serializedKeySize(); int serializedValueSize = next.serializedValueSize(); System.out.println( "topic:\t" +topic+ "\t" + "key:\t" +key+"\t" + "value:\t" +value+"\t" + "offset:\t" +offset+"\t" + "partition:\t" +partition+"\t" + "timestamp:\t" +timestamp+"\t" ); } } } } }
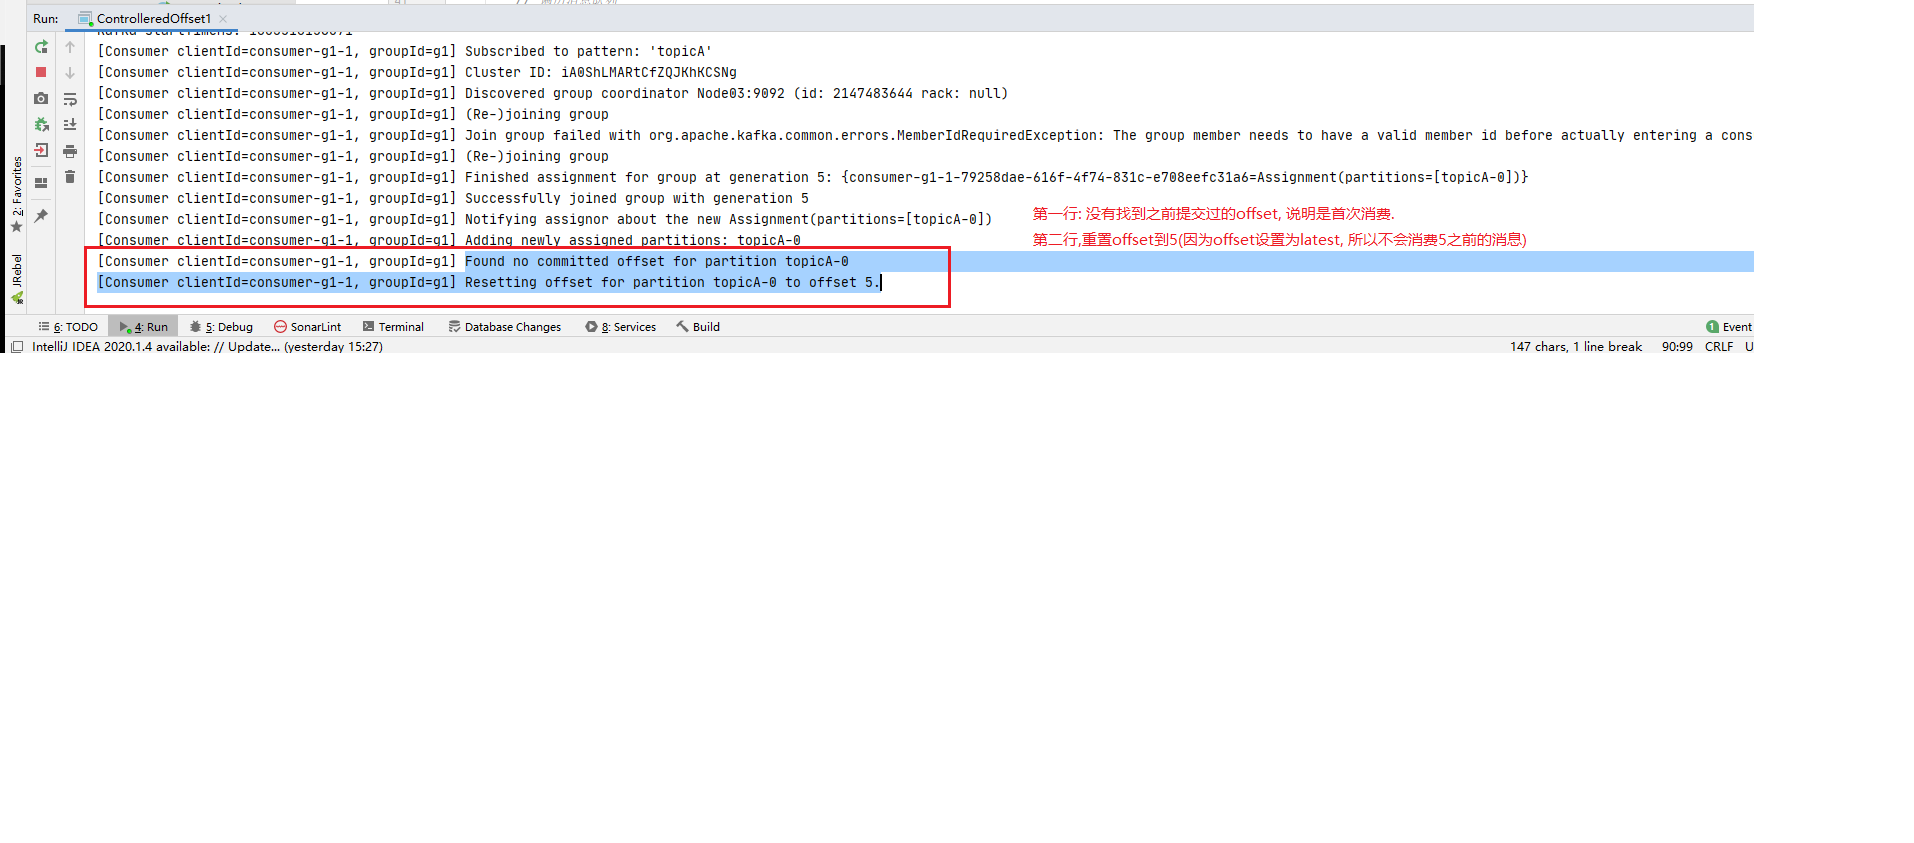
step4: 观察首次消费日志 检查consumer1和consumer2的控制台输出.
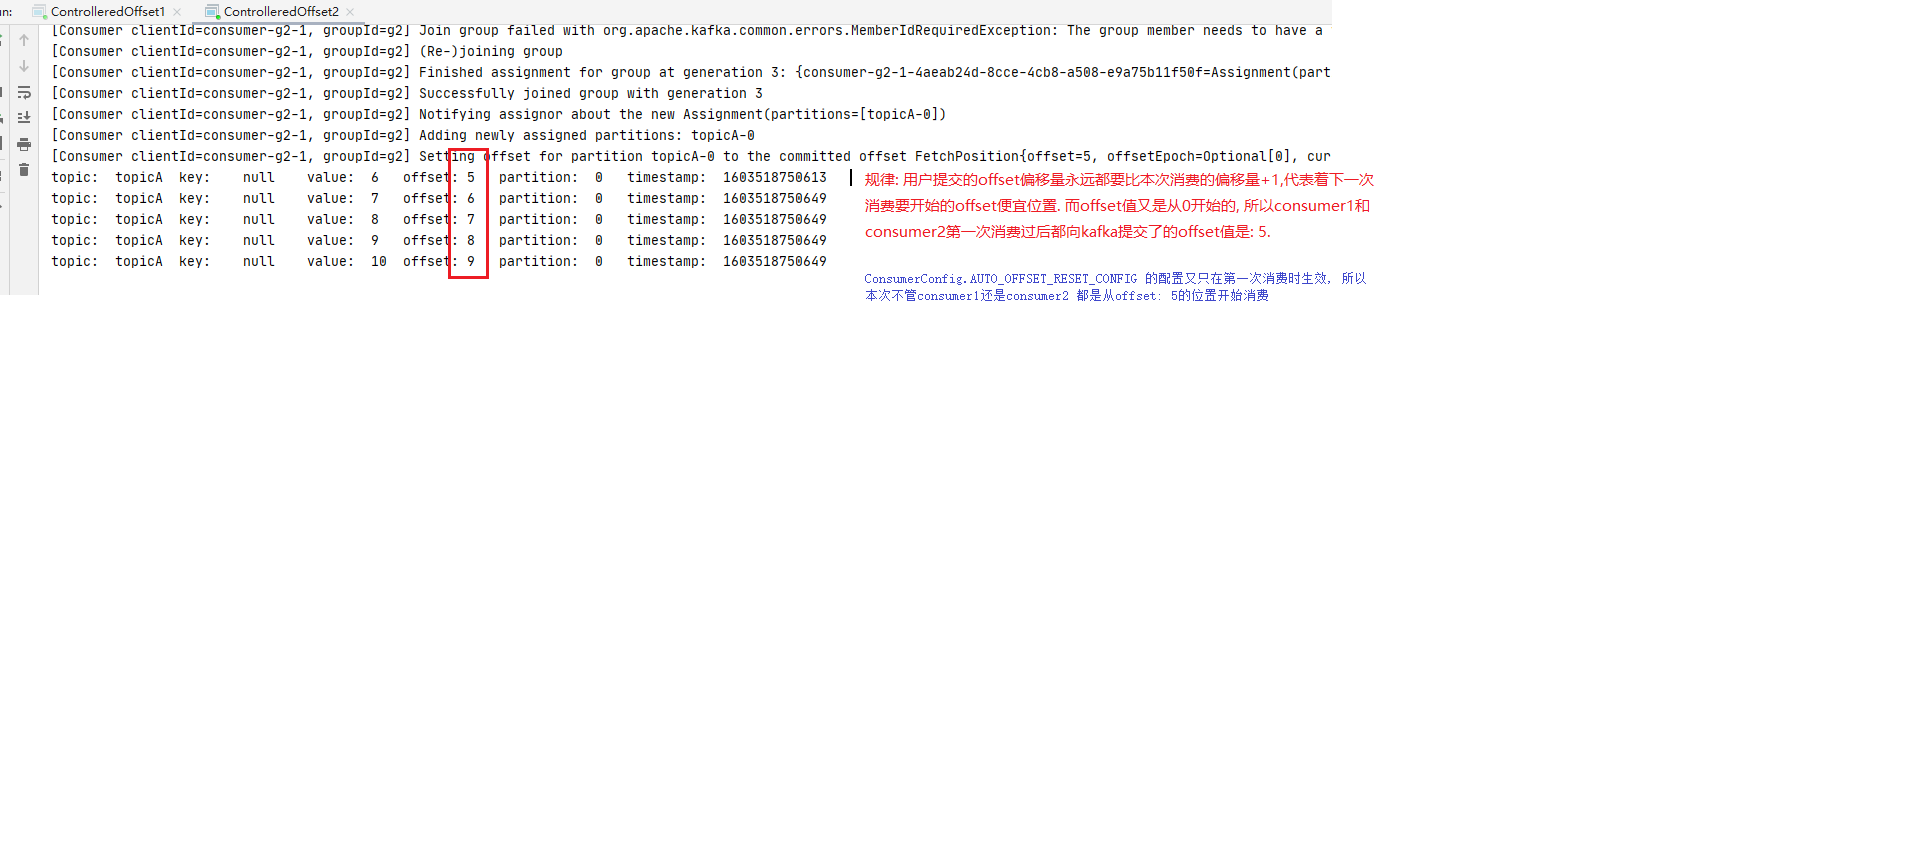
step5: 再次写消息 停掉consumer1和consumer2,后执行step2的代码继续往topicA里写5条数据. (注意为了方便观察, for循环里value的值改成6~10)
step6: 观察再次消费日志 然后执行step3中的代码再次启动consumer1和consumer2. 观察consumer1和consumer2的控制台输出.
1 2 3 4 5 ** 规律: 用户提交的offset偏移量永远都要比本次消费的偏移量+1,代表着下一次消费要开始的offset便宜位置. 而offset值又是从0开始的, 所以consumer1和consumer2第一次消费过后都向kafka提交了的offset值是: 5. `ConsumerConfig.AUTO_OFFSET_RESET_CONFIG` 的配置又只在第一次消费时生效, 所以本次不管consumer1还是consumer2 第二次订阅topicA都是从offset: 5的位置开始消费.**
step1 ~ step4 说明 offset的配置在消费者首次订阅某主题消息时后按照指定的ConsumerConfig.AUTO_OFFSET_RESET_CONFIG值(latest,earliest,none)生效. ConsumerConfig.AUTO_OFFSET_RESET_CONFIG值只在首次消费时生效
ConsumerConfig.ENABLE_AUTO_COMMIT_CONFIG 自动提交开启 另外可以通过下面两行(也是官网的默认配置)设置自动提交的策略, 第一行开启, 第二行设置自动提交的时间间隔.
1 2 properties.put(ConsumerConfig.ENABLE_AUTO_COMMIT_CONFIG,true ); properties.put(ConsumerConfig.AUTO_COMMIT_INTERVAL_MS_CONFIG,5000 );
ConsumerConfig.ENABLE_AUTO_COMMIT_CONFIG 测试 自动提交的具体测试步骤;
step1 新建AAA,开启生产者往AAA写5条数据 (具体可以参见ConsumerConfig.AUTO_OFFSET_RESET_CONFIG的step2和step3, 将topic名称改为AAA即可)
step2 编写消费者consumer3, 并开启消费者上面两行自动提交的配置注意: 自动提交配置, 使用的是put方法, 不是setProperty方法
1 2 3 4 5 6 7 8 9 10 11 12 13 14 15 16 17 18 19 20 21 22 23 24 25 26 27 28 29 30 31 32 33 34 35 36 37 38 39 40 41 42 43 44 45 46 47 48 49 50 51 52 53 54 55 56 57 58 59 60 61 62 63 64 65 66 67 68 69 70 package advanced.offset1;import org.apache.kafka.clients.consumer.ConsumerConfig;import org.apache.kafka.clients.consumer.ConsumerRecord;import org.apache.kafka.clients.consumer.ConsumerRecords;import org.apache.kafka.clients.consumer.KafkaConsumer;import org.apache.kafka.common.header.Headers;import org.apache.kafka.common.record.TimestampType;import org.apache.kafka.common.serialization.StringDeserializer;import java.time.Duration;import java.util.Iterator;import java.util.Optional;import java.util.Properties;import java.util.regex.Pattern;public class MyAutoCommitConfig public static void main (String[] args) throws InterruptedException consume(); } private static void consume () Properties properties = new Properties(); properties.setProperty( ConsumerConfig.BOOTSTRAP_SERVERS_CONFIG, "Node01:9092,Node02:9092,Node03:9092" ); properties.setProperty(ConsumerConfig.KEY_DESERIALIZER_CLASS_CONFIG, StringDeserializer.class .getName ()) ; properties.setProperty(ConsumerConfig.VALUE_DESERIALIZER_CLASS_CONFIG, StringDeserializer.class .getName ()) ; properties.put(ConsumerConfig.GROUP_ID_CONFIG,"gc1" ); properties.setProperty(ConsumerConfig.AUTO_OFFSET_RESET_CONFIG,"earliest" ); properties.put(ConsumerConfig.ENABLE_AUTO_COMMIT_CONFIG,true ); properties.put(ConsumerConfig.AUTO_COMMIT_INTERVAL_MS_CONFIG,20000 ); KafkaConsumer<String, String> consumer = new KafkaConsumer<String, String>(properties); consumer.subscribe(Pattern.compile("AAA" )); while (true ){ ConsumerRecords<String, String> consumerRecords = consumer.poll(Duration.ofSeconds(1 )); if (!consumerRecords.isEmpty()){ Iterator<ConsumerRecord<String, String>> iterator = consumerRecords.iterator(); while (iterator.hasNext()){ ConsumerRecord<String, String> next = iterator.next(); String topic = next.topic(); int partition = next.partition(); String key = next.key(); String value = next.value(); long offset = next.offset(); long timestamp = next.timestamp(); TimestampType timestampType = next.timestampType(); Headers headers = next.headers(); Optional<Integer> leaderEpoch = next.leaderEpoch(); int serializedKeySize = next.serializedKeySize(); int serializedValueSize = next.serializedValueSize(); System.out.println( "topic:\t" +topic+ "\t" + "key:\t" +key+"\t" + "value:\t" +value+"\t" + "offset:\t" +offset+"\t" + "partition:\t" +partition+"\t" + "timestamp:\t" +timestamp+"\t" ); } } } } }
step3 启动consumer3进行消费, 观察控制台结果如下. 然后尽快停掉应用(不要超过step2中设置的自动提交offset的时间间隔: 20秒)
再次启动consumer3进行消费, 发现还是从最开始offset:0的位置开始消费, 这次让进城多运行一会, 超过20秒后停掉应用.
step5 第三次启动consumer3进行消费, 因为step4中gc1消费时间超过20秒, auto_commit自动提交过offset了, 所以此次启动时不会看到从0开始消费.
ConsumerConfig.ENABLE_AUTO_COMMIT_CONFIG 自定义提交策略 step1 新建BBB,开启生产者往BBB写10条数据 (具体可以参见ConsumerConfig.AUTO_OFFSET_RESET_CONFIG的step2和step3, 将topic名称改为BBB即可)
step2 编写消费者consumer4, 并将自动提交的配置 ConsumerConfig.ENABLE_AUTO_COMMIT_CONFIG置为false.
1 2 3 4 5 6 7 8 9 10 11 12 13 14 15 16 17 18 19 20 21 22 23 24 25 26 27 28 29 30 31 32 33 34 35 36 37 38 39 40 41 42 43 44 45 46 47 48 49 50 51 52 53 54 55 56 57 58 59 60 61 62 63 64 65 66 67 68 69 70 71 72 73 74 75 76 77 78 79 80 81 82 83 84 85 86 package advanced.offset1;import org.apache.kafka.clients.consumer.*;import org.apache.kafka.common.TopicPartition;import org.apache.kafka.common.header.Headers;import org.apache.kafka.common.record.TimestampType;import org.apache.kafka.common.serialization.StringDeserializer;import java.time.Duration;import java.util.*;import java.util.regex.Pattern; public class SelfDefinedCommitStrategy public static void main (String[] args) throws InterruptedException consume(); } private static void consume () Properties properties = new Properties(); properties.setProperty( ConsumerConfig.BOOTSTRAP_SERVERS_CONFIG, "localhost:9092,localhost:9093,localhost:9094" ); properties.setProperty(ConsumerConfig.KEY_DESERIALIZER_CLASS_CONFIG, StringDeserializer.class .getName ()) ; properties.setProperty(ConsumerConfig.VALUE_DESERIALIZER_CLASS_CONFIG, StringDeserializer.class .getName ()) ; properties.put(ConsumerConfig.GROUP_ID_CONFIG,"g4" ); properties.setProperty(ConsumerConfig.AUTO_OFFSET_RESET_CONFIG,"earliest" ); properties.put(ConsumerConfig.ENABLE_AUTO_COMMIT_CONFIG,false ); KafkaConsumer<String, String> consumer = new KafkaConsumer<String, String>(properties); consumer.subscribe(Pattern.compile("BBB" )); while (true ){ ConsumerRecords<String, String> consumerRecords = consumer.poll(Duration.ofSeconds(1 )); if (!consumerRecords.isEmpty()){ Iterator<ConsumerRecord<String, String>> iterator = consumerRecords.iterator(); Map<TopicPartition, OffsetAndMetadata> offsetMap=new HashMap<>(); while (iterator.hasNext()){ ConsumerRecord<String, String> next = iterator.next(); String topic = next.topic(); int partition = next.partition(); String key = next.key(); String value = next.value(); long offset = next.offset(); long timestamp = next.timestamp(); TimestampType timestampType = next.timestampType(); Headers headers = next.headers(); Optional<Integer> leaderEpoch = next.leaderEpoch(); int serializedKeySize = next.serializedKeySize(); int serializedValueSize = next.serializedValueSize(); System.out.println( "topic:\t" +topic+ "\t" + "key:\t" +key+"\t" + "value:\t" +value+"\t" + "offset:\t" +offset+"\t" + "partition:\t" +partition+"\t" + "timestamp:\t" +timestamp+"\t" ); offsetMap.put(new TopicPartition(topic,partition),new OffsetAndMetadata(offset+1 )); consumer.commitAsync(offsetMap, new OffsetCommitCallback() { @Override public void onComplete (Map<TopicPartition, OffsetAndMetadata> offsets, Exception exception) System.out.println("提交了如下offset&metadata信息: \t" +"offset:\t" +offsets+"\texception:\t" +exception); } }); } } } } }
发现确实有提交
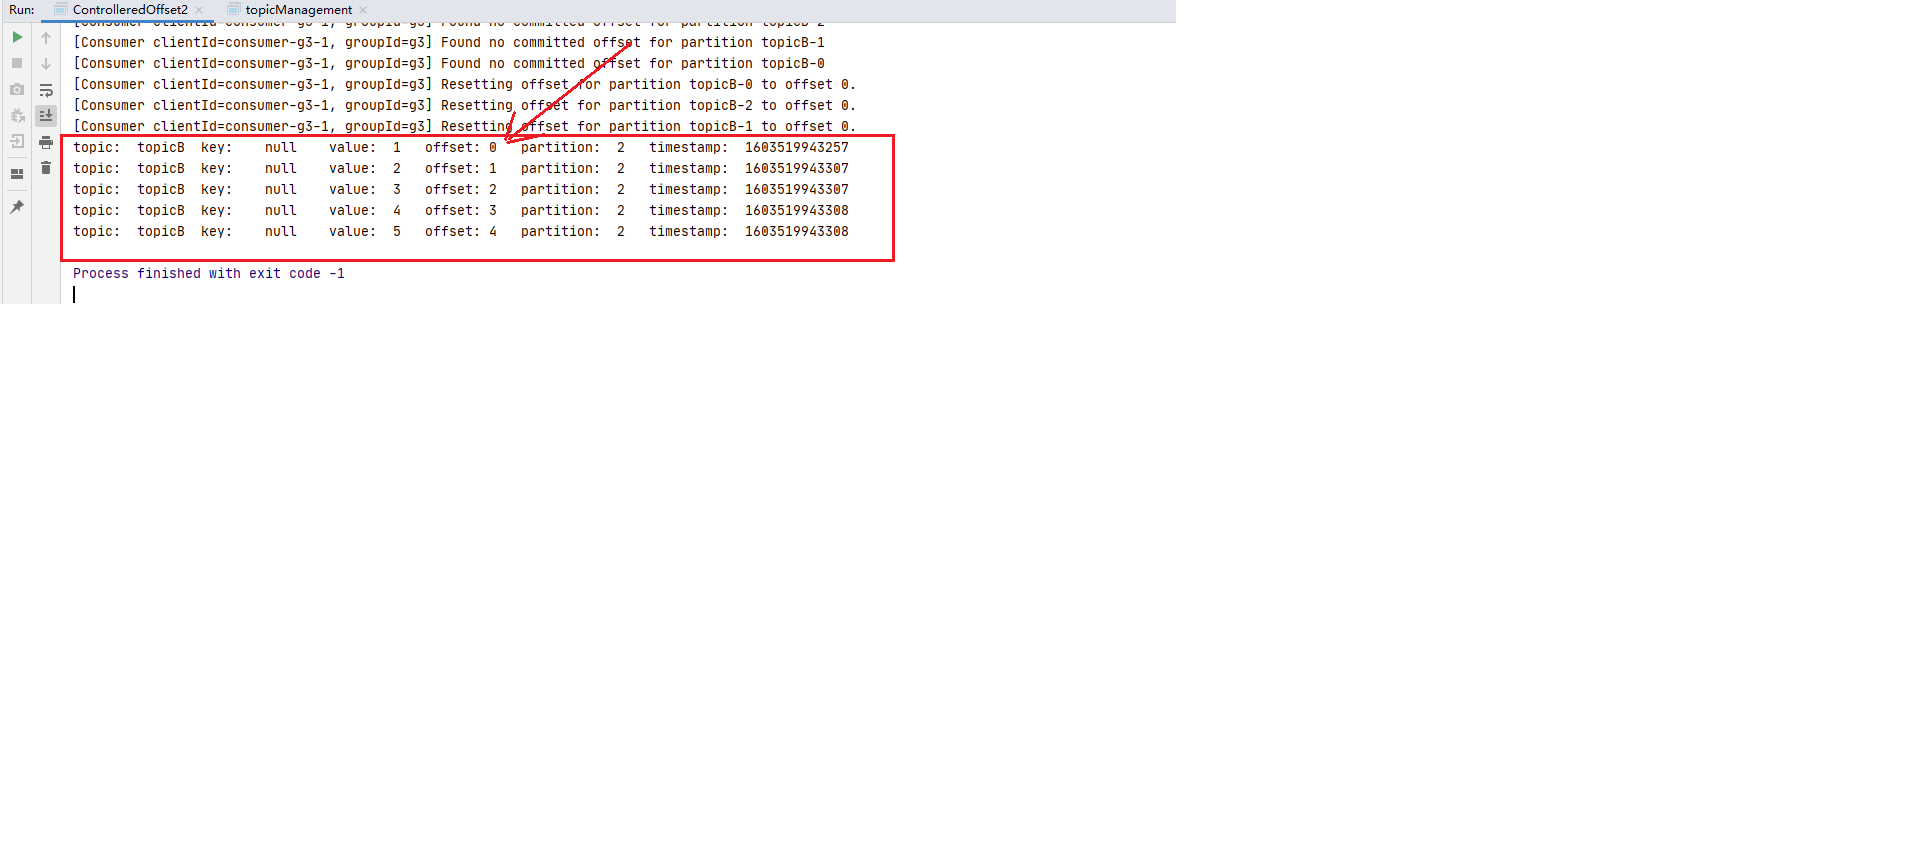
step3: 停掉消费进城后再次重启, 还是消费者组g4,此时再观察发现又消费到了: offset:4 (如下图:)1 offsetMap.put(new TopicPartition(topic,partition),new OffsetAndMetadata(offset+1 ));
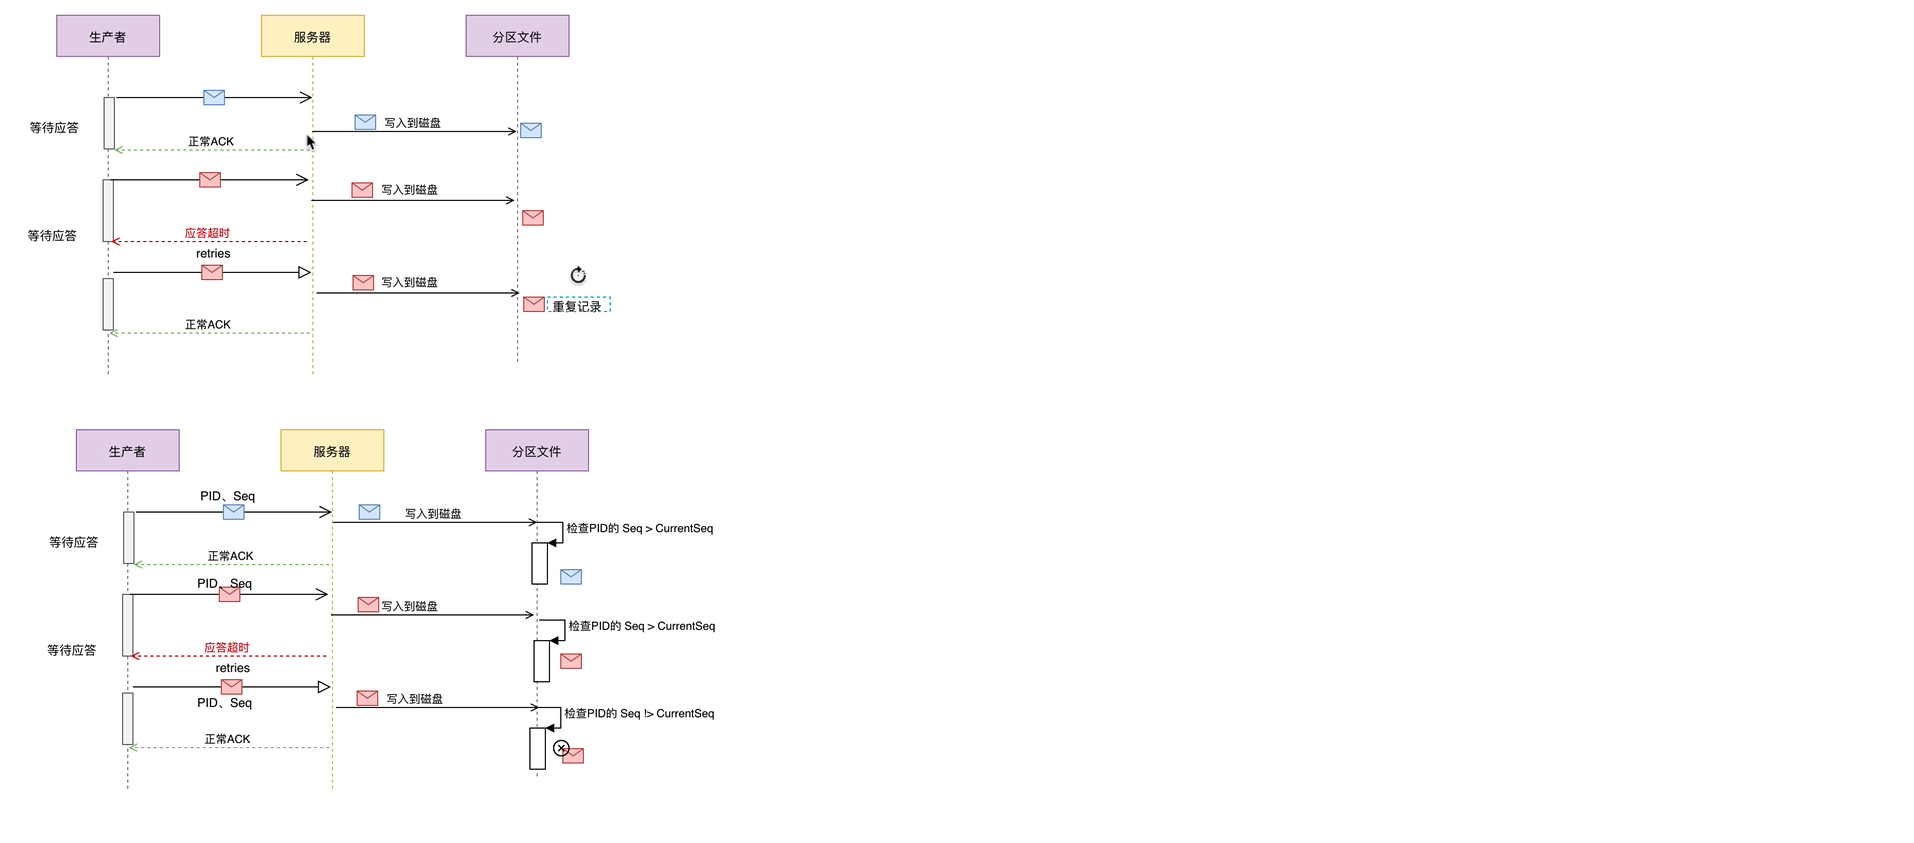
确认应答与重试机制 机制解释 Kafka生产这在发送完一个消息后, 要求broker在规定的时间内进行Ack应答, 如果没有在规定的时间内进行应答, Kafka生产者会重试N次重新发送信息.
acks=1: 此时Leader会将record写到本地日志中, 但会在不等待所有follower都确认的情况下就做出响应. 这种情况下,如果Leader在确认应答后宕机, 那么记录会丢失. 因为follower还没有进行复制记录到副本. acks=0: 此时, 生产者根本不会等待broker做出任何确认, 该记录将立即添加到网络套接字缓冲区并视为已发送.这种情况下不能保证服务端broker已接收到信息. acks=all / acks=-1: 两种写法效果一样, 都是: Leader在接收到信息后需要等待全部ISR(in-sync replicas)同步副本确认.这就保证了, 只要至少一个同步副本处于活动状态, 记录就不会丢失. 这是最有力的保证 如果生产者在规定时间内没有得到Leader的yingda , 可以开启retries重试机制.
request.timeout.ms=30000 (默认30秒)
retries=2147483647 (默认)
具体可以参见官网文档3.3节的acks 部分和4.8节的 Availability and Durability Guarantees 部分
测试 step1: 启动消费者订阅CCC的消息:1 2 3 4 5 6 7 8 9 10 11 12 13 14 15 16 17 18 19 20 21 22 23 24 25 26 27 28 29 30 31 32 33 34 35 36 37 38 39 40 41 42 43 44 45 46 47 48 49 50 51 52 53 54 55 56 57 58 59 60 61 62 63 64 65 66 67 68 69 70 71 72 73 74 75 76 77 78 79 80 81 package advanced.Ack2; import org.apache.kafka.clients.consumer.ConsumerConfig;import org.apache.kafka.clients.consumer.ConsumerRecord;import org.apache.kafka.clients.consumer.ConsumerRecords;import org.apache.kafka.clients.consumer.KafkaConsumer;import org.apache.kafka.common.header.Headers;import org.apache.kafka.common.record.TimestampType;import org.apache.kafka.common.serialization.StringDeserializer;import java.time.Duration;import java.util.Collections;import java.util.Iterator;import java.util.Optional;import java.util.Properties;import java.util.regex.Pattern;public class AcksConsumer public static void main (String[] args) throws InterruptedException consume(); } private static void consume () Properties properties = new Properties(); properties.setProperty( ConsumerConfig.BOOTSTRAP_SERVERS_CONFIG, "localhost:9092,localhost:9093,localhost:9094" ); properties.setProperty(ConsumerConfig.KEY_DESERIALIZER_CLASS_CONFIG, StringDeserializer.class .getName ()) ; properties.setProperty(ConsumerConfig.VALUE_DESERIALIZER_CLASS_CONFIG, StringDeserializer.class .getName ()) ; properties.put(ConsumerConfig.GROUP_ID_CONFIG,"g4" ); properties.setProperty(ConsumerConfig.AUTO_OFFSET_RESET_CONFIG,"latest" ); KafkaConsumer<String, String> consumer = new KafkaConsumer<String, String>(properties); consumer.subscribe(Collections.singletonList("CCC" )); while (true ){ ConsumerRecords<String, String> consumerRecords = consumer.poll(Duration.ofSeconds(1 )); if (!consumerRecords.isEmpty()){ Iterator<ConsumerRecord<String, String>> iterator = consumerRecords.iterator(); while (iterator.hasNext()){ ConsumerRecord<String, String> next = iterator.next(); String topic = next.topic(); int partition = next.partition(); String key = next.key(); String value = next.value(); long offset = next.offset(); long timestamp = next.timestamp(); TimestampType timestampType = next.timestampType(); Headers headers = next.headers(); Optional<Integer> leaderEpoch = next.leaderEpoch(); int serializedKeySize = next.serializedKeySize(); int serializedValueSize = next.serializedValueSize(); System.out.println( "topic:\t" +topic+ "\t" + "key:\t" +key+"\t" + "value:\t" +value+"\t" + "offset:\t" +offset+"\t" + "partition:\t" +partition+"\t" + "timestampType:\t" +timestampType+"\t" + "timestamp:\t" +timestamp+"\t" ); } } } } }
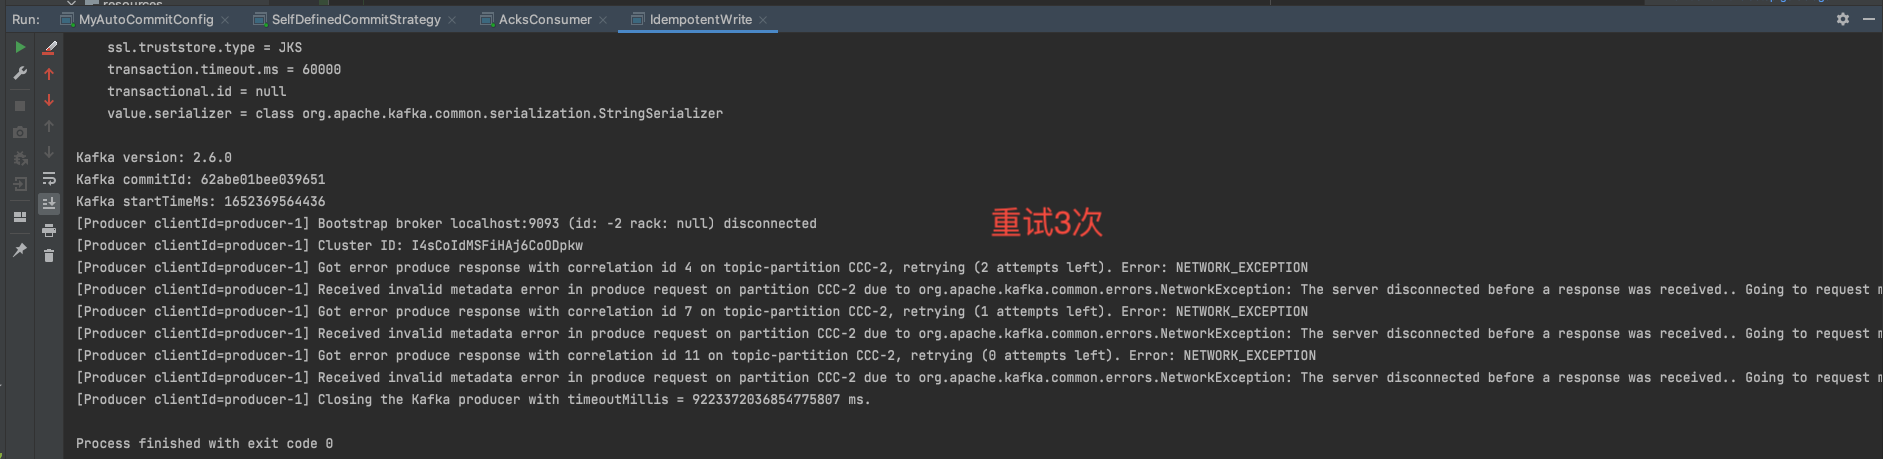
注意三行确认应答和重试机制的配置 )1 2 3 4 5 6 7 8 9 10 11 12 13 14 15 16 17 18 19 20 21 22 23 24 25 26 27 28 29 30 31 32 33 34 35 36 37 38 39 40 package advanced.Ack2;import org.apache.kafka.clients.producer.KafkaProducer;import org.apache.kafka.clients.producer.ProducerConfig;import org.apache.kafka.clients.producer.ProducerRecord;import org.apache.kafka.common.serialization.StringSerializer;import java.util.Properties;public class AcksProducer public static void main (String[] args) throws InterruptedException produce(); } private static void produce () throws InterruptedException Properties properties = new Properties(); properties.setProperty(ProducerConfig.BOOTSTRAP_SERVERS_CONFIG, "localhost:9092,localhost:9093,localhost:9094" ); properties.setProperty(ProducerConfig.KEY_SERIALIZER_CLASS_CONFIG, StringSerializer.class .getName ()) ; properties.setProperty(ProducerConfig.VALUE_SERIALIZER_CLASS_CONFIG, StringSerializer.class .getName ()) ; properties.put(ProducerConfig.REQUEST_TIMEOUT_MS_CONFIG,"1" ); properties.put(ProducerConfig.ACKS_CONFIG,"all" ); properties.put(ProducerConfig.RETRIES_CONFIG,3 ); KafkaProducer<String, String> producer = new KafkaProducer<>(properties); ProducerRecord<String, String> producerRecord = new ProducerRecord<>("CCC" , "acks" ,"ack test" ); producer.send(producerRecord); producer.flush(); producer.close(); } }
可以看到producer的控制台的3次重试记录:
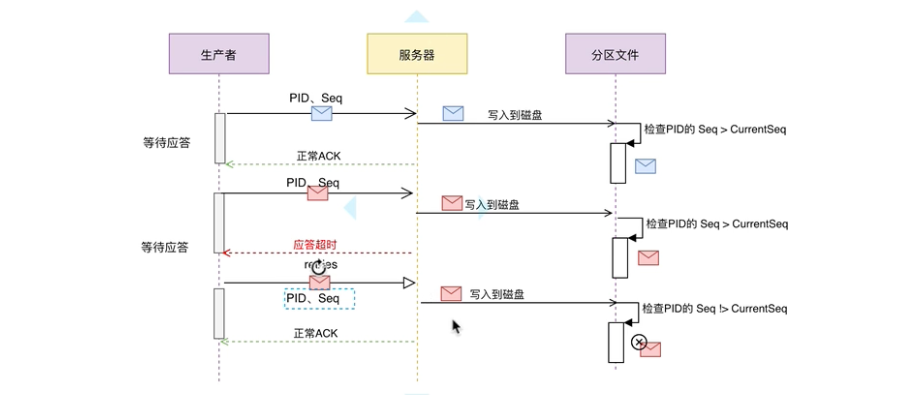
确认应答与重试机制原理流程图参见如下:
幂等写 概念 流程描述
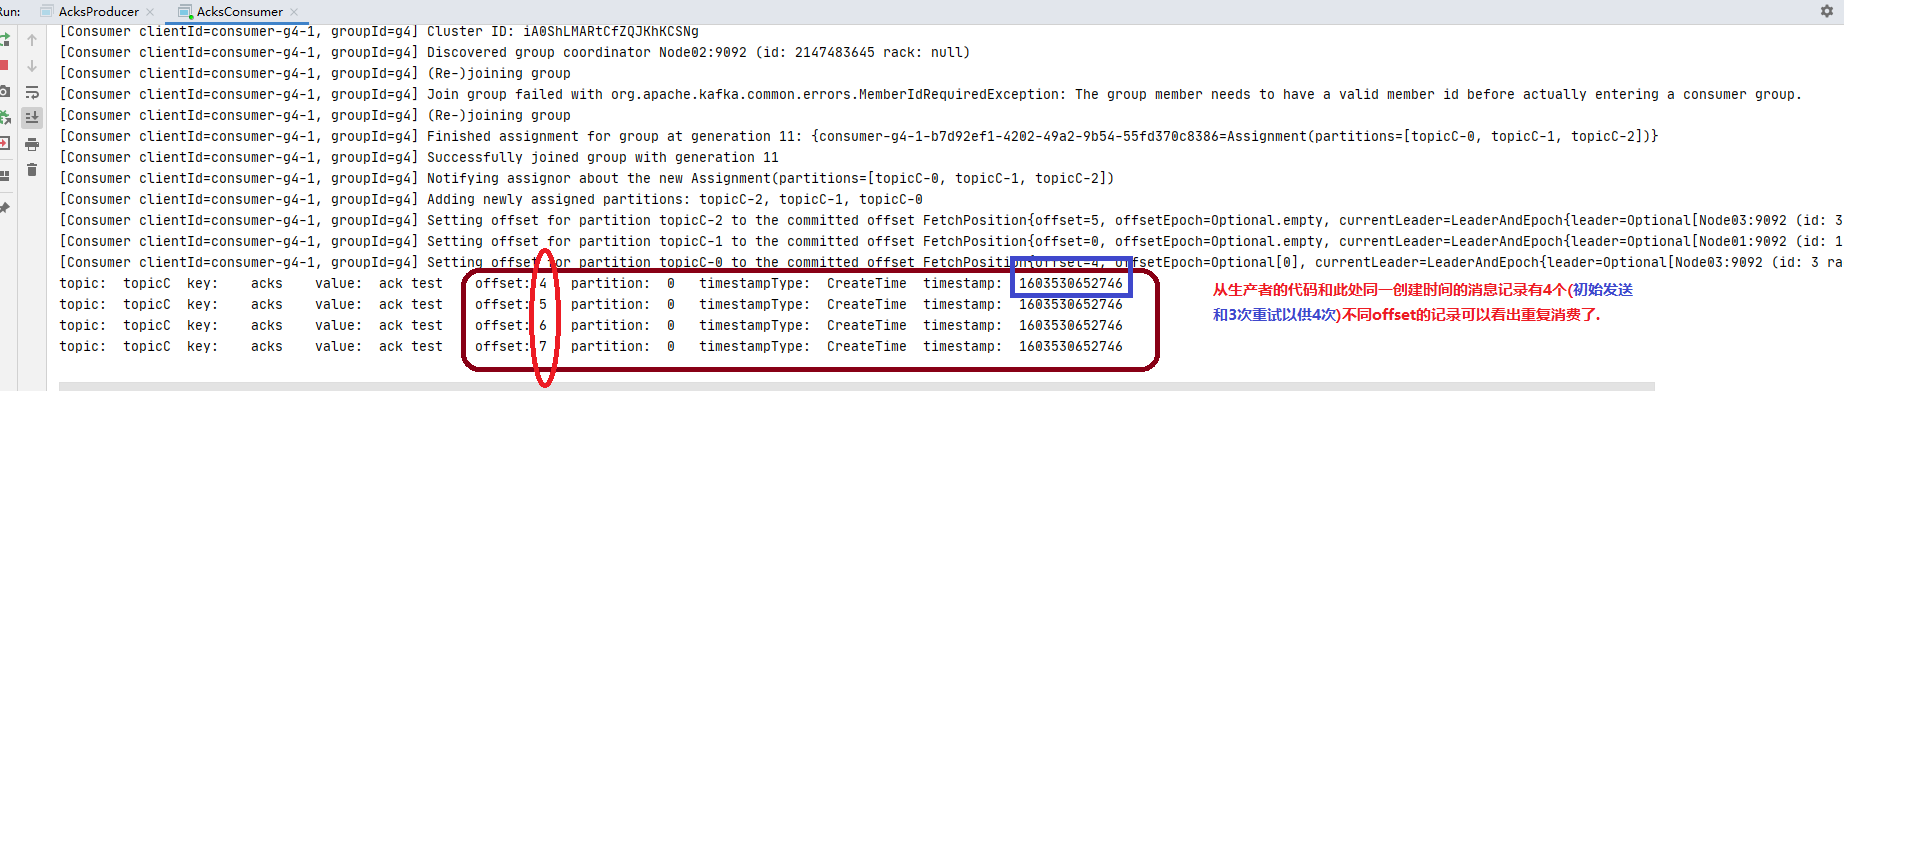
在Ack-Retry 重试应答 的例子里, 如果生产者在发送消息之后, 服务器已经将数据写到对应分区, 但是应答的过程失败, 那么生产者重试之后, broker是不需要再将同样的消息记录写到分区的。
那么如何避免重复写呢? 就引入了幂等写的概念。 幂等写又叫Exactly once。 是指同样的消息有且只有消费一次。即使重试写入多次, 也不会被消费者重新消费。
测试 step1: 先启动消费者订阅消息: step2: 然后启动producer 1 2 3 4 5 6 7 8 9 10 11 12 13 14 15 16 17 18 19 20 21 22 23 24 25 26 27 28 29 30 31 32 33 34 35 36 37 38 39 40 41 42 43 44 45 46 47 48 49 50 package advanced.idempotence;import org.apache.kafka.clients.producer.KafkaProducer;import org.apache.kafka.clients.producer.ProducerConfig;import org.apache.kafka.clients.producer.ProducerRecord;import org.apache.kafka.common.serialization.StringSerializer;import java.util.Properties;public class IdempotentWrite public static void main (String[] args) Properties properties = new Properties(); properties.setProperty(ProducerConfig.BOOTSTRAP_SERVERS_CONFIG, "localhost:9092,localhost:9093,localhost:9094" ); properties.put(ProducerConfig.ENABLE_IDEMPOTENCE_CONFIG,false ); properties.put(ProducerConfig.MAX_IN_FLIGHT_REQUESTS_PER_CONNECTION,1 ); properties.setProperty(ProducerConfig.KEY_SERIALIZER_CLASS_CONFIG, StringSerializer.class .getName ()) ; properties.setProperty(ProducerConfig.VALUE_SERIALIZER_CLASS_CONFIG, StringSerializer.class .getName ()) ; properties.put(ProducerConfig.REQUEST_TIMEOUT_MS_CONFIG,"1" ); properties.put(ProducerConfig.ACKS_CONFIG,"all" ); properties.put(ProducerConfig.RETRIES_CONFIG,3 ); KafkaProducer<String, String> producer = new KafkaProducer<>(properties); ProducerRecord<String, String> producerRecord = new ProducerRecord<>("CCC" , "IDEMPOTENCE" ,"turned off" ); producer.send(producerRecord); producer.flush(); producer.close(); } }
step3: 观察现象(幂等写关闭 的情况)
step4: 开启幂等写重新生产 对上述生产者代码做如下修改
28行改成properties.put(ProducerConfig.ENABLE_IDEMPOTENCE_CONFIG,true); 开启幂等写。
43行改成ProducerRecord<String, String> producerRecord = new ProducerRecord<>("CCC" , "IDEMPOTENCE","ON"); 只是为了日志清晰。
修改完再运行一次producer。
step5: 观察现象(幂等写开启 的情况) 只比上一次消费者多了一行消费记录, 虽然生产者还是重试, 但是因为开启了幂等写, 重试的记录没有写到分区,所以消费者只消费了一次。
生产者事务 To Be Continued~


 step4
step4