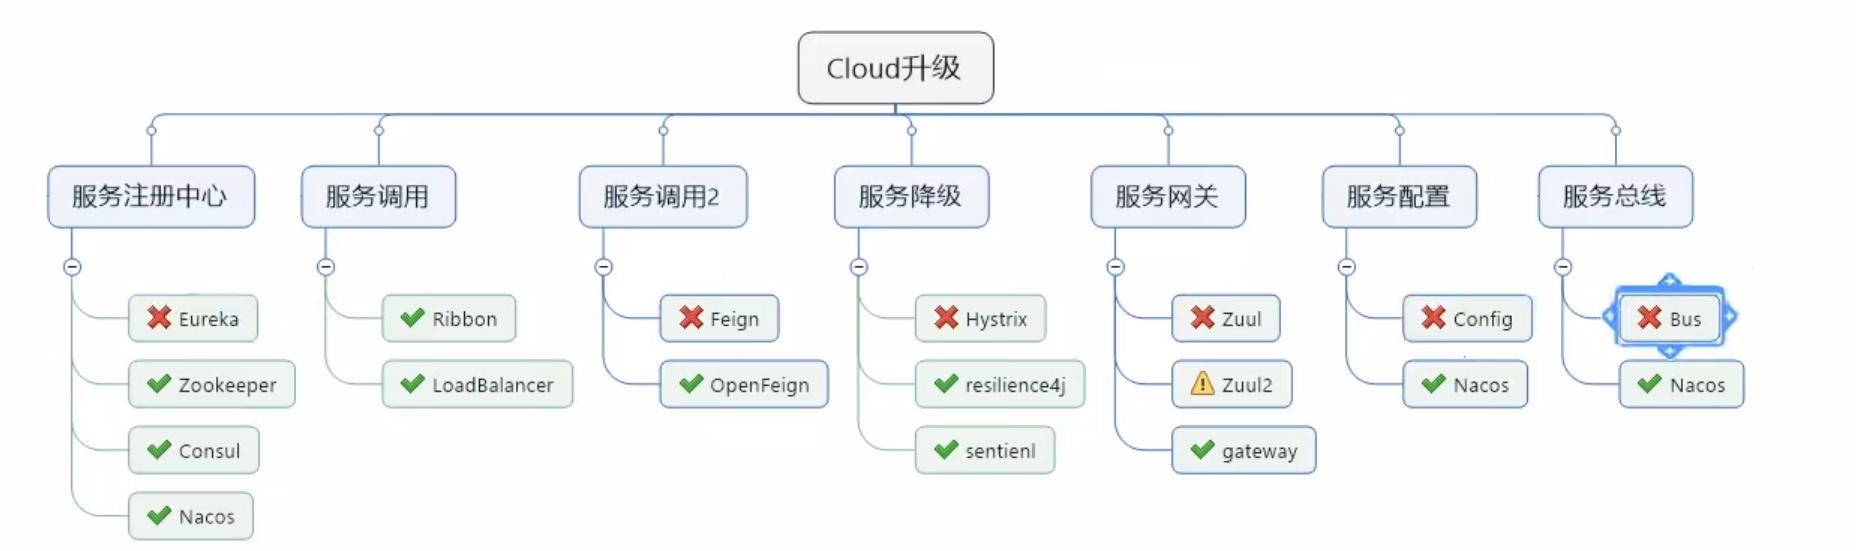
SpringCloud-服务组册与发现将学习讨论相关组件: Eureka,Conzul, zookeeper, Nacos(其中包含服务配置的部分请参考《SpringCloud-服务配置》y一文)
1. SpringCloud组件一览(E1-4)
选型说明:
springboot: 2.2 (springboot官网Release Note强烈建议: we strongly recommend that you upgrade to Spring Boot 1.5 before migrating to Spring Boot 2.0.)
Cloud 各组件功能及现状说明:
| – |
|
|
|
|
| 注册中心 |
Eureka(停更) |
Zookeeper |
Consul |
Nacos(推荐) |
| 服务调用 |
Ribbon |
LoadBalancer |
Feign停更 |
OpenFeign(推荐) |
| 服务降级 |
Hystrix(大规模使用中, 但也已停更) |
resilence4J(国外流行) |
sentinel(阿里系,强烈推荐) |
|
| 服务网关 |
Zuul |
Zuul2 |
Gateway |
|
| 服务配置 |
Config |
Nacos(推荐) |
|
|
| 服务总线 |
Bus |
Nacos(推荐) |
|
|
上图可以看出, Nacos是重中之重.
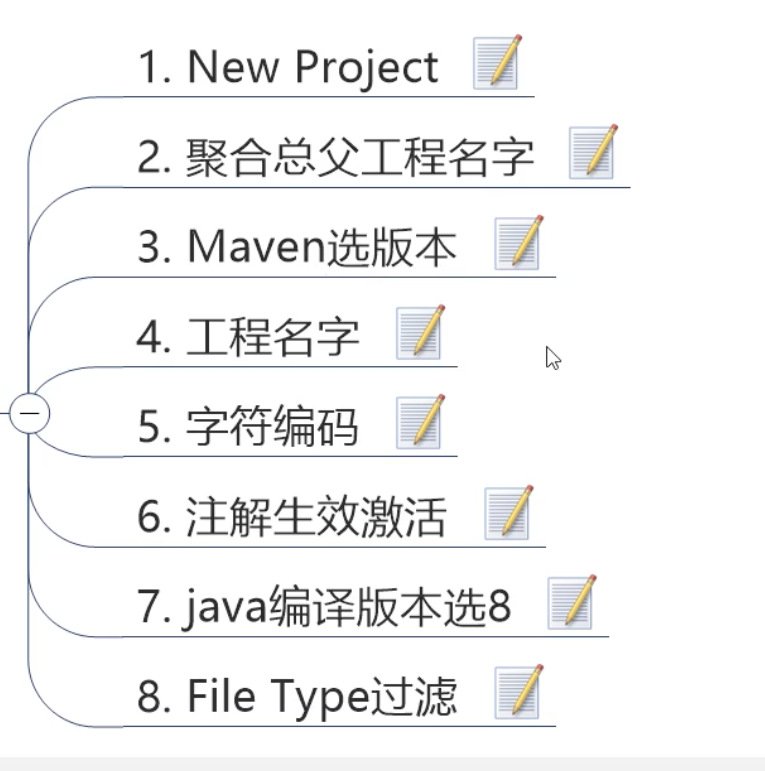
Step 1: 首先建父工程: CloudAll 并设置好编码环境, 具体步骤参考下面图例.
父工程pom.xml 文件如下:
1
2
3
4
5
6
7
8
9
10
11
12
13
14
15
16
17
18
19
20
21
22
23
24
25
26
27
28
29
30
31
32
33
34
35
36
37
38
39
40
41
42
43
44
45
46
47
48
49
50
51
52
53
54
55
56
57
58
59
60
61
62
63
64
65
66
67
68
69
70
71
72
73
74
75
76
77
78
79
80
81
82
83
84
85
86
87
88
89
90
91
92
93
94
95
96
97
98
| <?xml version="1.0" encoding="UTF-8"?>
<project xmlns="http://maven.apache.org/POM/4.0.0"
xmlns:xsi="http://www.w3.org/2001/XMLSchema-instance"
xsi:schemaLocation="http://maven.apache.org/POM/4.0.0 http://maven.apache.org/xsd/maven-4.0.0.xsd">
<modelVersion>4.0.0</modelVersion>
<groupId>com.lee</groupId>
<artifactId>CloudAll</artifactId>
<packaging>pom</packaging>
<version>1.0-SNAPSHOT</version>
<modules>
<module>cloud-api-commons</module>
</modules>
<properties>
<project.build.sourceEncoding>UTF-8</project.build.sourceEncoding>
<maven.compiler.source>1.8</maven.compiler.source>
<maven.compiler.target>1.8</maven.compiler.target>
<junit.version>4.12</junit.version>
<log4j.version>1.2.17</log4j.version>
<lombok.version>1.16.18</lombok.version>
<mysql.version>5.1.47</mysql.version>
<druid.version>1.1.16</druid.version>
<mybatis.spring.boot.version>1.3.2</mybatis.spring.boot.version>
</properties>
<dependencyManagement>
<dependencies>
<dependency>
<groupId>org.springframework.boot</groupId>
<artifactId>spring-boot-dependencies</artifactId>
<version>2.2.RELEASE</version>
<type>pom</type>
<scope>import</scope>
</dependency>
<dependency>
<groupId>org.springframework.cloud</groupId>
<artifactId>spring-cloud-dependencies</artifactId>
<version>Hoxton.SR1</version>
<type>pom</type>
<scope>import</scope>
</dependency>
<dependency>
<groupId>junit</groupId>
<artifactId>junit</artifactId>
<version>${junit.version}</version>
<scope>test</scope>
</dependency>
<dependency>
<groupId>log4j</groupId>
<artifactId>log4j</artifactId>
<version>${log4j.version}</version>
</dependency>
<dependency>
<groupId>org.projectlombok</groupId>
<artifactId>lombok</artifactId>
<version>${lombok.version}</version>
</dependency>
<dependency>
<groupId>mysql</groupId>
<artifactId>mysql-connector-java</artifactId>
<version>${mysql.version}</version>
</dependency>
<dependency>
<groupId>org.mybatis.spring.boot</groupId>
<artifactId>mybatis-spring-boot-starter</artifactId>
<version>${mybatis.spring.boot.version}</version>
</dependency>
<dependency>
<groupId>com.alibaba</groupId>
<artifactId>druid</artifactId>
<version>${druid.version}</version>
</dependency>
</dependencies>
</dependencyManagement>
<build>
<plugins>
<plugin>
<groupId>org.springframework.boot</groupId>
<artifactId>spring-boot-maven-plugin</artifactId>
<configuration>
<fork>true</fork>
<addResources>true</addResources>
</configuration>
</plugin>
</plugins>
</build>
</project>
|
2 项目基础环境搭建(E5-14)
2.1 建module: Providor
在父工程下面新建服务提供者模块: cloud-provider-payment8001
2.2 编写pom.xml
1
2
3
4
5
6
7
8
9
10
11
12
13
14
15
16
17
18
19
20
21
22
23
24
25
26
27
28
29
30
31
32
33
34
35
36
37
38
39
40
41
42
43
44
45
46
47
48
49
50
51
52
53
54
55
56
57
58
59
| <?xml version="1.0" encoding="UTF-8"?>
<project xmlns="http://maven.apache.org/POM/4.0.0"
xmlns:xsi="http://www.w3.org/2001/XMLSchema-instance"
xsi:schemaLocation="http://maven.apache.org/POM/4.0.0 http://maven.apache.org/xsd/maven-4.0.0.xsd">
<parent>
<artifactId>CloudAll</artifactId>
<groupId>com.lee</groupId>
<version>1.0-SNAPSHOT</version>
</parent>
<modelVersion>4.0.0</modelVersion>
<artifactId>cloud-provider-payment8001</artifactId>
<dependencies>
<dependency>
<groupId>org.springframework.boot</groupId>
<artifactId>spring-boot-starter-web</artifactId>
</dependency>
<dependency>
<groupId>org.springframework.boot</groupId>
<artifactId>spring-boot-starter-actuator</artifactId>
</dependency>
<dependency>
<groupId>mysql</groupId>
<artifactId>mysql-connector-java</artifactId>
</dependency>
<dependency>
<groupId>org.mybatis.spring.boot</groupId>
<artifactId>mybatis-spring-boot-starter</artifactId>
</dependency>
<dependency>
<groupId>org.springframework.boot</groupId>
<artifactId>spring-boot-starter-jdbc</artifactId>
</dependency>
<dependency>
<groupId>org.springframework.boot</groupId>
<artifactId>spring-boot-devtools</artifactId>
<scope>runtime</scope>
<optional>true</optional>
</dependency>
<dependency>
<groupId>org.projectlombok</groupId>
<artifactId>lombok</artifactId>
</dependency>
<dependency>
<groupId>com.alibaba</groupId>
<artifactId>druid-spring-boot-starter</artifactId>
<version>1.1.10</version>
</dependency>
<dependency>
<groupId>org.springframework.boot</groupId>
<artifactId>spring-boot-starter-test</artifactId>
<scope>test</scope>
</dependency>
</dependencies>
</project>
|
2.3 建yml
在子模块resource目录下新建application.yml (<span style="color:red">**注意: yml文件的缩进空格敏感, 另外, 只要是微服务,一定要保持良好习惯显示声明服务名称和端口号**</span>)
1
2
3
4
5
6
7
8
9
10
11
12
13
14
15
16
17
18
| server:
port: 8001
spring:
application:
name: cloud-payment-service
datasource:
driver-class-name: com.mysql.jdbc.Driver
type: com.alibaba.druid.pool.DruidDataSource
url: jdbc:mysql://localhost:3306/springcloud?useUnicode=true&characterEncoding=utf-8&useSSL=false&allowPublicKeyRetrieval=true&serverTimezone=UTC&rewriteBatchedStatements=true
username: root
password: root
druid:
validation-query: select 1
mybatis:
mapper-locations: classpath:mapper/*.xml
type-aliases-package: com.lee.springcloud.com.lee.springcloud.entities
|
2.4 主启动类
1
2
3
4
5
6
7
8
9
10
11
12
| package com.lee.springcloud;
import org.springframework.boot.SpringApplication;
import org.springframework.boot.autoconfigure.SpringBootApplication;
import org.springframework.cloud.client.discovery.EnableDiscoveryClient;
@SpringBootApplication
public class PaymentMain8001 {
public static void main(String[] args) {
SpringApplication.run(PaymentMain8001.class,args);
}
}
|
2.5 业务类编写
业务逻辑的编写过程如下: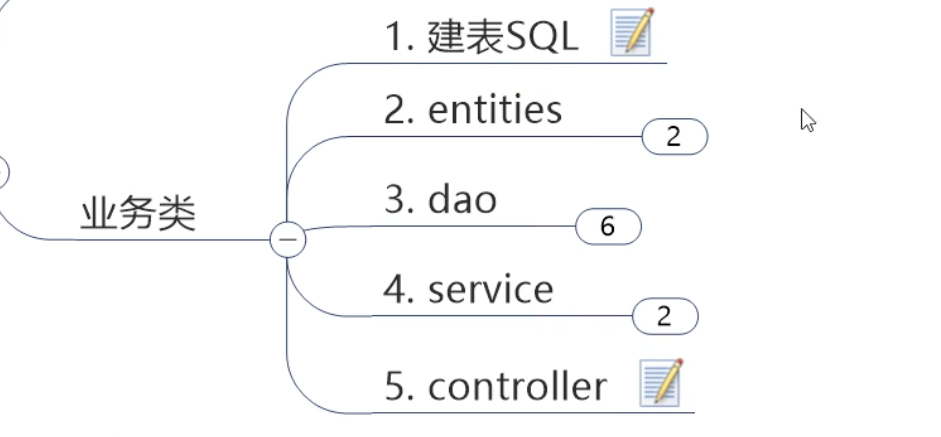
2.6 SQL脚本
1
2
3
4
5
| CREATE TABLE `payment` (
`id` bigint(20) NOT NULL AUTO_INCREMENT,
`serial` varchar(200) DEFAULT NULL,
PRIMARY KEY (`id`)
) ENGINE=InnoDB AUTO_INCREMENT=5 DEFAULT CHARSET=utf8mb4 COLLATE=utf8mb4_0900_ai_ci
|
2.7 Entity 实体类
1
2
3
4
5
6
7
8
9
10
11
12
13
14
15
| import lombok.AllArgsConstructor;
import lombok.Data;
import lombok.NoArgsConstructor;
import lombok.ToString;
import java.io.Serializable;
@Data
@AllArgsConstructor
@NoArgsConstructor
@ToString
public class Payment implements Serializable {
private long id;
private String serial;
}
|
返回给前端的包装类
1
2
3
4
5
6
7
8
9
10
11
12
13
14
15
16
| import lombok.AllArgsConstructor;
import lombok.Data;
import lombok.NoArgsConstructor;
@Data
@AllArgsConstructor
@NoArgsConstructor
public class CommonResult<T> {
private Integer code;
private String msg;
private T data;
public CommonResult(Integer code, String msg){
this(code,msg,null);
}
}
|
2.8 DAO & Mapper
1
2
3
4
5
6
7
8
9
| import com.lee.springcloud.entities.Payment;
import org.apache.ibatis.annotations.Mapper;
import org.apache.ibatis.annotations.Param;
@Mapper
public interface PaymentDao {
public int create(Payment payment);
public Payment getPaymentById(@Param("id")Long id);
}
|
根据yml文件里mybatis的配置创建对应的目录, 将mapper.xml放在对应目录
1
2
3
4
5
6
7
8
9
10
11
12
13
14
15
16
17
18
19
| <?xml version="1.0" encoding="UTF-8" ?>
<!DOCTYPE mapper PUBLIC "-//mybatis.org//DTD Mapper 3.0//EN" "http://mybatis.org/dtd/mybatis-3-mapper.dtd" >
<mapper namespace="com.lee.springcloud.dao.PaymentDao">
<resultMap id="BaseResultMap" type="com.lee.springcloud.entities.Payment">
<id column="id" property="id" jdbcType="BIGINT"></id>
<id column="serial" property="serial" jdbcType="VARCHAR"></id>
</resultMap>
<insert id="create" parameterType="com.lee.springcloud.entities.Payment" useGeneratedKeys="true" keyProperty="id">
insert into payment(serial) values(${serial});
</insert>
<select id="getPaymentById" parameterType="Long" resultMap="BaseResultMap">
select * from payment where id=#{id}
</select>
</mapper>
|
2.9 Service &Impl
1
2
3
4
5
6
| import com.lee.springcloud.entities.Payment;
public interface PaymentService {
int create(Payment payment);
Payment getPaymentById(Long id);
}
|
1
2
3
4
5
6
7
8
9
10
11
12
13
14
15
16
17
18
19
20
21
22
| import com.lee.springcloud.dao.PaymentDao;
import com.lee.springcloud.entities.Payment;
import com.lee.springcloud.service.PaymentService;
import org.springframework.stereotype.Service;
import javax.annotation.Resource;
@Service
public class PaymentServicceImpl implements PaymentService {
@Resource
public PaymentDao paymentDao;
@Override
public int create(Payment payment) {
return paymentDao.create(payment);
}
@Override
public Payment getPaymentById(Long id) {
return paymentDao.getPaymentById(id);
}
}
|
2.10 Controller
1
2
3
4
5
6
7
8
9
10
11
12
13
14
15
16
17
18
19
20
21
22
23
24
25
26
27
28
29
30
31
32
33
34
35
36
37
38
39
40
41
42
43
44
45
46
47
48
49
50
51
| package com.lee.springcloud.controller;
import com.lee.springcloud.entities.CommonResult;
import com.lee.springcloud.entities.Payment;
import com.lee.springcloud.service.PaymentService;
import lombok.extern.slf4j.Slf4j;
import org.springframework.beans.factory.annotation.Value;
import org.springframework.cloud.client.ServiceInstance;
import org.springframework.cloud.client.discovery.DiscoveryClient;
import org.springframework.web.bind.annotation.*;
import javax.annotation.Resource;
import java.util.List;
@RestController
@Slf4j
public class PaymentController {
@Resource
private DiscoveryClient discoveryClient;
@Resource
PaymentService paymentService;
@PostMapping(value="/p/create",produces = "application/json; charset=UTF-8")
public CommonResult create(@RequestBody Payment payment){
int rowsAffected = paymentService.create(payment);
log.info("受影响记录条数: "+rowsAffected);
if(rowsAffected>0){
return new CommonResult(200,"插入成功,thru: "+rowsAffected+"条记录受影响.");
}else{
return new CommonResult(400,"插入失败,thru: "+serverPort);
}
}
@GetMapping(value="/p/get/{id}",produces = "application/json; charset=UTF-8")
public CommonResult<Payment> getById(@PathVariable("id") Long id){
Payment paymentQueryed = paymentService.getPaymentById(id);
if(paymentQueryed !=null){
log.info("查询成功");
System.out.println("sth");
System.out.println(paymentQueryed.toString());
return new CommonResult(200,"查询成功,thru: "+paymentQueryed);
}else{
return new CommonResult(400,"查询失败,thru: "+"查无此条目");
}
}
}
|
2.11 测试
向数据库payment表插入一条记录:
1
| insert into payment (id, serial) values (1,12345)
|
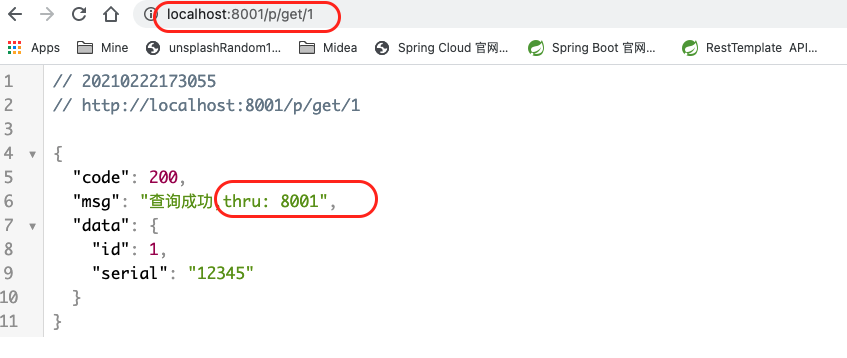
然后启动项目, 并访问:
1
| http://localhost:8001/p/get/1
|
发现能够正常访问到插入的数据即到此成功构建环境.
为了后续能够提高编码效率 此处测试成功后进行热部署的相关配置, 具体步骤如下.
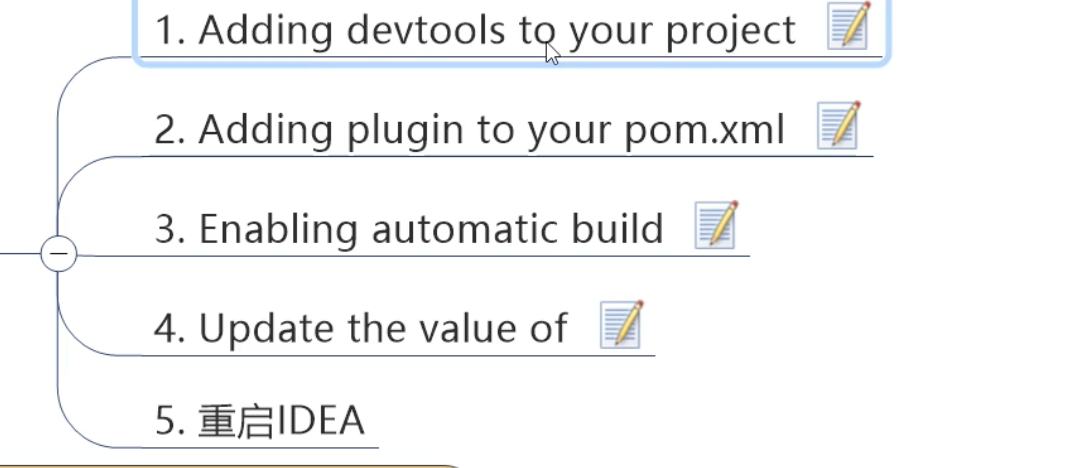
- 添加依赖到需要热部署的模块, 此处是cloud-provider-payment8001
1
2
3
4
5
6
| <dependency>
<groupId>org.springframework.boot</groupId>
<artifactId>spring-boot-devtools</artifactId>
<scope>runtime</scope>
<optional>true</optional>
</dependency>
|
向父工程pom添加plugin
1
2
3
4
5
6
7
8
9
10
11
12
13
| <build>
<finalName>你自己的工程名,该标签可写可不写</finalName>
<plugins>
<plugin>
<groupId>org.springframework.boot</groupId>
<artifactId>spring-boot-maven-plugin</artifactId>
<configuration>
<fork>true</fork>
<addResources>true</addResources>
</configuration>
</plugin>
</plugins>
</build>
|
开启Idea的自动构建
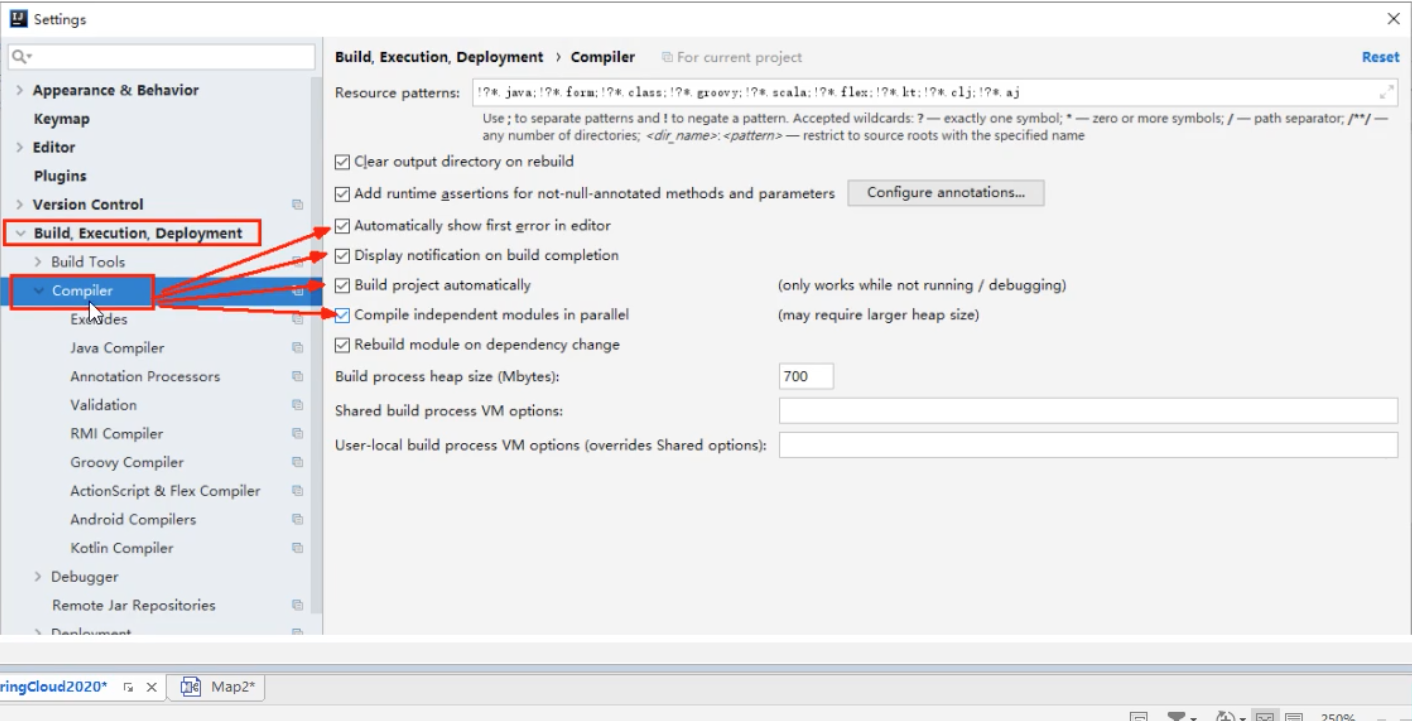
使用快捷键: command+shift+alt+/ 调出如下窗口并点击第一个Registry
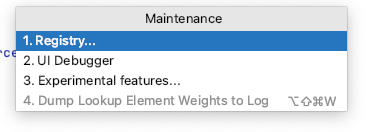
勾选上如下两个配置:
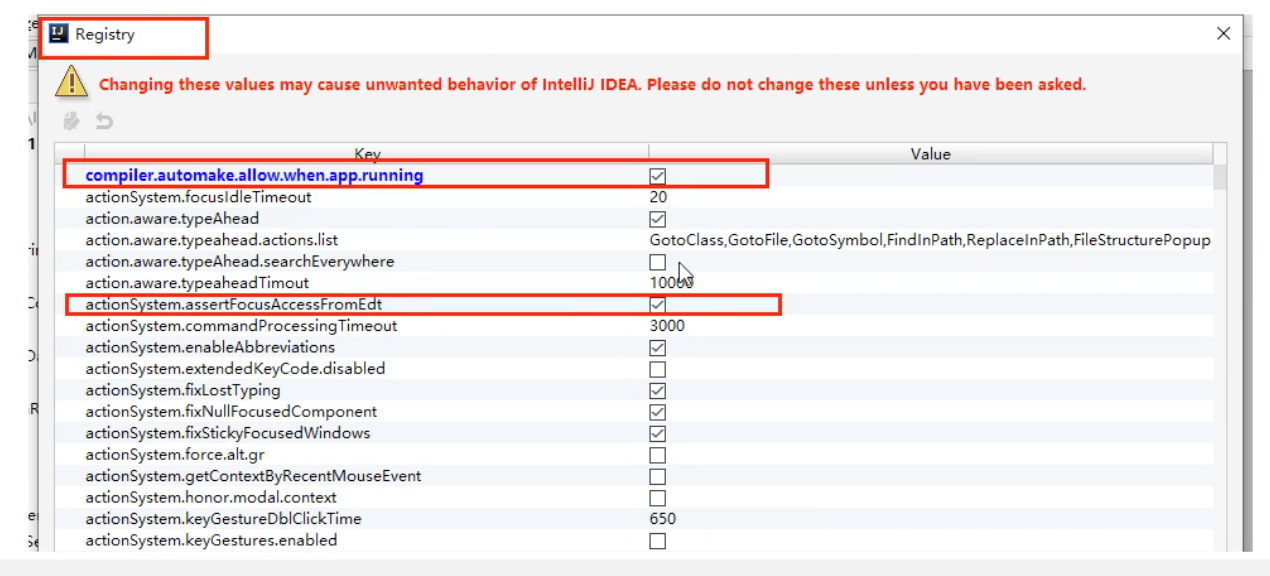
最后重启IDEA即可生效.
(值得注意的是: 热部署只用于开发阶段, 生产上线之前要关闭.)
2.13 建module: Consumer
在父工程下面新建服务消费者模块: cloud-consumer-order80, 因为服务调用者在调用时不会再请求路径上添加具体的端口号, 所以一般客户端消费者使用80端口, 即可以省略不写.
2.14 编写pom.xml
1
2
3
4
5
6
7
8
9
10
11
12
13
14
15
16
17
18
19
20
21
22
23
24
25
26
27
28
29
30
31
32
33
34
35
36
37
38
39
40
| <?xml version="1.0" encoding="UTF-8"?>
<project xmlns="http://maven.apache.org/POM/4.0.0"
xmlns:xsi="http://www.w3.org/2001/XMLSchema-instance"
xsi:schemaLocation="http://maven.apache.org/POM/4.0.0 http://maven.apache.org/xsd/maven-4.0.0.xsd">
<parent>
<artifactId>CloudAll</artifactId>
<groupId>com.lee</groupId>
<version>1.0-SNAPSHOT</version>
</parent>
<modelVersion>4.0.0</modelVersion>
<artifactId>cloud-consumer-order80</artifactId>
<dependencies>
<dependency>
<groupId>org.springframework.boot</groupId>
<artifactId>spring-boot-starter-web</artifactId>
</dependency>
<dependency>
<groupId>org.springframework.boot</groupId>
<artifactId>spring-boot-starter-actuator</artifactId>
</dependency>
<dependency>
<groupId>org.springframework.boot</groupId>
<artifactId>spring-boot-devtools</artifactId>
<scope>runtime</scope>
<optional>true</optional>
</dependency>
<dependency>
<groupId>org.projectlombok</groupId>
<artifactId>lombok</artifactId>
<optional>true</optional>
</dependency>
<dependency>
<groupId>org.springframework.boot</groupId>
<artifactId>spring-boot-starter-test</artifactId>
<scope>test</scope>
</dependency>
</dependencies>
</project>
|
2.15 建yml
2.16 主启动类
1
2
3
4
5
6
7
8
9
10
11
12
13
14
15
16
| package com.lee.springcloud;
import com.lee.myRule.MyselfRule;
import org.springframework.boot.SpringApplication;
import org.springframework.boot.autoconfigure.SpringBootApplication;
import org.springframework.boot.autoconfigure.jdbc.DataSourceAutoConfiguration;
import org.springframework.cloud.client.discovery.EnableDiscoveryClient;
import org.springframework.cloud.netflix.eureka.EnableEurekaClient;
import org.springframework.cloud.netflix.ribbon.RibbonClient;
@SpringBootApplication
public class ConsumerMain80 {
public static void main(String[] args) {
SpringApplication.run(ConsumerMain80.class);
}
}
|
2.17 业务类编写
由于是服务调用者, 只需要entity和controller, 因为具体的业务处理和数据交互处理是在服务提供方进行的.
2.18 Entity 实体类 (同2.7)
2.19 Controller
因为要调用远程服务, spring给我们提供了专门用来执行HTTP 调用的请求工具RestTemplate.
RestTemplate 是从 Spring3.0 开始支持的一个 HTTP 请求工具,它提供了常见的REST请求方案的模版,例如 GET 请求、POST 请求、PUT 请求、DELETE 请求以及一些通用的请求执行方法 exchange 以及 execute。RestTemplate 继承自 InterceptingHttpAccessor 并且实现了 RestOperations 接口,其中 RestOperations 接口定义了基本的 RESTful 操作,这些操作在 RestTemplate 中都得到了实现。(RestTemplate的具体使用可以参见官网API和博客)
因为RestTemplate是spring提供的, 所以在使用前要做相关 的configuration,向spring容器注入一个RestTemplate的bean对象.
1
2
3
4
5
6
7
8
9
10
11
12
13
14
15
| package com.lee.springcloud.config;
import org.springframework.cloud.client.loadbalancer.LoadBalanced;
import org.springframework.context.annotation.Bean;
import org.springframework.context.annotation.Configuration;
import org.springframework.web.client.RestTemplate;
@Configuration
public class ApplicationContextConfig {
@Bean
public RestTemplate getRestTemplate(){
return new RestTemplate();
}
}
|
所以有了以上的背景介绍, 创建controller如下:
1
2
3
4
5
6
7
8
9
10
11
12
13
14
15
16
17
18
19
20
21
22
23
24
25
26
27
28
29
30
31
32
33
34
35
36
37
38
39
40
| package com.lee.springcloud.controller;
import com.lee.springcloud.entities.CommonResult;
import com.lee.springcloud.entities.Payment;
import com.lee.springcloud.lb.LoadBalancer;
import lombok.extern.slf4j.Slf4j;
import org.springframework.cloud.client.ServiceInstance;
import org.springframework.cloud.client.discovery.DiscoveryClient;
import org.springframework.web.bind.annotation.GetMapping;
import org.springframework.web.bind.annotation.PathVariable;
import org.springframework.web.bind.annotation.RestController;
import org.springframework.web.client.RestTemplate;
import javax.annotation.Resource;
import java.net.URI;
import java.util.List;
@RestController
@Slf4j
public class OrderController {
public static final String REQUEST_URL="http://localhost:8001";
@Resource
private RestTemplate restTemplate;
@GetMapping(value = "/c/create",produces = "application/json; charset=UTF-8")
public CommonResult<Payment> create(Payment payment){
log.info("插入");
return restTemplate.postForObject(REQUEST_URL+"/p/create",payment,CommonResult.class);
}
@GetMapping(value = "/c/get/{id}",produces = "application/json; charset=UTF-8")
public CommonResult<Payment> get(@PathVariable("id") Long id){
log.info("查询");
CommonResult forObject = (CommonResult) restTemplate.getForObject(REQUEST_URL + "/p/get/" + id, CommonResult.class);
System.out.println(forObject.toString());
return forObject;
}
}
|
2.20 测试
依次启动服务提供者模块(8001)和服务消费者模块(80), 然后访问消费者模块controller 暴露的请求地址:
1
| http://localhost:8001/c/get/1
|
可以看到正常访问到数据.
2.21 重构cloud-api-commons
观察Providor和Consumer模块, 不难发现, 其实有些公共的地方, 如Entity, 会在微服务各个模块中公用, 一样的代码重复出现多次显得臃肿, 无意义. 所以向上提取, 抽出公共层模块. 新建模块 cloud-api-commons, 将Entity等公共部分放在其中.
2.22 编写pom.xml
1
2
3
4
5
6
7
8
9
10
11
12
13
14
15
16
17
18
19
20
21
22
23
24
25
26
27
28
29
30
31
32
33
34
35
36
37
38
39
40
41
42
43
44
45
| <?xml version="1.0" encoding="UTF-8"?>
<project xmlns="http://maven.apache.org/POM/4.0.0"
xmlns:xsi="http://www.w3.org/2001/XMLSchema-instance"
xsi:schemaLocation="http://maven.apache.org/POM/4.0.0 http://maven.apache.org/xsd/maven-4.0.0.xsd">
<parent>
<artifactId>CloudAll</artifactId>
<groupId>com.lee</groupId>
<version>1.0-SNAPSHOT</version>
</parent>
<modelVersion>4.0.0</modelVersion>
<artifactId>cloud-api-commons</artifactId>
<dependencies>
<dependency>
<groupId>org.springframework.boot</groupId>
<artifactId>spring-boot-starter-web</artifactId>
</dependency>
<dependency>
<groupId>org.springframework.boot</groupId>
<artifactId>spring-boot-starter-actuator</artifactId>
</dependency>
<dependency>
<groupId>org.springframework.boot</groupId>
<artifactId>spring-boot-devtools</artifactId>
<scope>runtime</scope>
<optional>true</optional>
</dependency>
<dependency>
<groupId>org.projectlombok</groupId>
<artifactId>lombok</artifactId>
<optional>true</optional>
</dependency>
<dependency>
<groupId>cn.hutool</groupId>
<artifactId>hutool-all</artifactId>
<version>5.1.0</version>
</dependency>
<dependency>
<groupId>org.springframework.boot</groupId>
<artifactId>spring-boot-starter-test</artifactId>
<scope>test</scope>
</dependency>
</dependencies>
</project>
|
因为抽取了公共部分后, 原来的Providor和Consumer模块都要从公共模块获取实体类信息, 所以在原来的Providor和Consumer模块的pom中添加如下依赖, 将公共模块的entity引入
1
2
3
4
5
| <dependency>
<groupId>com.lee</groupId>
<artifactId>cloud-api-commons</artifactId>
<version>1.0-SNAPSHOT</version>
</dependency>
|
2.23 Entity 实体类
在cloud-api-commons模块中添加实体类, 并删除原来providor和consumer中的entity.
1
2
3
4
5
6
7
8
9
10
11
12
13
14
15
| import lombok.AllArgsConstructor;
import lombok.Data;
import lombok.NoArgsConstructor;
import lombok.ToString;
import java.io.Serializable;
@Data
@AllArgsConstructor
@NoArgsConstructor
@ToString
public class Payment implements Serializable {
private long id;
private String serial;
}
|
1
2
3
4
5
6
7
8
9
10
11
12
13
14
15
16
| import lombok.AllArgsConstructor;
import lombok.Data;
import lombok.NoArgsConstructor;
@Data
@AllArgsConstructor
@NoArgsConstructor
public class CommonResult<T> {
private Integer code;
private String msg;
private T data;
public CommonResult(Integer code, String msg){
this(code,msg,null);
}
}
|
2.24 测试
重构完成后, 再次按照2.20的步骤进行测试, 仍然能进行数据访问即成功.
3. 注册中心(E15-)
3.1 服务注册中心解决方案
设计或者选型一个服务注册中心,首先要考虑的就是服务注册与发现机制。纵观当下各种主流的服务注册中心解决方案,大致可归为三类:
- 应用内:直接集成到应用中,依赖于应用自身完成服务的注册与发现,最典型的是Netflix提供的Eureka
- 应用外:把应用当成黑盒,通过应用外的某种机制将服务注册到注册中心,最小化对应用的侵入性,比如Airbnb的SmartStack,HashiCorp的Consul
- DNS:将服务注册为DNS的SRV记录,严格来说,是一种特殊的应用外注册方式,SkyDNS是其中的代表
注1:对于第一类注册方式,除了Eureka这种一站式解决方案,还可以基于ZooKeeper或者Etcd自行实现一套服务注册机制,这在大公司比较常见,但对于小公司而言显然性价比太低。
注2:由于DNS固有的缓存缺陷,本文不对第三类注册方式作深入探讨。
除了基本的服务注册与发现机制,从开发和运维角度,至少还要考虑如下五个方面:
- 测活:服务注册之后,如何对服务进行测活以保证服务的可用性?
- 负载均衡:当存在多个服务提供者时,如何均衡各个提供者的负载?
- 集成:在服务提供端或者调用端,如何集成注册中心?
- 运行时依赖:引入注册中心之后,对应用的运行时环境有何影响?
- 可用性:如何保证注册中心本身的可用性,特别是消除单点故障?
3.2 主流注册中心产品
|
Nacos |
Eureka |
Consul |
CoreDNS |
Zookeeper |
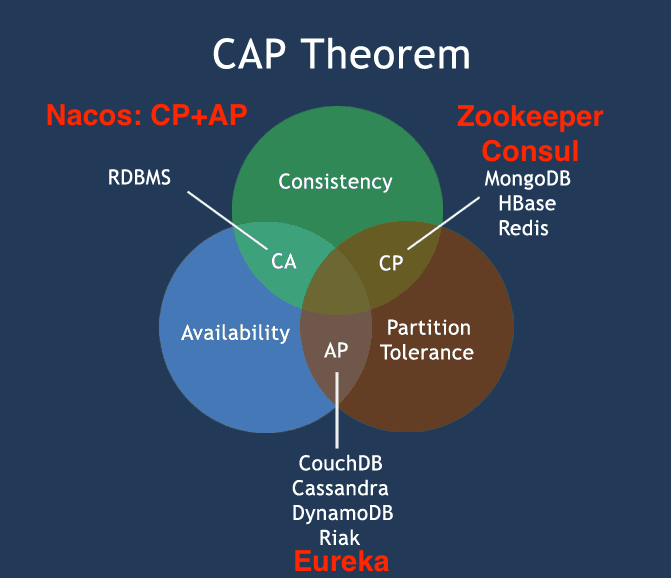
| 一致性协议 |
CP+AP |
AP |
CP |
— |
CP |
| 健康检查 |
TCP/HTTP/MYSQL/Client Beat |
Client Beat |
TCP/HTTP/gRPC/Cmd |
— |
Keep Alive |
| 负载均衡策略 |
权重/ |
|
|
|
|
| metadata/Selector |
Ribbon |
Fabio |
RoundRobin |
— |
|
| 雪崩保护 |
有 |
有 |
无 |
无 |
无 |
| 自动注销实例 |
支持 |
支持 |
不支持 |
不支持 |
支持 |
| 访问协议 |
HTTP/DNS |
HTTP |
HTTP/DNS |
DNS |
TCP |
| 监听支持 |
支持 |
支持 |
支持 |
不支持 |
支持 |
| 多数据中心 |
支持 |
支持 |
支持 |
不支持 |
不支持 |
| 跨注册中心同步 |
支持 |
不支持 |
支持 |
不支持 |
不支持 |
| SpringCloud集成 |
支持 |
支持 |
支持 |
不支持 |
不支持 |
| Dubbo集成 |
支持 |
不支持 |
不支持 |
不支持 |
支持 |
| K8S集成 |
支持 |
不支持 |
支持 |
支持 |
不支持 |
3.3 Eureka - 注册中心
3.3.1 服务治理

3.3.2 服务注册与发现

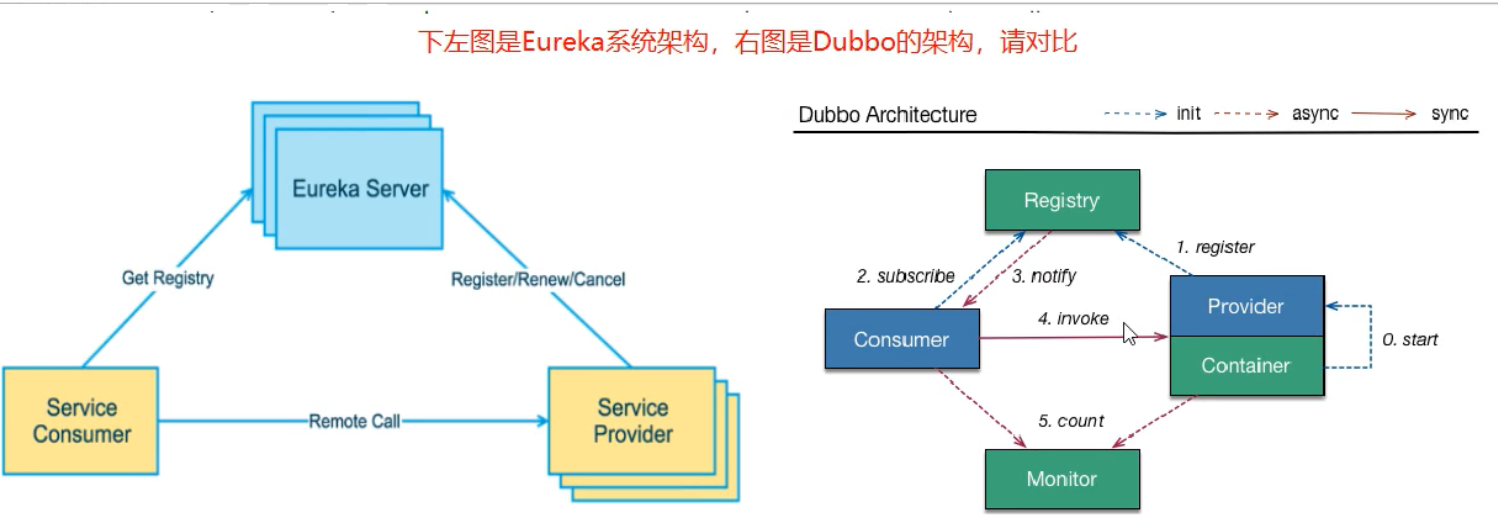
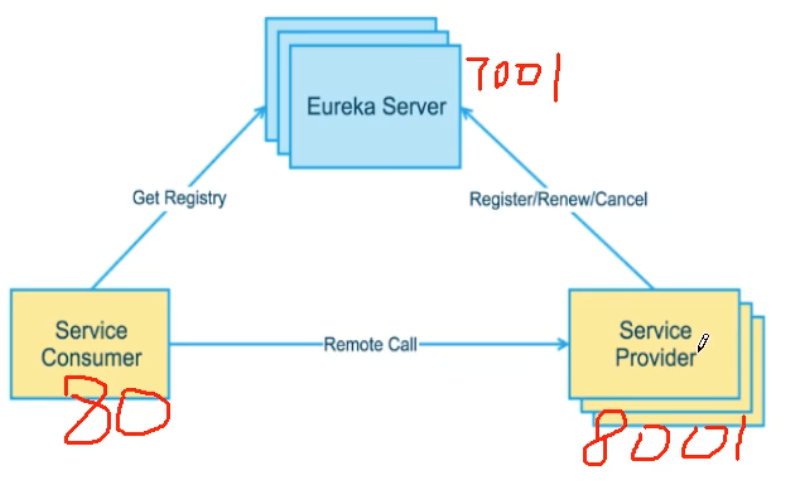
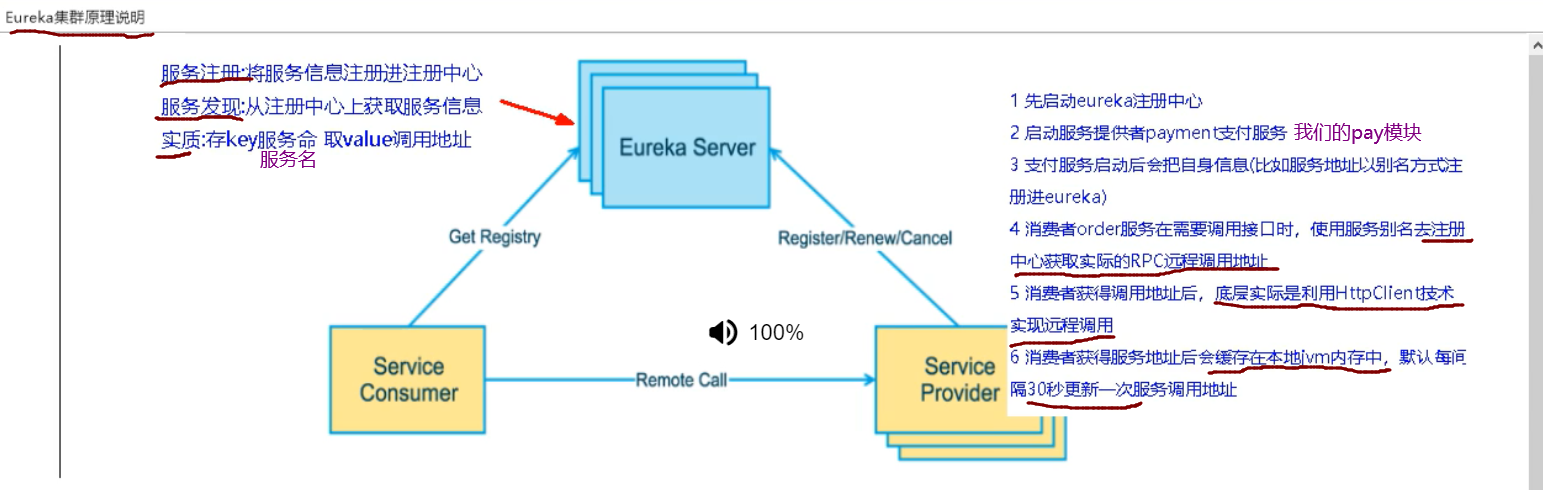
3.3.3 Eureka & Dubbo 架构图
3.3.4 Eureka AP理论图示

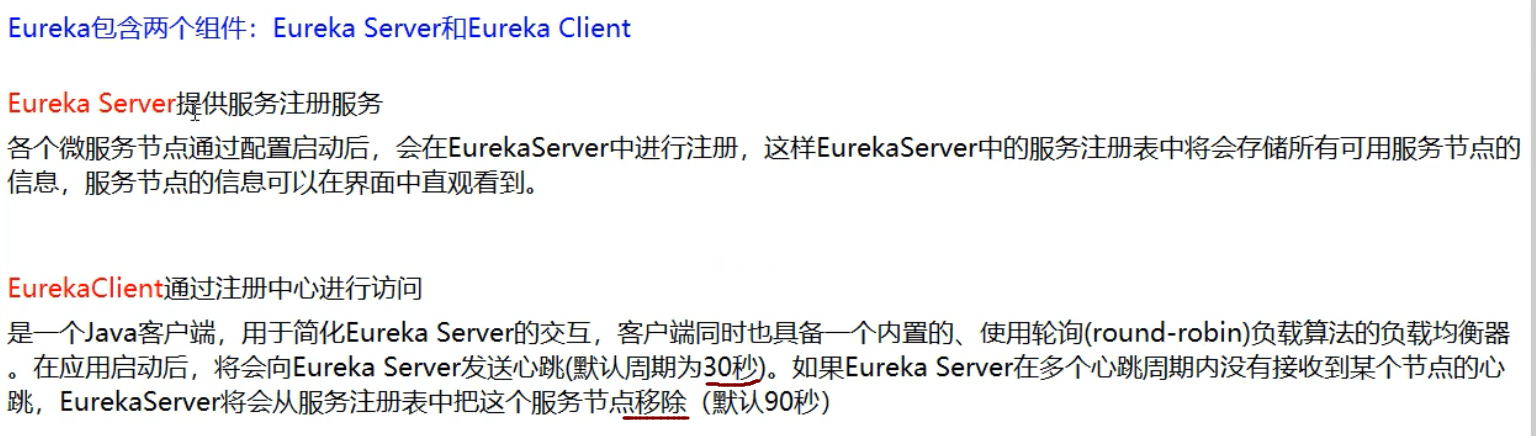
3.3.5 Eureka 服务端与客户端
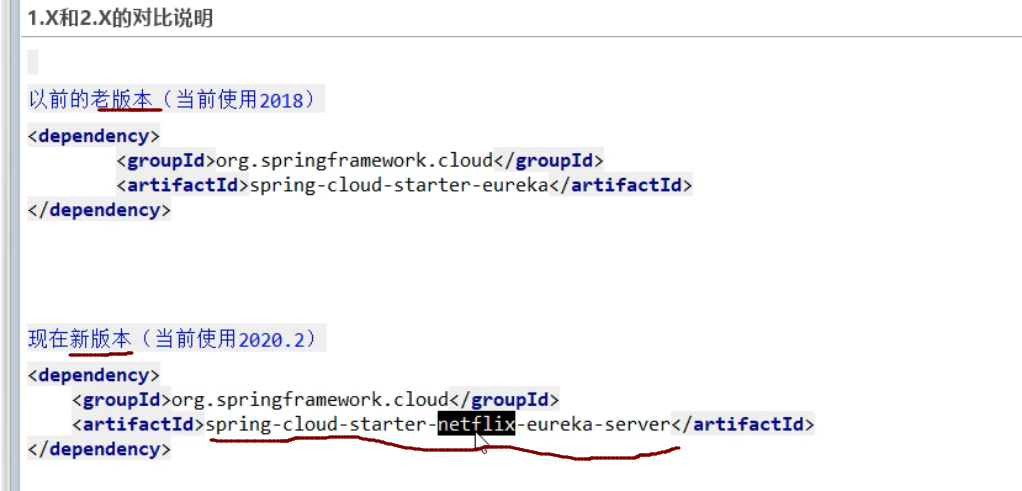
3.3.6 Eureka 版本说明
3.3.7 Eureka 服务端与客户端

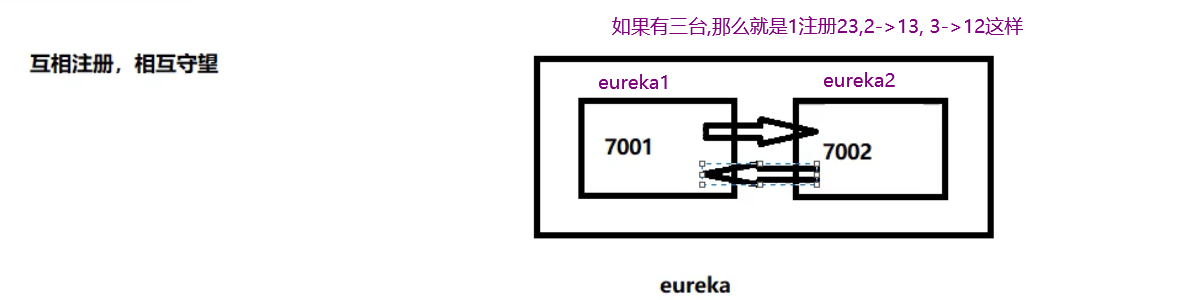
3.3.8 Eureka 集群节点注册方式
3.4 Eureka 微服务
3.4.1 单点构建
3.4.1.1 新建cloud-eureka-server7001 模块
3.4.1.2 编写pom.xml
1
2
3
4
5
6
7
8
9
10
11
12
13
14
15
16
17
18
19
20
21
22
23
24
25
26
27
28
29
30
31
32
33
34
35
36
37
38
39
40
41
42
43
44
45
46
47
48
49
50
| <?xml version="1.0" encoding="UTF-8"?>
<project xmlns="http://maven.apache.org/POM/4.0.0"
xmlns:xsi="http://www.w3.org/2001/XMLSchema-instance"
xsi:schemaLocation="http://maven.apache.org/POM/4.0.0 http://maven.apache.org/xsd/maven-4.0.0.xsd">
<parent>
<artifactId>CloudAll</artifactId>
<groupId>com.lee</groupId>
<version>1.0-SNAPSHOT</version>
</parent>
<modelVersion>4.0.0</modelVersion>
<artifactId>cloud-eureka-server7001</artifactId>
<dependencies>
<dependency>
<groupId>org.springframework.cloud</groupId>
<artifactId>spring-cloud-starter-netflix-eureka-server</artifactId>
<exclusions>
<exclusion>
<groupId>javax.servlet</groupId>
<artifactId>servlet-api</artifactId>
</exclusion>
</exclusions>
</dependency>
<dependency>
<groupId>org.springframework.boot</groupId>
<artifactId>spring-boot-starter-web</artifactId>
</dependency>
<dependency>
<groupId>org.springframework.boot</groupId>
<artifactId>spring-boot-starter-actuator</artifactId>
</dependency>
<dependency>
<groupId>org.springframework.boot</groupId>
<artifactId>spring-boot-devtools</artifactId>
<scope>runtime</scope>
<optional>true</optional>
</dependency>
<dependency>
<groupId>org.projectlombok</groupId>
<artifactId>lombok</artifactId>
<optional>true</optional>
</dependency>
<dependency>
<groupId>org.springframework.boot</groupId>
<artifactId>spring-boot-starter-test</artifactId>
<scope>test</scope>
</dependency>
</dependencies>
</project>
|
3.4.1.3 建yml
1
2
3
4
5
6
7
8
9
10
11
| server:
port: 7001
eureka:
instance:
hostname: localhost
client:
register-with-eureka: false
fetch-registry: false
service-url:
defaultZone: http://${eureka.instance.hostname}:${server.port}/eureka/
|
3.4.1.4 主启动类
1
2
3
4
5
6
7
8
9
10
11
12
13
| package com.lee.springcloud;
import org.springframework.boot.SpringApplication;
import org.springframework.boot.autoconfigure.SpringBootApplication;
import org.springframework.cloud.netflix.eureka.server.EnableEurekaServer;
@SpringBootApplication
@EnableEurekaServer
public class EurekaMain7001 {
public static void main(String[] args) {
SpringApplication.run(EurekaMain7001.class,args);
}
}
|
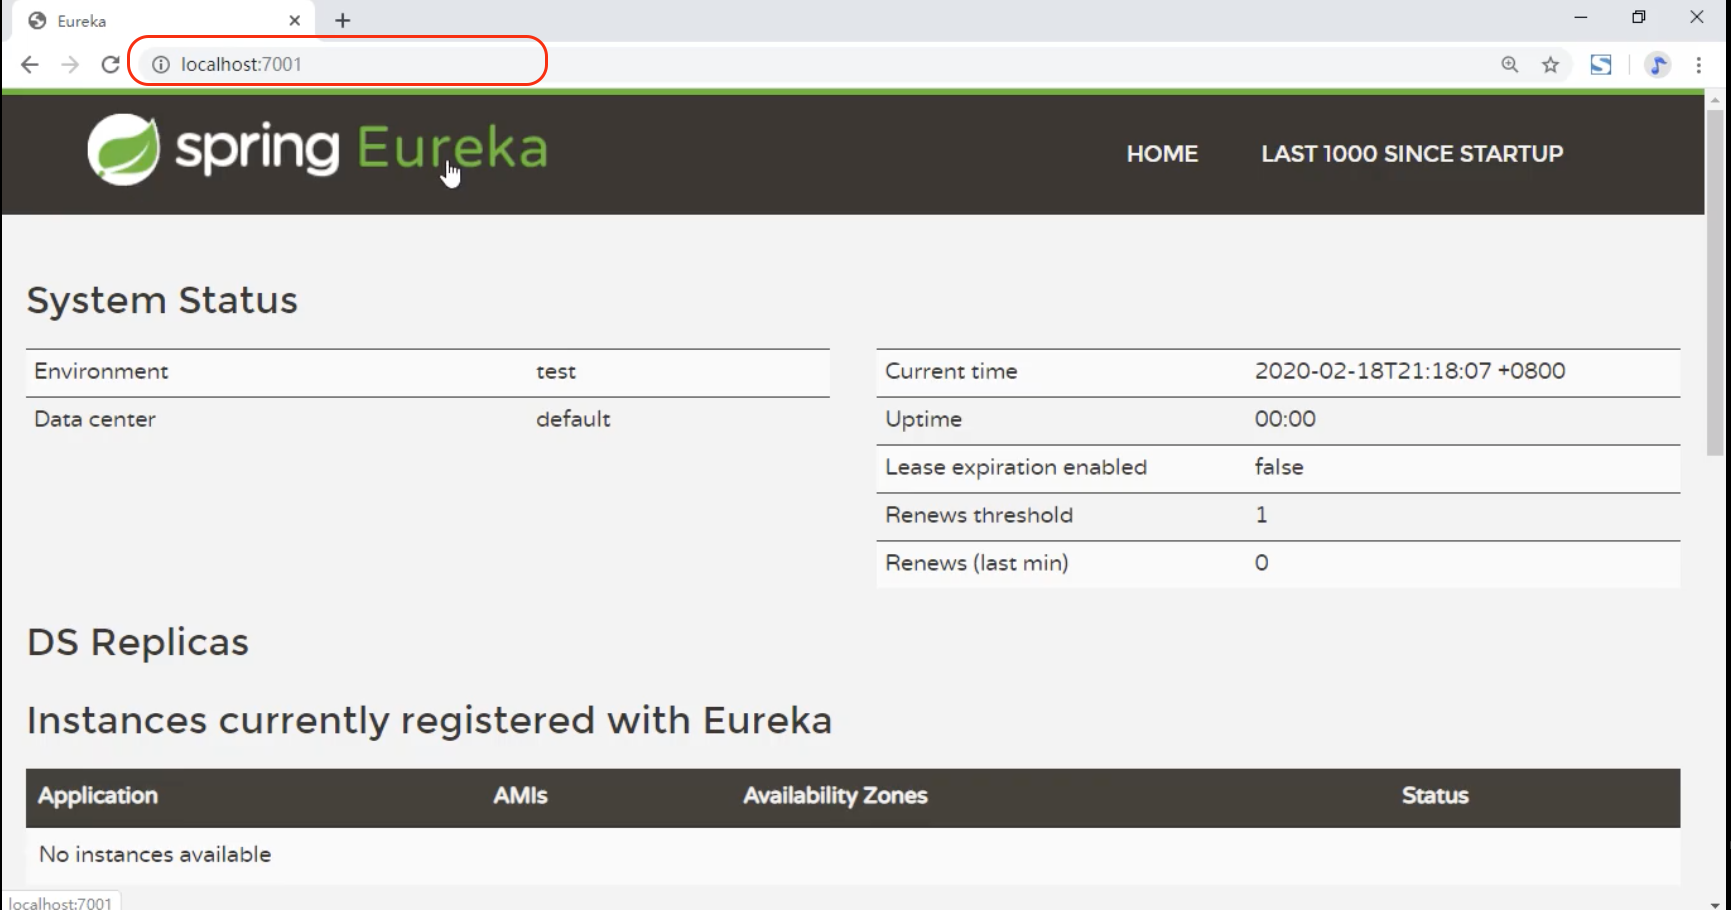
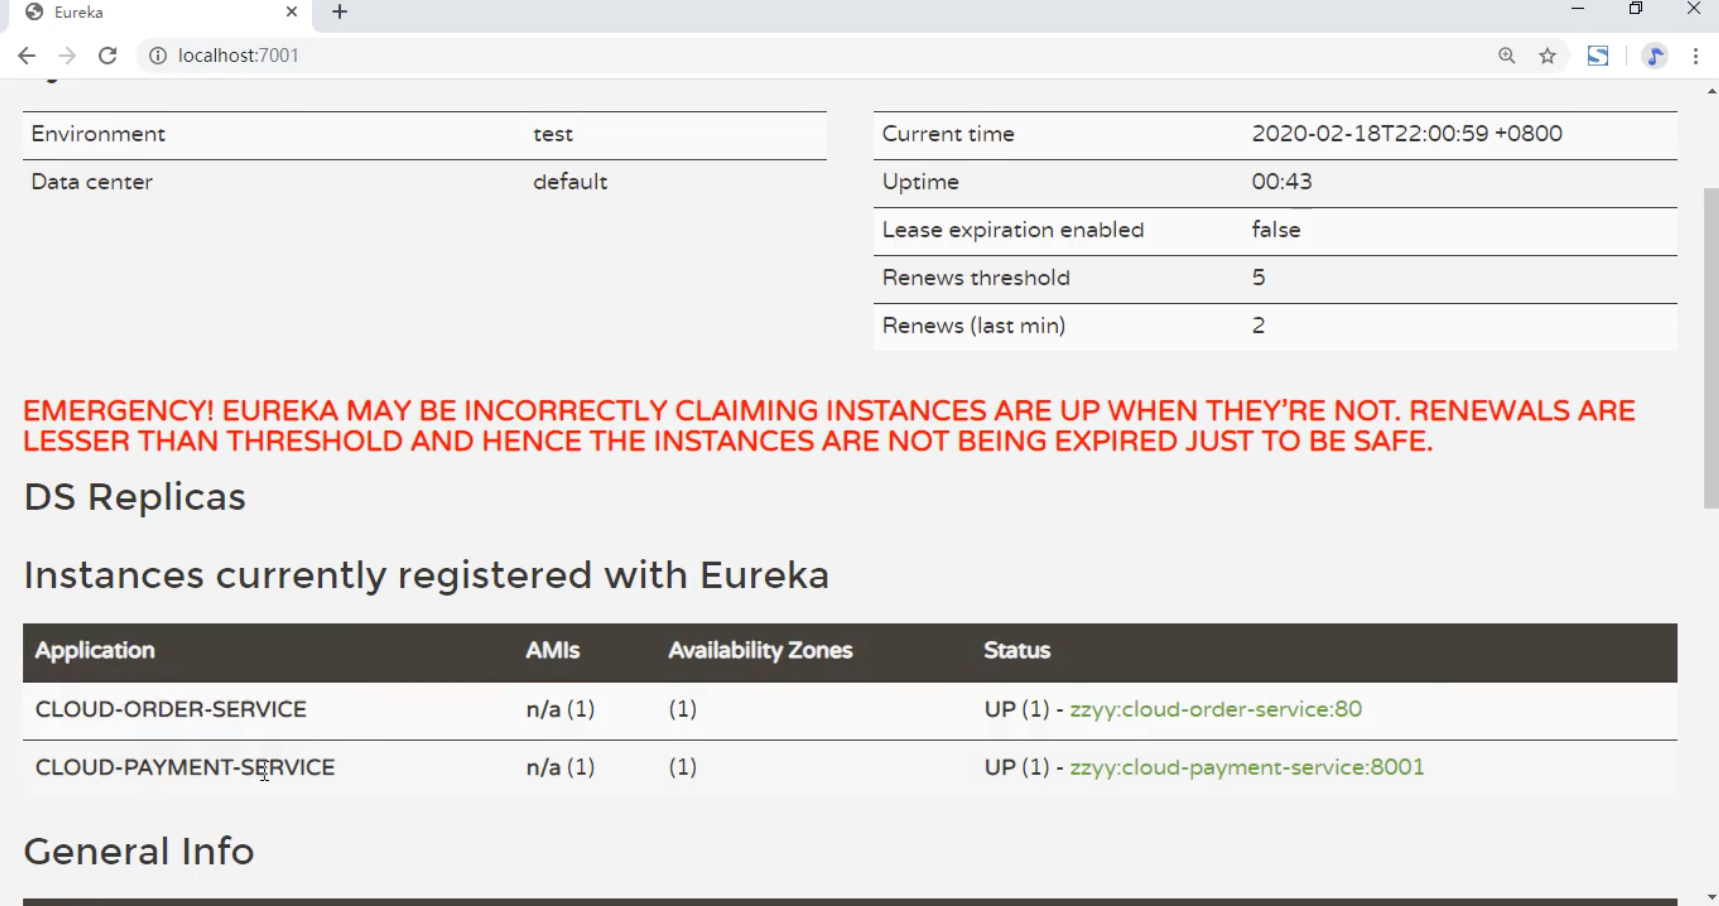
3.4.1.5 测试Eureka-Server
启动cloud-eureka-server7001 模块, 访问地址: http://localhost:7001 . 如能见到下图, 则说明服务注册中心搭建成功.
3.4.1.6 注册Providor模块
将Providor模块作为Eureka-Client注册到服务注册中心. 具体做法是
- 修改cloud-provider-payment8001 模块的pom.xml, 添加eureka-client的依赖
1
2
3
4
| <dependency>
<groupId>org.springframework.cloud</groupId>
<artifactId>spring-cloud-starter-netflix-eureka-client</artifactId>
</dependency>
|
- 修改 cloud-provider-payment8001 模块的application.yml
1
2
3
4
5
6
7
8
9
10
11
12
13
14
15
16
17
18
19
20
21
22
23
24
25
26
27
| server:
port: 8001
spring:
application:
name: cloud-payment-service
datasource:
driver-class-name: com.mysql.jdbc.Driver
type: com.alibaba.druid.pool.DruidDataSource
url: jdbc:mysql://localhost:3306/springcloud?useUnicode=true&characterEncoding=utf-8&useSSL=false&allowPublicKeyRetrieval=true&serverTimezone=UTC&rewriteBatchedStatements=true
username: root
password: root
druid:
validation-query: select 1
mybatis:
mapper-locations: classpath:mapper/*.xml
type-aliases-package: com.lee.springcloud.com.lee.springcloud.entities
eureka:
client:
service-url:
defaultZone: http://localhost:7001/eureka
fetch-registry: true
register-with-eureka: true
|
- 修改 cloud-provider-payment8001 模块的主启动类
1
2
3
4
5
6
7
8
9
10
11
12
13
| package com.lee.springcloud;
import org.springframework.boot.SpringApplication;
import org.springframework.boot.autoconfigure.SpringBootApplication;
import org.springframework.cloud.client.discovery.EnableDiscoveryClient;
@SpringBootApplication
@EnableEurekaClient
public class PaymentMain8001 {
public static void main(String[] args) {
SpringApplication.run(PaymentMain8001.class,args);
}
}
|
3.4.1.7 测试Providor注册成功与否
依次启动cloud-eureka-server7001 模块 和 cloud-provider-payment8001 模块, 然后访问再次访问地址: http://localhost:7001 . 如能看见下图效果, 则表示providor注册到了Eureka-Server.
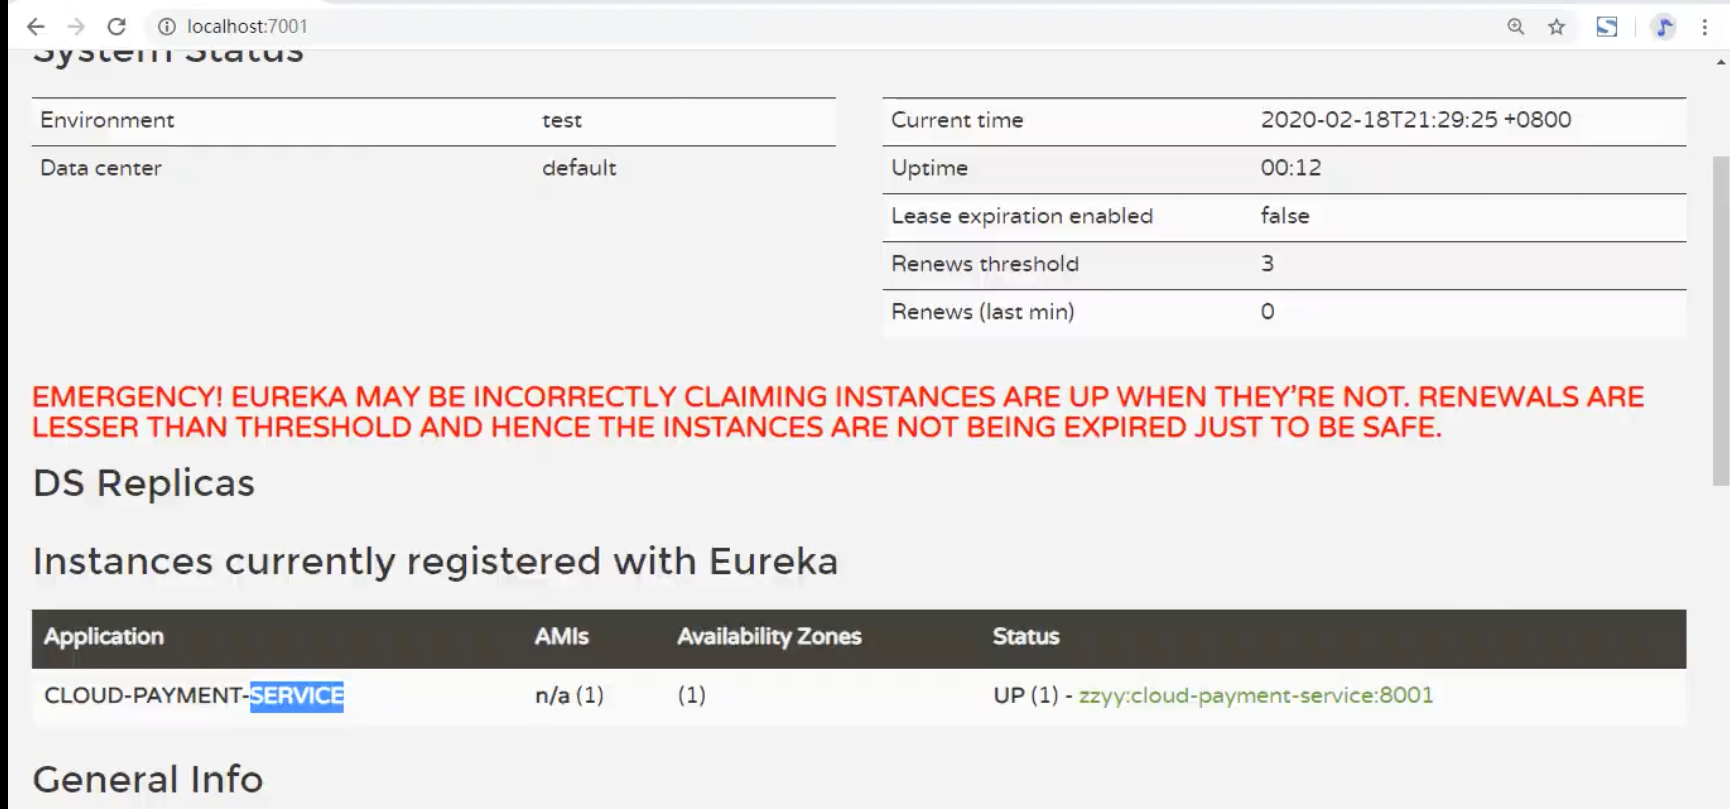
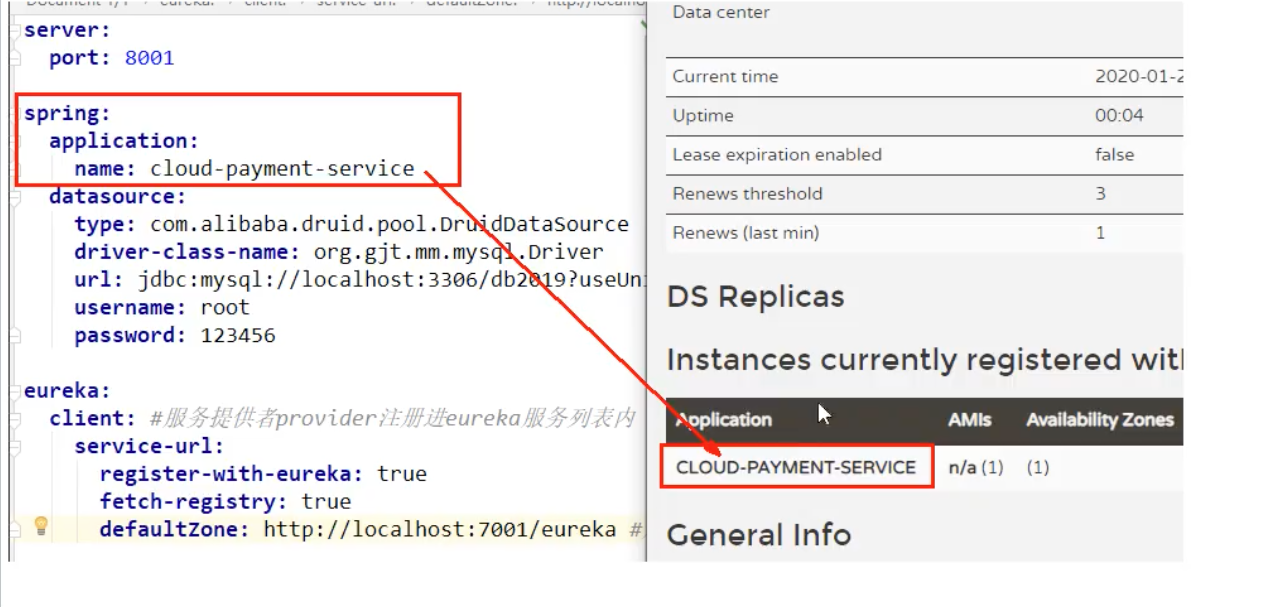
服务的名称就是application.yml文件 中配置的:
3.4.1.8 注册Consumer模块
同理, 按 [3.4.1.6]( #3.4.1.6 注册Providor模块)修改Consumer的pom, yml和主启动类即可.
POM:
1
2
3
4
| <dependency>
<groupId>org.springframework.cloud</groupId>
<artifactId>spring-cloud-starter-netflix-eureka-client</artifactId>
</dependency>
|
YAML:
1
2
3
4
5
6
7
8
9
10
11
12
13
| server:
port: 80
spring:
application:
name: cloud-order-service
eureka:
client:
service-url:
defaultZone: http://localhost:7001/eureka
fetch-registry: true
register-with-eureka: true
|
主启动类:
1
2
3
4
5
6
7
8
9
10
11
12
13
14
15
16
17
| package com.lee.springcloud;
import com.lee.myRule.MyselfRule;
import org.springframework.boot.SpringApplication;
import org.springframework.boot.autoconfigure.SpringBootApplication;
import org.springframework.boot.autoconfigure.jdbc.DataSourceAutoConfiguration;
import org.springframework.cloud.client.discovery.EnableDiscoveryClient;
import org.springframework.cloud.netflix.eureka.EnableEurekaClient;
import org.springframework.cloud.netflix.ribbon.RibbonClient;
@SpringBootApplication
@EnableEurekaClient
public class ConsumerMain80 {
public static void main(String[] args) {
SpringApplication.run(ConsumerMain80.class);
}
}
|
3.4.1.9 测试Consumer注册成功与否
依次启动cloud-eureka-server7001 , cloud-provider-payment8001 和 cloud-consumer-order80 三个 模块, 如能看见下图所示服务, 即成功.
所以至此, 单机版的注册中心搭建并测试完毕. 具体架构如下图.
3.4.1.10 Eureka的工作原理解析
3.4.2 集群构建
3.4.2.1 新建cloud-eureka-server7002 模块
3.4.2.2 编写pom.xml 并修改host
1
2
3
4
5
6
7
8
9
10
11
12
13
14
15
16
17
18
19
20
21
22
23
24
25
26
27
28
29
30
31
32
33
34
35
36
37
38
39
40
41
42
43
| <?xml version="1.0" encoding="UTF-8"?>
<project xmlns="http://maven.apache.org/POM/4.0.0"
xmlns:xsi="http://www.w3.org/2001/XMLSchema-instance"
xsi:schemaLocation="http://maven.apache.org/POM/4.0.0 http://maven.apache.org/xsd/maven-4.0.0.xsd">
<parent>
<artifactId>CloudAll</artifactId>
<groupId>com.lee</groupId>
<version>1.0-SNAPSHOT</version>
</parent>
<modelVersion>4.0.0</modelVersion>
<artifactId>cloud-sureka-server7002</artifactId>
<dependencies>
<dependency>
<groupId>org.springframework.cloud</groupId>
<artifactId>spring-cloud-starter-netflix-eureka-server</artifactId>
</dependency>
<dependency>
<groupId>org.springframework.boot</groupId>
<artifactId>spring-boot-starter-web</artifactId>
</dependency>
<dependency>
<groupId>org.springframework.boot</groupId>
<artifactId>spring-boot-starter-actuator</artifactId>
</dependency>
<dependency>
<groupId>org.springframework.boot</groupId>
<artifactId>spring-boot-devtools</artifactId>
<scope>runtime</scope>
<optional>true</optional>
</dependency>
<dependency>
<groupId>org.projectlombok</groupId>
<artifactId>lombok</artifactId>
<optional>true</optional>
</dependency>
<dependency>
<groupId>org.springframework.boot</groupId>
<artifactId>spring-boot-starter-test</artifactId>
<scope>test</scope>
</dependency>
</dependencies>
</project>
|
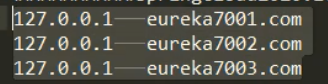
(注意在本地配置集群环境时, 需要先进行host文件域名映射配置.)
1
2
| 127.0.0.1 eureka7001.com
127.0.0.1 eureka7002.com
|
3.4.2.3 建yml
1
2
3
4
5
6
7
8
9
10
11
12
13
14
| server:
port: 7002
spring:
application:
name: eureka-server02
eureka:
instance:
hostname: eureka7002.com
client:
register-with-eureka: false
fetch-registry: false
service-url:
defaultZone: http://eureka7001.com:7001/eureka/
|
同理也要修改7001的application.yml文件, 将 7001注册到7002节点
1
2
3
4
5
6
7
8
9
10
11
12
13
| server:
port: 7001
spring:
application:
name: eureka-server01
eureka:
instance:
hostname: eureka7001.com
client:
register-with-eureka: false
fetch-registry: false
service-url:
defaultZone: http://eureka7002.com:7002/eureka/
|
3.4.2.4 主启动类
1
2
3
4
5
6
7
8
9
10
11
12
13
| package com.lee.springcloud;
import org.springframework.boot.SpringApplication;
import org.springframework.boot.autoconfigure.SpringBootApplication;
import org.springframework.cloud.netflix.eureka.server.EnableEurekaServer;
@SpringBootApplication
@EnableEurekaServer
public class EurekaMain7002 {
public static void main(String[] args) {
SpringApplication.run(EurekaMain7002.class,args);
}
}
|
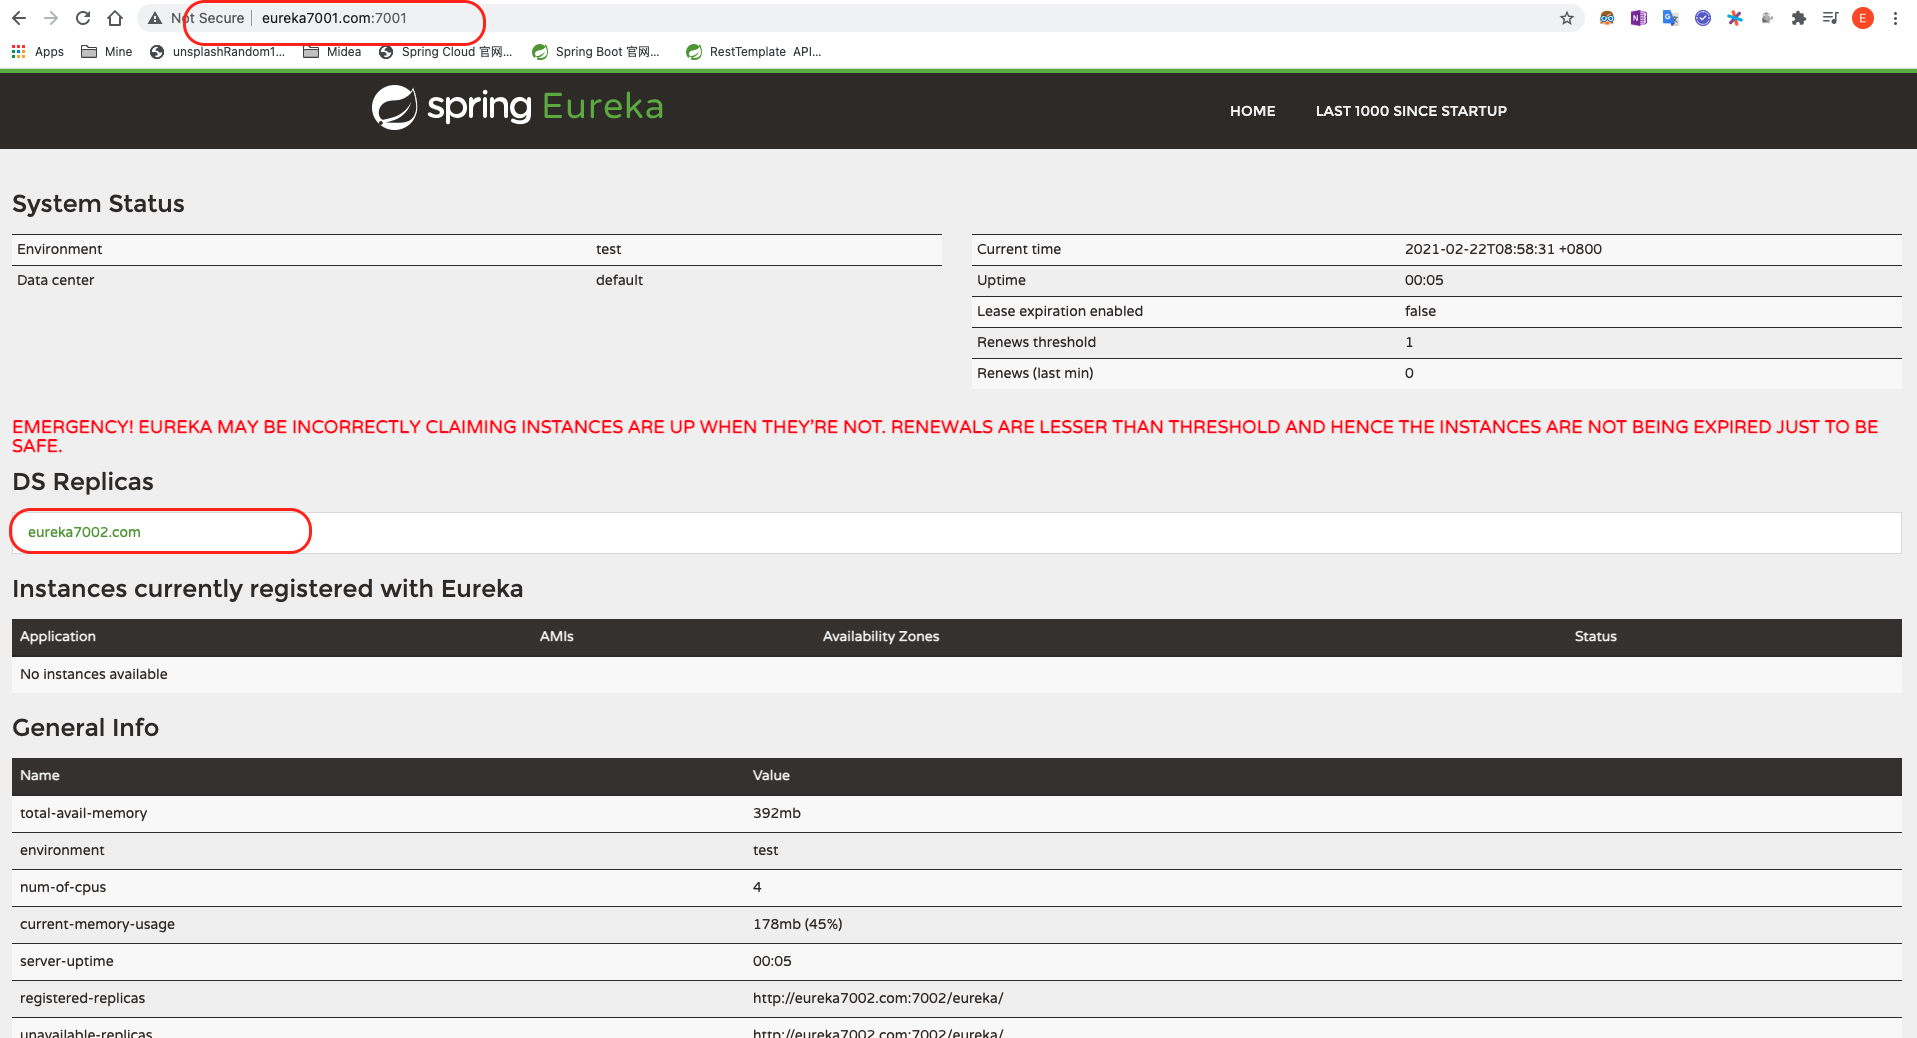
3.4.2.5 测试两个server
依次启动*cloud-eureka-server7001 和 cloud-eureka-server7002 * 模块 , 然后在浏览器依次访问
1
2
| eureka7001.com:7001
eureka7002.com:7002
|
可以依次看见下面的结果, 则说明集群中2个eureka-server节点相互注册成功.
3.4.2.6 注册Providor&Consumer到Eureka 集群
按如下方式修改Providor & Consumer 模块的application.yml文件, 即可注册进eureka-server集群.
Providor:
1
2
3
4
5
6
7
8
9
10
| spring:
application:
name: cloud-payment-service
eureka:
client:
service-url:
defaultZone: http://eureka7001.com:7001/eureka,http://eureka7002.com:7002/eureka
fetch-registry: true
register-with-eureka: true
|
Consumer:
1
2
3
4
5
6
7
8
9
10
| spring:
application:
name: cloud-order-service
eureka:
client:
service-url:
defaultZone: http://eureka7001.com:7001/eureka,http://eureka7002.com:7002/eureka
register-with-eureka: true
fetch-registry: true
|
3.4.2.7 测试注册是否成功
一次启动下面四个模块:
1
2
3
4
| cloud-eureka-server7001
cloud-eureka-server7002
cloud-provider-payment8001
cloud-consumer-order80
|
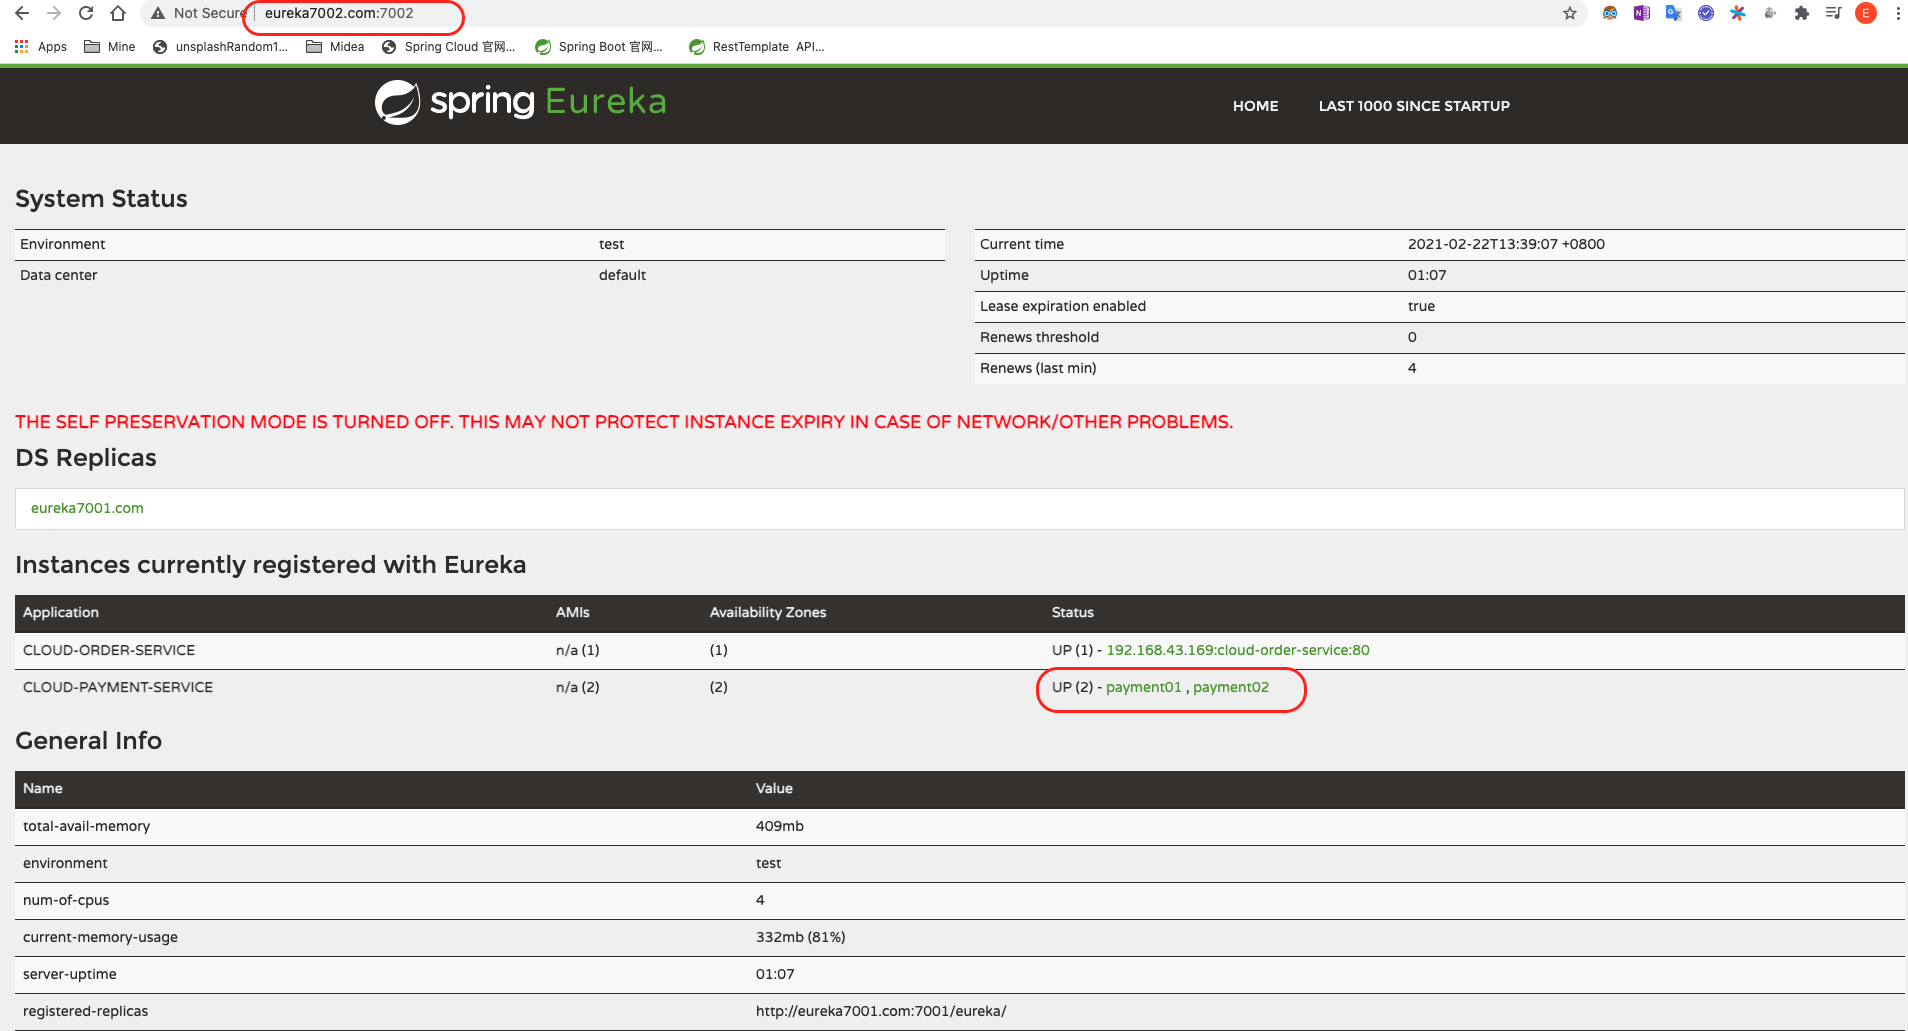
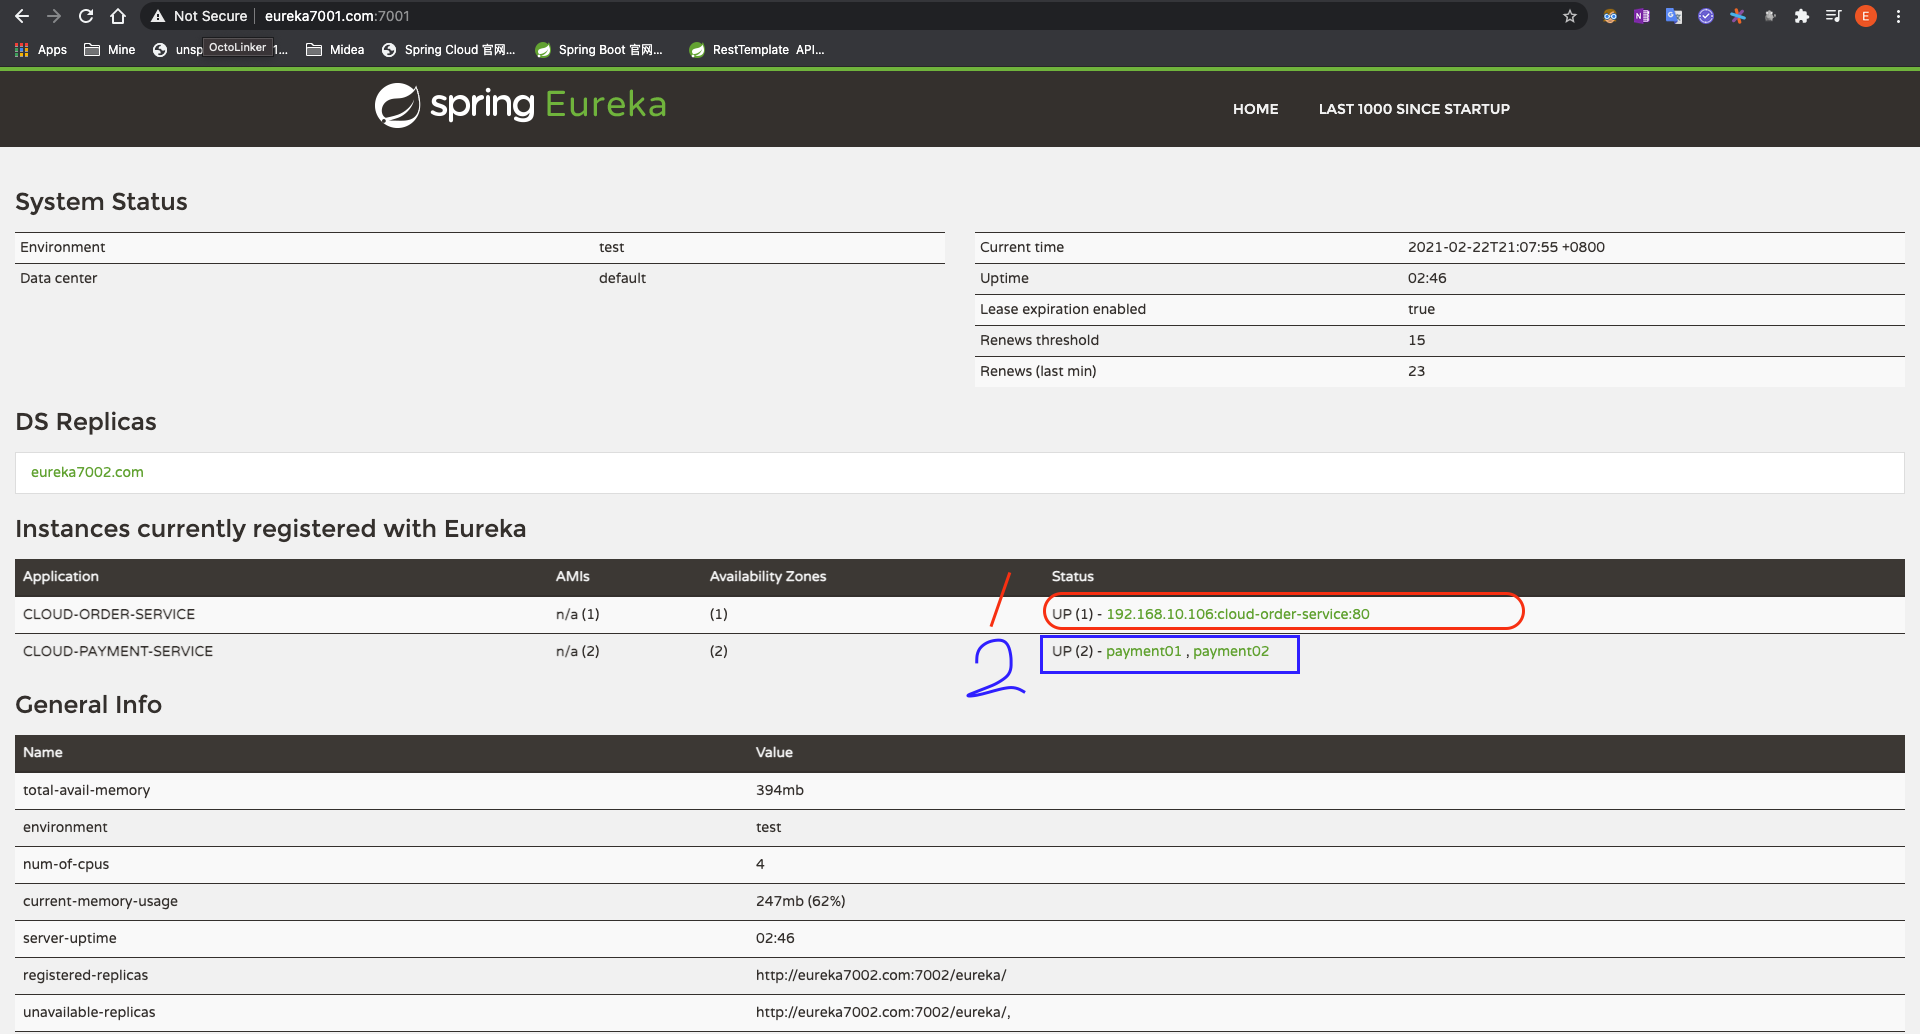
可以看见支付服务和订单服务都已经注册到了Eureka集群, 如下图, 则成功.
3.4.3 Providor(支付服务Payment)的集群搭建
按照截止当前的8001模块的状态和配置进行8002的新建配置.
3.4.3.1 新建cloud-provider-payment8002模块
3.4.3.2 编写pom.xml
1
2
3
4
5
6
7
8
9
10
11
12
13
14
15
16
17
18
19
20
21
22
23
24
25
26
27
28
29
30
31
32
33
34
35
36
37
38
39
40
41
42
43
44
45
46
47
48
49
50
51
52
53
54
55
56
57
58
59
60
61
62
63
64
65
66
67
68
69
70
71
| <?xml version="1.0" encoding="UTF-8"?>
<project xmlns="http://maven.apache.org/POM/4.0.0"
xmlns:xsi="http://www.w3.org/2001/XMLSchema-instance"
xsi:schemaLocation="http://maven.apache.org/POM/4.0.0 http://maven.apache.org/xsd/maven-4.0.0.xsd">
<parent>
<artifactId>CloudAll</artifactId>
<groupId>com.lee</groupId>
<version>1.0-SNAPSHOT</version>
</parent>
<modelVersion>4.0.0</modelVersion>
<artifactId>cloud-provider-payment8002</artifactId>
<dependencies>
<dependency>
<groupId>com.lee</groupId>
<artifactId>cloud-api-commons</artifactId>
<version>1.0-SNAPSHOT</version>
</dependency>
<dependency>
<groupId>org.springframework.cloud</groupId>
<artifactId>spring-cloud-starter-netflix-eureka-client</artifactId>
</dependency>
<dependency>
<groupId>org.springframework.boot</groupId>
<artifactId>spring-boot-starter-web</artifactId>
</dependency>
<dependency>
<groupId>org.springframework.boot</groupId>
<artifactId>spring-boot-starter-actuator</artifactId>
</dependency>
<dependency>
<groupId>mysql</groupId>
<artifactId>mysql-connector-java</artifactId>
</dependency>
<dependency>
<groupId>org.mybatis.spring.boot</groupId>
<artifactId>mybatis-spring-boot-starter</artifactId>
</dependency>
<dependency>
<groupId>org.springframework.boot</groupId>
<artifactId>spring-boot-starter-jdbc</artifactId>
</dependency>
<dependency>
<groupId>org.springframework.boot</groupId>
<artifactId>spring-boot-devtools</artifactId>
<scope>runtime</scope>
<optional>true</optional>
</dependency>
<dependency>
<groupId>org.projectlombok</groupId>
<artifactId>lombok</artifactId>
</dependency>
<dependency>
<groupId>com.alibaba</groupId>
<artifactId>druid-spring-boot-starter</artifactId>
<version>1.1.10</version>
</dependency>
<dependency>
<groupId>org.springframework.boot</groupId>
<artifactId>spring-boot-starter-test</artifactId>
<scope>test</scope>
</dependency>
</dependencies>
</project>
|
3.4.3.3 建yml
1
2
3
4
5
6
7
8
9
10
11
12
13
14
15
16
17
18
19
20
21
22
23
24
25
26
| server:
port: 8002
spring:
application:
name: cloud-payment-service
datasource:
driver-class-name: org.gjt.mm.mysql.Driver
type: com.alibaba.druid.pool.DruidDataSource
url: jdbc:mysql://localhost:3306/springcloud?useUnicode=true&characterEncoding=utf-8&useSSL=false&serverTimezone=UTC&rewriteBatchedStatements=true
username: root
password: root
druid:
validation-query: select 1
mybatis:
mapper-locations: classpath:mapper/*.xml
type-aliases-package: com.lee.springcloud.com.lee.springcloud.entities
eureka:
client:
service-url:
defaultZone: http://eureka7001.com:7001/eureka,http://eureka7002.com:7002/eureka
fetch-registry: true
register-with-eureka: true
|
3.4.3.4 主启动类
1
2
3
4
5
6
7
8
9
10
11
12
13
| package com.lee.springcloud;
import org.springframework.boot.SpringApplication;
import org.springframework.boot.autoconfigure.SpringBootApplication;
import org.springframework.cloud.client.discovery.EnableDiscoveryClient;
@SpringBootApplication
@EnableEurekaClient
public class PaymentMain8002 {
public static void main(String[] args) {
SpringApplication.run(PaymentMain8002.class,args);
}
}
|
3.4.3.5 业务类
仿照8001的业务, 在8002节点的对应目录下新建业务类.
dao:
1
2
3
4
5
6
7
8
9
10
11
| package com.lee.springcloud.dao;
import com.lee.springcloud.entities.Payment;
import org.apache.ibatis.annotations.Mapper;
import org.apache.ibatis.annotations.Param;

@Mapper
public interface PaymentDao {
    public int create(Payment payment);
    public Payment getPaymentById(@Param("id")Long id);
}
|
service & Impl:
1
2
3
4
5
6
7
8
9
10
11
| package com.lee.springcloud.service;
import com.lee.springcloud.entities.Payment;
import org.apache.ibatis.annotations.Param;
public interface PaymentService {
public int create(Payment payment);
public Payment getPaymentById(Long id);
}
|
1
2
3
4
5
6
7
8
9
10
11
12
13
14
15
16
17
18
19
20
21
22
23
24
| package com.lee.springcloud.service.impl;
import com.lee.springcloud.dao.PaymentDao;
import com.lee.springcloud.entities.Payment;
import com.lee.springcloud.service.PaymentService;
import org.springframework.stereotype.Service;
import javax.annotation.Resource;
@Service
public class PaymentServicceImpl implements PaymentService {
@Resource
public PaymentDao paymentDao;
@Override
public int create(Payment payment) {
return paymentDao.create(payment);
}
@Override
public Payment getPaymentById(Long id) {
return paymentDao.getPaymentById(id);
}
}
|
controller:
1
2
3
4
5
6
7
8
9
10
11
12
13
14
15
16
17
18
19
20
21
22
23
24
25
26
27
28
29
30
31
32
33
34
35
36
37
38
39
40
41
42
43
44
45
46
47
48
49
50
51
52
| package com.lee.springcloud.controller;
import com.lee.springcloud.entities.CommonResult;
import com.lee.springcloud.entities.Payment;
import com.lee.springcloud.service.PaymentService;
import lombok.extern.slf4j.Slf4j;
import org.slf4j.LoggerFactory;
import org.springframework.beans.factory.annotation.Value;
import org.springframework.cloud.client.ServiceInstance;
import org.springframework.cloud.client.discovery.DiscoveryClient;
import org.springframework.web.bind.annotation.*;
import javax.annotation.Resource;
import java.util.List;
@RestController
@Slf4j
public class PaymentController {
@Resource
private DiscoveryClient discoveryClient;
@Resource
PaymentService paymentService;
@PostMapping(value="/p/create",produces = "application/json; charset=UTF-8")
public CommonResult create(@RequestBody Payment payment){
int rowsAffected = paymentService.create(payment);
log.info("受影响记录条数: "+rowsAffected);
if(rowsAffected>0){
return new CommonResult(200,"插入成功,thru: "+serverPort,rowsAffected+"条记录受影响.");
}else{
return new CommonResult(400,"插入失败,thru: "+serverPort);
}
}
@GetMapping(value="/p/get/{id}",produces = "application/json; charset=UTF-8")
public CommonResult<Payment> getById(@PathVariable("id") Long id){
Payment paymentQueryed = paymentService.getPaymentById(id);
if(paymentQueryed !=null){
log.info("查询成功");
System.out.println("sth");
System.out.println(paymentQueryed.toString());
return new CommonResult(200,"查询成功,thru: "+paymentQueryed);
}else{
return new CommonResult(400,"查询失败,thru: "+"查无此条目");
}
}
}
|
3.4.3.6 修改8001和8002的controller
因为8001和8002是以同样的服务名称注册进Eureka_Server的, 为了清楚的知道当请求到达服务端时提供服务的节点到底是8001还是8002, 我们对8001和8002controller做细微修改, 引入对应微服务的端口号
1
2
3
4
5
6
7
8
9
| @Value("${server.port}")
private String serverPort ;
if(rowsAffected>0){
return new CommonResult(200,"插入成功,thru: "+serverPort,rowsAffected+"条记录受影响.");
}else{
return new CommonResult(400,"插入失败,thru: "+serverPort);
}
|
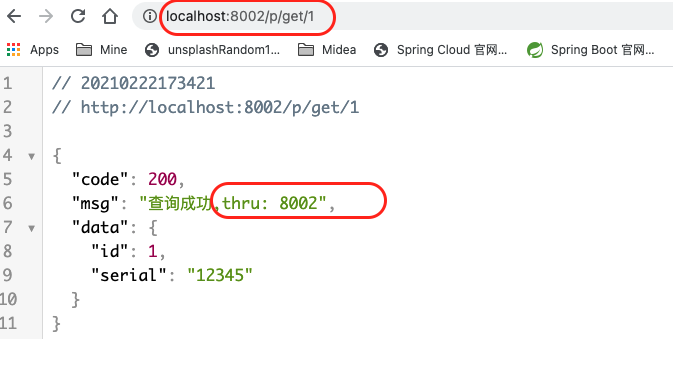
3.4.3.7 测试
依次启动7001, 7002 , 8001, 8002, 并依次访问
1
2
3
4
| http:eureka7001.com:7001
http:eureka7001.com:7002
http://localhost:8001/p/get/1
http://localhost:8002/p/get/1
|
可以看到结果如下图所以 则成功构建了支付模块集群.
3.4.3.8 Consumer(80)配置
客户端在调用服务提供方(8001和8002)提供的服务时, 之前的那种写死 ip:port 的方式 将不再适用集群环境. 因为写死的话, 就会一直同一个服务提供模块(比如8001)请求. 那么, 为了做到负载均衡, 需要对80模块的controller作如下修改:
1
2
3
4
5
6
7
8
9
10
11
12
13
14
15
16
17
18
19
20
21
22
23
24
25
26
27
28
29
30
31
32
33
34
35
36
37
38
39
40
| package com.lee.springcloud.controller;
import com.lee.springcloud.entities.CommonResult;
import com.lee.springcloud.entities.Payment;
import com.lee.springcloud.lb.LoadBalancer;
import lombok.extern.slf4j.Slf4j;
import org.springframework.cloud.client.ServiceInstance;
import org.springframework.cloud.client.discovery.DiscoveryClient;
import org.springframework.web.bind.annotation.GetMapping;
import org.springframework.web.bind.annotation.PathVariable;
import org.springframework.web.bind.annotation.RestController;
import org.springframework.web.client.RestTemplate;
import javax.annotation.Resource;
import java.net.URI;
import java.util.List;
@RestController
@Slf4j
public class OrderController {
public static final String PAYMENT_URL = "http://CLOUD-PAYMENT-SERVICE";
@Resource
private RestTemplate restTemplate;
@GetMapping(value = "/c/create",produces = "application/json; charset=UTF-8")
public CommonResult<Payment> create(Payment payment){
log.info("插入");
return restTemplate.postForObject(PAYMENT_URL+"/p/create",payment,CommonResult.class);
}
@GetMapping(value = "/c/get/{id}",produces = "application/json; charset=UTF-8")
public CommonResult<Payment> get(@PathVariable("id") Long id){
log.info("查询");
CommonResult forObject = (CommonResult) restTemplate.getForObject(PAYMENT_URL + "/p/get/" + id, CommonResult.class);
System.out.println(forObject.toString());
return forObject;
}
}
|
同时, 还需要开启RestTemplate的负载均衡, 否则会报错.
修改配置类: ApplicationContextConfig :
1
2
3
4
5
6
7
8
9
10
11
12
13
14
15
16
| package com.lee.springcloud.config;
import org.springframework.cloud.client.loadbalancer.LoadBalanced;
import org.springframework.context.annotation.Bean;
import org.springframework.context.annotation.Configuration;
import org.springframework.web.client.RestTemplate;
@Configuration
public class ApplicationContextConfig {
@Bean
@LoadBalanced
public RestTemplate getRestTemplate(){
return new RestTemplate();
}
}
|
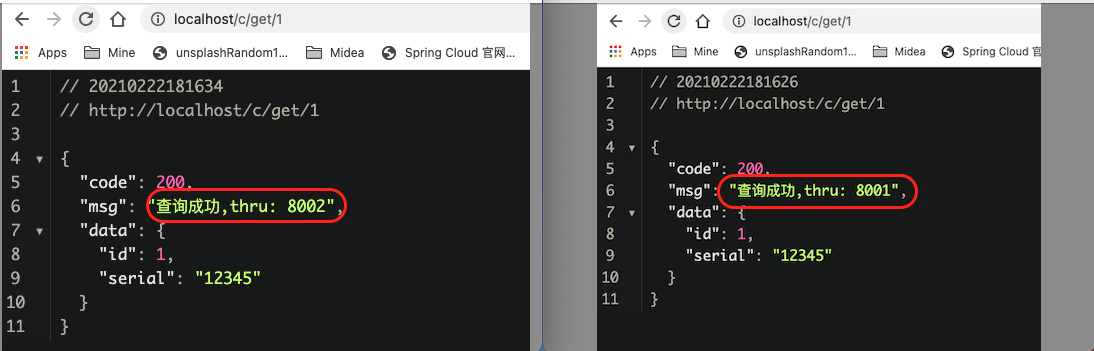
此时通过客户端调用远程服务多次会发现通过不同的节点(8001 & 8002) 一次交替响应. (因为默认是轮巡的负载均衡策略)
3.4.3.9 服务名称配置
eureka界面服务名称的默认格式为下图中1(ip+应用名称), 通过下述两处修改即可改成如下图中2(实例名称)所示的格式
- 通过配置pom, 添加如下依赖:
1
2
3
4
5
6
7
8
| <dependency>
<groupId>org.springframework.boot</groupId>
<artifactId>spring-boot-starter-web</artifactId>
</dependency>
<dependency>
<groupId>org.springframework.boot</groupId>
<artifactId>spring-boot-starter-actuator</artifactId>
</dependency>
|
- 然后修改yaml文件添加instance部分:
1
2
3
4
5
6
7
8
9
10
11
12
13
14
15
16
| server:
port: 80
spring:
application:
name: cloud-order-service
eureka:
client:
service-url:
defaultZone: http://eureka7001.com:7001/eureka,http://eureka7002.com:7002/eureka
register-with-eureka: true
fetch-registry: true
instance:
instance-id: order01
prefer-ip-address: true
|
3.4.4 服务发现
3.4.4.1 修改8001 Controller
向8001模块的Controller注入discoveryClient实例并添加 discovery()方法
1
2
3
4
5
6
7
8
9
10
11
12
13
14
15
16
17
18
19
20
21
22
23
24
25
26
27
28
29
30
31
32
33
34
35
36
37
38
39
40
41
42
43
44
45
46
47
48
49
50
51
52
53
54
55
56
57
58
59
60
61
62
63
64
65
66
67
68
69
| package com.lee.springcloud.controller;
import com.lee.springcloud.entities.CommonResult;
import com.lee.springcloud.entities.Payment;
import com.lee.springcloud.service.PaymentService;
import lombok.extern.slf4j.Slf4j;
import org.springframework.beans.factory.annotation.Value;
import org.springframework.cloud.client.ServiceInstance;
import org.springframework.cloud.client.discovery.DiscoveryClient;
import org.springframework.web.bind.annotation.*;
import javax.annotation.Resource;
import java.util.List;
@RestController
@Slf4j
public class PaymentController {
@Resource
private DiscoveryClient discoveryClient;
@Resource
PaymentService paymentService;
@Value("${server.port}")
private String serverPort ;
@PostMapping(value="/p/create",produces = "application/json; charset=UTF-8")
public CommonResult create(@RequestBody Payment payment){
int rowsAffected = paymentService.create(payment);
log.info("受影响记录条数: "+rowsAffected);
if(rowsAffected>0){
return new CommonResult(200,"插入成功,thru: "+serverPort,rowsAffected+"条记录受影响.");
}else{
return new CommonResult(400,"插入失败,thru: "+serverPort);
}
}
@GetMapping(value="/p/get/{id}",produces = "application/json; charset=UTF-8")
public CommonResult<Payment> getById(@PathVariable("id") Long id){
Payment paymentQueryed = paymentService.getPaymentById(id);
if(paymentQueryed !=null){
log.info("查询成功");
System.out.println("sth");
System.out.println(paymentQueryed.toString());
return new CommonResult(200,"查询成功,thru: "+serverPort,paymentQueryed);
}else{
return new CommonResult(400,"查询失败,thru: "+serverPort,"查无此条目");
}
}
@GetMapping(value = "/payment/discovery",produces = "application/json; charset=UTF-8")
public Object discovery(){
List<String> services = discoveryClient.getServices();
for (String element : services) {
log.info("element:"+element);
}
List<ServiceInstance> instances = discoveryClient.getInstances("CLOUD-PAYMENT-SERVICE");
for (ServiceInstance instance : instances) {
log.info(instance.getServiceId()+"\t"+instance.getHost()+"\t"+instance.getPort()+"\t"+instance.getUri());
}
return this.discoveryClient;
}
}
|
3.4.4.2 修改主启动类
向主启动类添加@EnableDiscoveryClient注解
1
2
3
4
5
6
7
8
9
10
11
12
13
| package com.lee.springcloud;
import org.springframework.boot.SpringApplication;
import org.springframework.boot.autoconfigure.SpringBootApplication;
import org.springframework.cloud.client.discovery.EnableDiscoveryClient;
@SpringBootApplication
@EnableDiscoveryClient
public class PaymentMain8001 {
public static void main(String[] args) {
SpringApplication.run(PaymentMain8001.class,args);
}
}
|
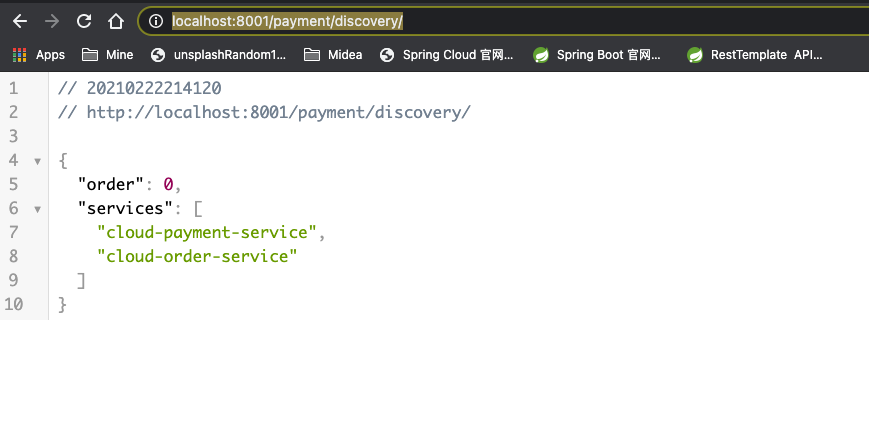
3.4.4.3 测试服务发现配置是否成功
以上两处修改后重启8001项目, 然后访问
1
| http://localhost:8001/payment/discovery/
|
可以发现如下结果:
并在控制台有如下输出:

3.4.4.4 配置8002服务发现
按照8001的方式(3.4.4.1&3.4.4.2两步) , 对8002做同样的配置.
3.4.5 Eureka 自我保护机制
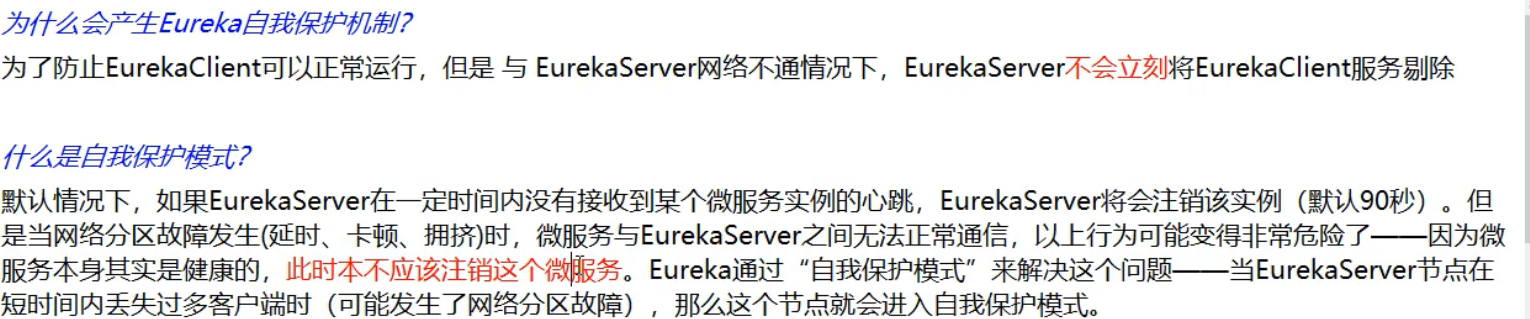
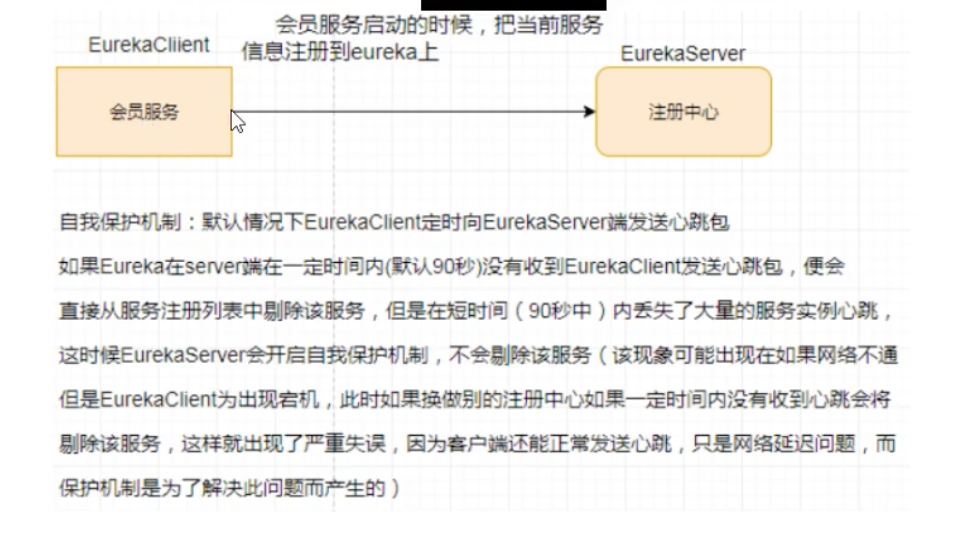
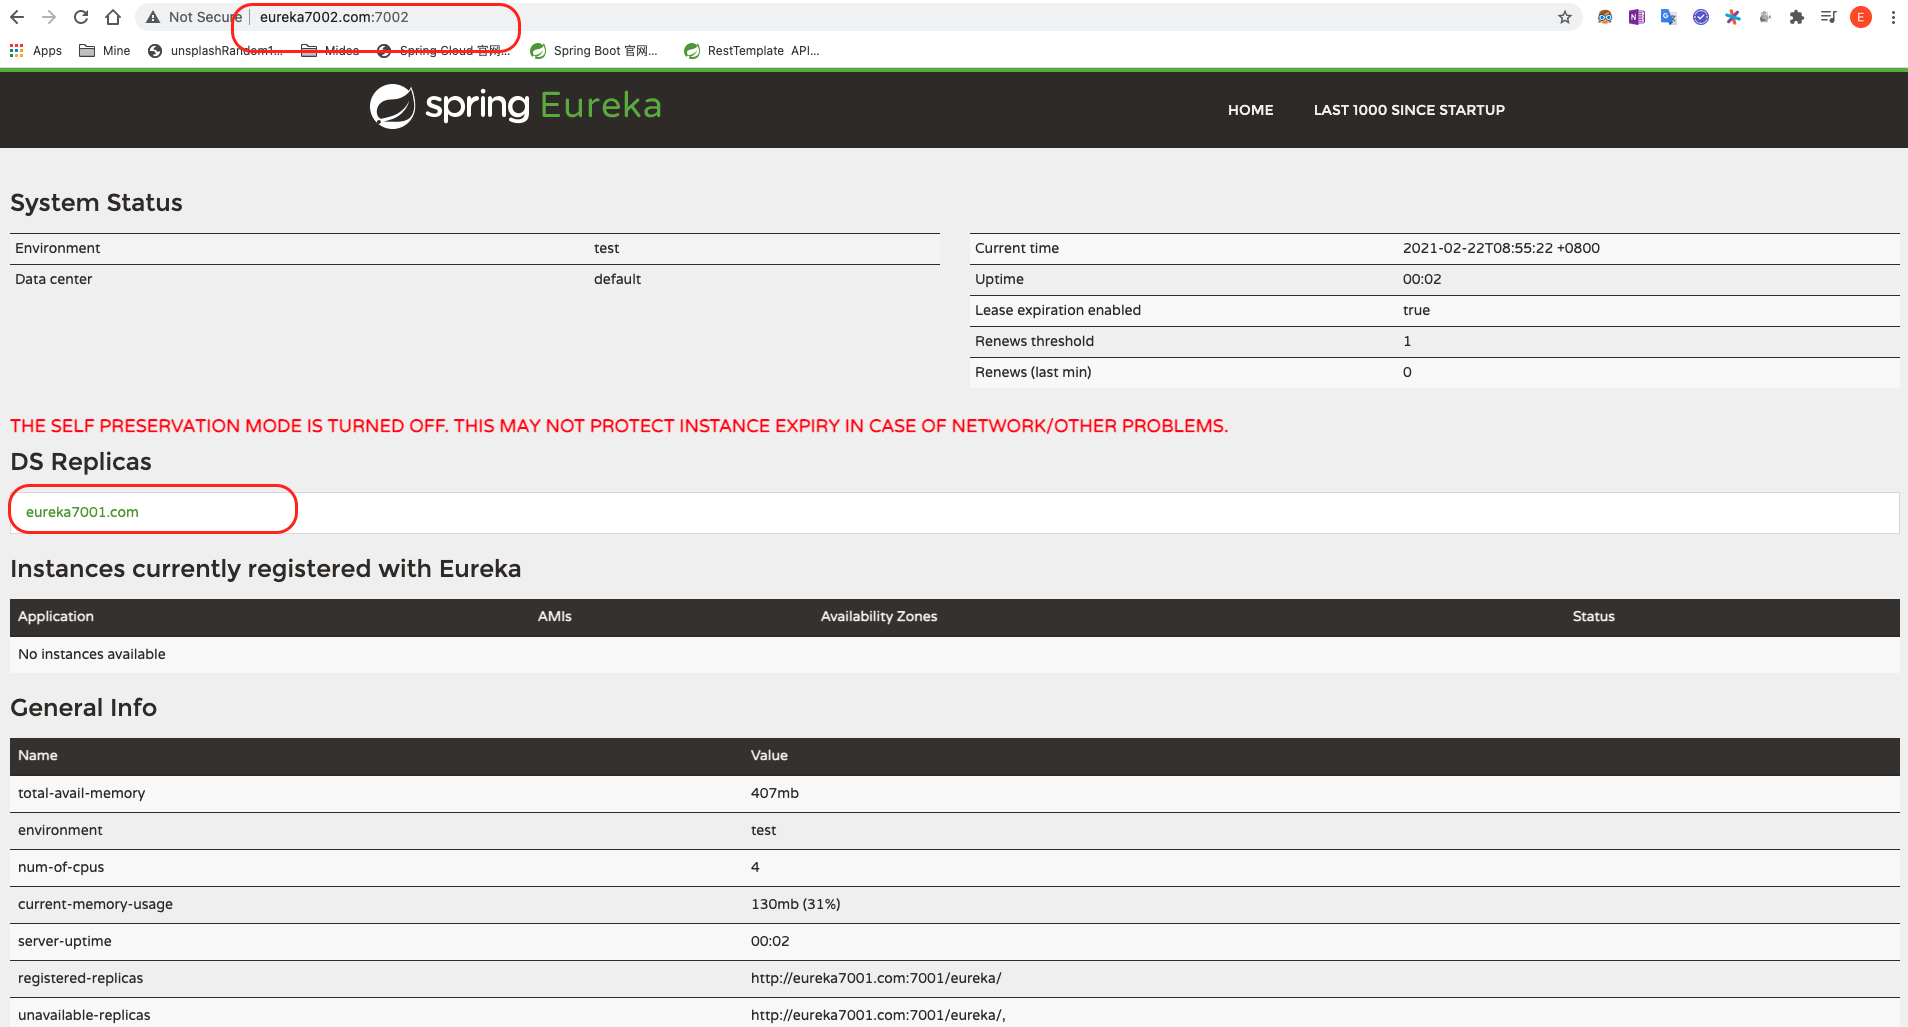
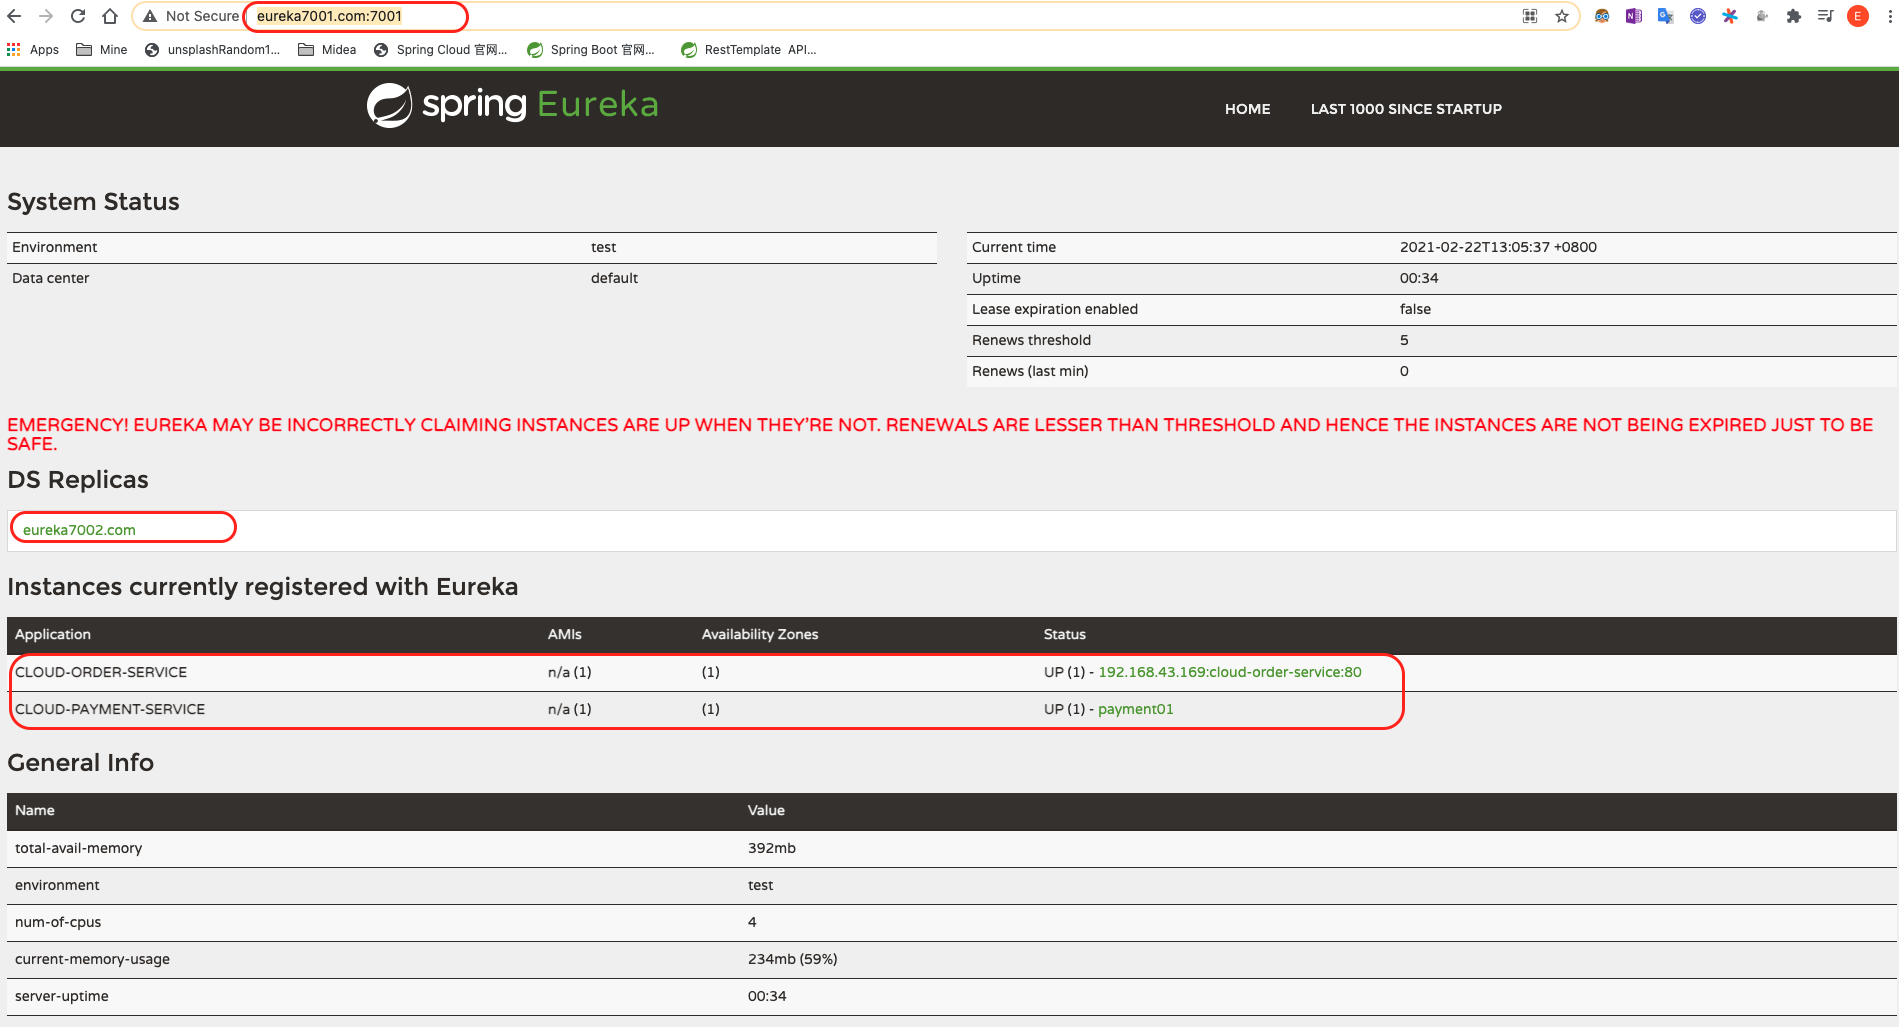
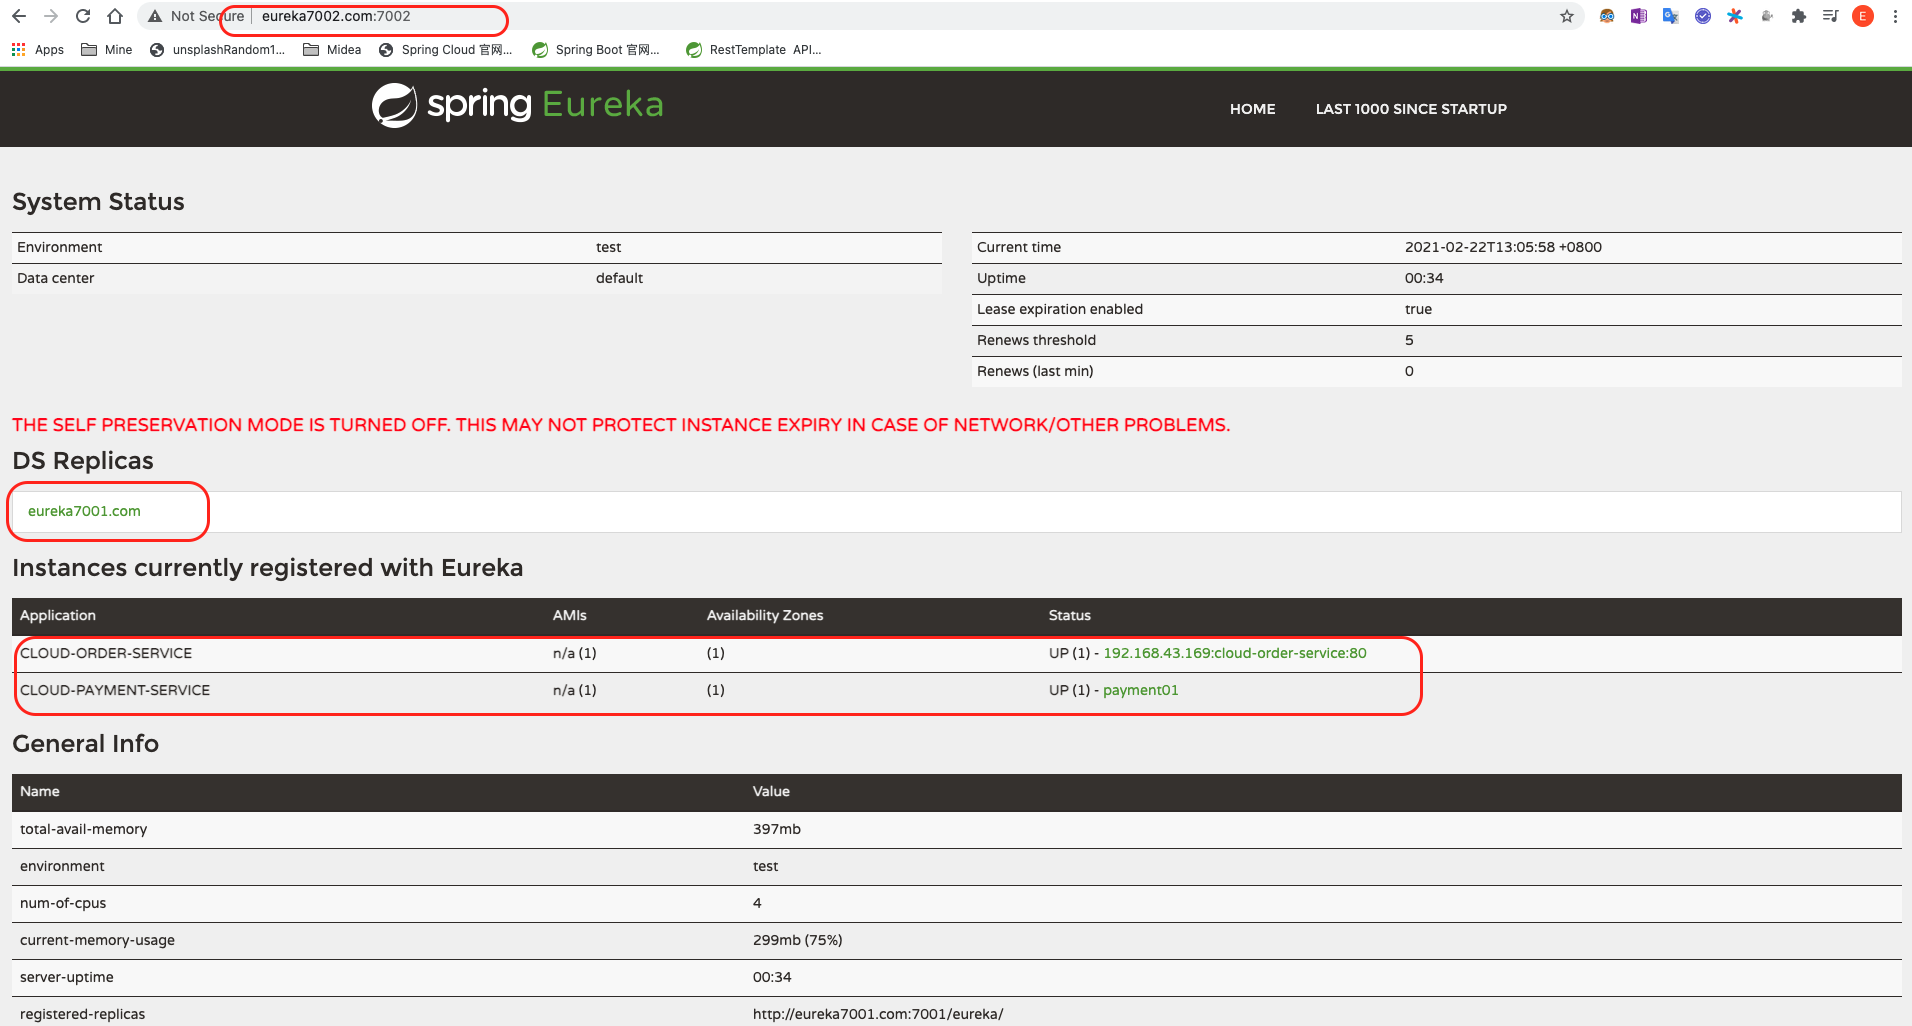
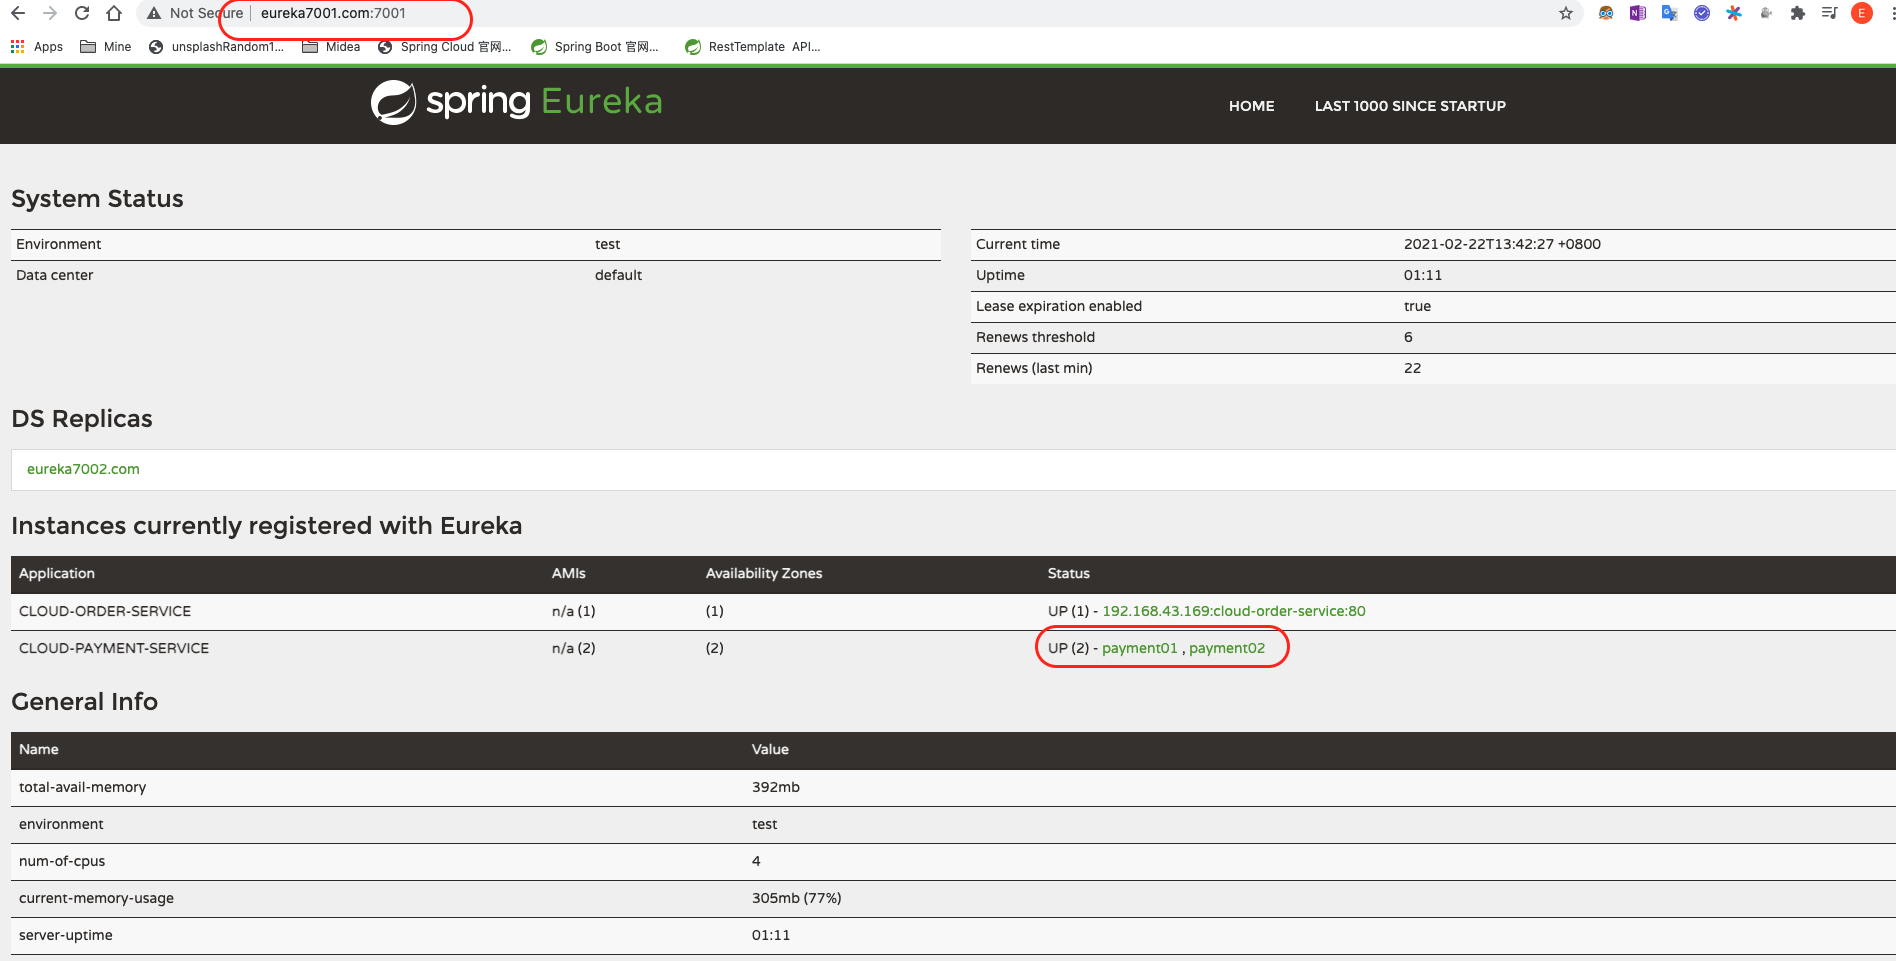
结论: Eureka 保证了CAP理论的 AP.
3.4.6 Eureka自我保护配置与测试
以8001模块为例, 对自我保护机制进行配置, 并测试
修改yml即可:
1
2
3
4
5
6
7
8
9
10
11
12
13
| eureka:
client:
service-url:
defaultZone: http://eureka7001.com:7001/eureka,http://eureka7002.com:7002/eureka
fetch-registry: true
register-with-eureka: true
instance:
instance-id: payment01
prefer-ip-address: true
lease-renewal-interval-in-seconds: 30
lease-expiration-duration-in-seconds: 90
server:
enable-self-preservation: true
|
访问
1
| http://eureka7001.com:7001/
|
能正常看见 CLOUD-PAYMENT-SERVICE 微服务上有两个服务实例payment01 和 payment02.
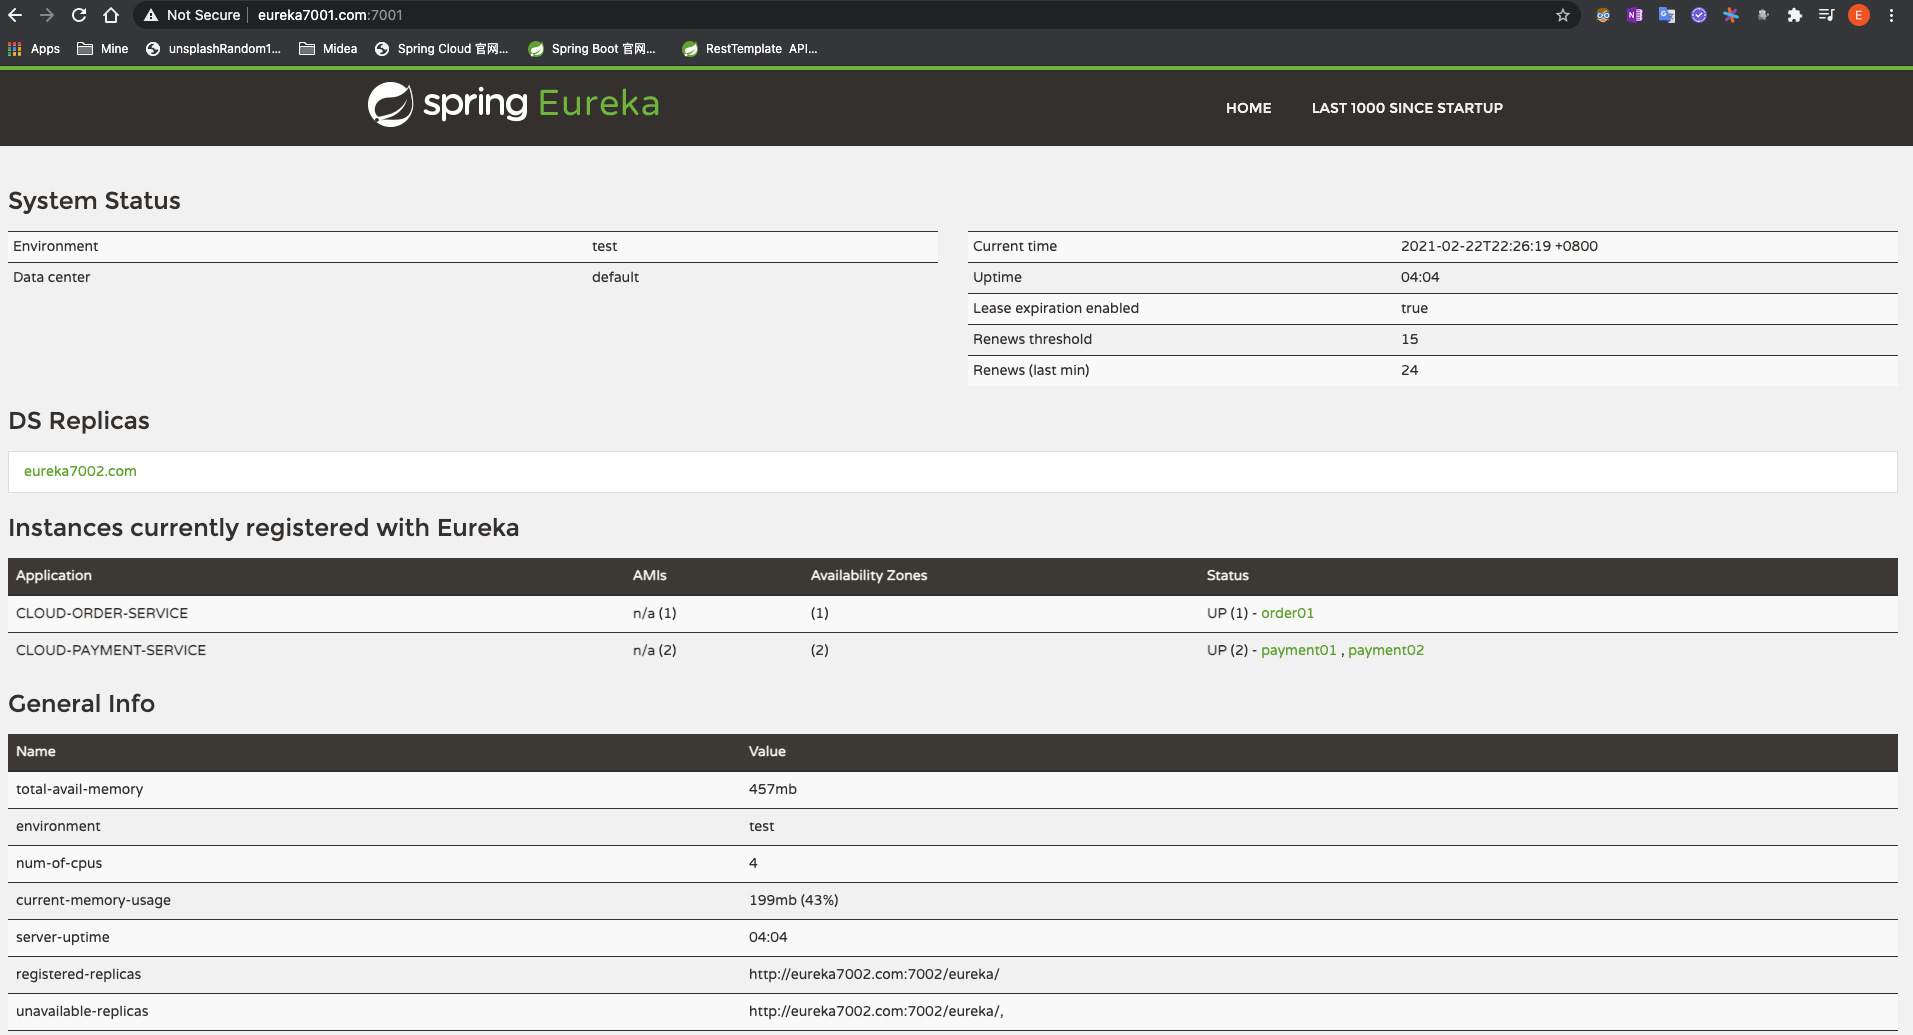
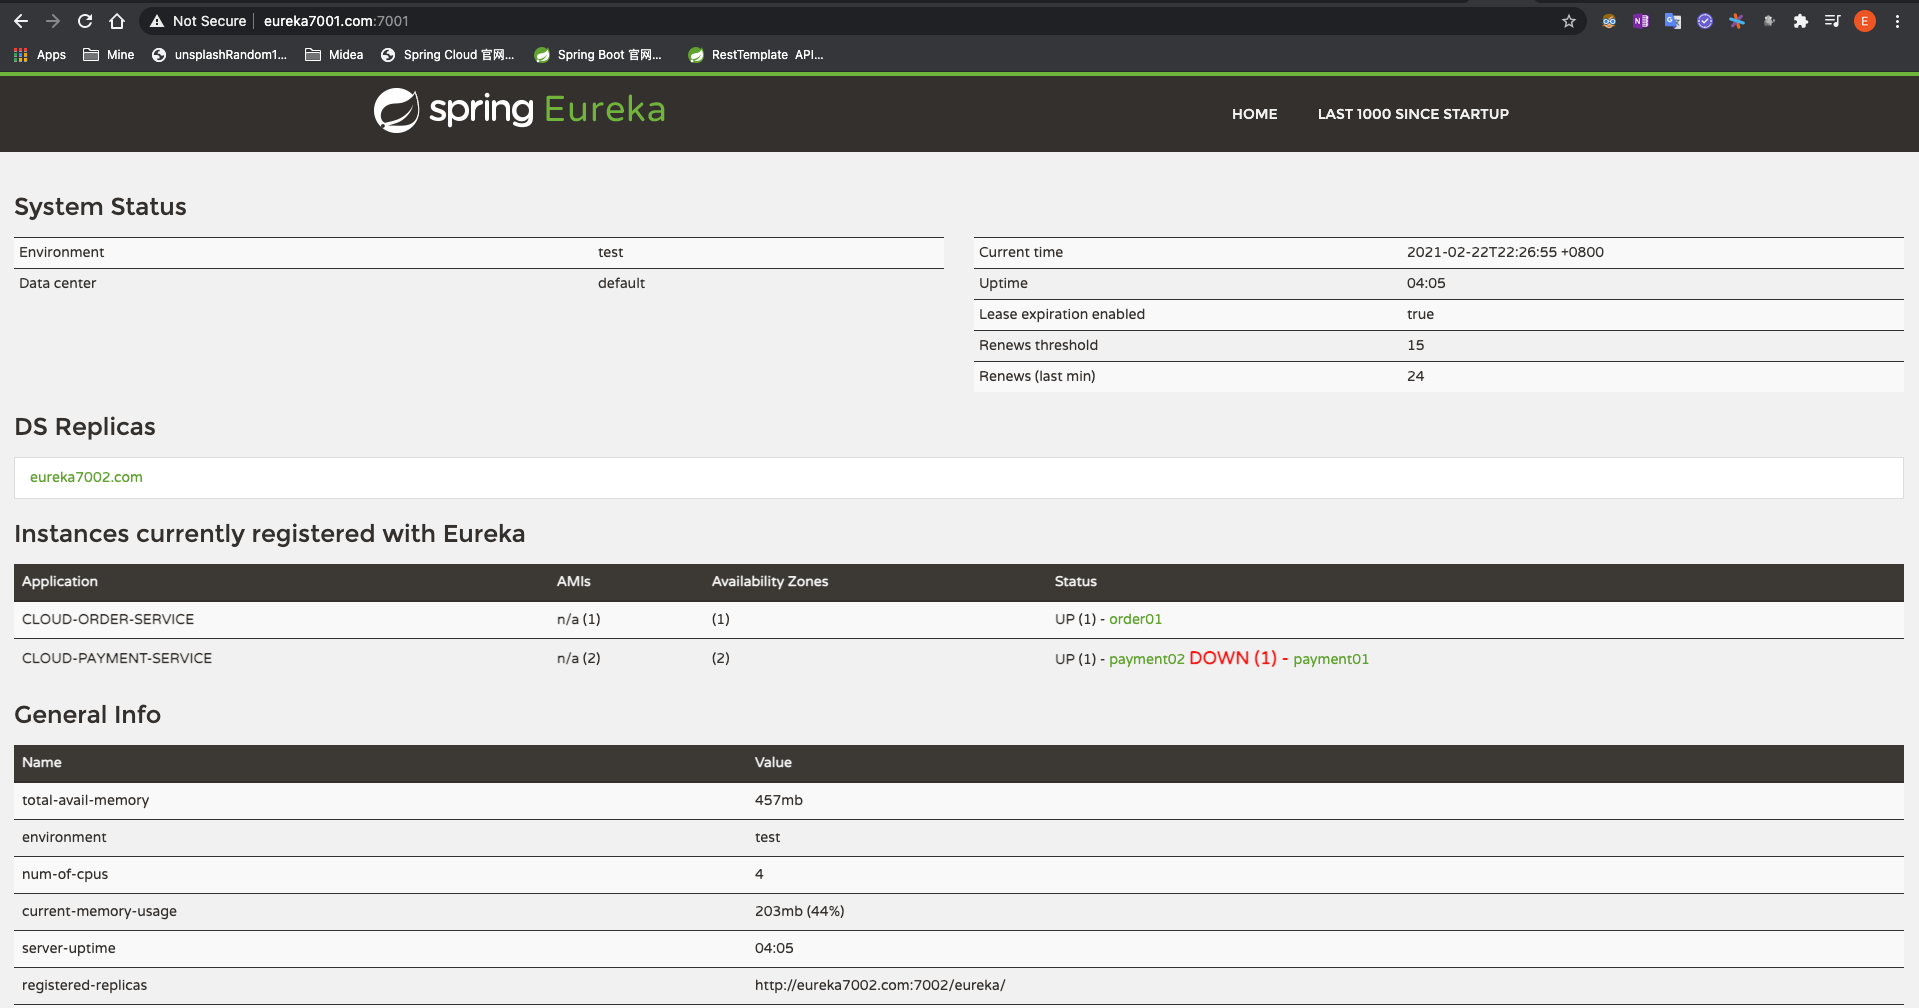
当关闭进程8001后立即访问会发现如下图所示:
所以通过如下yml的配置即可实现自我保护机制的开启与关闭.
1
2
3
4
5
6
7
8
9
10
11
12
13
| eureka:
client:
service-url:
defaultZone: http://eureka7001.com:7001/eureka,http://eureka7002.com:7002/eureka
fetch-registry: true
register-with-eureka: true
instance:
instance-id: payment01
prefer-ip-address: true
lease-renewal-interval-in-seconds: 30
lease-expiration-duration-in-seconds: 90
server:
enable-self-preservation: true
|
3.5 Zookeeper - 注册中心
3.5.1 支付服务注册进zookeeper
3.5.1.1 新建cloud-provider-payment8004模块
3.5.1.2 编写pom.xml
1
2
3
4
5
6
7
8
9
10
11
12
13
14
15
16
17
18
19
20
21
22
23
24
25
26
27
28
29
30
31
32
33
34
35
36
37
38
39
40
41
42
43
44
45
46
47
48
49
50
51
52
53
54
55
56
57
58
59
60
61
62
63
64
65
66
67
68
69
70
71
72
73
74
75
76
77
78
79
80
| <?xml version="1.0" encoding="UTF-8"?>
<project xmlns="http://maven.apache.org/POM/4.0.0"
xmlns:xsi="http://www.w3.org/2001/XMLSchema-instance"
xsi:schemaLocation="http://maven.apache.org/POM/4.0.0 http://maven.apache.org/xsd/maven-4.0.0.xsd">
<parent>
<artifactId>CloudAll</artifactId>
<groupId>com.lee</groupId>
<version>1.0-SNAPSHOT</version>
</parent>
<modelVersion>4.0.0</modelVersion>
<artifactId>cloud-provider-payment8004</artifactId>
<dependencies>
<dependency>
<groupId>com.lee</groupId>
<artifactId>cloud-api-commons</artifactId>
<version>${project.version}</version>
</dependency>
<dependency>
<groupId>org.springframework.cloud</groupId>
<artifactId>spring-cloud-starter-zookeeper-discovery</artifactId>
</dependency>
<dependency>
<groupId>org.springframework.boot</groupId>
<artifactId>spring-boot-starter-web</artifactId>
<exclusions>
<exclusion>
<groupId>org.springframework.boot</groupId>
<artifactId>spring-boot-starter-logging</artifactId>
</exclusion>
</exclusions>
</dependency>
<dependency>
<groupId>org.springframework.boot</groupId>
<artifactId>spring-boot-starter-log4j2</artifactId>
</dependency>
<dependency>
<groupId>org.springframework.boot</groupId>
<artifactId>spring-boot-starter-actuator</artifactId>
</dependency>
<dependency>
<groupId>mysql</groupId>
<artifactId>mysql-connector-java</artifactId>
</dependency>
<dependency>
<groupId>org.mybatis.spring.boot</groupId>
<artifactId>mybatis-spring-boot-starter</artifactId>
</dependency>
<dependency>
<groupId>org.springframework.boot</groupId>
<artifactId>spring-boot-starter-jdbc</artifactId>
</dependency>
<dependency>
    <groupId>org.springframework.boot</groupId>
    <artifactId>spring-boot-devtools</artifactId>
    <scope>runtime</scope>
    <optional>true</optional>
</dependency>
<dependency>
<groupId>org.projectlombok</groupId>
<artifactId>lombok</artifactId>
</dependency>
<dependency>
<groupId>com.alibaba</groupId>
<artifactId>druid-spring-boot-starter</artifactId>
<version>1.1.10</version>
</dependency>
<dependency>
<groupId>org.springframework.boot</groupId>
<artifactId>spring-boot-starter-test</artifactId>
<scope>test</scope>
</dependency>
</dependencies>
</project>
|
3.5.1.3 建yml
1
2
3
4
5
6
7
8
9
10
11
12
13
14
15
16
17
18
19
20
21
22
| server:
port: 8004
spring:
application:
name: cloud-payment-service
datasource:
driver-class-name: org.gjt.mm.mysql.Driver
type: com.alibaba.druid.pool.DruidDataSource
url: jdbc:mysql://localhost:3306/springcloud?useUnicode=true&characterEncoding=utf-8&useSSL=false&serverTimezone=UTC&rewriteBatchedStatements=true
username: root
password: root
druid:
validation-query: select 1
cloud:
zookeeper:
connect-string: localhost:2181
mybatis:
mapper-locations: classpath:mapper/*.xml
type-aliases-package: com.lee.springcloud.com.lee.springcloud.entities
|
3.5.1.4 主启动类
1
2
3
4
5
6
7
8
9
10
11
12
13
14
| package com.lee.springcloud;
import org.springframework.boot.SpringApplication;
import org.springframework.boot.autoconfigure.SpringBootApplication;
import org.springframework.cloud.client.discovery.EnableDiscoveryClient;
@SpringBootApplication
@EnableDiscoveryClient
public class PaymentMain8004 {
public static void main(String[] args) {
SpringApplication.run(PaymentMain8004.class,args);
}
}
|
3.5.1.5 业务类
新建controller:
1
2
3
4
5
6
7
8
9
10
11
12
13
14
15
16
17
18
19
20
21
22
23
| package com.lee.springcloud.controller;
import lombok.extern.slf4j.Slf4j;
import org.springframework.beans.factory.annotation.Value;
import org.springframework.web.bind.annotation.RequestMapping;
import org.springframework.web.bind.annotation.RestController;
import java.util.UUID;
@Slf4j
@RestController
public class PaymentController {
@Value("${server.port}")
private String serverPort;
@RequestMapping(value="/payment/zk")
public String paymentZk(){
return "springcloud with zookeeper:" + serverPort + "\t" + UUID.randomUUID().toString();
}
}
|
3.5.1.6 测试
做好如上准备配置后, 启动8004模块, 会发现报如下错误
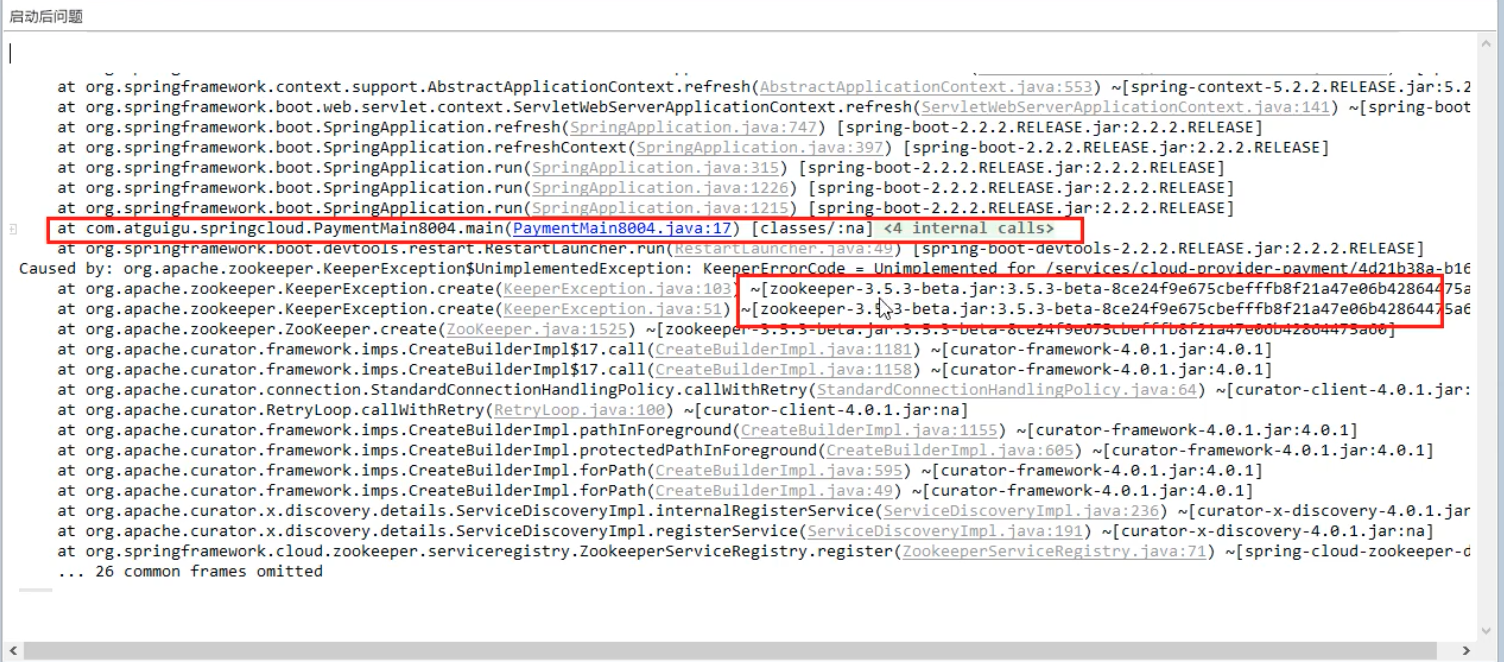
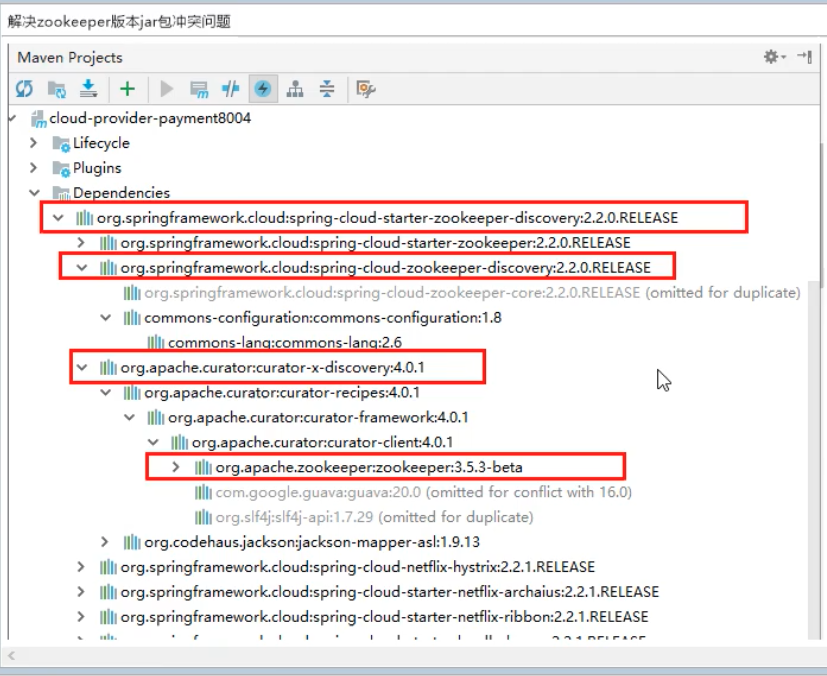
修改pom文件(先排除spring-cloud-starter-zookeeper-discovery自带的zookeeper,然后重新单独引入), 解决zookeeper冲突问题:
1
2
3
4
5
6
7
8
9
10
11
12
13
14
15
| <dependency>
<groupId>org.springframework.cloud</groupId>
<artifactId>spring-cloud-starter-zookeeper-discovery</artifactId>
<exclusions>
<exclusion>
<groupId>org.apache.zookeeper</groupId>
<artifactId>zookeeper</artifactId>
</exclusion>
</exclusions>
</dependency>
<dependency>
<groupId>org.apache.zookeeper</groupId>
<artifactId>zookeeper</artifactId>
<version>3.4.14</version>
</dependency>
|
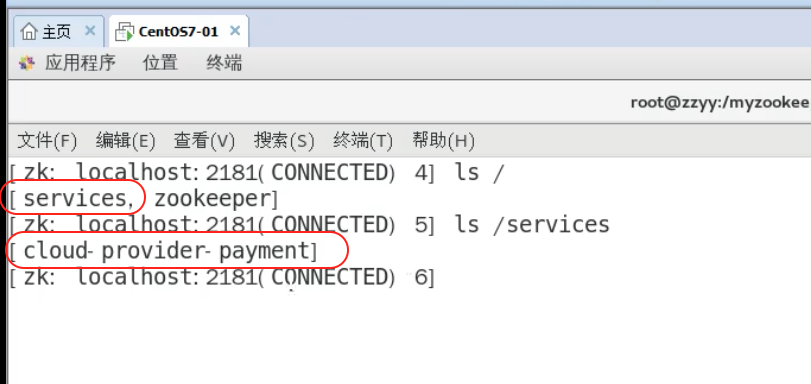
重新启动模块, 可以成功启动. 启动后查看zookeeper节点能发现注册进去的服务节点.
3.5.2 订单服务注册进zookeeper
3.5.2.1 新建cloud-consumerZK-order80模块
3.5.2.2 编写pom.xml
1
2
3
4
5
6
7
8
9
10
11
12
13
14
15
16
17
18
19
20
21
22
23
24
25
26
27
28
29
30
31
32
33
34
35
36
37
38
39
40
41
42
43
44
45
46
47
48
49
50
51
52
53
54
55
56
57
58
59
60
61
62
| <?xml version="1.0" encoding="UTF-8"?>
<project xmlns="http://maven.apache.org/POM/4.0.0"
xmlns:xsi="http://www.w3.org/2001/XMLSchema-instance"
xsi:schemaLocation="http://maven.apache.org/POM/4.0.0 http://maven.apache.org/xsd/maven-4.0.0.xsd">
<parent>
<artifactId>CloudAll</artifactId>
<groupId>com.lee</groupId>
<version>1.0-SNAPSHOT</version>
</parent>
<modelVersion>4.0.0</modelVersion>
<artifactId>cloud-consumerZK-order80</artifactId>
<description>订单消费者之注册中心zookeeper</description>
<dependencies>
<dependency>
<groupId>com.lee</groupId>
<artifactId>cloud-api-commons</artifactId>
<version>1.0-SNAPSHOT</version>
</dependency>
<dependency>
<groupId>org.springframework.boot</groupId>
<artifactId>spring-boot-starter-web</artifactId>
</dependency>
<dependency>
<groupId>org.springframework.cloud</groupId>
<artifactId>spring-cloud-starter-zookeeper-discovery</artifactId>
<exclusions>
<exclusion>
<groupId>org.apache.zookeeper</groupId>
<artifactId>zookeeper</artifactId>
</exclusion>
</exclusions>
</dependency>
<dependency>
<groupId>org.apache.zookeeper</groupId>
<artifactId>zookeeper</artifactId>
<version>3.4.14</version>
</dependency>
<dependency>
<groupId>org.springframework.boot</groupId>
<artifactId>spring-boot-starter-actuator</artifactId>
</dependency>
<dependency>
<groupId>org.springframework.boot</groupId>
<artifactId>spring-boot-devtools</artifactId>
<scope>runtime</scope>
<optional>true</optional>
</dependency>
<dependency>
<groupId>org.projectlombok</groupId>
<artifactId>lombok</artifactId>
<optional>true</optional>
</dependency>
<dependency>
<groupId>org.springframework.boot</groupId>
<artifactId>spring-boot-starter-test</artifactId>
<scope>runtime</scope>
</dependency>
</dependencies>
</project>
|
3.5.2.3 建yml
1
2
3
4
5
6
7
8
9
| server:
port: 80
spring:
application:
name: cloud-consumer-order
cloud:
zookeeper:
connect-string: localhost:2181
|
3.5.2.4 主启动类
1
2
3
4
5
6
7
8
9
10
11
12
13
14
15
| package com.lee.springcloud;
import lombok.extern.slf4j.Slf4j;
import org.springframework.boot.SpringApplication;
import org.springframework.boot.autoconfigure.SpringBootApplication;
import org.springframework.cloud.client.discovery.EnableDiscoveryClient;
import org.springframework.web.bind.annotation.RestController;
@SpringBootApplication
@EnableDiscoveryClient
public class OrderZkMain80 {
public static void main(String[] args) {
SpringApplication.run(OrderZkMain80.class, args);
}
}
|
3.5.2.5 业务类
向容器注入RestTemplate
1
2
3
4
5
6
7
8
9
10
11
12
13
14
15
| package com.lee.springcloud.config;
import org.springframework.cloud.client.loadbalancer.LoadBalanced;
import org.springframework.context.annotation.Bean;
import org.springframework.context.annotation.Configuration;
import org.springframework.web.client.RestTemplate;
@Configuration
public class ApplicationContextConfig {
@LoadBalanced
@Bean
public RestTemplate getRestTemplate() {
return new RestTemplate();
}
}
|
新建controller
1
2
3
4
5
6
7
8
9
10
11
12
13
14
15
16
17
18
19
20
21
| package com.lee.springcloud.controller;
import lombok.extern.slf4j.Slf4j;
import org.springframework.web.bind.annotation.GetMapping;
import org.springframework.web.bind.annotation.RestController;
import org.springframework.web.client.RestTemplate;
import javax.annotation.Resource;
@RestController
@Slf4j
public class OrderZkController {
public static final String INVOKE_URL = "http://cloud-payment-service";
@Resource
private RestTemplate restTemplate;
@GetMapping("/consumer/payment/zk")
public String paymentInfo(){
return restTemplate.getForObject(INVOKE_URL+"/payment/zk", String.class);
}
}
|
3.6 Consul - 注册中心
3.6.1 安装Mac版本Consul
此处只介绍Mac OS的安装, 其他版本可以参见官网
终端依次执行下面两行代码即可
1
2
| brew tap hashicorp/tap
brew install hashicorp/tap/consul
|
安装完后执行
若能见到如下输出,则说明安装成功
1
2
3
4
5
6
7
| usage: consul [--version] [--help] []
Available commands are:
agent Runs a Consul agent
event Fire a new event
...
|
想更新到最新版本执行 如下命令即可:
1
| brew upgrade hashicorp/tap/consul
|
3.6.2 运行consul
Start the Consul agent in development mode. (Warning: Never run Consul in -dev mode in production.)
3.6.3 支付服务注册进Consul
3.6.3.1 新建cloud-providerConsul-payment8006模块
3.6.3.2 编写pom.xml
1
2
3
4
5
6
7
8
9
10
11
12
13
14
15
16
17
18
19
20
21
22
23
24
25
26
27
28
29
30
31
| <?xml version="1.0" encoding="UTF-8"?>
<project xmlns="http://maven.apache.org/POM/4.0.0"
xmlns:xsi="http://www.w3.org/2001/XMLSchema-instance"
xsi:schemaLocation="http://maven.apache.org/POM/4.0.0 http://maven.apache.org/xsd/maven-4.0.0.xsd">
<parent>
<artifactId>CloudAll</artifactId>
<groupId>com.lee</groupId>
<version>1.0-SNAPSHOT</version>
</parent>
<modelVersion>4.0.0</modelVersion>
<artifactId>cloud-providerConsul-payment8006</artifactId>
<description>支付服务提供者之注册中心consul</description>
<dependencies>
<dependency>
<groupId>com.lee</groupId>
<artifactId>cloud-api-commons</artifactId>
<version>${project.version}</version>
</dependency>
<dependency>
<groupId>org.springframework.cloud</groupId>
<artifactId>spring-cloud-starter-consul-discovery</artifactId>
</dependency>
<dependency>
<groupId>org.projectlombok</groupId>
<artifactId>lombok</artifactId>
<optional>true</optional>
</dependency>
</dependencies>
</project>
|
3.6.3.3 建yml
1
2
3
4
5
6
7
8
9
10
11
12
13
14
15
| server:
port: 8006
servlet:
application-display-name: ConsulProvider
spring:
application:
name: cloud-provider-payment
cloud:
consul:
host: localhost
port: 8500
discovery:
hostname: 127.0.0.1
service-name: ${spring.application.name}
|
3.6.3.4 主启动类
1
2
3
4
5
6
7
8
9
10
11
12
13
14
| package com.lee.springcloud;
import org.springframework.boot.SpringApplication;
import org.springframework.boot.autoconfigure.SpringBootApplication;
import org.springframework.cloud.client.discovery.EnableDiscoveryClient;
@SpringBootApplication
@EnableDiscoveryClient
public class PaymentMain8006 {
public static void main(String[] args) {
SpringApplication.run(PaymentMain8006.class,args);
}
}
|
3.6.3.5 业务类
1
2
3
4
5
6
7
8
9
10
11
12
13
14
15
16
17
18
19
20
| package com.lee.springcloud.controller;
import lombok.extern.slf4j.Slf4j;
import org.springframework.beans.factory.annotation.Value;
import org.springframework.web.bind.annotation.RequestMapping;
import org.springframework.web.bind.annotation.RestController;
import java.util.UUID;
@RestController
@Slf4j
public class PaymentController {
@Value("${server.port}")
private String serverPort;
@RequestMapping(value="/payment/consul")
public String paymentConsul(){
return "spring cloud with Consul:" + serverPort + "\t" + UUID.randomUUID().toString();
}
}
|
3.6.3.6 测试
启动8006模块, 访问http://localhost:8500 即可看见注册进consul的服务表.
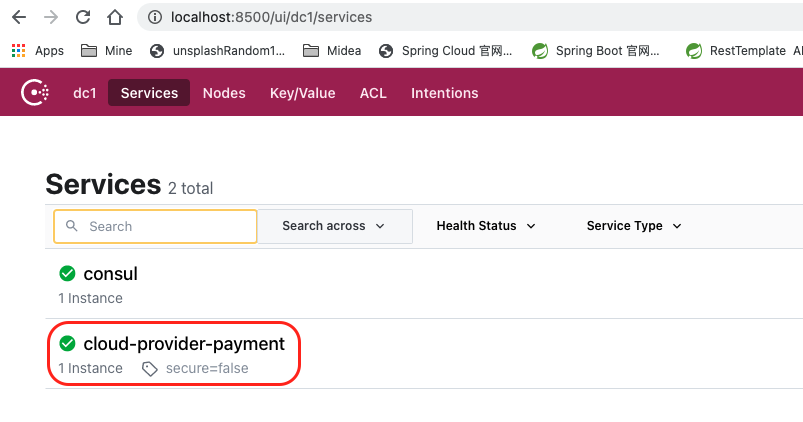
访问controller也可以得到预期的返回结果.

3.6.4 支付服务注册进Consul
3.6.4.1 新建cloud-consumerConsul-order80模块
3.6.4.2 编写pom.xml
1
2
3
4
5
6
7
8
9
10
11
12
13
14
15
16
17
18
19
20
21
22
23
24
25
26
27
28
29
30
31
32
33
| <?xml version="1.0" encoding="UTF-8"?>
<project xmlns="http://maven.apache.org/POM/4.0.0"
xmlns:xsi="http://www.w3.org/2001/XMLSchema-instance"
xsi:schemaLocation="http://maven.apache.org/POM/4.0.0 http://maven.apache.org/xsd/maven-4.0.0.xsd">
<parent>
<artifactId>CloudAll</artifactId>
<groupId>com.lee</groupId>
<version>1.0-SNAPSHOT</version>
</parent>
<modelVersion>4.0.0</modelVersion>
<artifactId>cloud-consumerConsul-order80</artifactId>
<description>订单服务消费者之注册中心consul</description>
<dependencies>
<dependency>
<groupId>com.lee</groupId>
<artifactId>cloud-api-commons</artifactId>
<version>${project.version}</version>
</dependency>
<dependency>
<groupId>org.springframework.cloud</groupId>
<artifactId>spring-cloud-starter-consul-discovery</artifactId>
</dependency>
<dependency>
<groupId>org.projectlombok</groupId>
<artifactId>lombok</artifactId>
<optional>true</optional>
</dependency>
</dependencies>
</project>
|
3.6.3.3 建yml
1
2
3
4
5
6
7
8
9
10
11
12
13
14
| server:
port: 80
servlet:
application-display-name: ConsulConsumer
spring:
application:
name: cloud-consumer-order
cloud:
consul:
host: localhost
port: 8500
discovery:
service-name: ${spring.application.name}
|
3.6.3.4 主启动类
1
2
3
4
5
6
7
8
9
10
11
12
13
| package com.lee.springcloud;
import org.springframework.boot.SpringApplication;
import org.springframework.boot.autoconfigure.SpringBootApplication;
import org.springframework.cloud.client.discovery.EnableDiscoveryClient;
@SpringBootApplication
@EnableDiscoveryClient
public class OrderConsulMain80 {
public static void main(String[] args) {
SpringApplication.run(OrderConsulMain80.class,args);
}
}
|
3.6.3.5 业务类
客户端调用依旧需要接祖RestTemplate, 所以先配置
1
2
3
4
5
6
7
8
9
10
11
12
13
14
15
| package com.lee.springcloud.config;
import org.springframework.cloud.client.loadbalancer.LoadBalanced;
import org.springframework.context.annotation.Bean;
import org.springframework.context.annotation.Configuration;
import org.springframework.web.client.RestTemplate;
@Configuration
public class ApplicationContextConfig {
@LoadBalanced
@Bean
public RestTemplate getRestTemplate() {
return new RestTemplate();
}
}
|
然后新建controller
1
2
3
4
5
6
7
8
9
10
11
12
13
14
15
16
17
18
19
20
21
22
23
| package com.lee.springcloud.controller;
import lombok.extern.slf4j.Slf4j;
import org.springframework.web.bind.annotation.GetMapping;
import org.springframework.web.bind.annotation.RestController;
import org.springframework.web.client.RestTemplate;
import javax.annotation.Resource;
@RestController
@Slf4j
public class ConsumerController {
public static final String INVOKE_URL = "http://cloud-provider-payment";
@Resource
private RestTemplate restTemplate;
@GetMapping("/consumer/payment/consul")
public String paymentInfo(){
return restTemplate.getForObject(INVOKE_URL+"/payment/consul", String.class);
}
}
|
3.6.3.6 测试
完成以上配置后访问 http://localhost:8500 即可看见订单服务也成功注册进了consul.
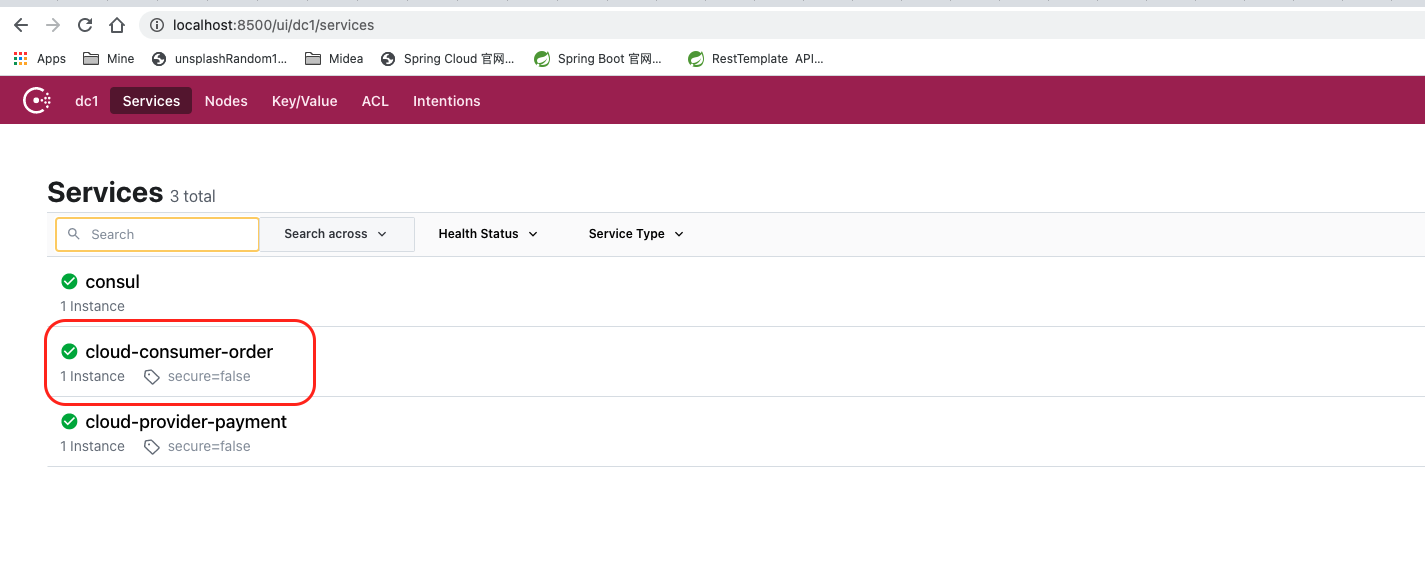
访问controller也可以得到预期的返回结果.

3.7 Eureka Zk & Consul总结
该笔记对应的bilibili教程地址: 笔记也是由视频教程总结编辑而成.