Spring Security系列文章 的第1-2篇是将用户数据保存在内存中,第3篇虽然介绍了 JdbcUserDetailsManager,但是使用起来依然不便,所以今天我要采用一个更加灵活的定义方式。
环境准备 为了搭建使用Spring Data JPA存储用户数据的项目环境
1.创建工程 首先我们创建一个新的 Spring Boot 工程,添加如下依赖:
新增依赖 1 2 3 4 <dependency > <groupId > org.springframework.boot</groupId > <artifactId > spring-boot-starter-data-jpa</artifactId > </dependency >
建库建表
1 create database if not exists springsecurityJPA;
注意⚠️不需要建表后续表会由程序根据实体类自动创建。
修改yml文件 将原来的**application.yml**文件中数据库改成JPA的库并且加上JPA相关的配置。
1 2 3 4 5 6 7 8 9 10 11 12 13 14 15 16 17 18 19 20 21 server: port: 9999 spring: datasource: url: jdbc:mysql://localhost:3306/springsecurityJPA?useUnicode=true&serverTimezone=Asia/Shanghai&characterEncoding=utf-8&zeroDateTimeBehavior=convertToNull&useSSL=false username: root password: driver-class-name: com.mysql.cj.jdbc.Driver jpa: show-sql: true hibernate: ddl-auto: update database-platform: mysql properties: hibernate: dialect: org.hibernate.dialect.MySQL8Dialect
创建存储用户和角色的实体类 用户实体类 1 2 3 4 5 6 7 8 9 10 11 12 13 14 15 16 17 18 19 20 21 22 23 24 25 26 27 28 29 30 31 32 33 34 35 36 37 38 39 40 41 42 43 44 45 46 47 48 49 50 51 52 53 54 55 56 57 58 59 60 61 62 63 64 65 66 67 68 69 70 71 72 73 74 75 76 77 78 79 80 81 82 83 84 85 86 87 88 89 90 91 92 93 94 95 96 97 98 99 100 101 102 103 104 105 106 107 108 109 110 111 112 113 114 115 116 117 118 119 120 121 122 123 124 125 126 127 128 129 130 131 132 133 134 135 136 137 138 139 140 141 142 package org.example.model;import org.springframework.security.core.GrantedAuthority;import org.springframework.security.core.authority.SimpleGrantedAuthority;import org.springframework.security.core.userdetails.UserDetails;import javax.persistence.*;import java.util.ArrayList;import java.util.Collection;import java.util.List;@Entity (name = "t_user" )public class User implements UserDetails @Id @GeneratedValue (strategy = GenerationType.IDENTITY) private Long id; @ManyToMany (fetch = FetchType.EAGER,cascade = CascadeType.PERSIST) List<Role> roles; private String username; private String password; private boolean accountNonExpired; private boolean accountNonLocked; private boolean credentialsNonExpired; private boolean enable; public boolean isAccountNonExpired () return this .accountNonExpired; } public boolean isAccountNonLocked () return this .accountNonLocked; } public boolean isCredentialsNonExpired () return this .credentialsNonExpired; } public boolean isEnabled () return this .enable; } @Override public Collection<? extends GrantedAuthority> getAuthorities() { List<SimpleGrantedAuthority> authorities = new ArrayList<>(); for (Role role:getRoles()) { authorities.add(new SimpleGrantedAuthority(role.getName())); } return authorities; } @Override public String getPassword () return this .password; } @Override public String getUsername () return this .username; } public Long getId () return id; } public List<Role> getRoles () return roles; } public boolean isEnable () return enable; } public void setId (Long id) this .id = id; } public void setRoles (List<Role> roles) this .roles = roles; } public void setUsername (String username) this .username = username; } public void setPassword (String password) this .password = password; } public void setAccountNonExpired (boolean accountNonExpired) this .accountNonExpired = accountNonExpired; } public void setAccountNonLocked (boolean accountNonLocked) this .accountNonLocked = accountNonLocked; } public void setCredentialsNonExpired (boolean credentialsNonExpired) this .credentialsNonExpired = credentialsNonExpired; } public void setEnable (boolean enable) this .enable = enable; } }
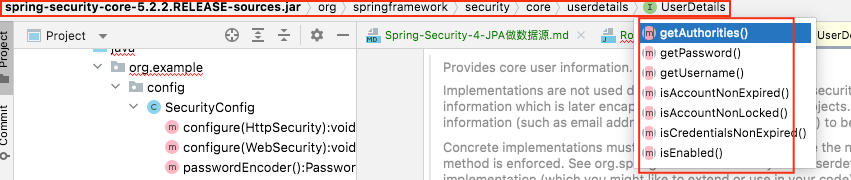
注意⚠️ 用户实体类是根据接口UserDetails中封装的方法提取属性, 添加get方法, 并添加id和关联角色实体类Role 生成的。其他信息可以继续添加, 但是这些必须要有。
用户实体类主要需要实现 UserDetails 接口,并实现接口中的方法。 这里的字段基本都好理解,几个特殊的我来稍微说一下:
角色实体类 1 2 3 4 5 6 7 8 9 10 11 12 13 14 15 16 17 18 19 20 21 22 23 24 25 26 27 28 29 30 31 32 33 34 35 36 37 38 39 40 41 42 43 44 package org.example.model;import javax.persistence.Entity;import javax.persistence.GeneratedValue;import javax.persistence.GenerationType;import javax.persistence.Id;@Entity (name = "t_role" )public class Role @Id @GeneratedValue (strategy = GenerationType.IDENTITY) private Long id; private String name; private String nameZh; public Long getId () return id; } public void setId (Long id) this .id = id; } public String getName () return name; } public void setName (String name) this .name = name; } public String getNameZh () return nameZh; } public void setNameZh (String nameZh) this .nameZh = nameZh; } }
配置Dao(继承 JpaRepository ) 数据模型准备好之后,我们再来定义一个 UserDao:
1
2
3
4
5
6
7
8
9
10
11
12
13
package org.example.dao;import org.example.model.User;import org.springframework.data.jpa.repository.JpaRepository;public interface UserDao extends JpaRepository <User ,Long > User findUserByUsername (String name) ; }
配置UserService 1 2 3 4 5 6 7 8 9 10 11 12 13 14 15 16 17 18 19 20 21 22 23 24 25 26 27 28 package org.example.service;import org.example.dao.UserDao;import org.example.model.User;import org.springframework.beans.factory.annotation.Autowired;import org.springframework.security.core.userdetails.UserDetails;import org.springframework.security.core.userdetails.UserDetailsService;import org.springframework.security.core.userdetails.UsernameNotFoundException;import org.springframework.stereotype.Service;@Service public class UserService implements UserDetailsService @Autowired UserDao userDao; @Override public UserDetails loadUserByUsername (String username) throws UsernameNotFoundException User user = userDao.findUserByUsername(username); if (user == null ) { throw new UsernameNotFoundException("用户不存在" ); } return user; } }
我们自己定义的 UserService 需要实现 UserDetailsService 接口,实现该接口,就要实现接口中的方法,也就是 loadUserByUsername ,这个方法的参数就是用户在登录的时候传入的用户名,根据用户名去查询用户信息(查出来之后,系统会自动进行密码比对)。
配置authManager 在 SecurityConfig 中,我们通过如下方式来配置用户:
1
2
3
4
5
6
@Autowired UserService userService; @Override protected void configure (AuthenticationManagerBuilder auth) throws Exception auth.userDetailsService(userService); }
注意⚠️: 还是重写 configure 方法,只不过这次我们不是基于内存,也不是基于 JdbcUserDetailsManager,而是使用自定义的 UserService,就这样配置就 OK 了。
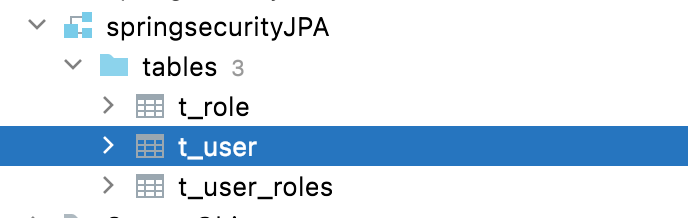
测试 启动项目插入表 启动项目发现已经建好三张表如下:
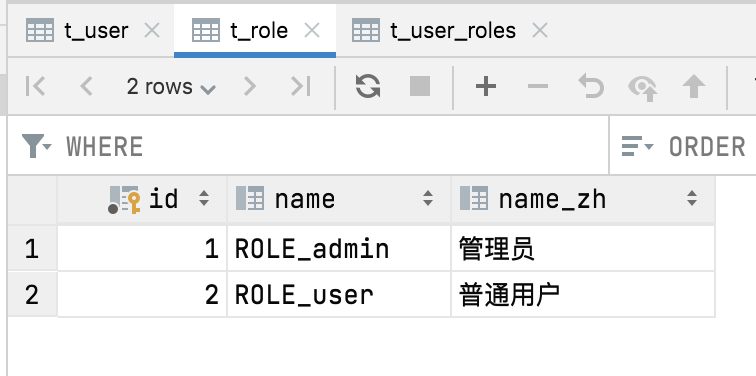
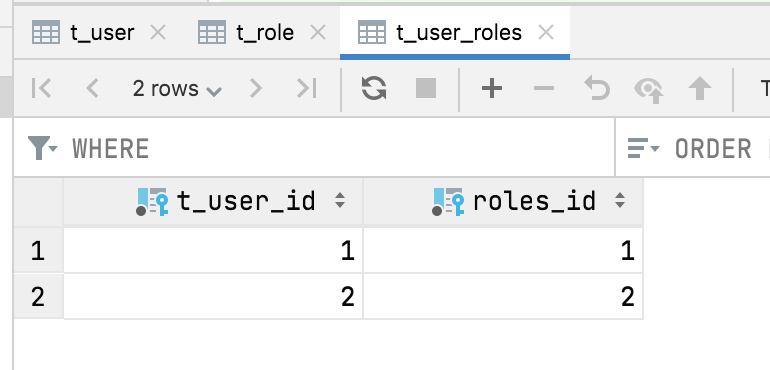
先往表里插入两条数据 1 2 3 4 5 6 7 8 9 10 11 12 13 14 15 16 17 18 19 20 21 22 23 24 25 26 27 28 29 30 31 32 33 34 35 36 37 38 39 40 41 42 43 44 45 46 47 48 49 50 package org.example;import org.example.dao.UserDao;import org.example.model.Role;import org.example.model.User;import org.junit.jupiter.api.Test;import org.springframework.beans.factory.annotation.Autowired;import org.springframework.boot.test.context.SpringBootTest;import java.util.ArrayList;import java.util.List;@SpringBootTest class AppTest @Autowired UserDao userDao; @Test void contextLoads () User u1 = new User(); u1.setUsername("Benedict" ); u1.setPassword("111" ); u1.setAccountNonExpired(true ); u1.setAccountNonLocked(true ); u1.setCredentialsNonExpired(true ); u1.setEnable(true ); List<Role> rs1 = new ArrayList<>(); Role r1 = new Role(); r1.setName("ROLE_admin" ); r1.setNameZh("管理员" ); rs1.add(r1); u1.setRoles(rs1); userDao.save(u1); User u2 = new User(); u2.setUsername("本尼迪克特" ); u2.setPassword("222" ); u2.setAccountNonExpired(true ); u2.setAccountNonLocked(true ); u2.setCredentialsNonExpired(true ); u2.setEnable(true ); List<Role> rs2 = new ArrayList<>(); Role r2 = new Role(); r2.setName("ROLE_user" ); r2.setNameZh("普通用户" ); rs2.add(r2); u2.setRoles(rs2); userDao.save(u2); } }
执行上述test可以向后台表插入两个用户信息。 对应的用户表 角色表 用户角色关联表都会新增两条数据如下:
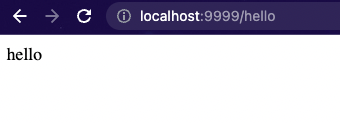
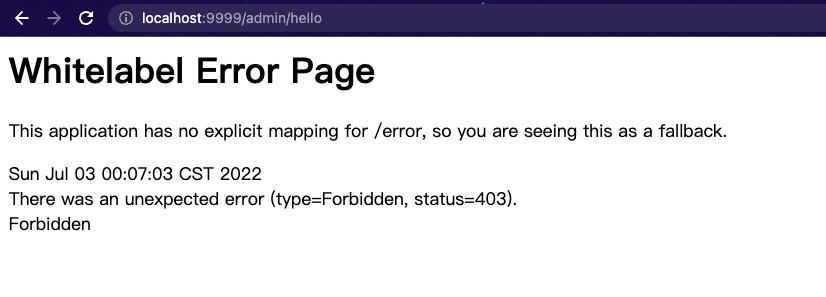
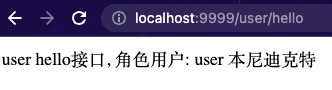
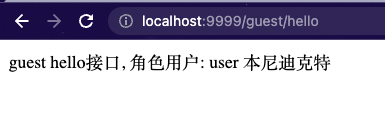
访问不同接口现象 有了数据,接下来启动项目,我们来进行测试。 首先以 “本尼迪克特”的身份进行登录:
/hello 因为登录后就可以访问,这个接口访问成功。
在测试的过程中,如果在数据库中将用户的 enabled 属性设置为 false,表示禁用该账户,此时再使用该账户登录就会登录失败。