本篇文章将介绍如何使用Spring Security实现记住我Remember Me的功能。
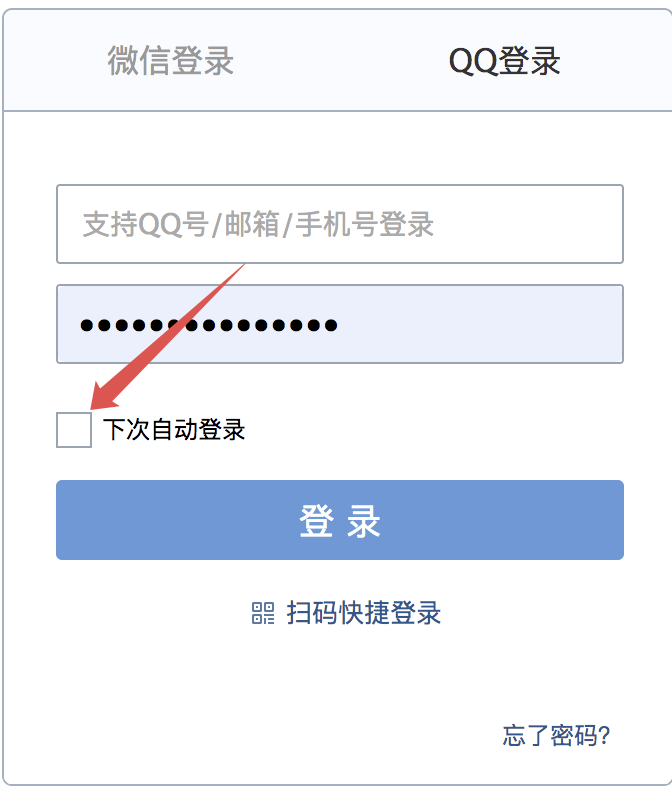
什么是RememberMe? 自动登录是我们在软件开发时一个非常常见的功能,例如我们登录 QQ 邮箱:注意⚠️: 和Shiro的RememberMe是不同的概念 不要混淆。
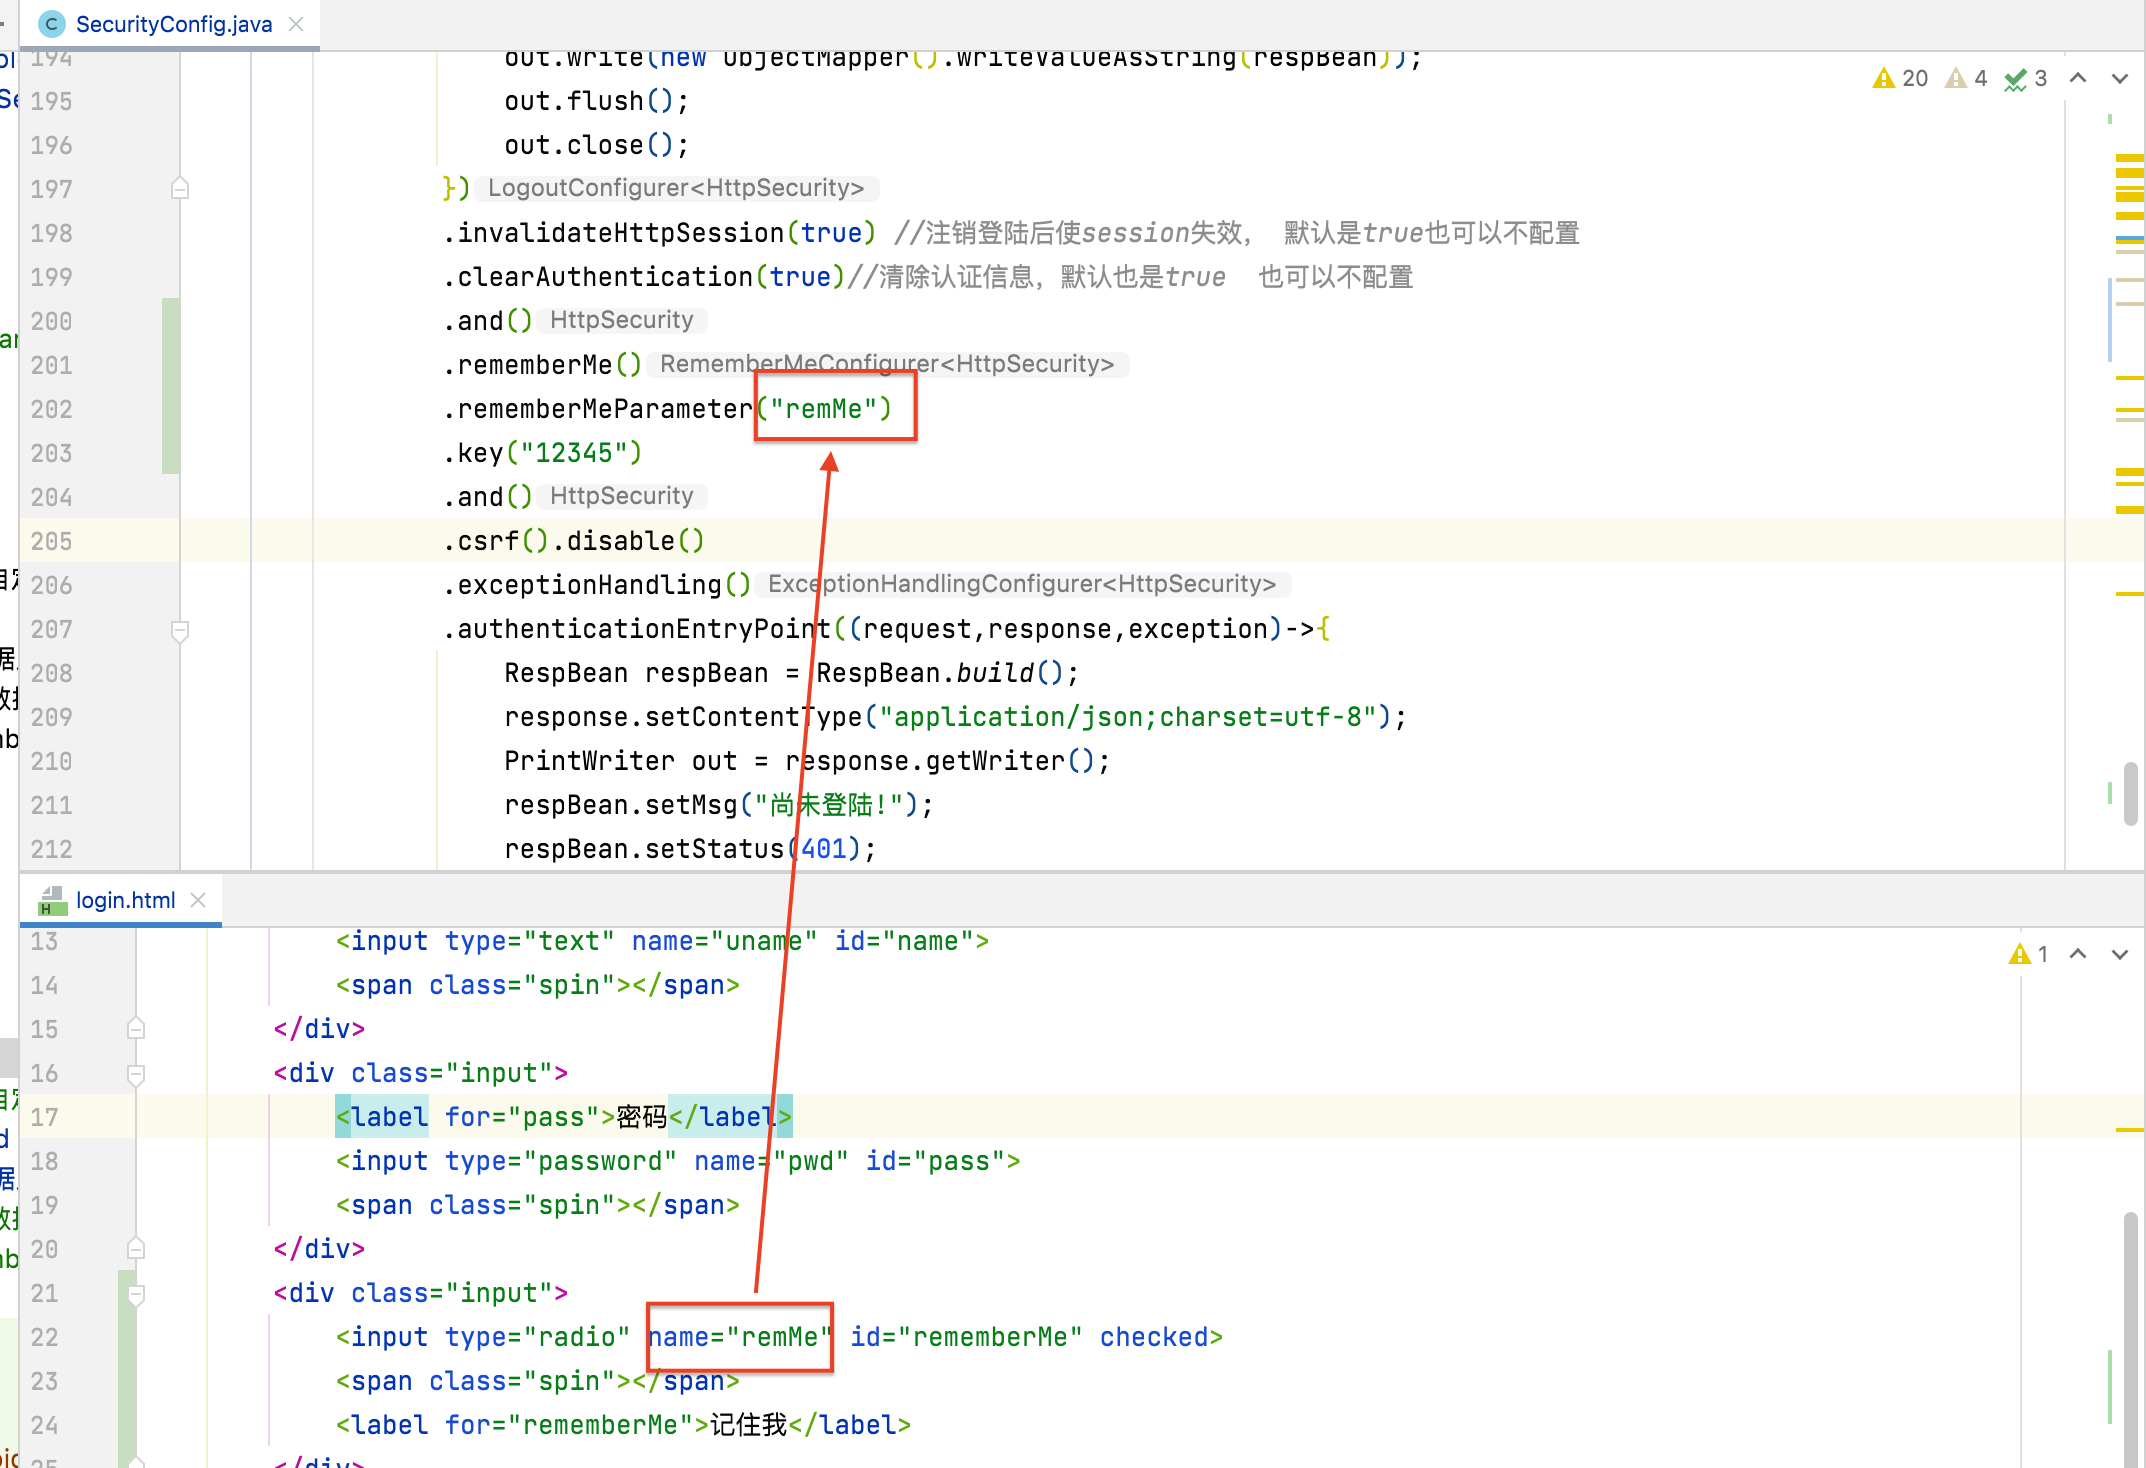
怎么实现? 修改SecurityConfig 在protected void configure(HttpSecurity http) throws Exception {方法中开启记住我功能
1
2
3
4
.and() .rememberMe() .rememberMeParameter("remMe" ) .key("12345" )
在登陆页面html中增加radio输入项供用户选择是否开启rememberMe
1 2 3 4 5 <div class ="input" > <input type ="radio" name ="remMe" id ="rememberMe" > <span class ="spin" > </span > <label for ="rememberMe" > 记住我</label > </div >
注意前后端开启RememberMe指定的key一样。
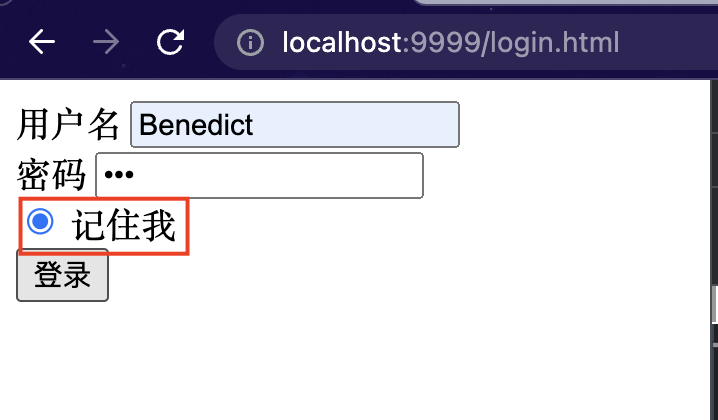
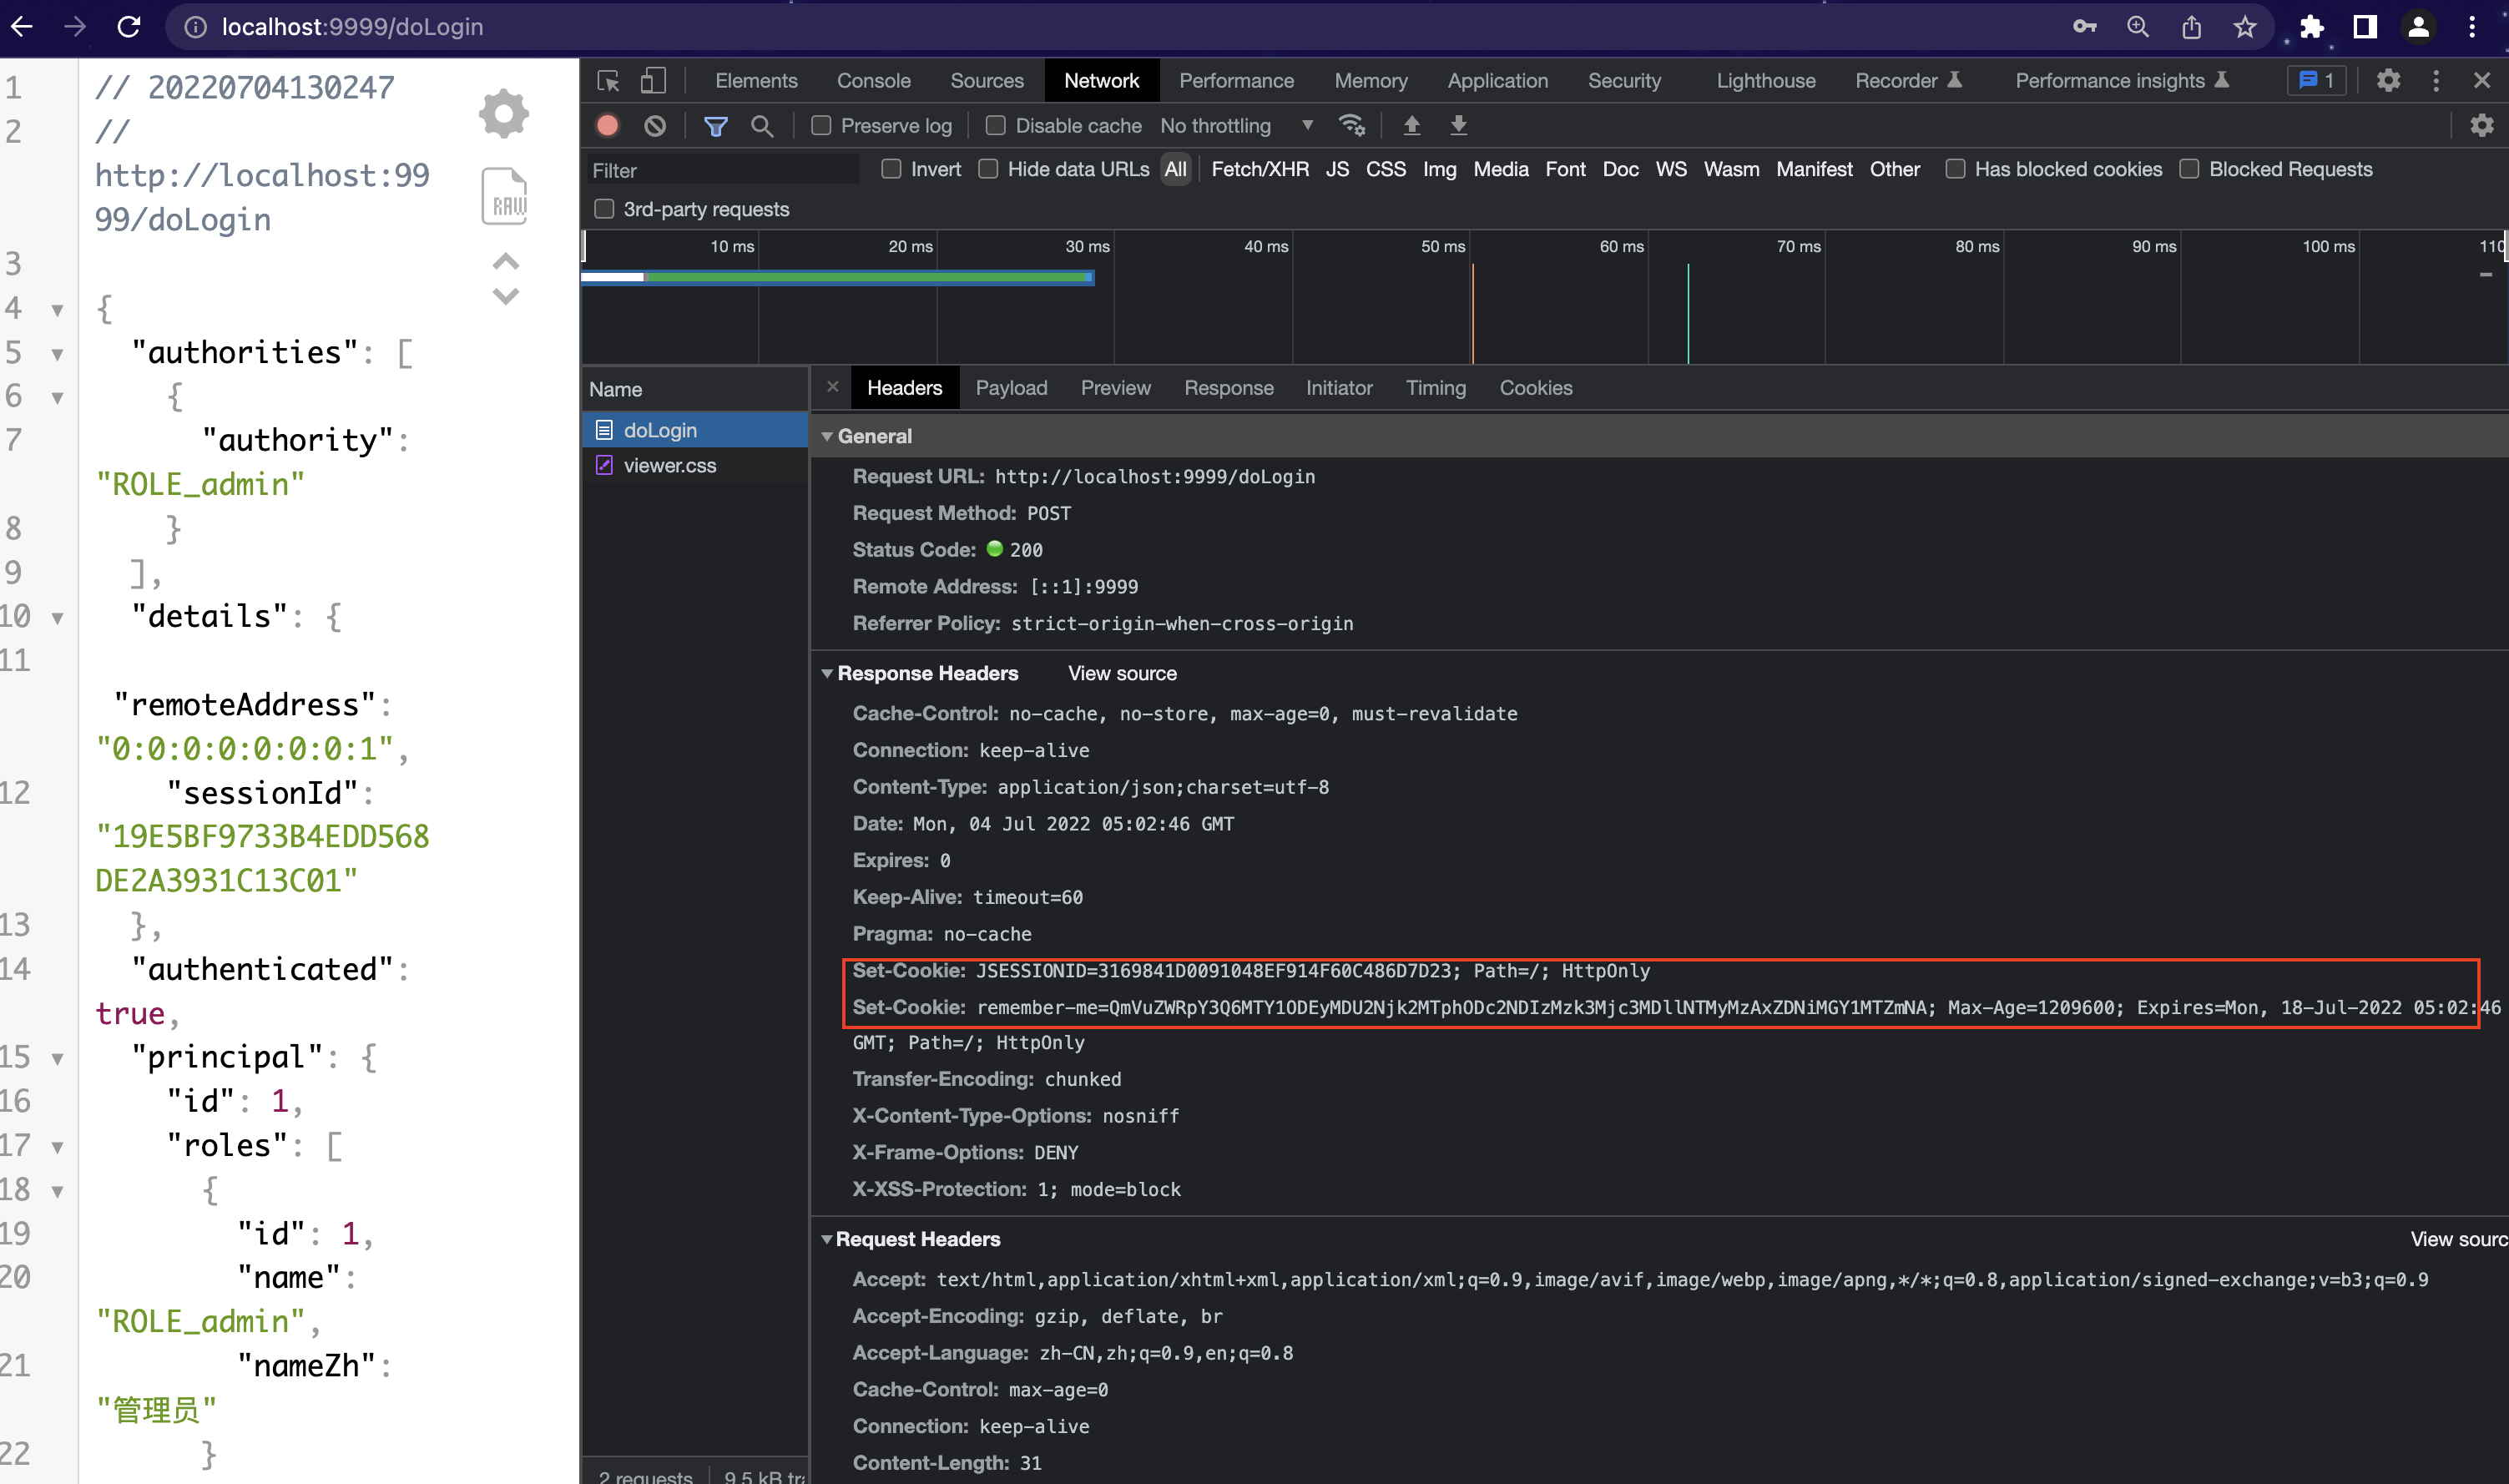
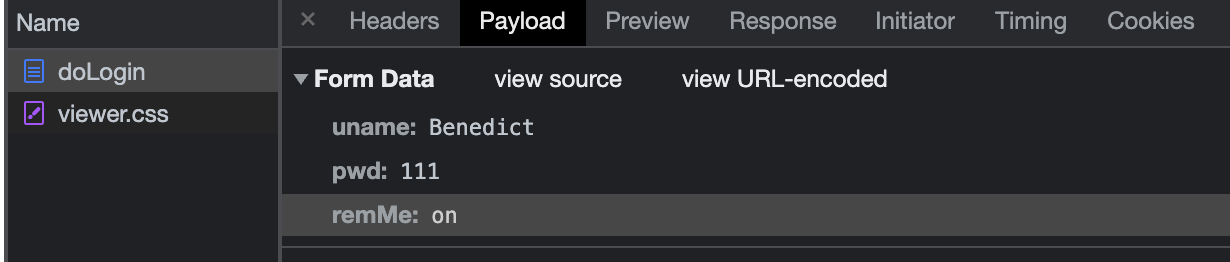
测试 记住我登陆 在上述配置完后启动项目, 然后访问登陆页面, 选择记住我登陆。观察HTTP请求协议里的内容。
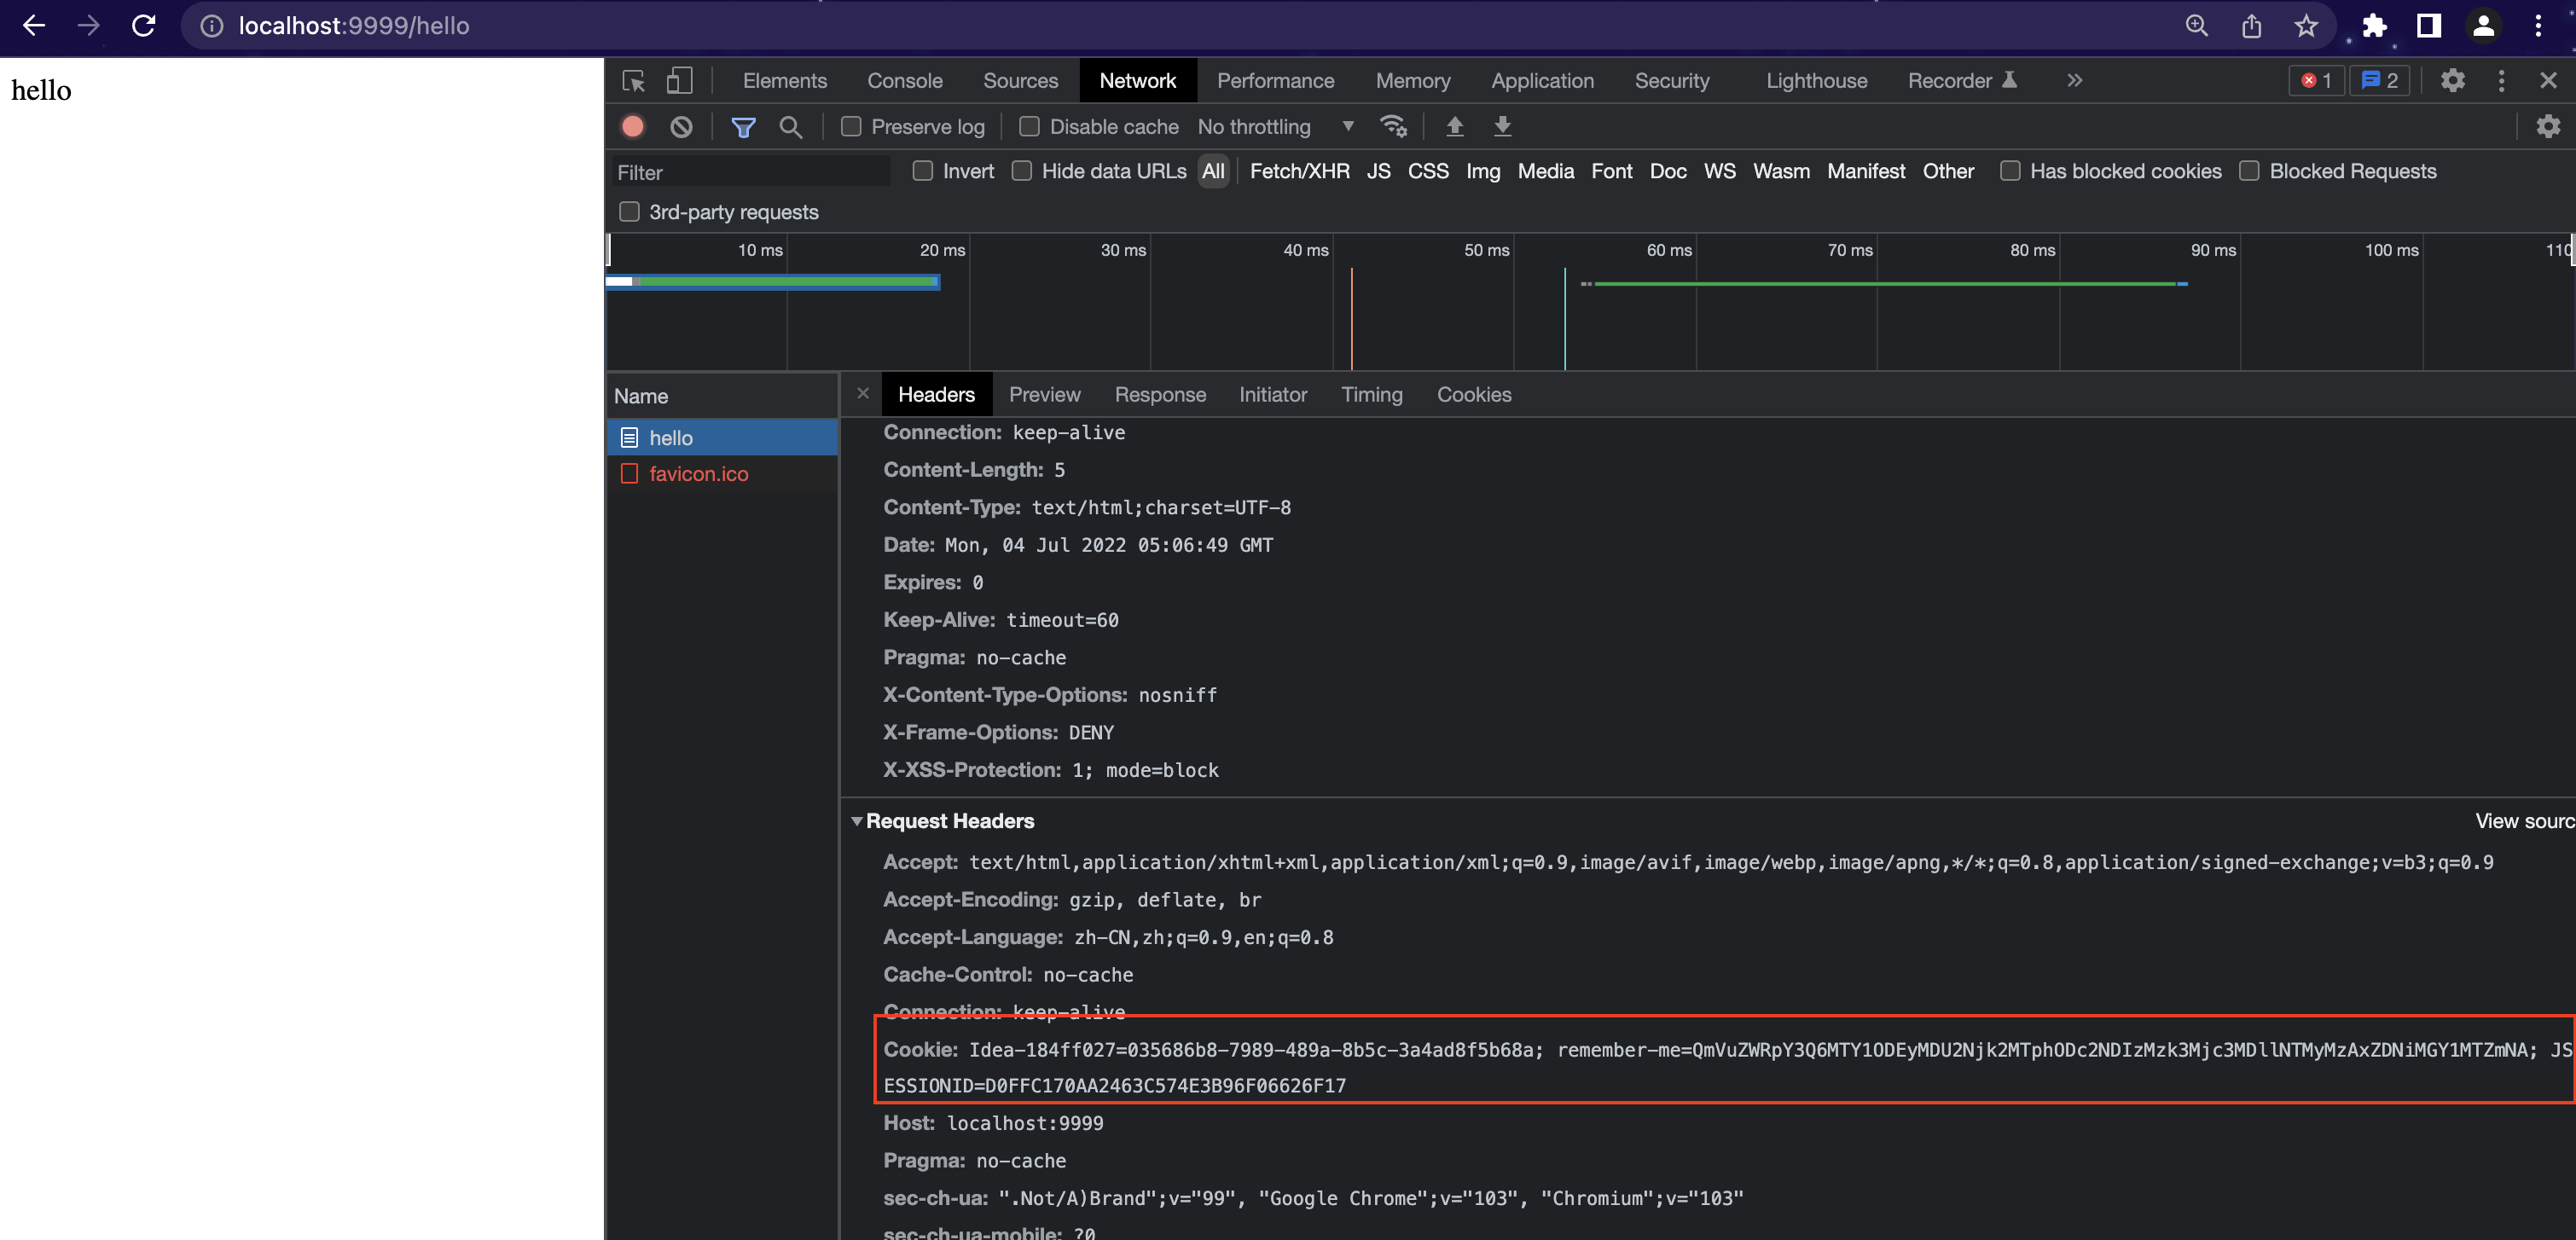
访问其他接口 观察上图说明记住我功能已经生效。继续测试,重启浏览器和后台项目后访问hello接口发现:
原理 分析刚才remember-me cookie的值,其实是使用Base64工具类加密 “用户名+过期时间(登陆时间后的两周)+md5算法加密的password和盐值(也就是SecurityConfig指定的key)。
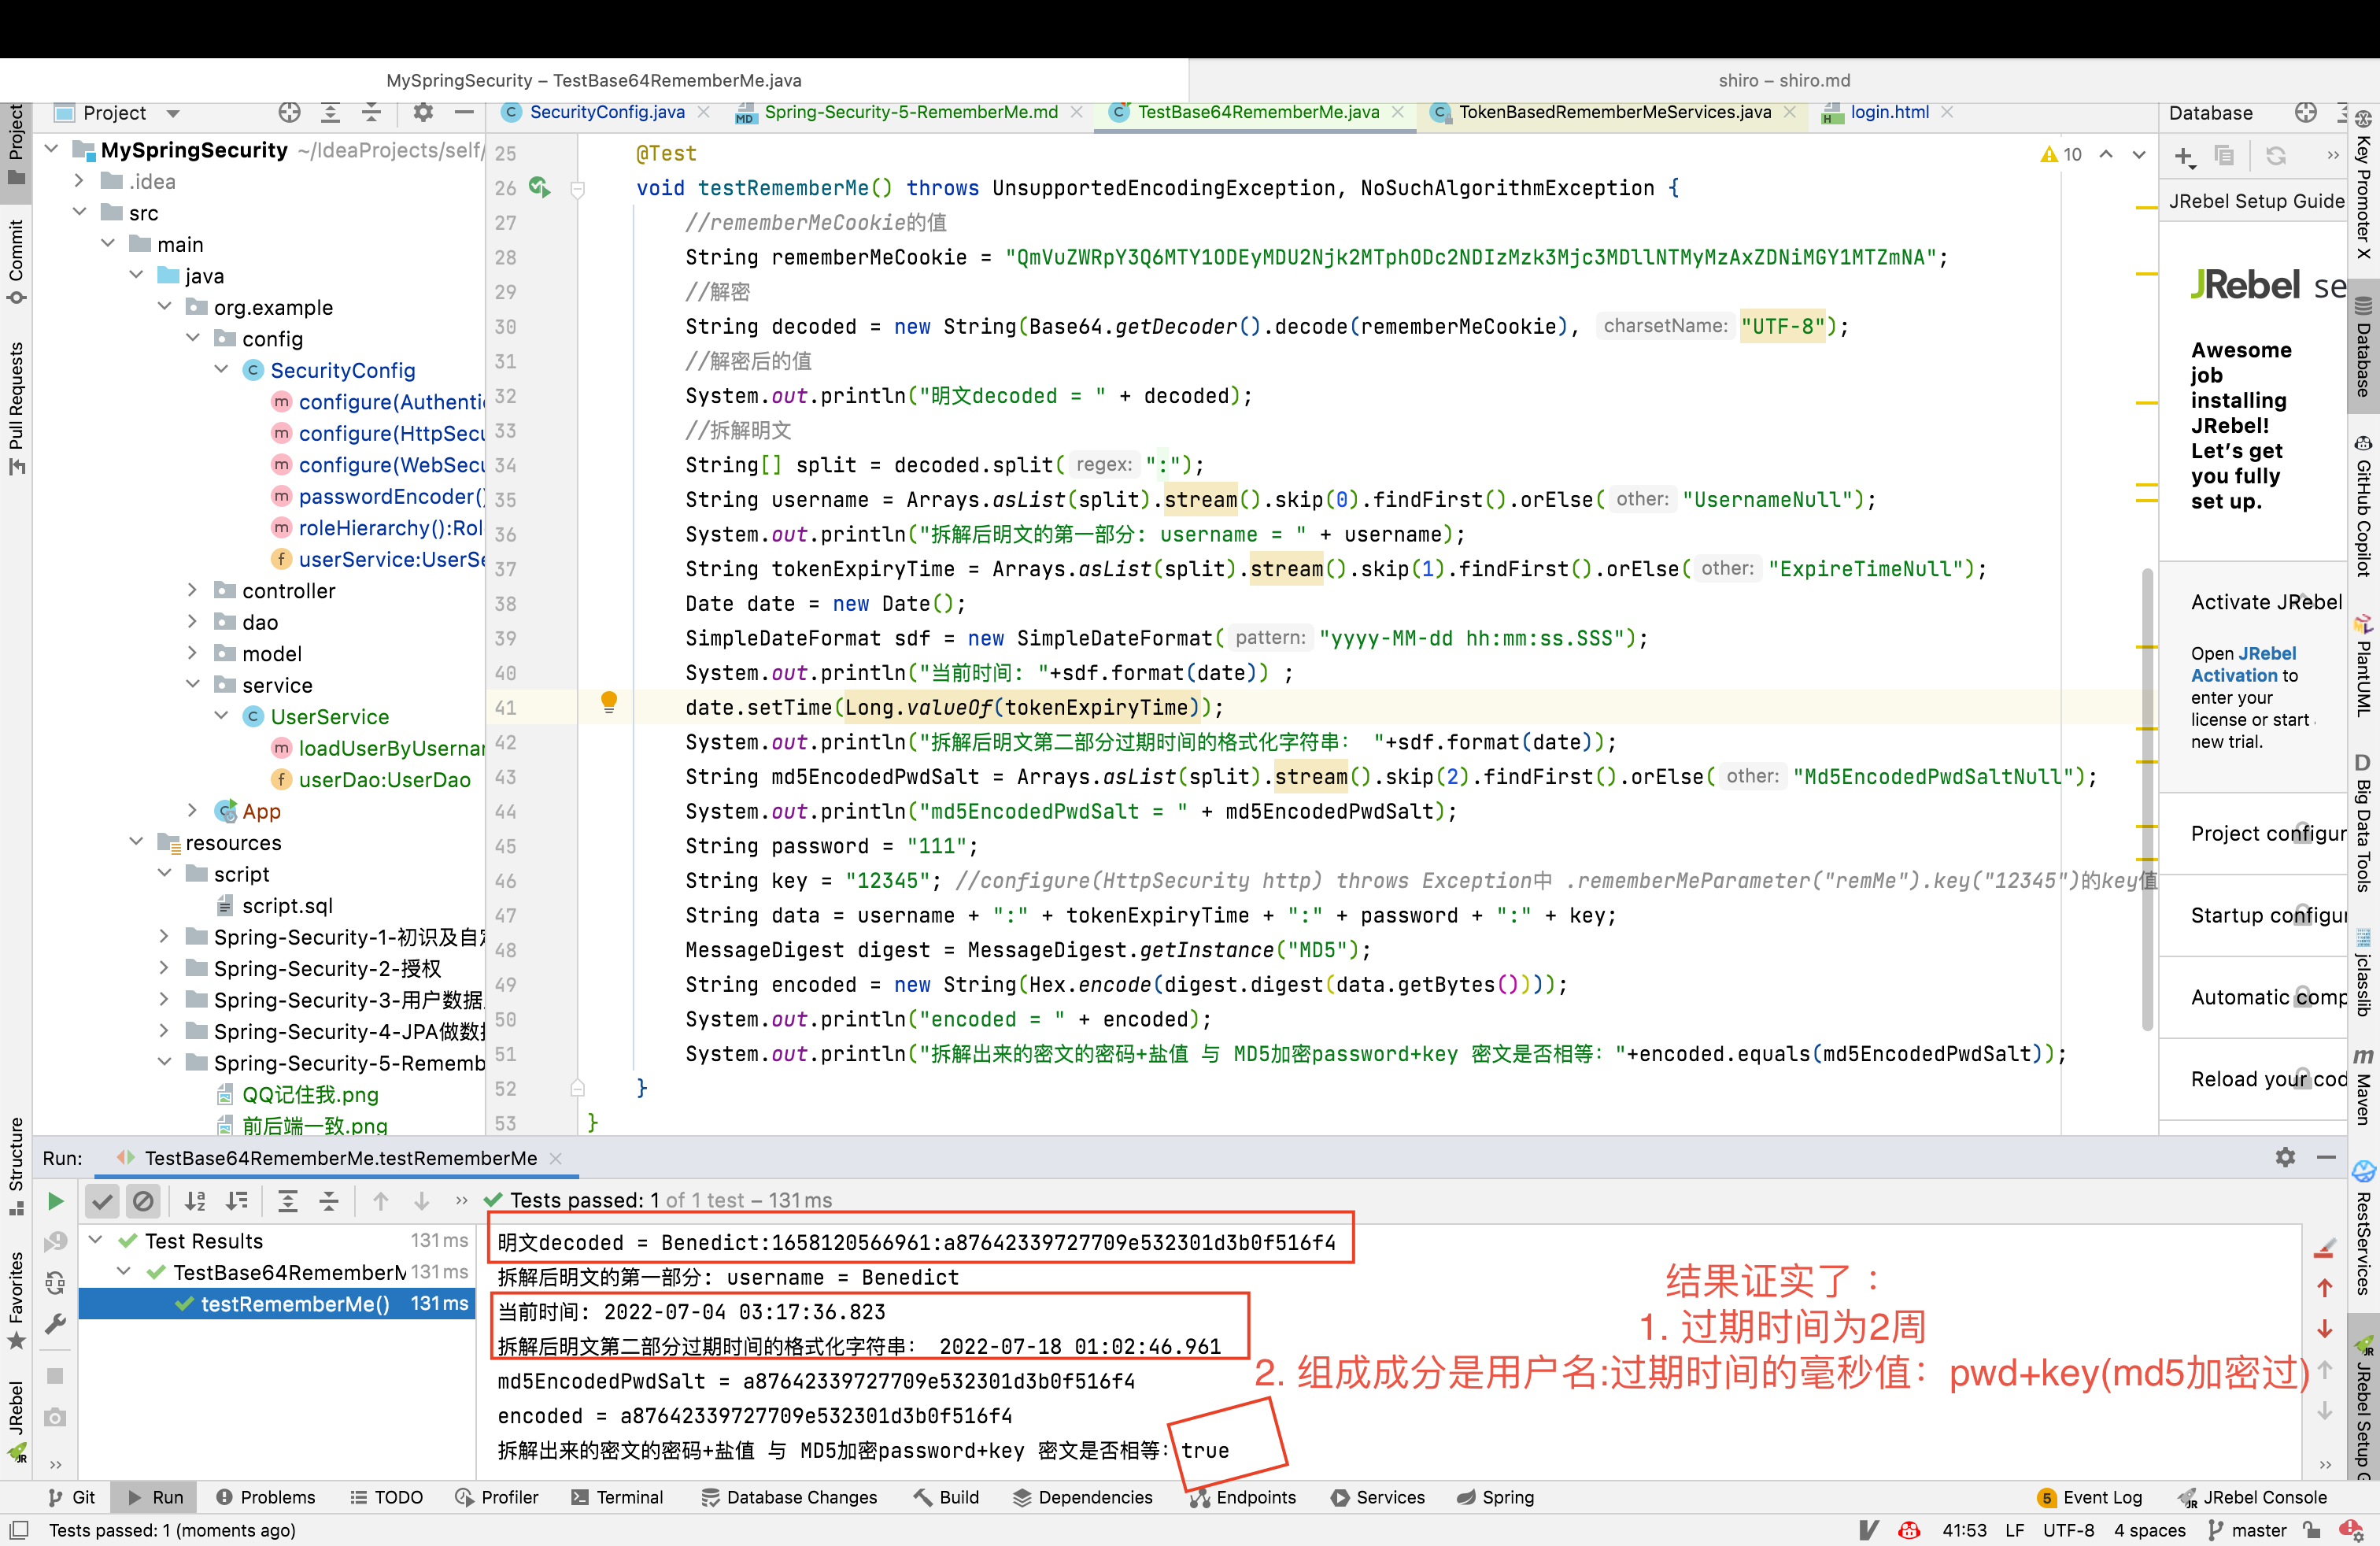
测试类验证 新建测试类 TestBase64RememberMe:
1
2
3
4
5
6
7
8
9
10
11
12
13
14
15
16
17
18
19
20
21
22
23
24
25
26
27
28
29
30
31
32
33
34
35
36
37
38
39
40
41
42
43
44
45
46
47
48
49
50
51
52
53
package org.example;import org.assertj.core.util.DateUtil;import org.junit.jupiter.api.Test;import org.springframework.boot.test.context.SpringBootTest;import org.springframework.security.crypto.codec.Hex;import sun.security.provider.MD5;import java.io.UnsupportedEncodingException;import java.security.MessageDigest;import java.security.NoSuchAlgorithmException;import java.text.SimpleDateFormat;import java.util.Arrays;import java.util.Base64;import java.util.Calendar;import java.util.Date;@SpringBootTest public class TestBase64RememberMe @Test void testRememberMe () throws UnsupportedEncodingException, NoSuchAlgorithmException String rememberMeCookie = "QmVuZWRpY3Q6MTY1ODEyMDU2Njk2MTphODc2NDIzMzk3Mjc3MDllNTMyMzAxZDNiMGY1MTZmNA" ; String decoded = new String(Base64.getDecoder().decode(rememberMeCookie), "UTF-8" ); System.out.println("明文decoded = " + decoded); String[] split = decoded.split(":" ); String username = Arrays.asList(split).stream().skip(0 ).findFirst().orElse("UsernameNull" ); System.out.println("拆解后明文的第一部分: username = " + username); String tokenExpiryTime = Arrays.asList(split).stream().skip(1 ).findFirst().orElse("ExpireTimeNull" ); Date date = new Date(); SimpleDateFormat sdf = new SimpleDateFormat("yyyy-MM-dd hh:mm:ss.SSS" ); System.out.println("当前时间: " +sdf.format(date)) ; date.setTime(Long.valueOf(tokenExpiryTime)); System.out.println("拆解后明文第二部分过期时间的格式化字符串: " +sdf.format(date)); String md5EncodedPwdSalt = Arrays.asList(split).stream().skip(2 ).findFirst().orElse("Md5EncodedPwdSaltNull" ); System.out.println("md5EncodedPwdSalt = " + md5EncodedPwdSalt); String password = "111" ; String key = "12345" ; String data = username + ":" + tokenExpiryTime + ":" + password + ":" + key; MessageDigest digest = MessageDigest.getInstance("MD5" ); String encoded = new String(Hex.encode(digest.digest(data.getBytes()))); System.out.println("encoded = " + encoded); System.out.println("拆解出来的密文的密码+盐值 与 MD5加密password+key 密文是否相等:" +encoded.equals(md5EncodedPwdSalt)); } }
运行结果:
源码分析 其实底层源码在 org.springframework.security.web.authentication.rememberme.TokenBasedRememberMeServices#onLoginSuccess#makeTokenSignature()方法中有所体现。
1 2 3 4 5 6 7 8 9 10 11 12 13 14 15 16 17 18 19 20 21 22 23 24 25 26 27 28 29 30 31 32 33 34 35 36 37 38 39 40 41 42 @Override public void onLoginSuccess (HttpServletRequest request, HttpServletResponse response, Authentication successfulAuthentication) String username = retrieveUserName(successfulAuthentication); String password = retrievePassword(successfulAuthentication); if (!StringUtils.hasLength(username)) { logger.debug("Unable to retrieve username" ); return ; } if (!StringUtils.hasLength(password)) { UserDetails user = getUserDetailsService().loadUserByUsername(username); password = user.getPassword(); if (!StringUtils.hasLength(password)) { logger.debug("Unable to obtain password for user: " + username); return ; } } int tokenLifetime = calculateLoginLifetime(request, successfulAuthentication); long expiryTime = System.currentTimeMillis(); expiryTime += 1000L * (tokenLifetime < 0 ? TWO_WEEKS_S : tokenLifetime); String signatureValue = makeTokenSignature(expiryTime, username, password); setCookie(new String[] { username, Long.toString(expiryTime), signatureValue }, tokenLifetime, request, response); if (logger.isDebugEnabled()) { logger.debug("Added remember-me cookie for user '" + username + "', expiry: '" + new Date(expiryTime) + "'" ); } }
org.springframework.security.web.authentication.rememberme.AbstractRememberMeServices#setCookie()方法
1
2
3
4
5
6
7
8
9
10
11
12
13
14
15
16
17
18
19
20
21
22
23
public static final String SPRING_SECURITY_REMEMBER_ME_COOKIE_KEY = "remember-me" ;public static final String DEFAULT_PARAMETER = "remember-me" ;public static final int TWO_WEEKS_S = 1209600 ;protected void setCookie (String[] tokens, int maxAge, HttpServletRequest request,HttpServletResponse response) String cookieValue = encodeCookie(tokens); Cookie cookie = new Cookie(cookieName, cookieValue); cookie.setMaxAge(maxAge); cookie.setPath(getCookiePath(request)); if (cookieDomain != null ) { cookie.setDomain(cookieDomain); } if (maxAge < 1 ) { cookie.setVersion(1 ); } if (useSecureCookie == null ) { cookie.setSecure(request.isSecure()); } else { cookie.setSecure(useSecureCookie); } cookie.setHttpOnly(true );response.addCookie(cookie); }
流程总结: 源码逻辑其实很好理解:
首先从登录成功的 Authentication 中提取出用户名/密码。
由于登录成功之后,密码可能被擦除了,所以,如果一开始没有拿到密码,就再从 UserDetailsService 中重新加载用户并重新获取密码。
再接下来去获取令牌的有效期,令牌有效期默认就是两周。
再接下来调用 makeTokenSignature 方法去计算散列值,实际上就是根据 username、令牌有效期以及 password、key 一起计算一个散列值。如果我们没有自己去设置这个 key,默认是在 RememberMeConfigurer#getKey 方法中进行设置的,它的值是一个 UUID 字符串。
最后,将用户名、令牌有效期以及计算得到的散列值放入 Cookie 中。
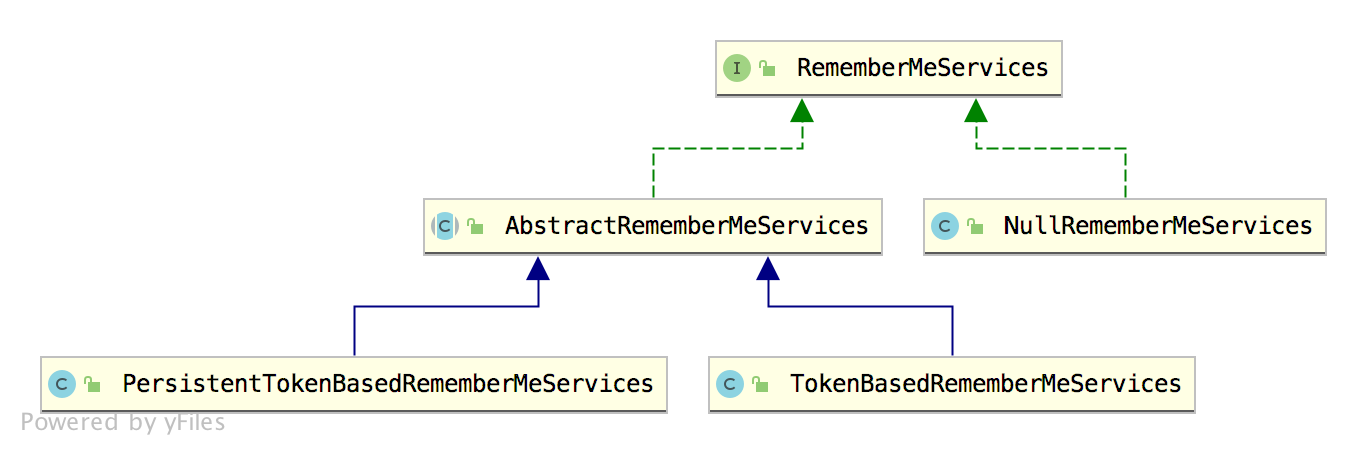
Spring Security 中的一系列功能都是通过一个过滤器链实现的,RememberMe 这个功能当然也不例外。Spring Security 中提供了 RememberMeAuthenticationFilter 类专门用来做相关的事情,我们来看下 RememberMeAuthenticationFilter 的 doFilter 方法:
1
2
3
4
5
6
7
8
9
10
11
12
13
14
15
16
17
18
19
20
21
22
23
24
25
26
27
28
29
30
31
32
33
34
35
36
37
38
39
40
41
42
43
44
45
46
47
48
49
50
51
52
53
54
public void doFilter (ServletRequest req, ServletResponse res, FilterChain chain) throws IOException, ServletException HttpServletRequest request = (HttpServletRequest) req; HttpServletResponse response = (HttpServletResponse) res; if (SecurityContextHolder.getContext().getAuthentication() == null ) { Authentication rememberMeAuth = rememberMeServices.autoLogin(request,response); if (rememberMeAuth != null ) { try { rememberMeAuth = authenticationManager.authenticate(rememberMeAuth); SecurityContextHolder.getContext().setAuthentication(rememberMeAuth); onSuccessfulAuthentication(request, response, rememberMeAuth); if (logger.isDebugEnabled()) { logger.debug("SecurityContextHolder populated with remember-me token: '" + SecurityContextHolder.getContext().getAuthentication() + "'" ); } if (this .eventPublisher != null ) { eventPublisher .publishEvent(new InteractiveAuthenticationSuccessEvent( SecurityContextHolder.getContext() .getAuthentication(), this .getClass())); } if (successHandler != null ) { successHandler.onAuthenticationSuccess(request, response, rememberMeAuth); return ; } } catch (AuthenticationException authenticationException) { if (logger.isDebugEnabled()) { logger.debug( "SecurityContextHolder not populated with remember-me token, as " + "AuthenticationManager rejected Authentication returned by RememberMeServices: '" + rememberMeAuth + "'; invalidating remember-me token" , authenticationException); } rememberMeServices.loginFail(request, response); onUnsuccessfulAuthentication(request, response, authenticationException); } } chain.doFilter(request, response); } else { if (logger.isDebugEnabled()) { logger.debug("SecurityContextHolder not populated with remember-me token, as it already contained: '" + SecurityContextHolder.getContext().getAuthentication() + "'" ); } chain.doFilter(request, response); } }
上面的逻辑解释了为什么重启后台或浏览器之后访问hello接口依然能通过过滤器放行的原因。
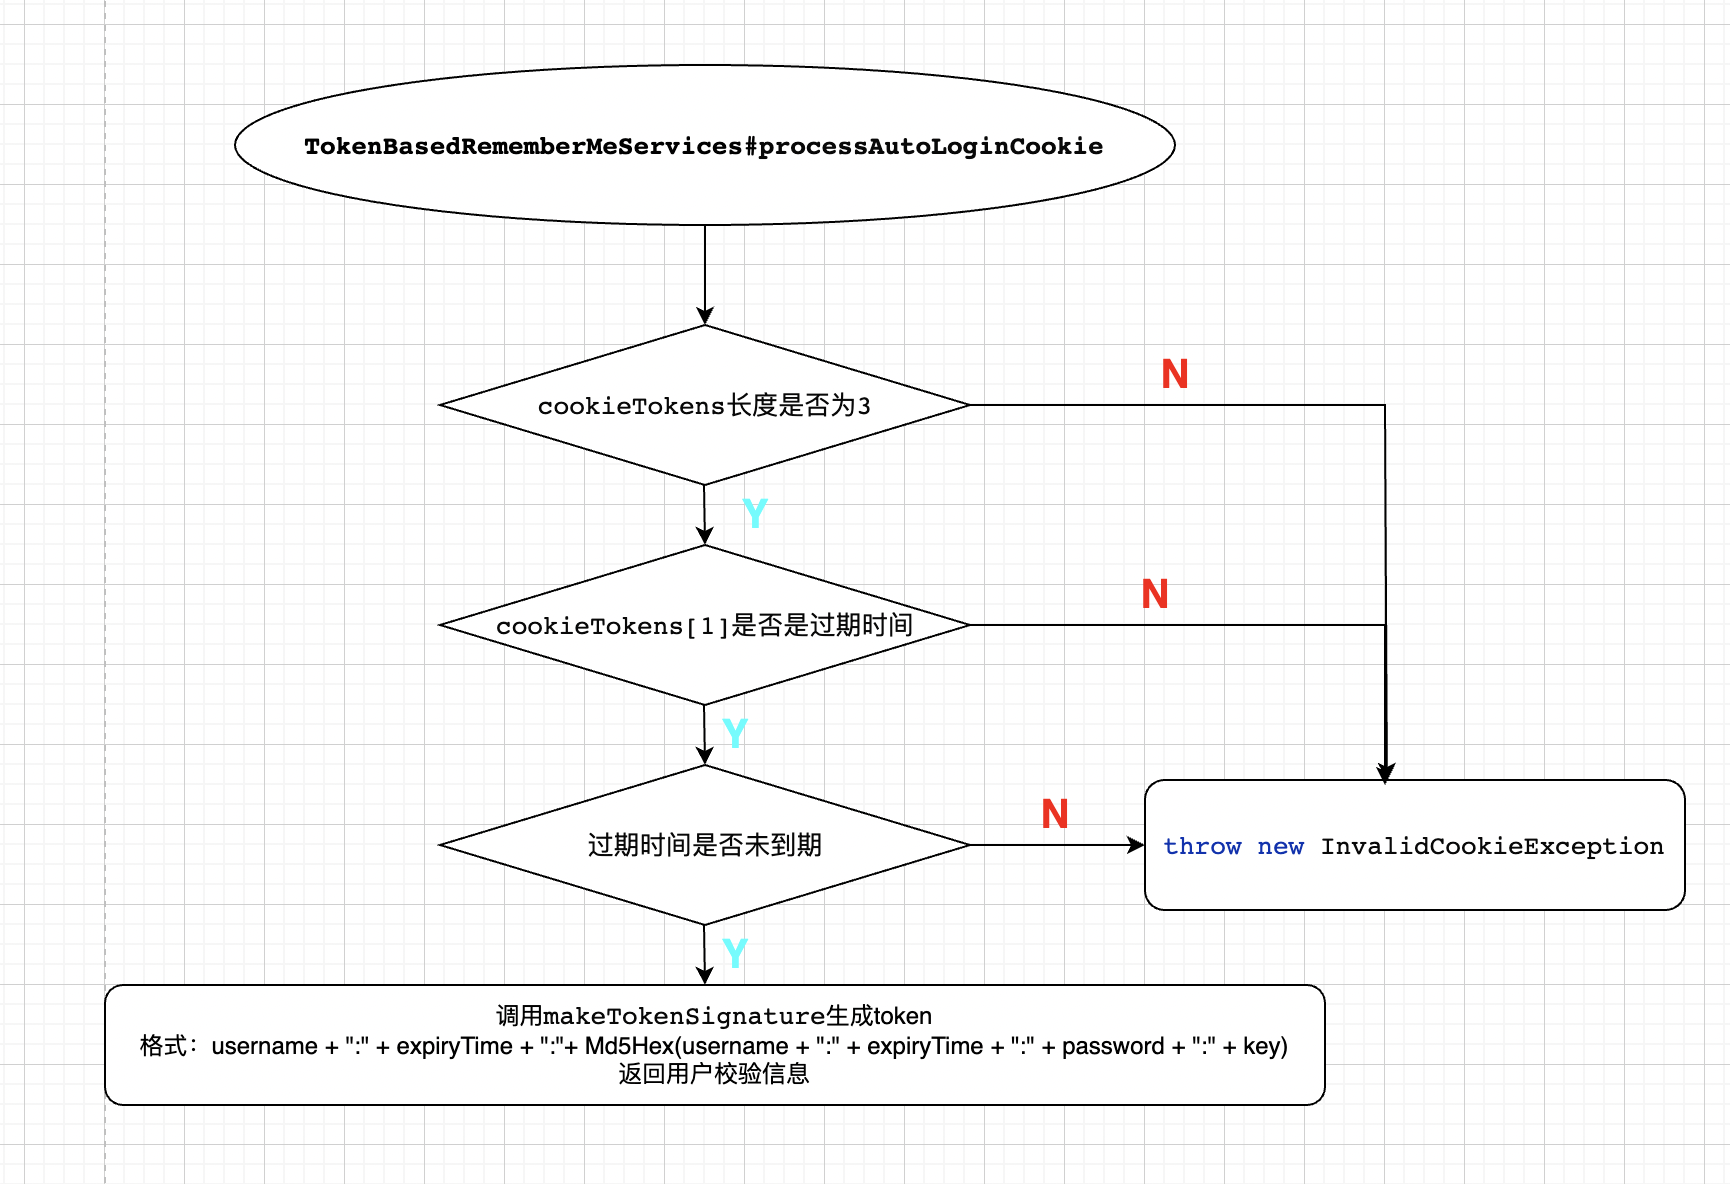
1
2
3
4
5
6
7
8
9
10
11
12
13
14
15
16
17
18
19
20
21
22
23
24
25
26
27
28
29
30
31
32
33
34
35
36
37
38
39
40
41
42
43
44
45
46
47
48
49
@Override public final Authentication autoLogin (HttpServletRequest request, HttpServletResponse response) String rememberMeCookie = extractRememberMeCookie(request); if (rememberMeCookie == null ) { return null ; } logger.debug("Remember-me cookie detected" ); if (rememberMeCookie.length() == 0 ) { logger.debug("Cookie was empty" ); cancelCookie(request, response); return null ; } UserDetails user = null ; try { String[] cookieTokens = decodeCookie(rememberMeCookie); user = processAutoLoginCookie(cookieTokens, request, response); userDetailsChecker.check(user); logger.debug("Remember-me cookie accepted" ); return createSuccessfulAuthentication(request, user); } catch (CookieTheftException cte) { cancelCookie(request, response); throw cte; } catch (UsernameNotFoundException noUser) { logger.debug("Remember-me login was valid but corresponding user not found." , noUser); } catch (InvalidCookieException invalidCookie) { logger.debug("Invalid remember-me cookie: " + invalidCookie.getMessage()); } catch (AccountStatusException statusInvalid) { logger.debug("Invalid UserDetails: " + statusInvalid.getMessage()); } catch (RememberMeAuthenticationException e) { logger.debug(e.getMessage()); } cancelCookie(request, response); return null ; }
可以看到,这里就是提取出 cookie 信息,并对 cookie 信息进行解码,解码之后,简单校验是否开启了rememberMe功能,如果开启了且cookie长度不为0,则解码,并调用子类(以为例)中的 processAutoLoginCookie 方法去做校验,如果校验通过并返回了用户信息则
1
2
3
4
private UserDetailsChecker userDetailsChecker = new AccountStatusUserDetailsChecker();user = processAutoLoginCookie(cookieTokens, request, response); userDetailsChecker.check(user);
而AccountStatusUserDetailsChecker#check()方法就是校验账号是否锁定,是否过期,密码是否正确这些。
1
2
3
4
5
6
7
8
9
10
11
12
13
14
15
16
17
18
19
20
21
22
23
public void check (UserDetails user) if (!user.isAccountNonLocked()) { throw new LockedException(messages.getMessage( "AccountStatusUserDetailsChecker.locked" , "User account is locked" )); } if (!user.isEnabled()) { throw new DisabledException(messages.getMessage( "AccountStatusUserDetailsChecker.disabled" , "User is disabled" )); } if (!user.isAccountNonExpired()) { throw new AccountExpiredException( messages.getMessage("AccountStatusUserDetailsChecker.expired" , "User account has expired" )); } if (!user.isCredentialsNonExpired()) { throw new CredentialsExpiredException(messages.getMessage( "AccountStatusUserDetailsChecker.credentialsExpired" , "User credentials have expired" )); } }
如果校验过通过, 就返回return createSuccessfulAuthentication(request, user);
安全隐患 文章截止目前,大家可能已经发现,如果我们开启了 RememberMe 功能,最最核心的东西就是放在 cookie 中的令牌了,这个令牌突破了 session 的限制,即使服务器重启、即使浏览器关闭又重新打开,只要这个令牌没有过期,就能访问到数据。
如何降低风险 降低安全风险,主要有如下两种方式:
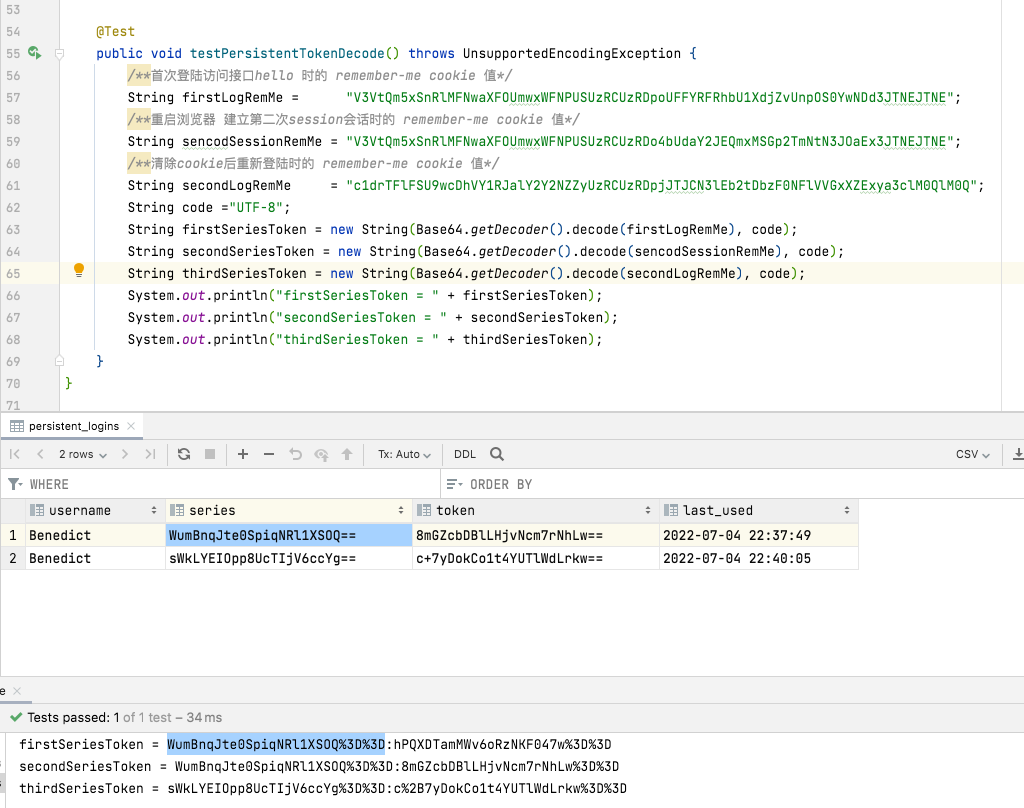
方案一: 持久化令牌方案 原理 持久化令牌就是在基本的自动登录RememberMe功能基础上,又增加了新的校验参数,来提高系统的安全性,这些都是由开发者在后台完成的,对于用户来说,登录体验和普通的自动登录体验是一样的。series 只有当用户在使用用户名/密码登录时,才会生成或者更新 ,而 token 只要有新的会话,就会重新生成 ,这样就可以避免一个用户同时在多端登录,就像手机 QQ ,一个手机上登录了,就会踢掉另外一个手机的登录,这样用户就会很容易发现账户是否泄漏。
1
2
3
4
5
6
7
8
9
10
11
12
13
14
15
16
17
18
19
20
21
22
23
24
25
26
27
28
29
30
31
32
33
package org.springframework.security.web.authentication.rememberme;import java.util.Date;public class PersistentRememberMeToken private final String username; private final String series; private final String tokenValue; private final Date date; public PersistentRememberMeToken (String username, String series, String tokenValue, Date date) this .username = username; this .series = series; this .tokenValue = tokenValue; this .date = date; } public String getUsername () return this .username; } public String getSeries () return this .series; } public String getTokenValue () return this .tokenValue; } public Date getDate () return this .date; } }
其中第四个属性的含义为:上一次登陆的时间。
接下来,我通过代码来给大家演示一下持久化令牌的具体用法。
首先我们需要一张表来记录令牌信息,这张表我们可以完全自定义,也可以使用系统默认提供的 JDBC 来操作,如果使用默认的 JDBC,其实现类为 **JdbcTokenRepositoryImpl**,我们可以来分析一下该类的定义:
1
2
3
4
5
6
7
8
9
10
11
12
13
14
15
16
17
18
19
20
21
22
23
24
25
26
27
28
29
30
31
32
33
34
35
36
37
38
39
40
41
42
43
44
45
46
47
48
49
50
51
52
53
54
55
56
57
58
59
60
61
62
63
64
65
66
67
68
69
70
71
72
73
74
75
76
77
78
79
80
81
82
83
84
85
86
87
88
89
90
91
92
93
94
95
96
97
98
99
100
101
102
103
package org.springframework.security.web.authentication.rememberme;import org.springframework.dao.DataAccessException;import org.springframework.dao.EmptyResultDataAccessException;import org.springframework.dao.IncorrectResultSizeDataAccessException;import org.springframework.jdbc.core.support.JdbcDaoSupport;import java.util.*;public class JdbcTokenRepositoryImpl extends JdbcDaoSupport implements PersistentTokenRepository { public static final String CREATE_TABLE_SQL = "create table persistent_logins (username varchar(64) not null, series varchar(64) primary key, " + "token varchar(64) not null, last_used timestamp not null)" ; public static final String DEF_TOKEN_BY_SERIES_SQL = "select username,series,token,last_used from persistent_logins where series = ?" ; public static final String DEF_INSERT_TOKEN_SQL = "insert into persistent_logins (username, series, token, last_used) values(?,?,?,?)" ; public static final String DEF_UPDATE_TOKEN_SQL = "update persistent_logins set token = ?, last_used = ? where series = ?" ; public static final String DEF_REMOVE_USER_TOKENS_SQL = "delete from persistent_logins where username = ?" ; private String tokensBySeriesSql = DEF_TOKEN_BY_SERIES_SQL; private String insertTokenSql = DEF_INSERT_TOKEN_SQL; private String updateTokenSql = DEF_UPDATE_TOKEN_SQL; private String removeUserTokensSql = DEF_REMOVE_USER_TOKENS_SQL; private boolean createTableOnStartup; protected void initDao () if (createTableOnStartup) { getJdbcTemplate().execute(CREATE_TABLE_SQL); } } public void createNewToken (PersistentRememberMeToken token) getJdbcTemplate().update(insertTokenSql, token.getUsername(), token.getSeries(), token.getTokenValue(), token.getDate()); } public void updateToken (String series, String tokenValue, Date lastUsed) getJdbcTemplate().update(updateTokenSql, tokenValue, lastUsed, series); } public PersistentRememberMeToken getTokenForSeries (String seriesId) try { return getJdbcTemplate().queryForObject(tokensBySeriesSql, (rs, rowNum) -> new PersistentRememberMeToken(rs.getString(1 ), rs .getString(2 ), rs.getString(3 ), rs.getTimestamp(4 )), seriesId); } catch (EmptyResultDataAccessException zeroResults) { if (logger.isDebugEnabled()) { logger.debug("Querying token for series '" + seriesId + "' returned no results." , zeroResults); } } catch (IncorrectResultSizeDataAccessException moreThanOne) { logger.error("Querying token for series '" + seriesId + "' returned more than one value. Series" + " should be unique" ); } catch (DataAccessException e) { logger.error("Failed to load token for series " + seriesId, e); } return null ; } public void removeUserTokens (String username) getJdbcTemplate().update(removeUserTokensSql, username); } public void setCreateTableOnStartup (boolean createTableOnStartup) this .createTableOnStartup = createTableOnStartup; } }
观察上述源码可以知道用来存储用户登陆series token信息的表都有哪些字段.
实现 建库建表 其中已经定义好了对Token进行持久化操作需要的默认的SQL。 分析其中的字段可以可以到退出建表需要的字段
1
2
3
4
5
6
7
CREATE TABLE `persistent_logins` ( `username` varchar (64 ) COLLATE utf8mb4_unicode_ci NOT NULL , `series` varchar (64 ) COLLATE utf8mb4_unicode_ci NOT NULL , `token` varchar (64 ) COLLATE utf8mb4_unicode_ci NOT NULL , `last_used` timestamp NOT NULL DEFAULT CURRENT_TIMESTAMP ON UPDATE CURRENT_TIMESTAMP , PRIMARY KEY (`series` ) ) ENGINE =InnoDB DEFAULT CHARSET =utf8mb4 COLLATE =utf8mb4_unicode_ci;
修改yaml 修改DB url 1 2 3 spring: datasource: url: jdbc:mysql://localhost:3306/springsecurityPersistentToken?useUnicode=true&serverTimezone=Asia/Shanghai&characterEncoding=utf-8&zeroDateTimeBehavior=convertToNull&useSSL=false
新增依赖 因为是需要DB交互, 所以需要MySQL 和 jdbc依赖
1 2 3 4 5 6 7 8 9 <dependency > <groupId > org.springframework.boot</groupId > <artifactId > spring-boot-starter-jdbc</artifactId > </dependency > <dependency > <groupId > mysql</groupId > <artifactId > mysql-connector-java</artifactId > <version > 8.0.29</version > </dependency >
配置SecurityConfig类 提供一个 JdbcTokenRepositoryImpl 实例,并给其配置 DataSource 数据源,
1
2
3
4
5
6
7
8
@Autowired DataSource dataSource; @Bean JdbcTokenRepositoryImpl jdbcTokenRepository () { JdbcTokenRepositoryImpl jdbcTokenRepository = new JdbcTokenRepositoryImpl(); jdbcTokenRepository.setDataSource(dataSource); return jdbcTokenRepository; }
SecurityConfig#configure(HttpSecurity http)方法中在原来rememberMe的基础上关联指定要使用的JdbcTokenRepository
1
2
3
4
.rememberMe() .rememberMeParameter("remMe" ) .key("12345" ) .tokenRepository(jdbcTokenRepository())
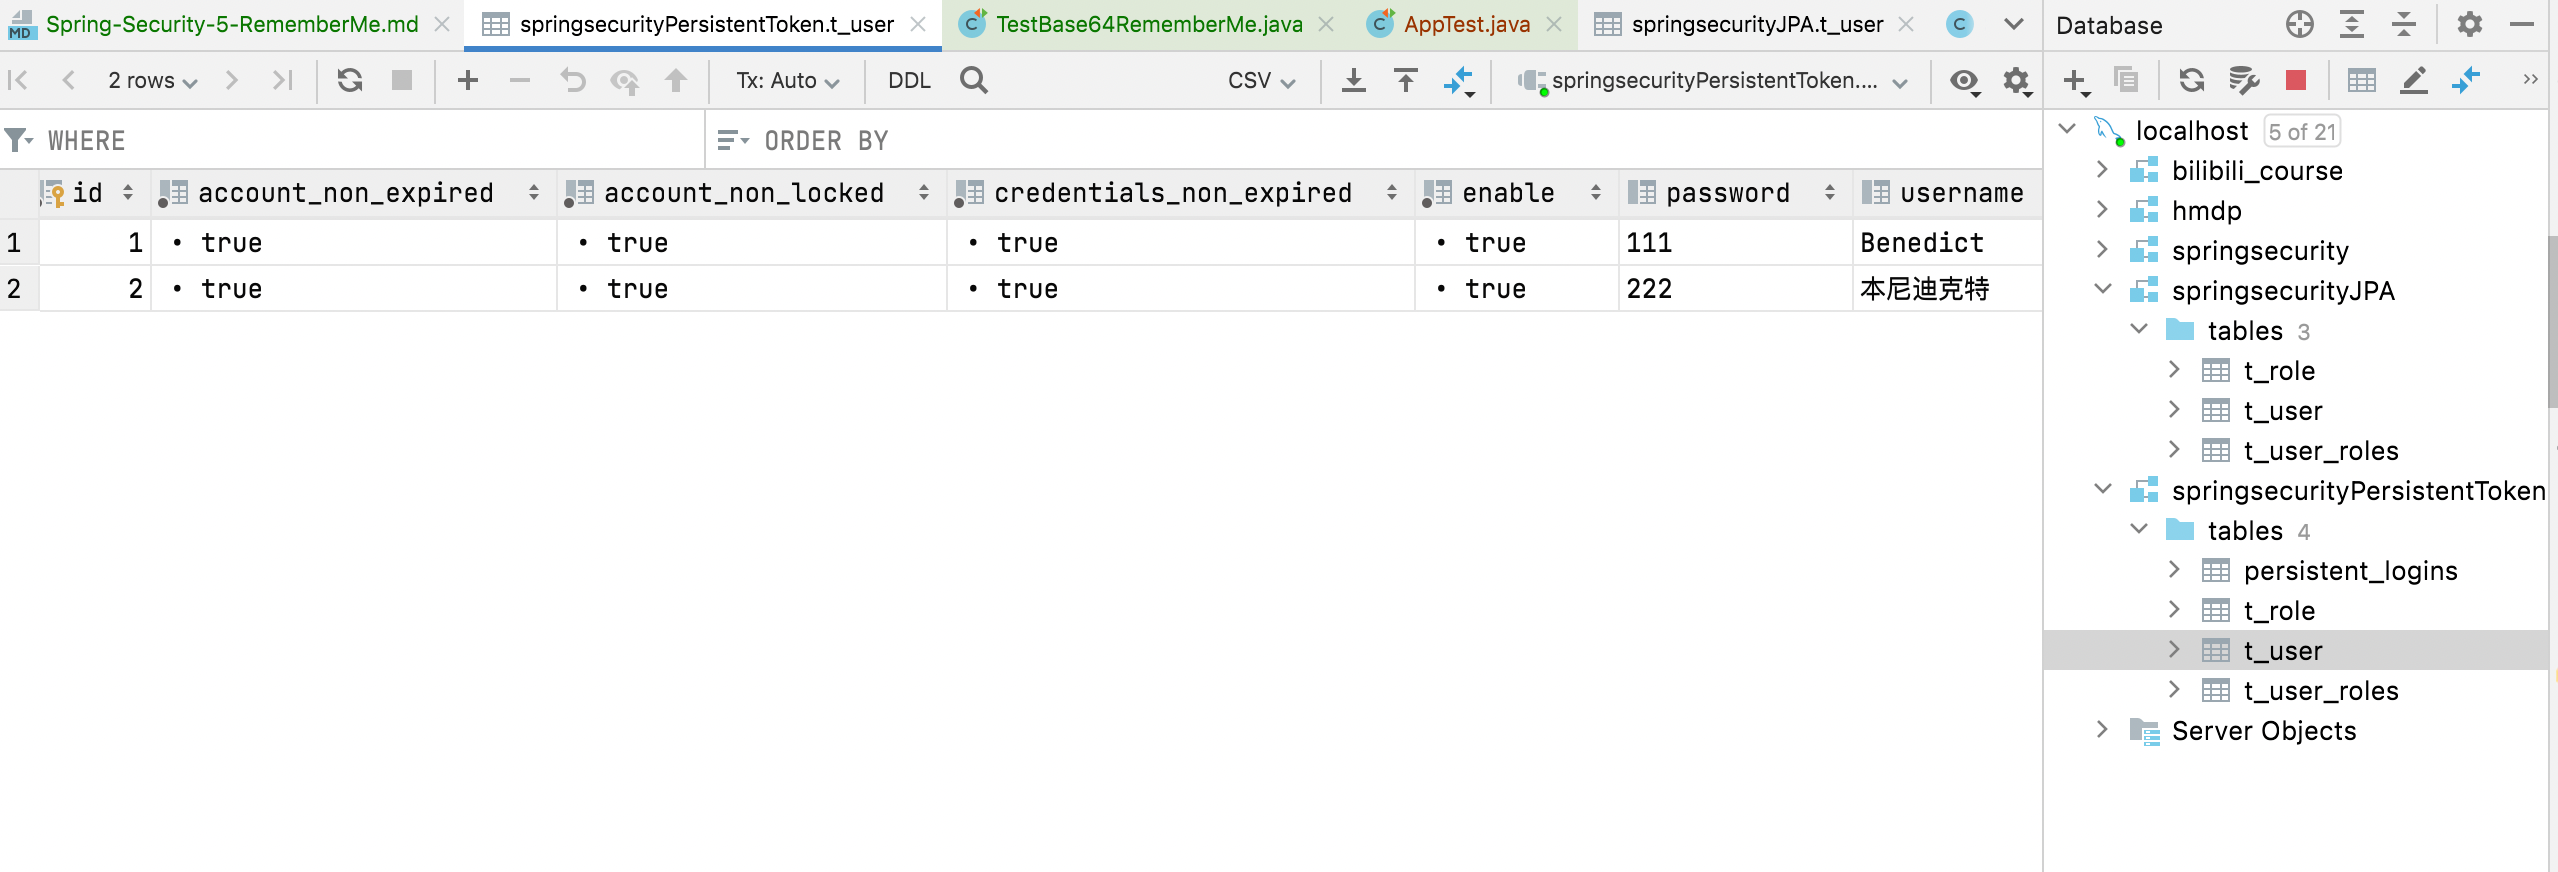
测试 准备用户 测试之前还是要先新增用户, 因为还是用的JPA的方式将用户信息存储到DB。所以再次执行test类中插入用户的动作AppTest#testInsertUsers()
启动项目并访问 启动项目并登陆访问接口观察其remember-me cookie值的变化
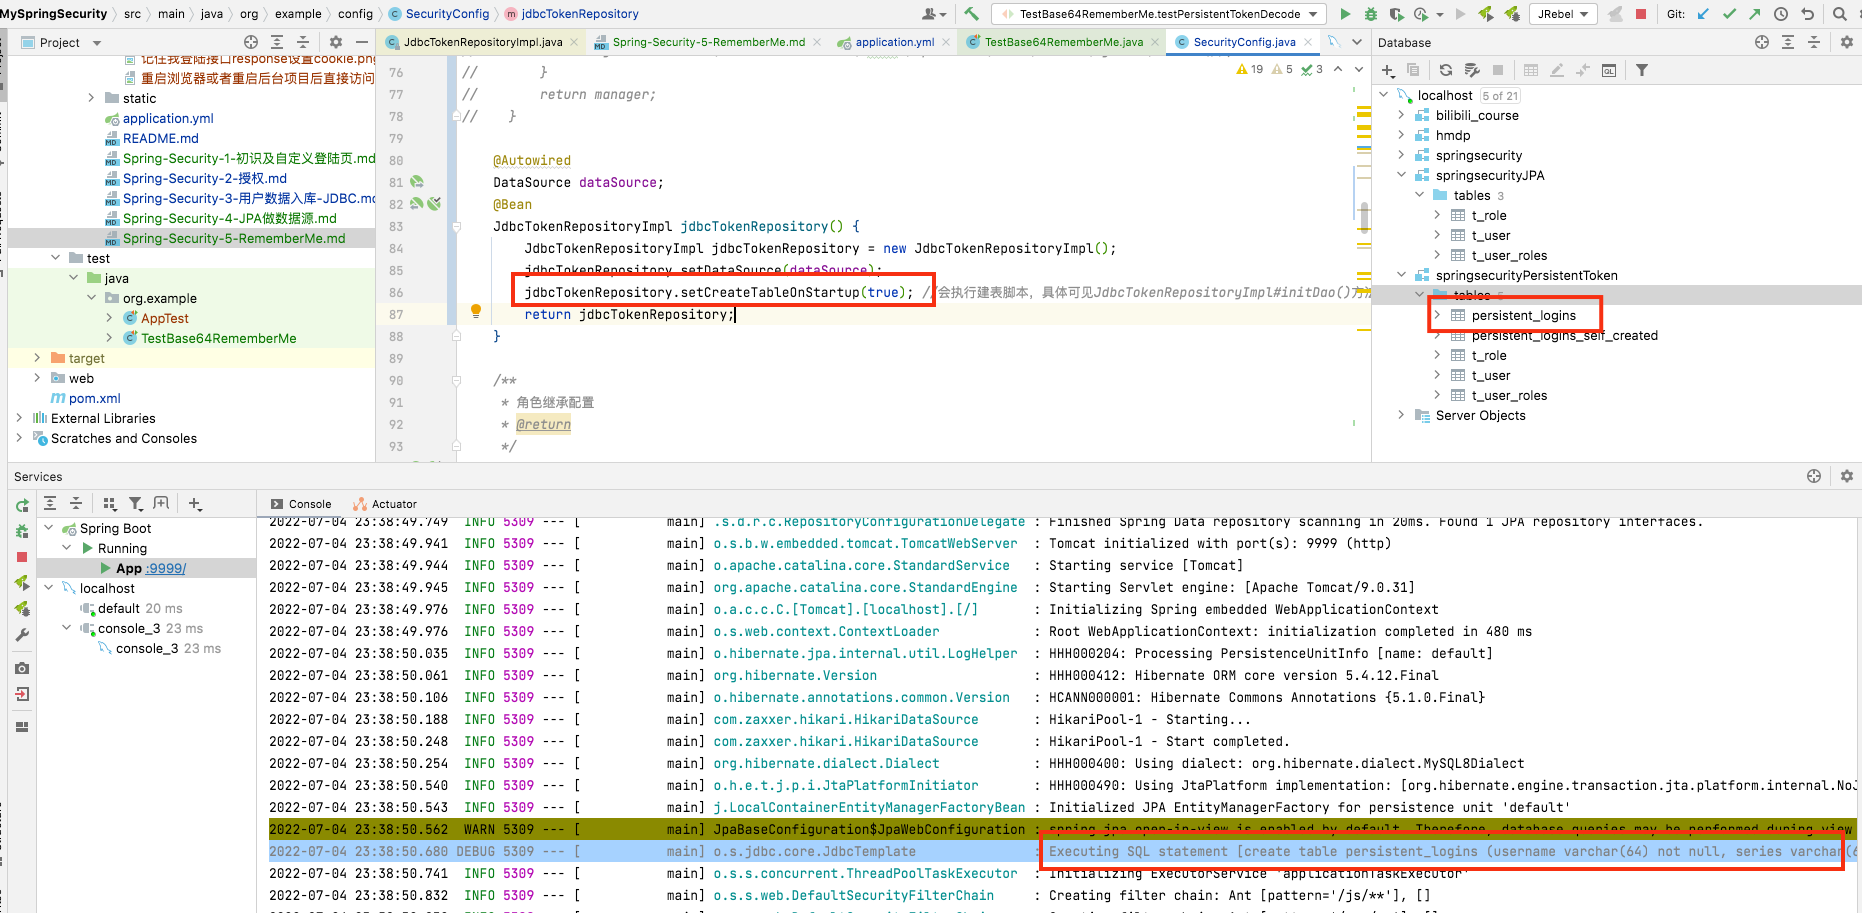
补充 对JdbcTokenRepositoryImpl源码分析可知, 不用自己建表而是通过setCreateTableOnStartup(true)来让initDao()执行建表脚本, 为了验证这一想法,
1
2
3
4
5
protected void initDao () if (createTableOnStartup) { getJdbcTemplate().execute(CREATE_TABLE_SQL); } }
JdbcTemplate#execute(final String sql)源码 (只是为了知道需要看见启动日志中的建表信息需要对jdbcTemplate开启debug日志)
1
2
3
4
5
public void execute (final String sql) throws DataAccessException if (this .logger.isDebugEnabled()){ this .logger.debug("Executing SQL statement [" +sql+"]" ); } }
开启日志 1 2 3 4 logging: level: org.example.dao: DEBUG org.springframework.jdbc.core.JdbcTemplate: DEBUG
旧表重命名 将原来的表重命名
1 rename table `persistent_logins` to `persistent_logins_self_created`
在原来的jdbcTokenRepository()中开启createTableOnStartup
1 2 3 4 5 6 7 @Bean JdbcTokenRepositoryImpl jdbcTokenRepository () { JdbcTokenRepositoryImpl jdbcTokenRepository = new JdbcTokenRepositoryImpl(); jdbcTokenRepository.setDataSource(dataSource); jdbcTokenRepository.setCreateTableOnStartup(true ); return jdbcTokenRepository; }
但是要注意这种方式如果之后重启会导致表已存在的错误: Table ‘persistent_logins’ already exists 应该修改逻辑避免。
测试 重启项目发现启动日志中打印了建表日志, 并且有新表生成。如图
方案二: 二次校验方案 原理 另外一种解决自动登录安全问题的方案其实是一种折中方案, 就是对敏感信息在记住我方式访问时需要二次登陆校验通过才可以, 而非敏感信息可以直接查看。
实现 还是之前的四个接口,角色继承和权限访问关系不变, 在此基础上添加一条, 路径带/admin的需要二次交验, 而带/user的只需要rememberme就可以访问
1 2 .antMatchers("/user/**" ).rememberMe() .antMatchers("/admin/**" ).fullyAuthenticated()
测试