
So in this Chapter, we will discuss the topics related to AWS Security and compliance and its resolutions provisioned by AWS.
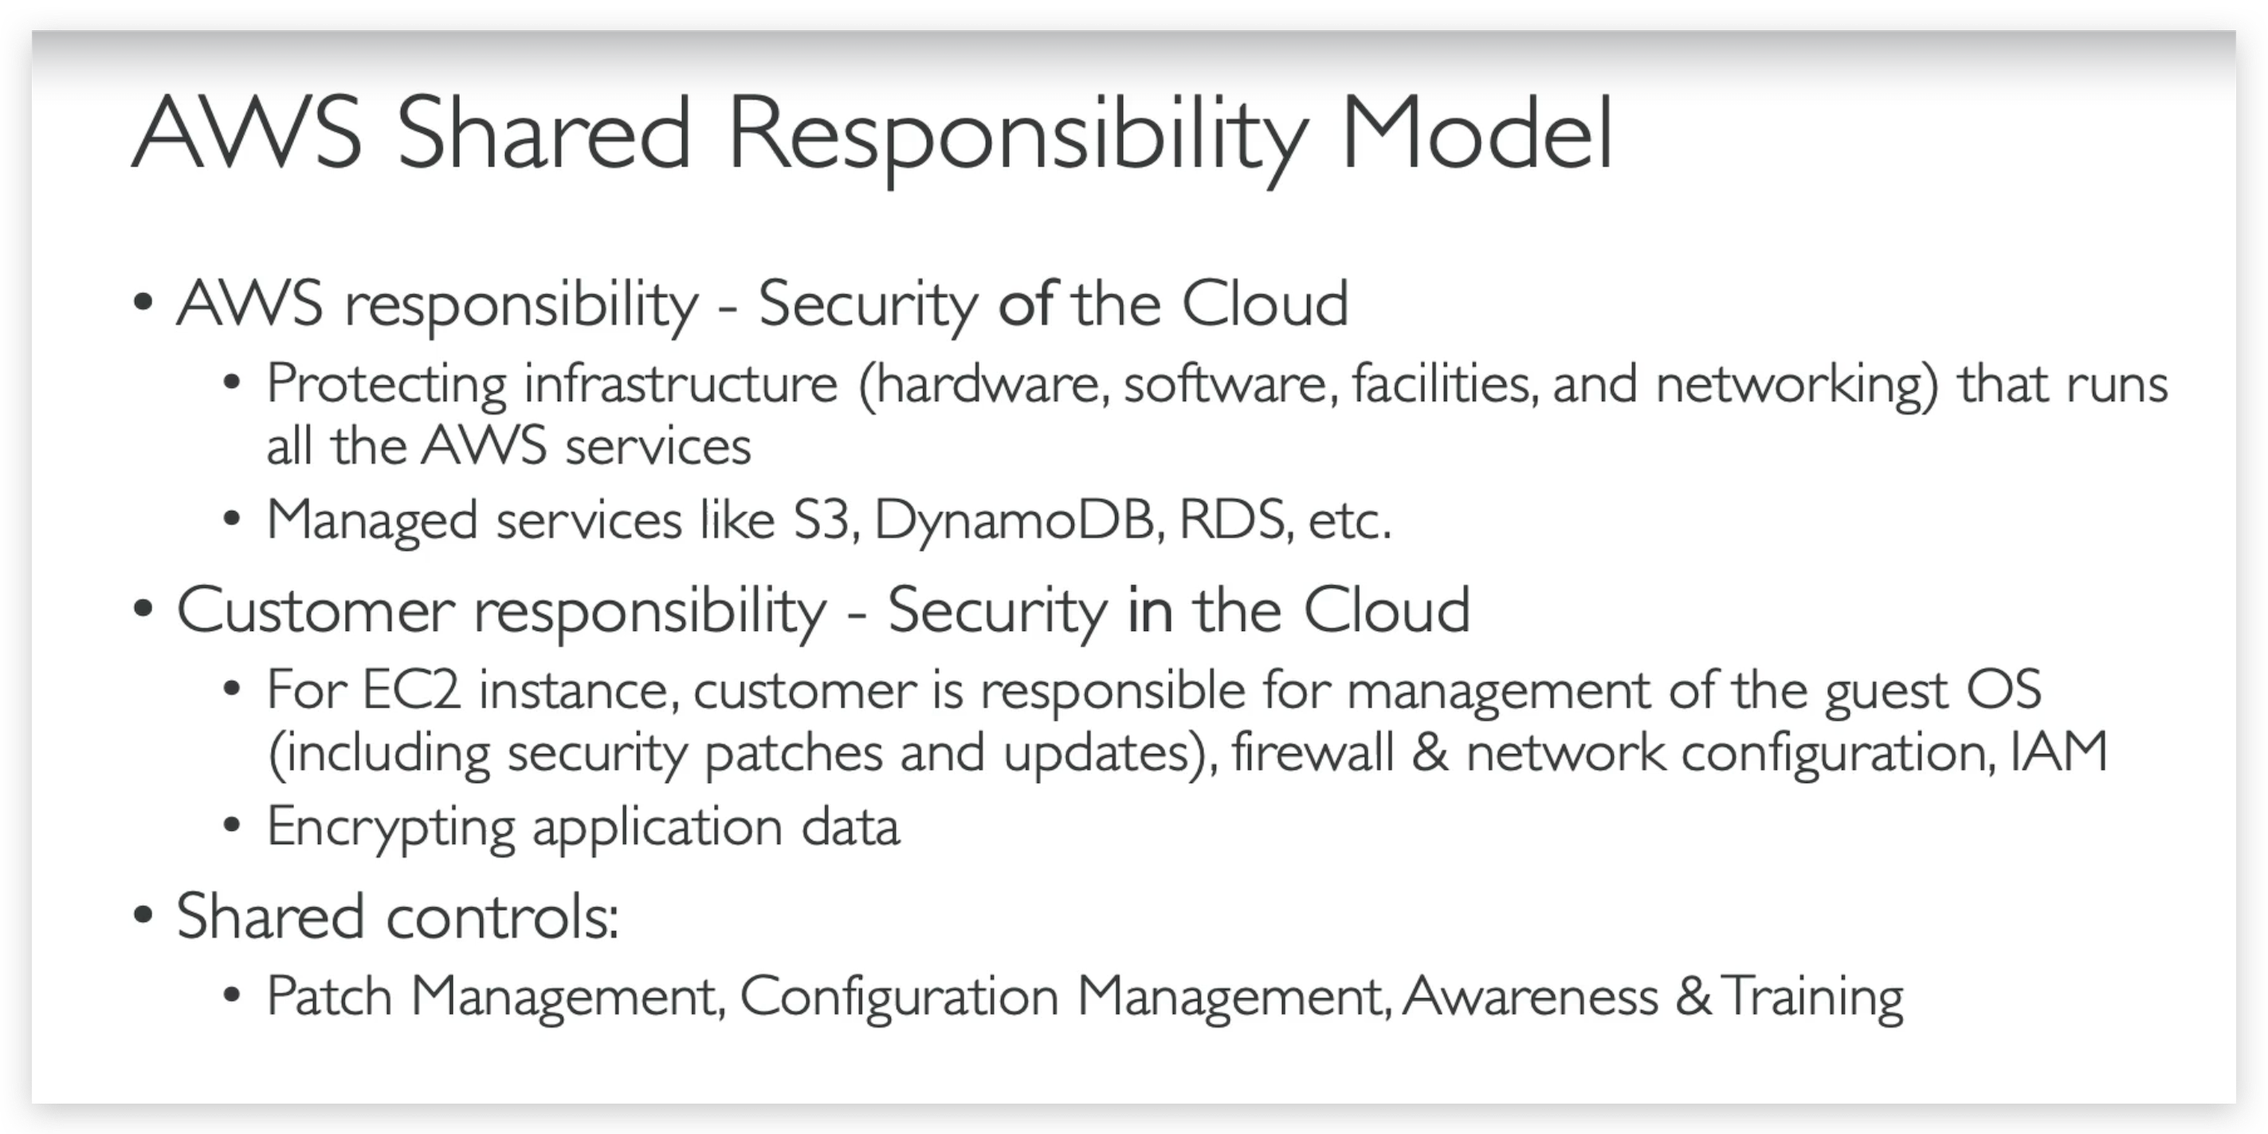
Shared Responsibility Model
DDos Protection: WAF & Shield
AWS Network Firewall
AWS Firewall Manager
Penetration Testing
Encryption with KMS & CloudHSM
Encryption with KMS & CloudHSM Hands-On
From KMS homepage dashboard menu, you can see an AWS managed key is already there of type “aws/sns”, that means you can create an SNS topic with encryption key being set to this key, Like below.
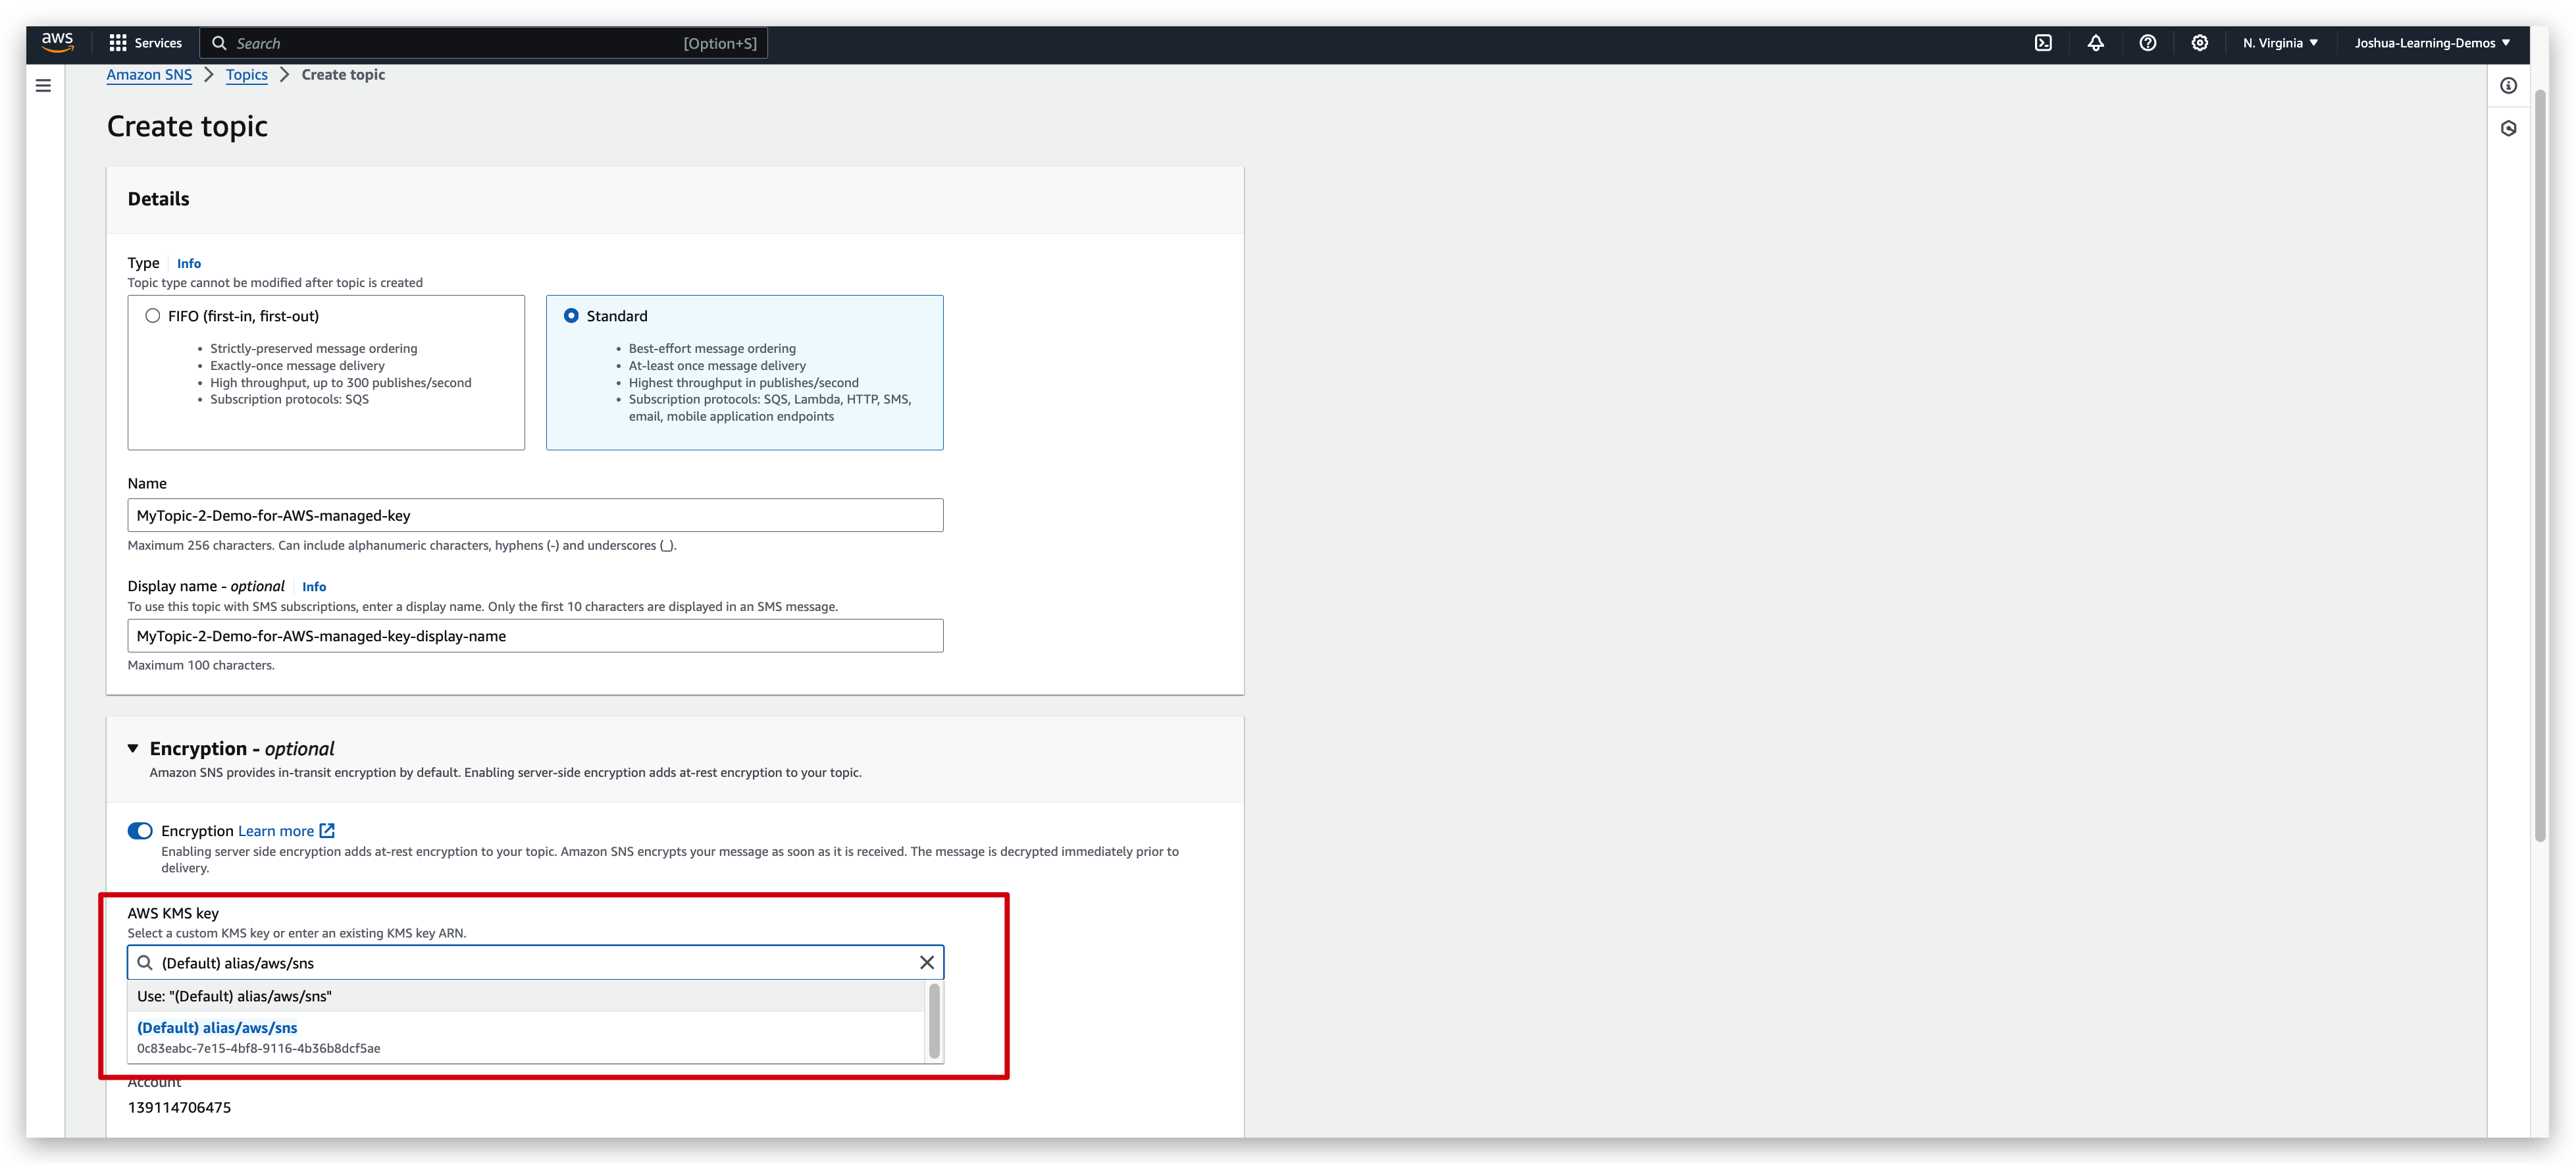
You will find the Key ID in the dropdown of below pic is exactly the same as the one in the “AWS menaged Keys” list of above pic.
But in services such as CloudTrail or S3 glacier, the encryption is enabled by default.
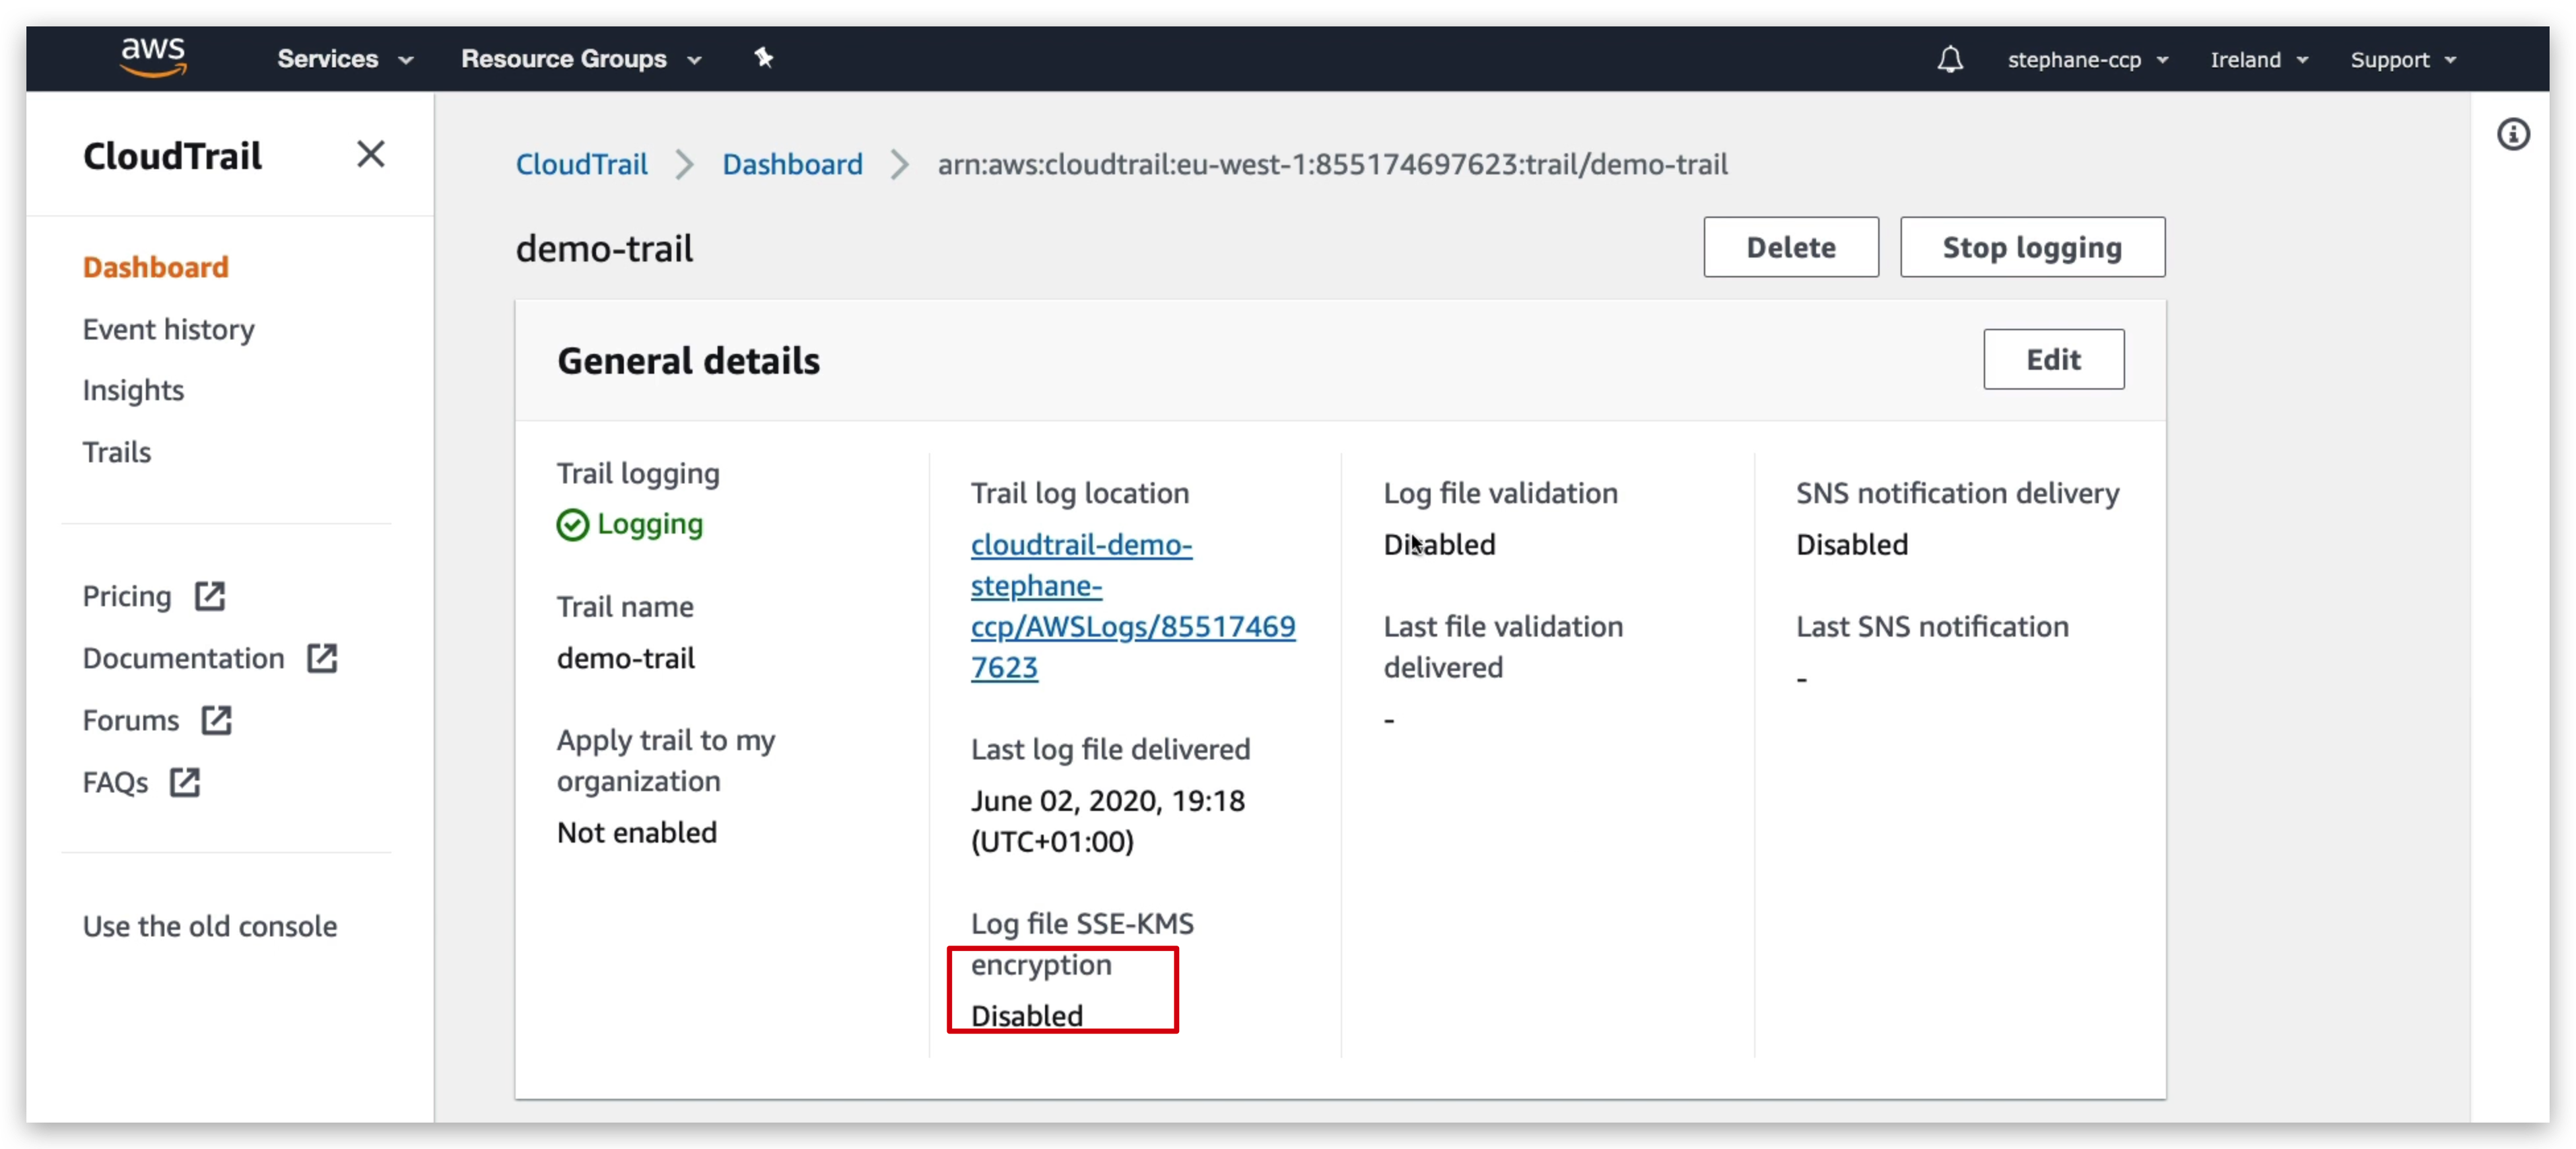
So if I go into CloudTrail and try to use a demo-trail as we can see if we go into the encryption even though it says disabled here, the encryption is actually enabled in the S3 buckets.
So let’s see, and have a look at the S3 bucket itself. So in S3, then we go to CloudTrail, go to EUS1, find this file. So I’ll go down in my buckets. And if you look at this file right here
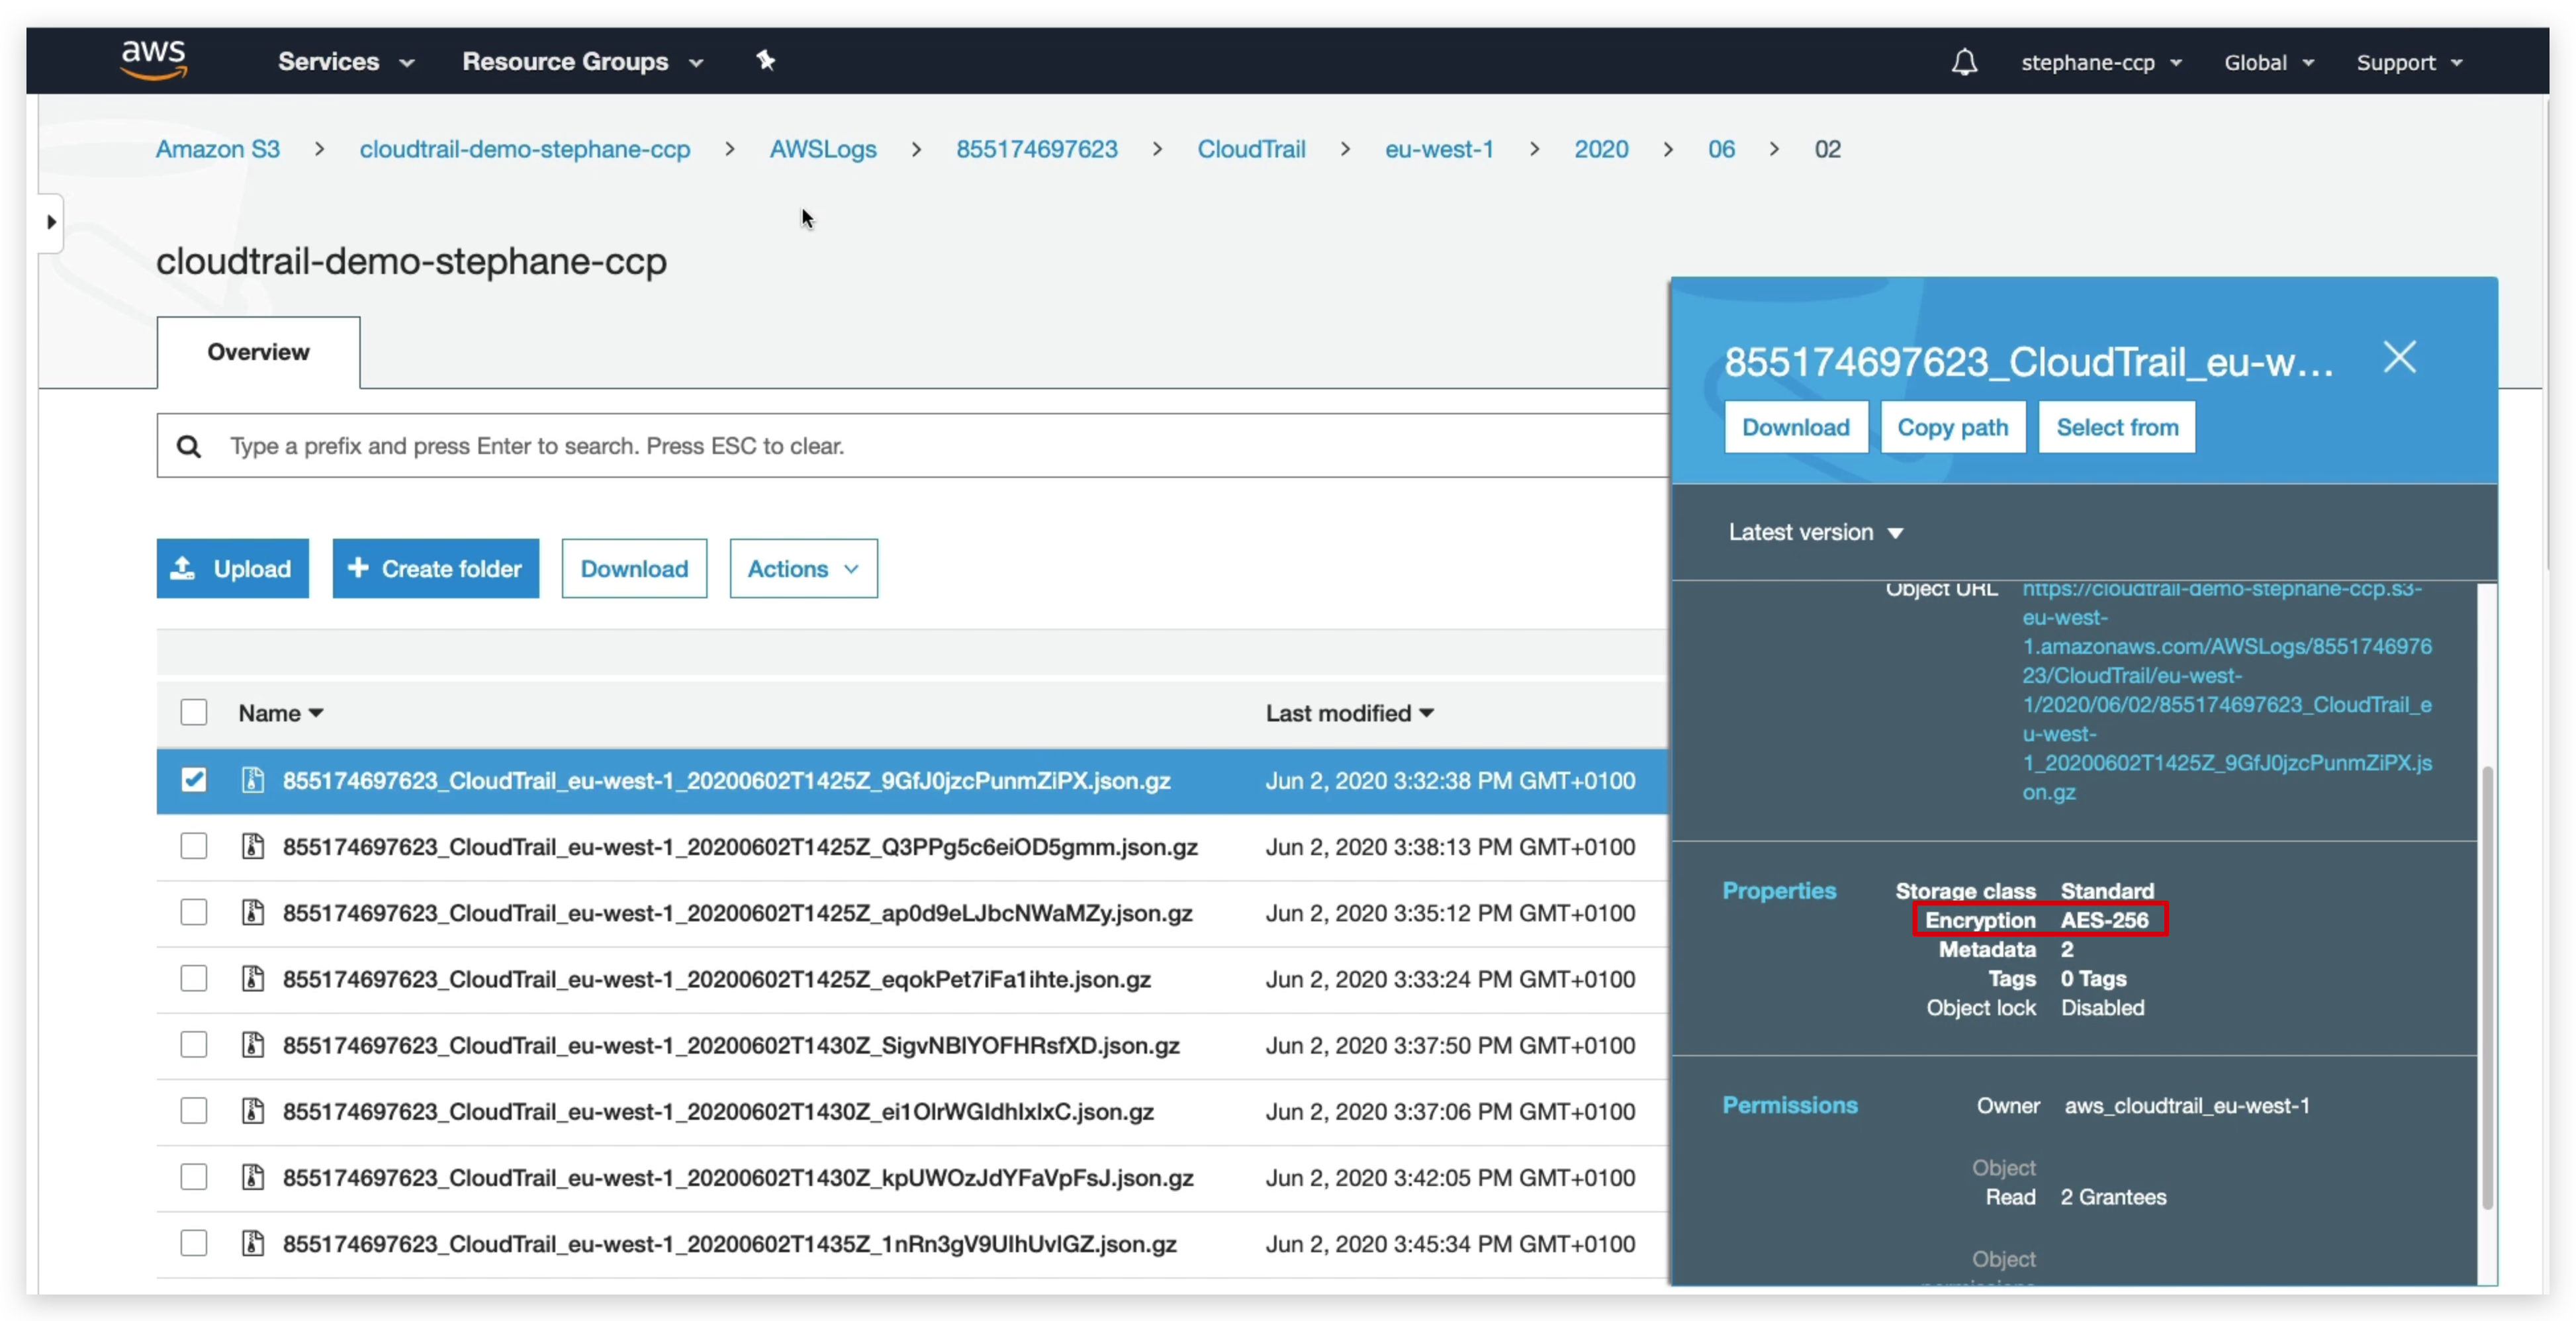
if you look at the property for the encryption it says encryption AES256, which means that this CloudTrail file, even though it said disabled here for the encryption, it actually was enabled in Amazon S3.
I won’t go over the details of why, but by default CloudTrail will encrypt all the files by default no matter what.
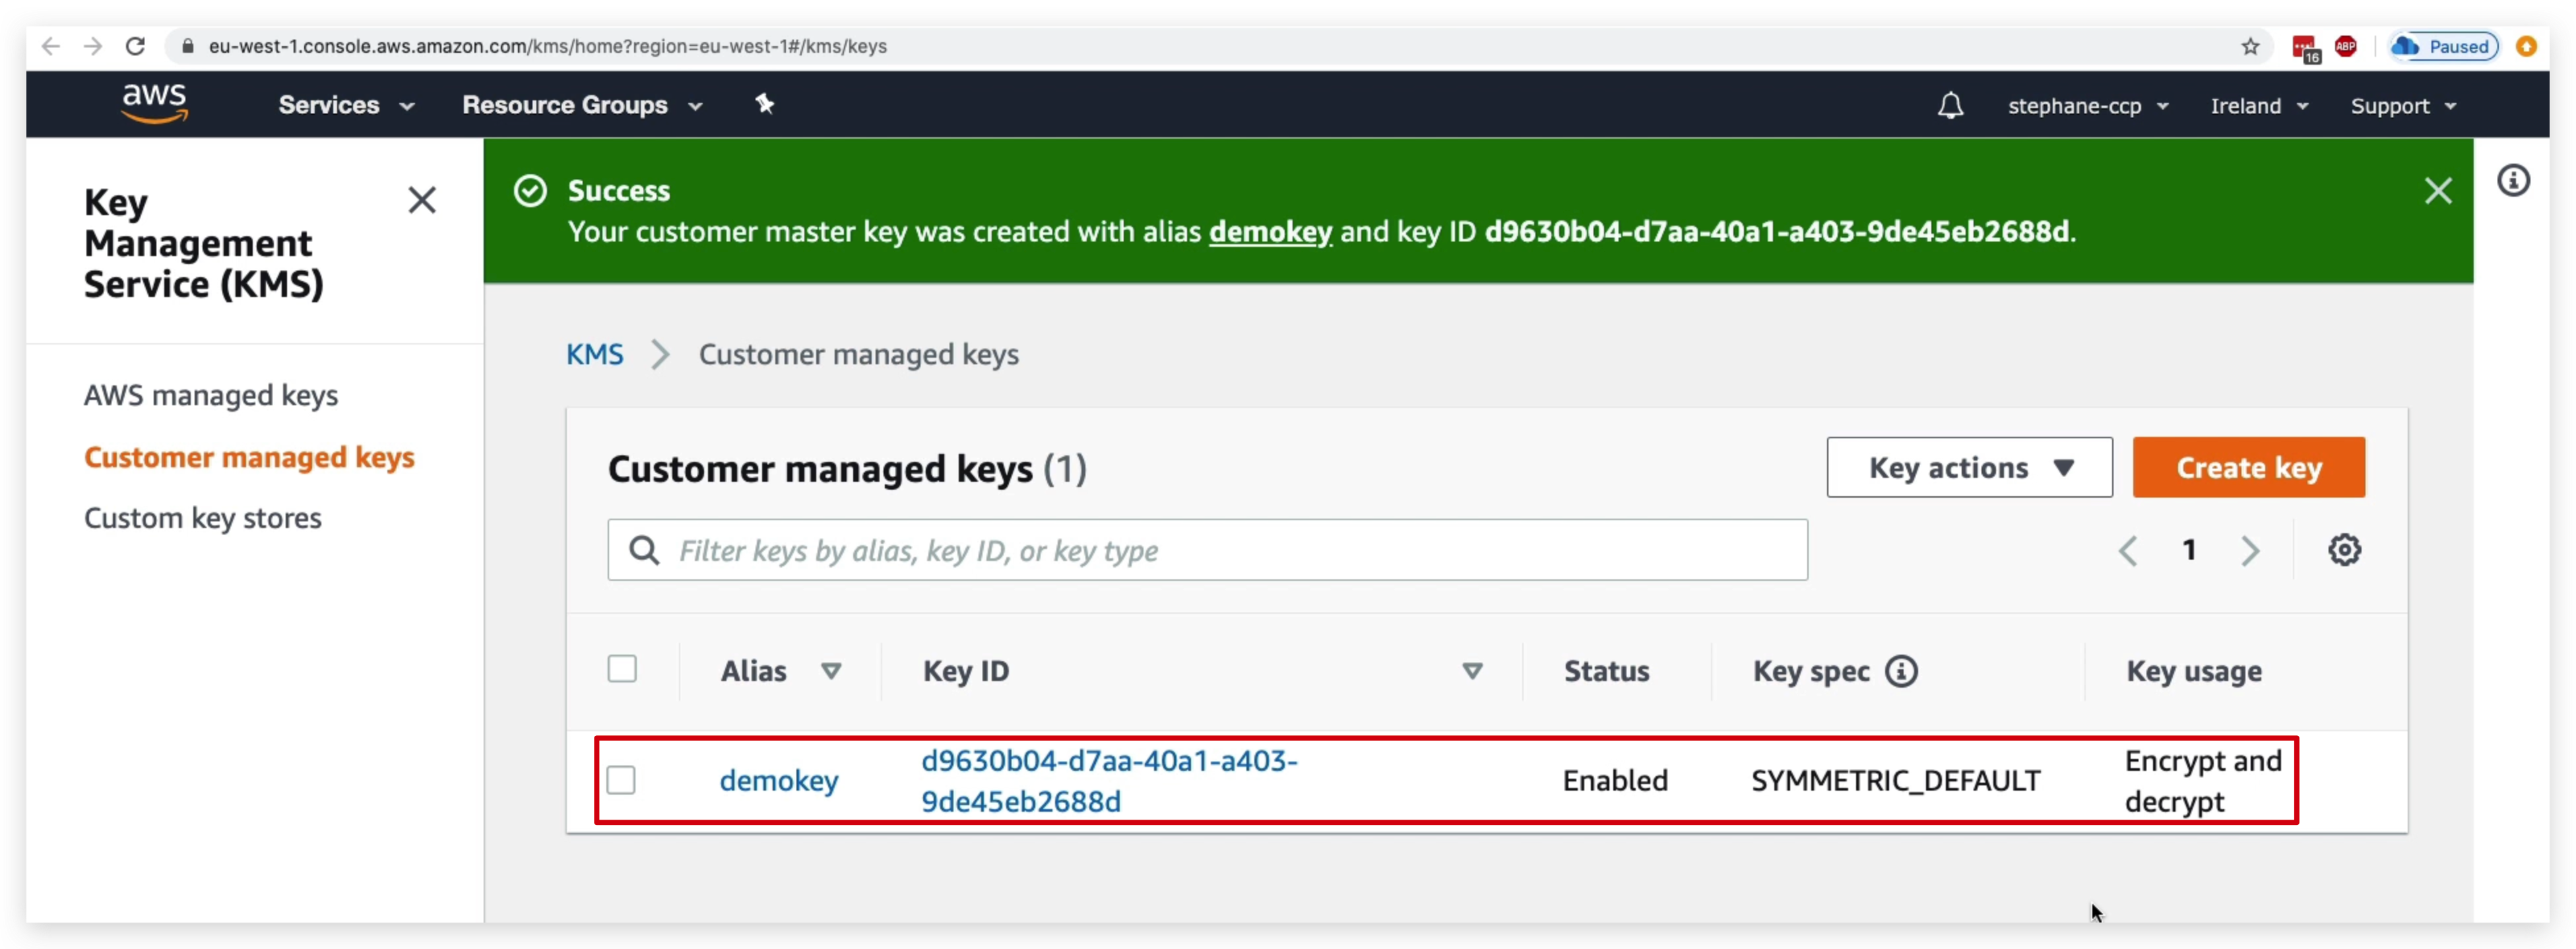
You can create your own key like below, but you need to be noted that this will cost you a buck or 2: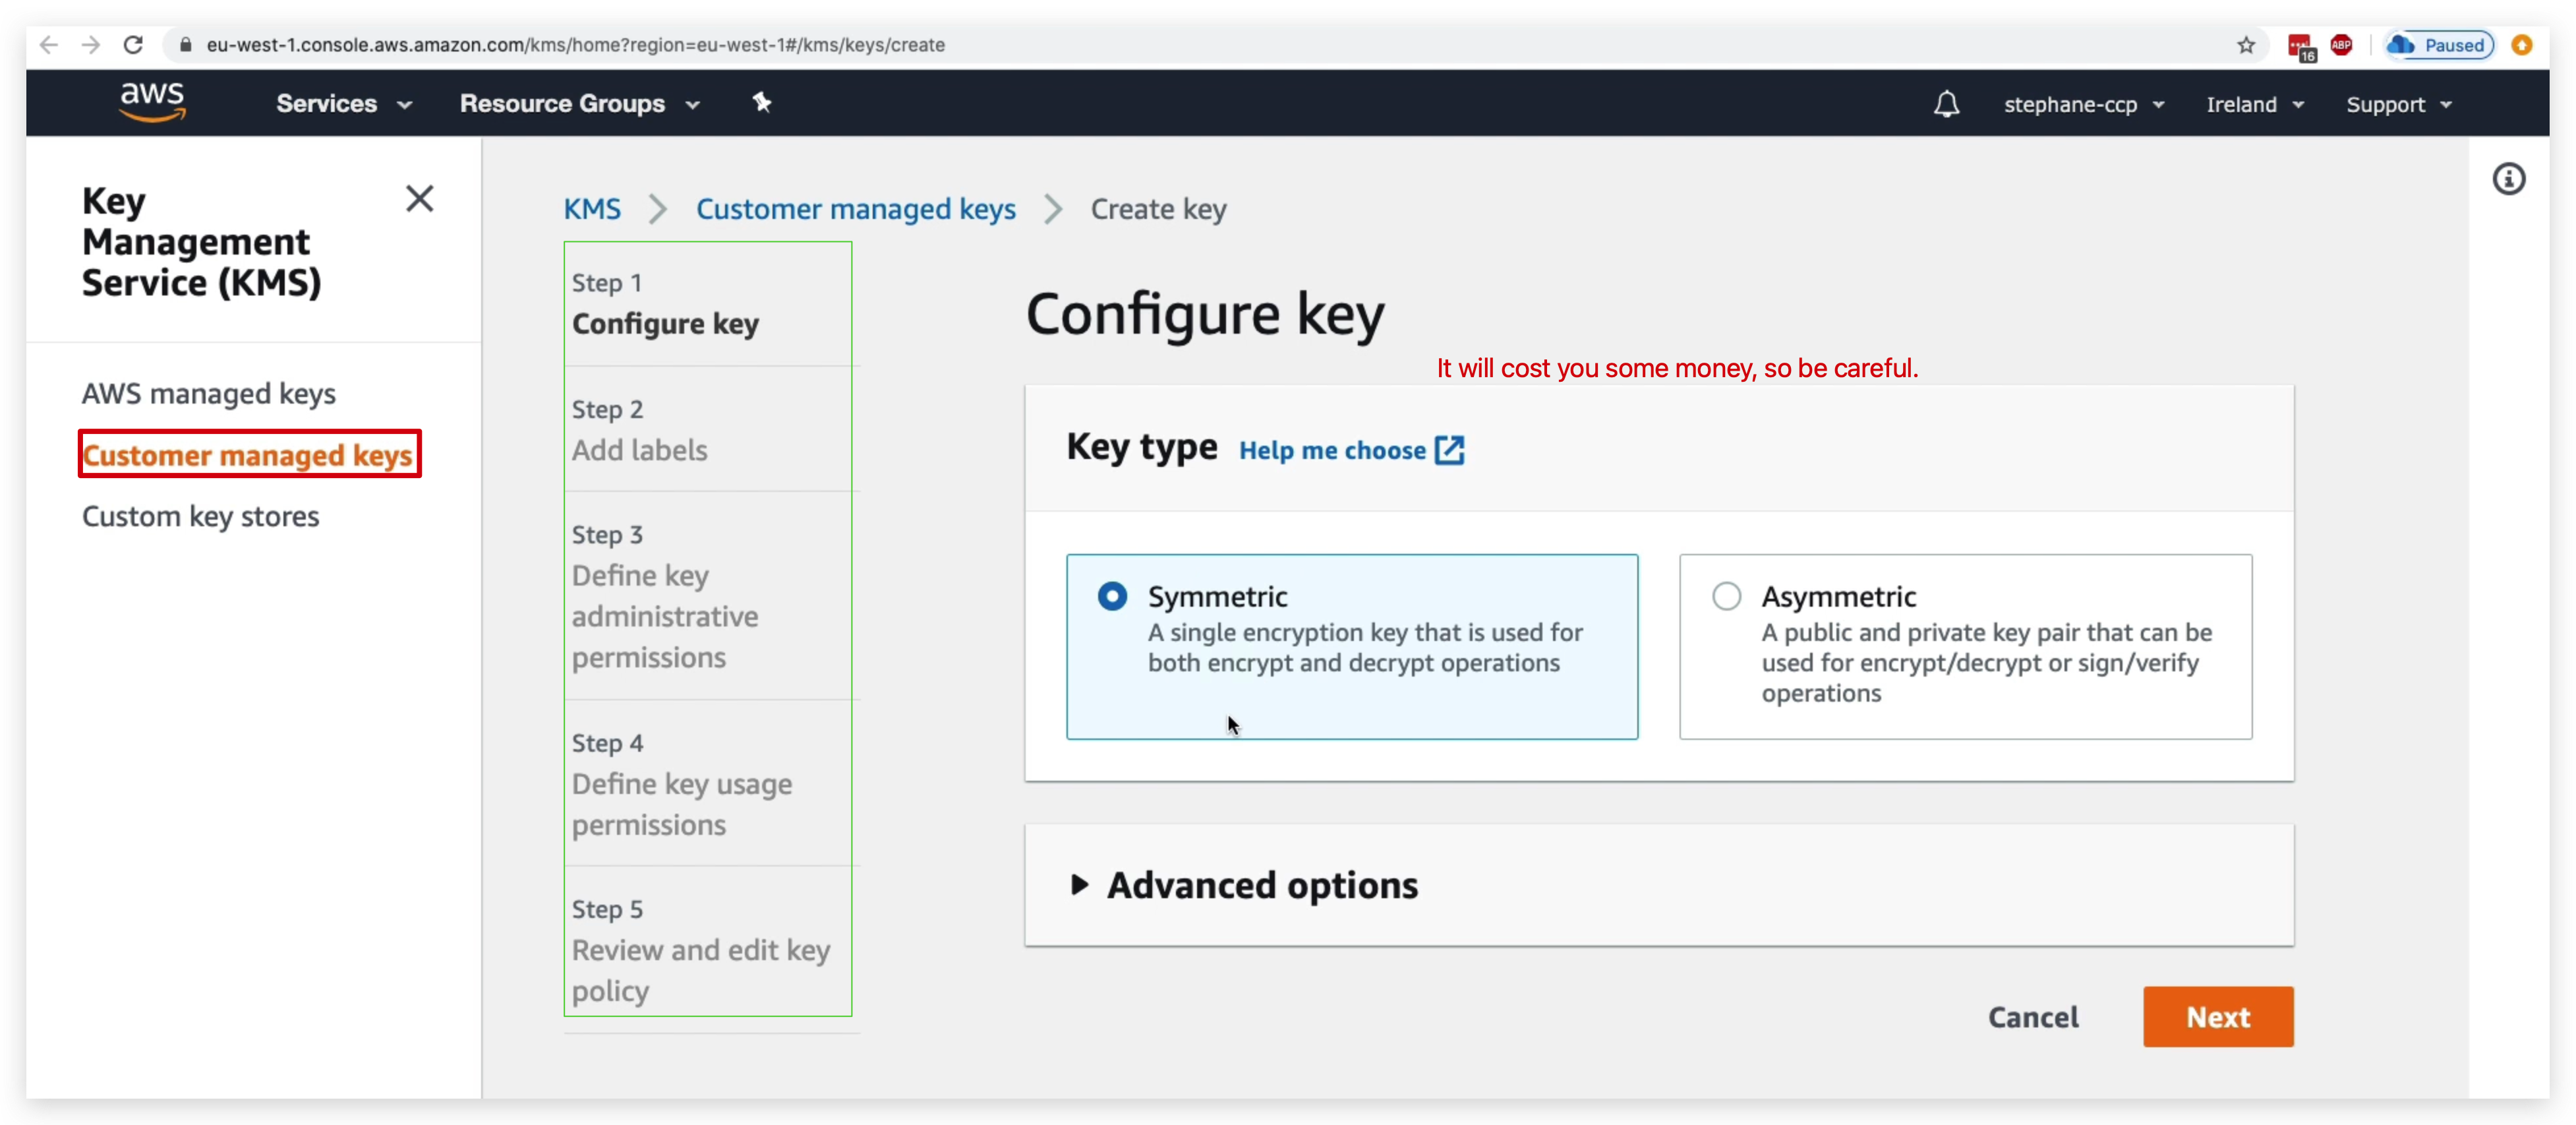
Once it’s created, you can click the key name to check the key details. Scroll down and you will find the Key Rotation tab. By check the checkbox, you can enable the Key rotation feature for this specific key.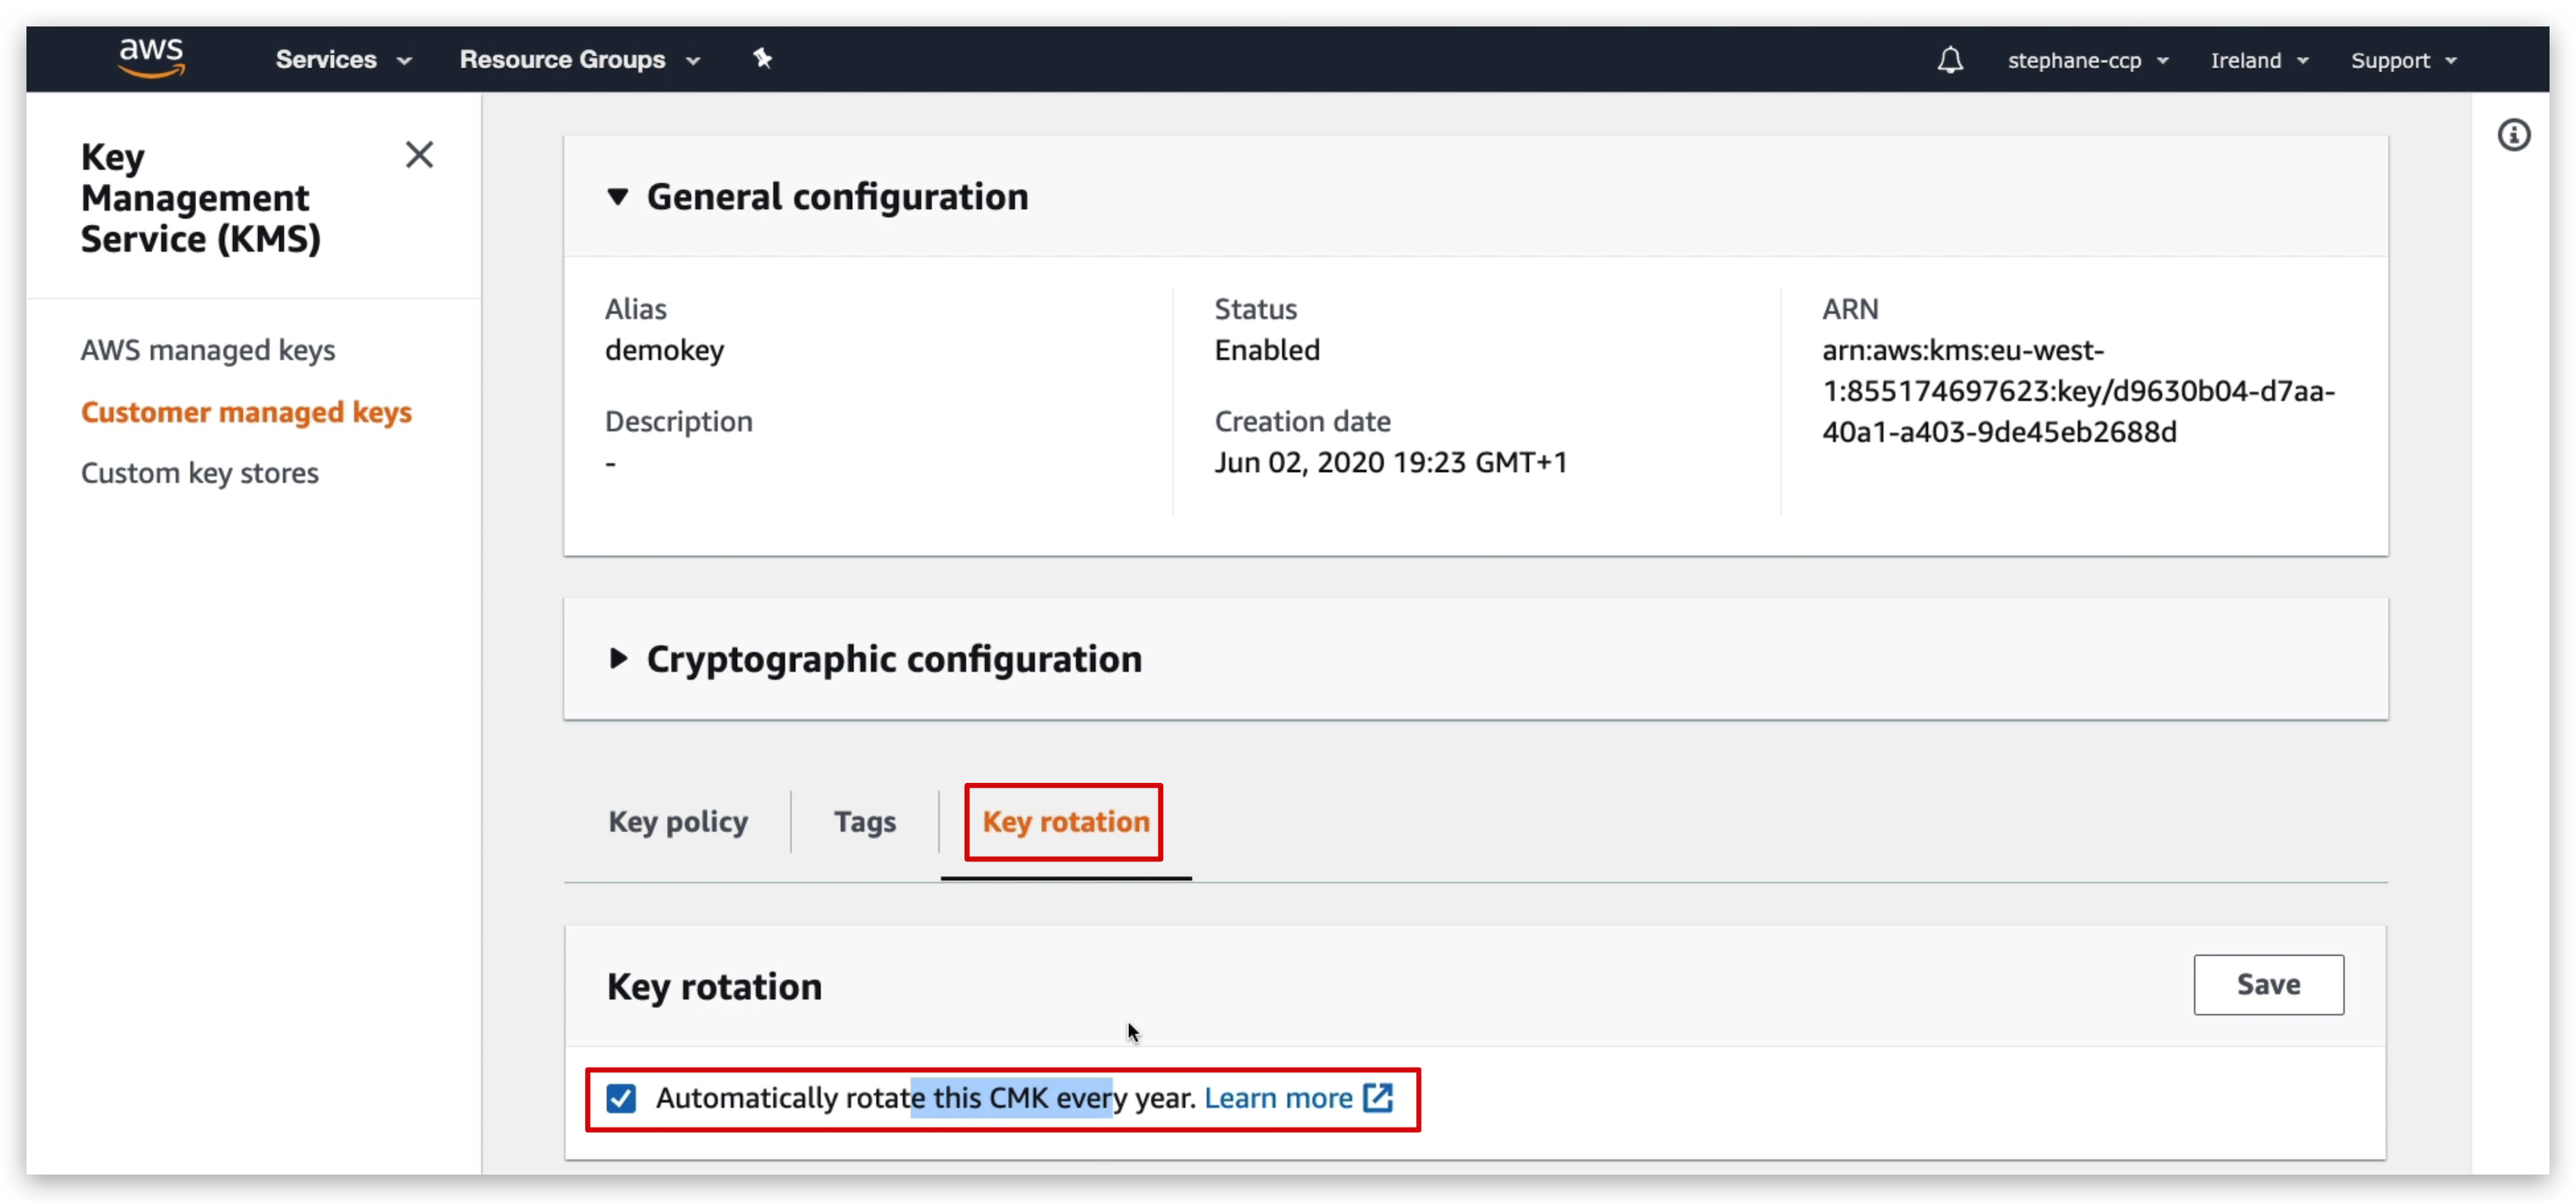
Now, you can create your own EBS or SNS topic and encrypt it with this key.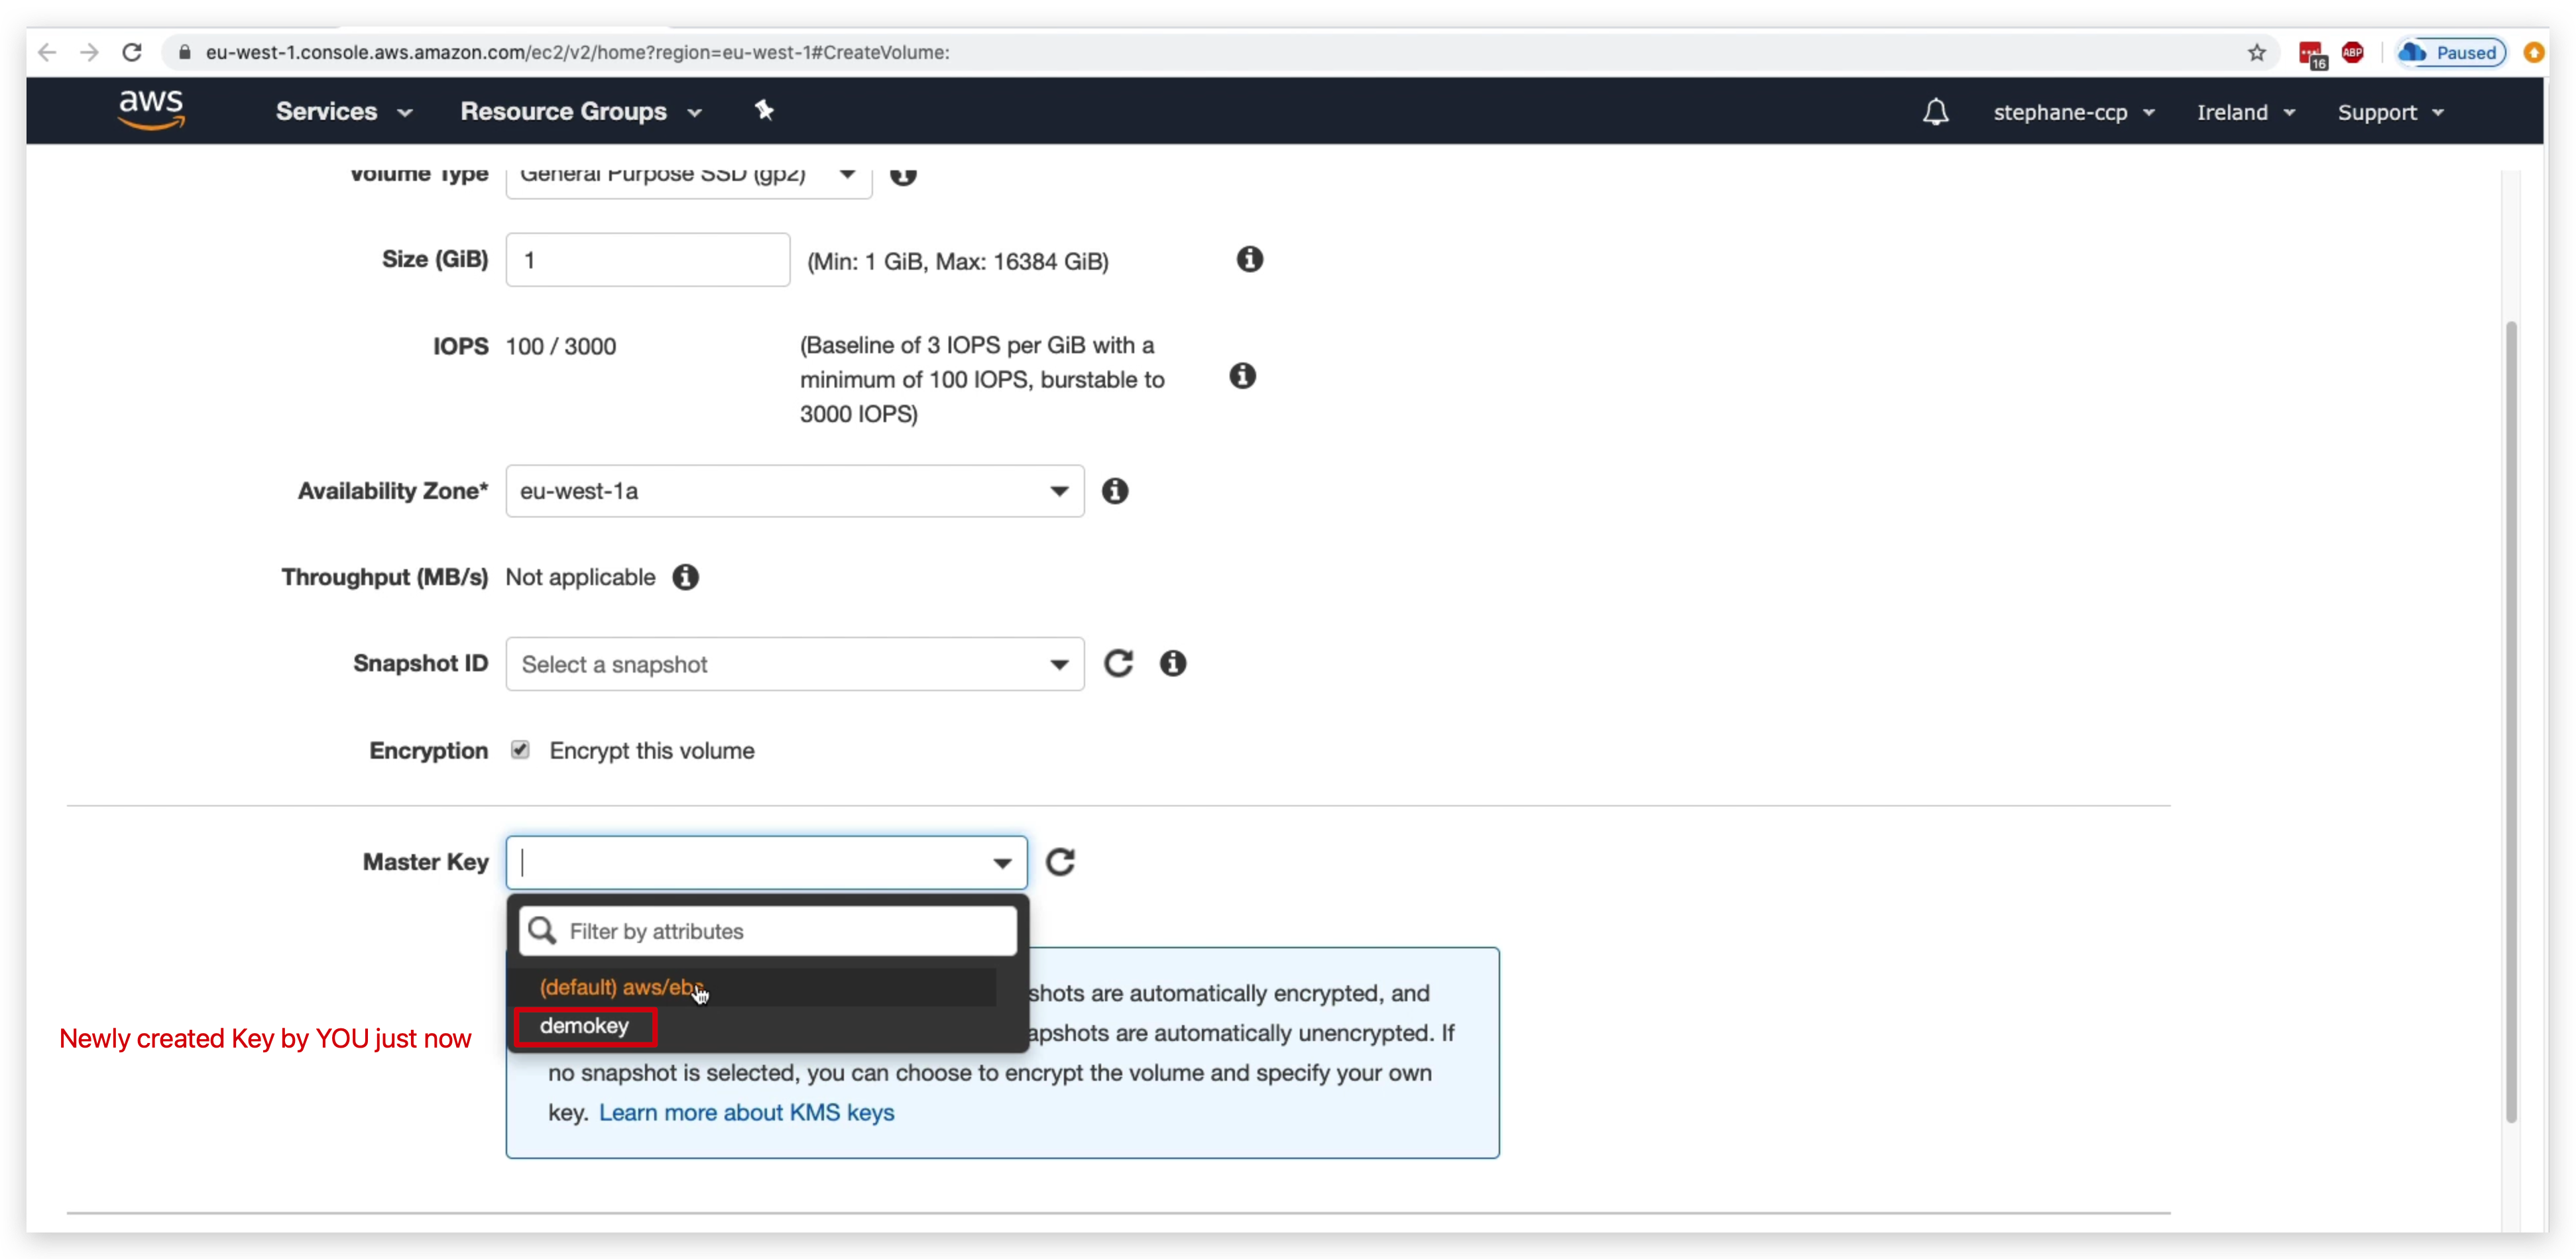
Once it’s created, you can check the EBS created and scroll to the right most to confrim it’s encrypted with the self-created CMK key.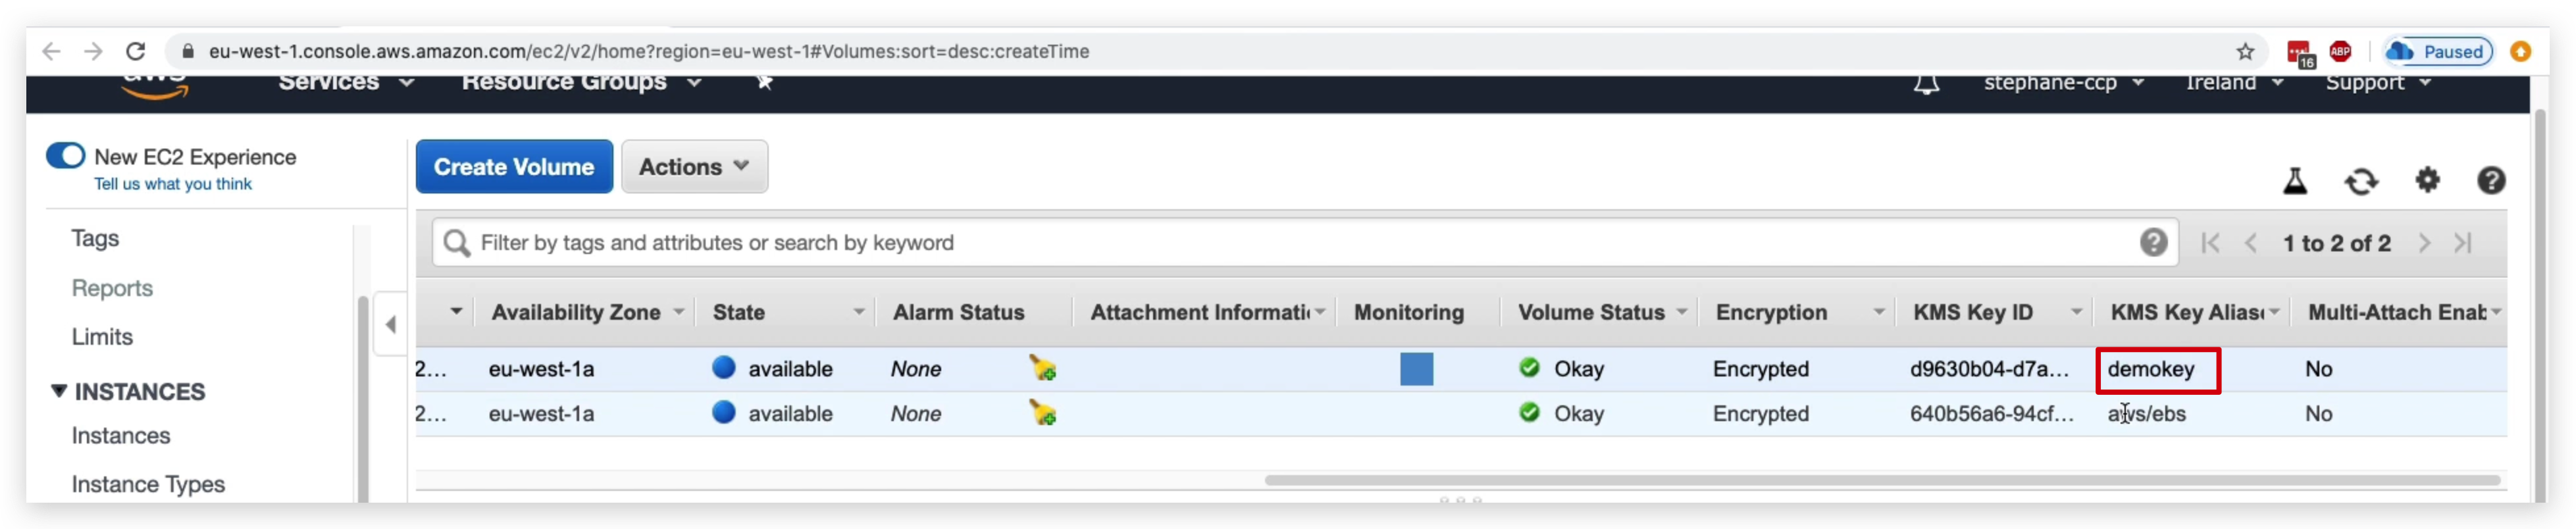
AWS Certificate Manager
- Let you easily provision, manage, and deploy your SSL/TLS certificates
- Used to provide an in-flight encryption for websites (HTTPS)
So let’s take an example.
We have our application load balancer, and it is connected in the backend through HTTP to an auto-scaling group with our EC2 instances.
But we want our end users to have HTTPS exposed on our application load balancer. So to do so we’re going to use ACM. And ACM once it’s connected to our domain is going to be allowing us to provision and maintain these TLS certificates.
They will be loaded onto our application load balancer and then automatically the load balancer will be able to offer HTTPS as an end point for our clients, which allows us to get in-flight encryption over the public web.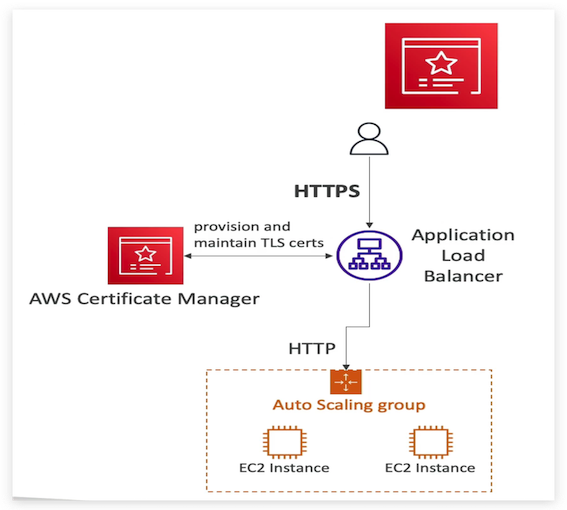
- supports both public and private TLS certificates
- Free of charge for public TLS certificates.
- automatic TLS certificate renewal
There’s also a very nice feature which is automatic TLS certificate renewal which is very helpful, I use it all the time.
And it has integration, that means that it loads the TLS certificates on different services, It could be your:- Elastic Load Balancer,
- CloudFront Distributions
- APIs on API gateway
- list goes on & on …
So anytime you see what service can help us do in-flight encryption and generates these certificates then think ACM, that’s it.
Secrets Manager Overview
• Newer service, meant for storing secrets
• Capability to force rotation of secrets every X days
• Automate generation of secrets on rotation (uses Lambda)
• Integration with Amazon RDS (MySQL, PostgreSQL, Aurora)
• Secrets are encrypted using KMS
• Mostly meant for RDS integration
Since this is again a charged service, we are not going to do detailed demos. Instead, I will just show the basics, but that’s enough for the CLF exam.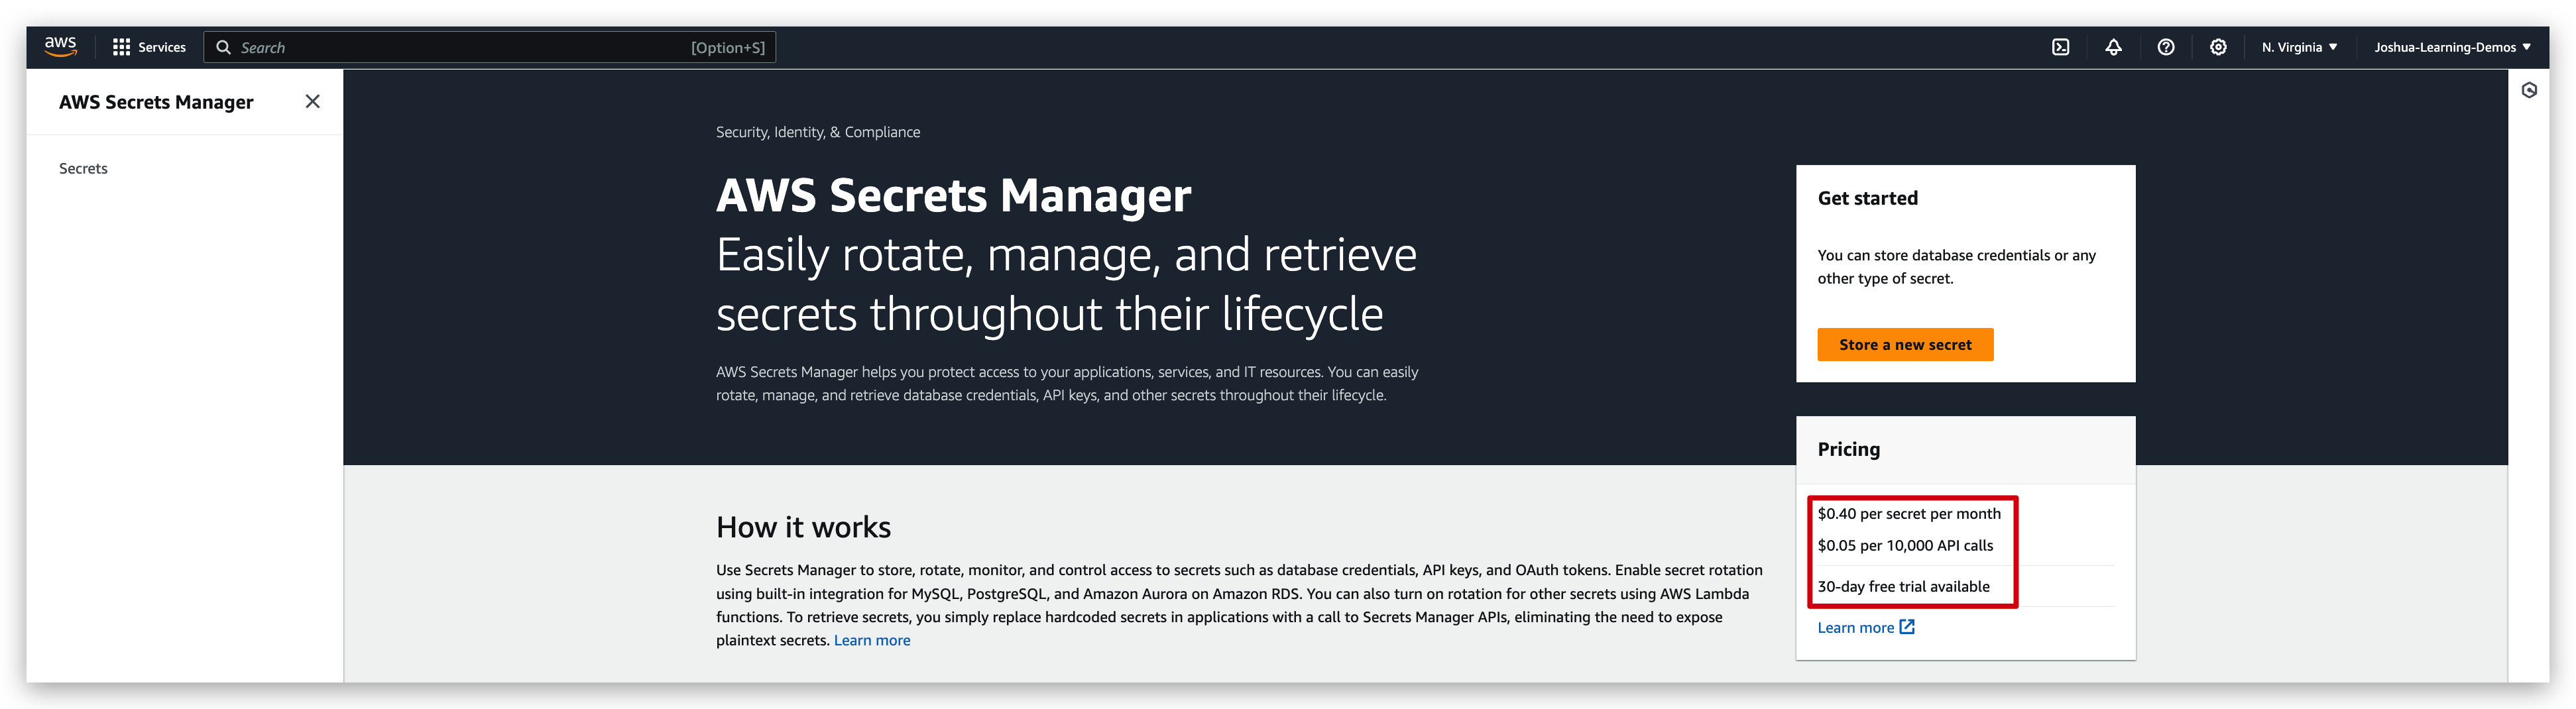
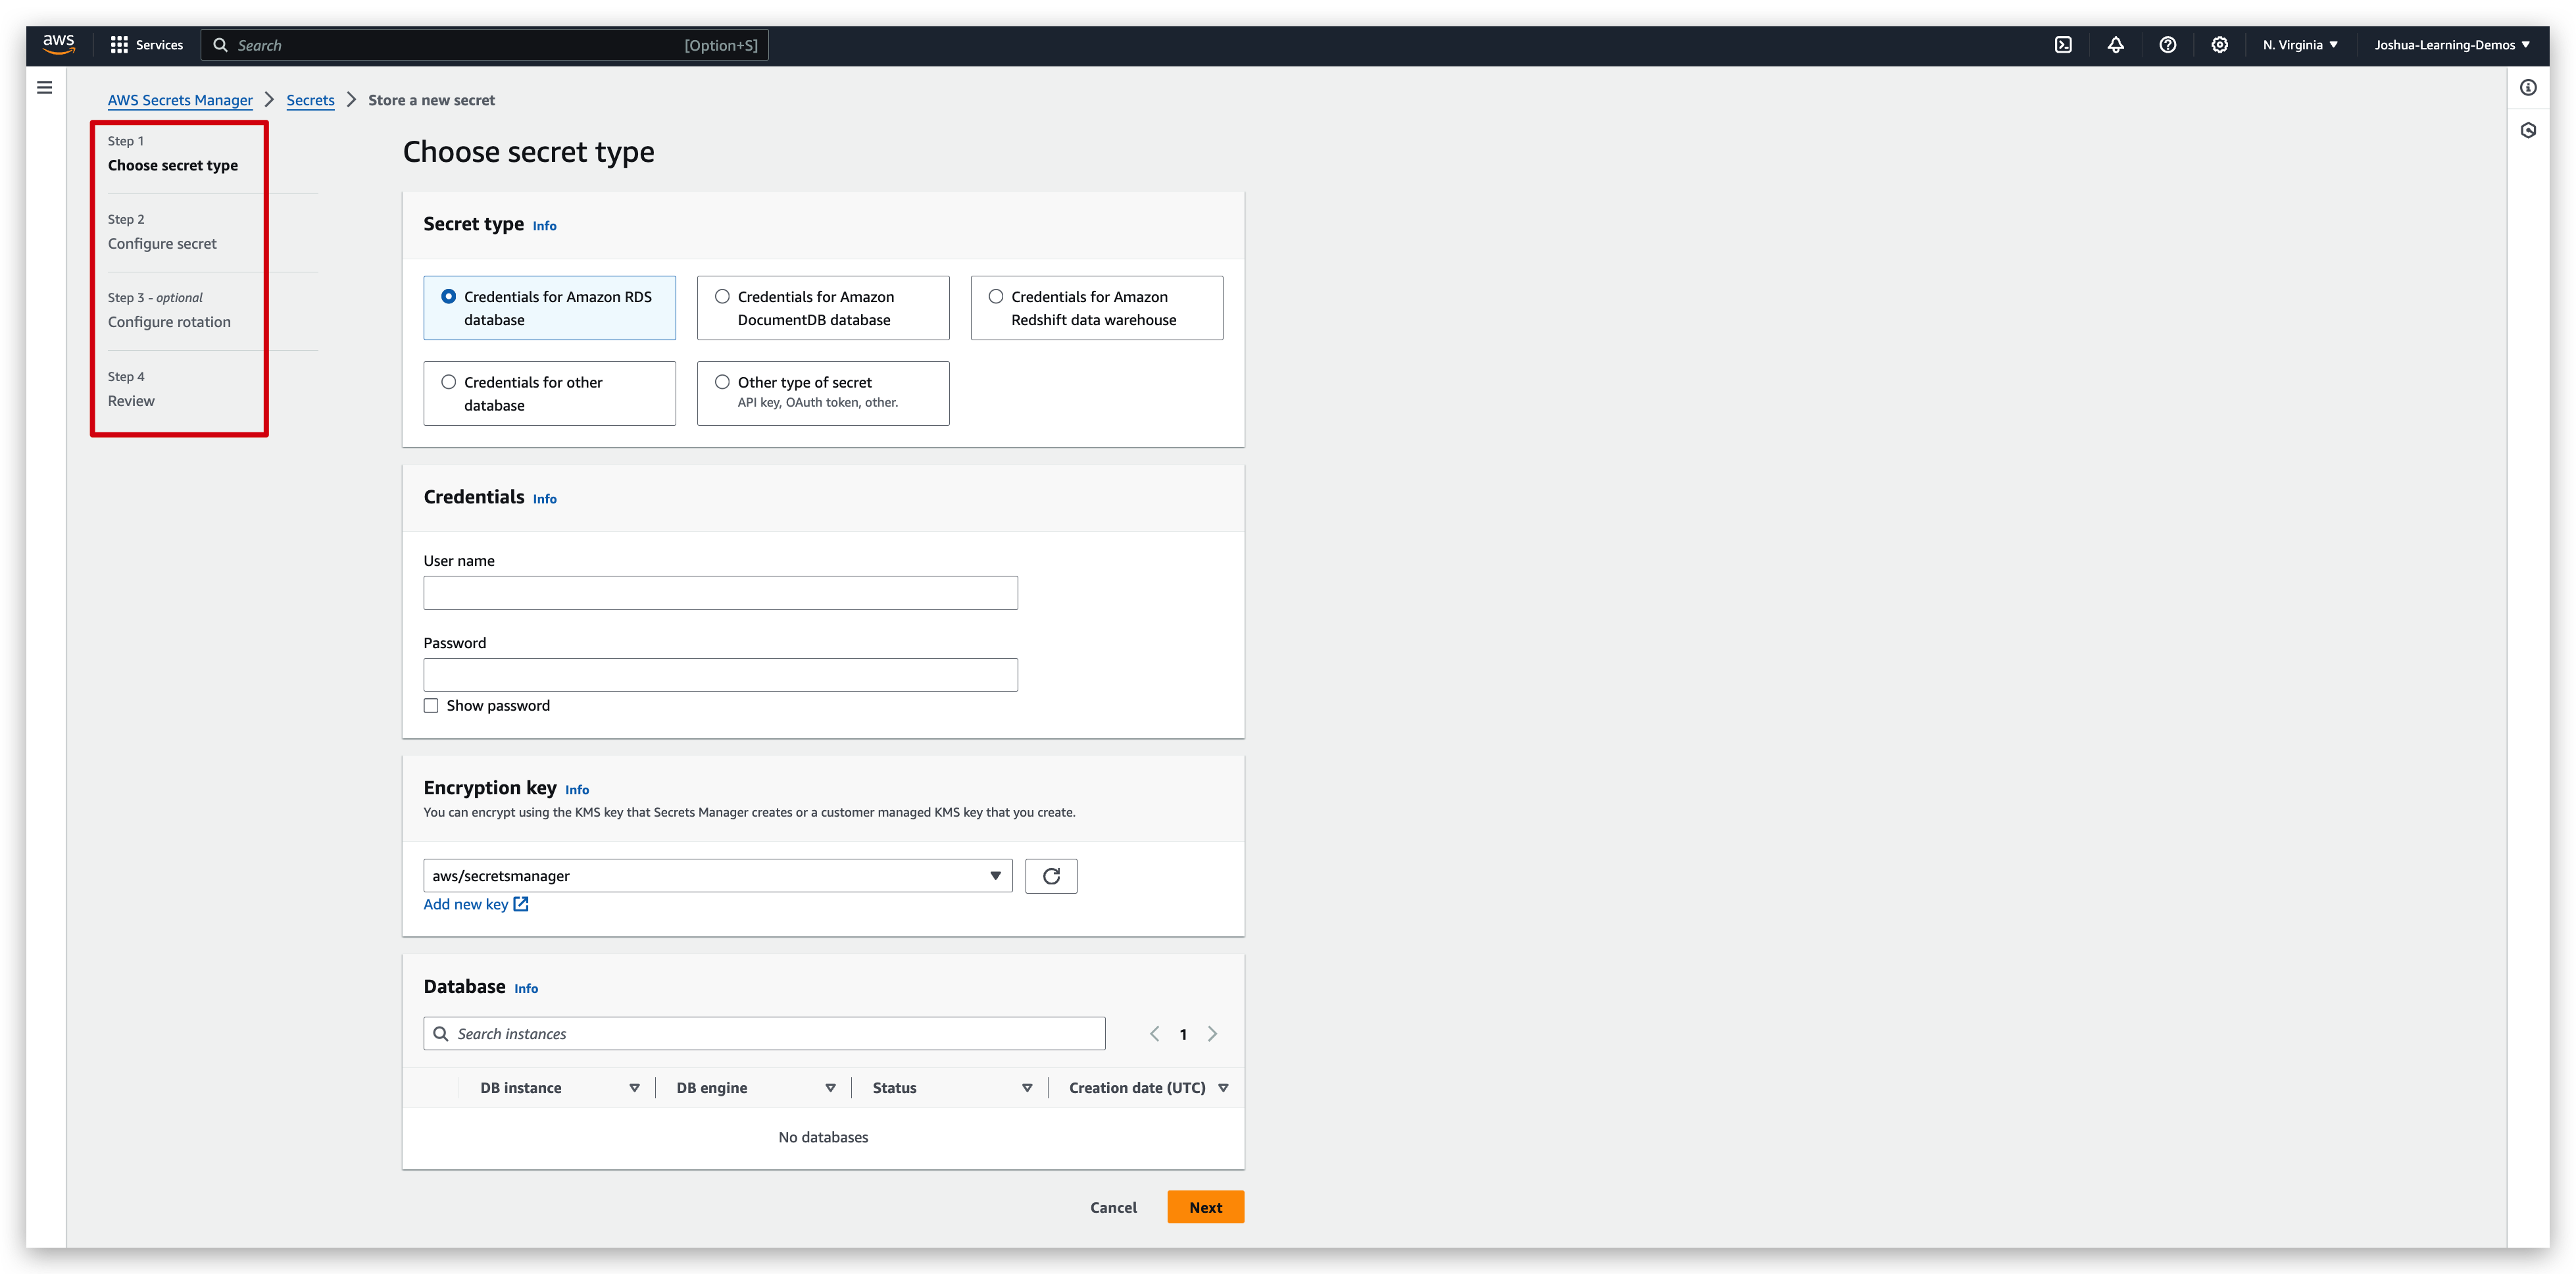
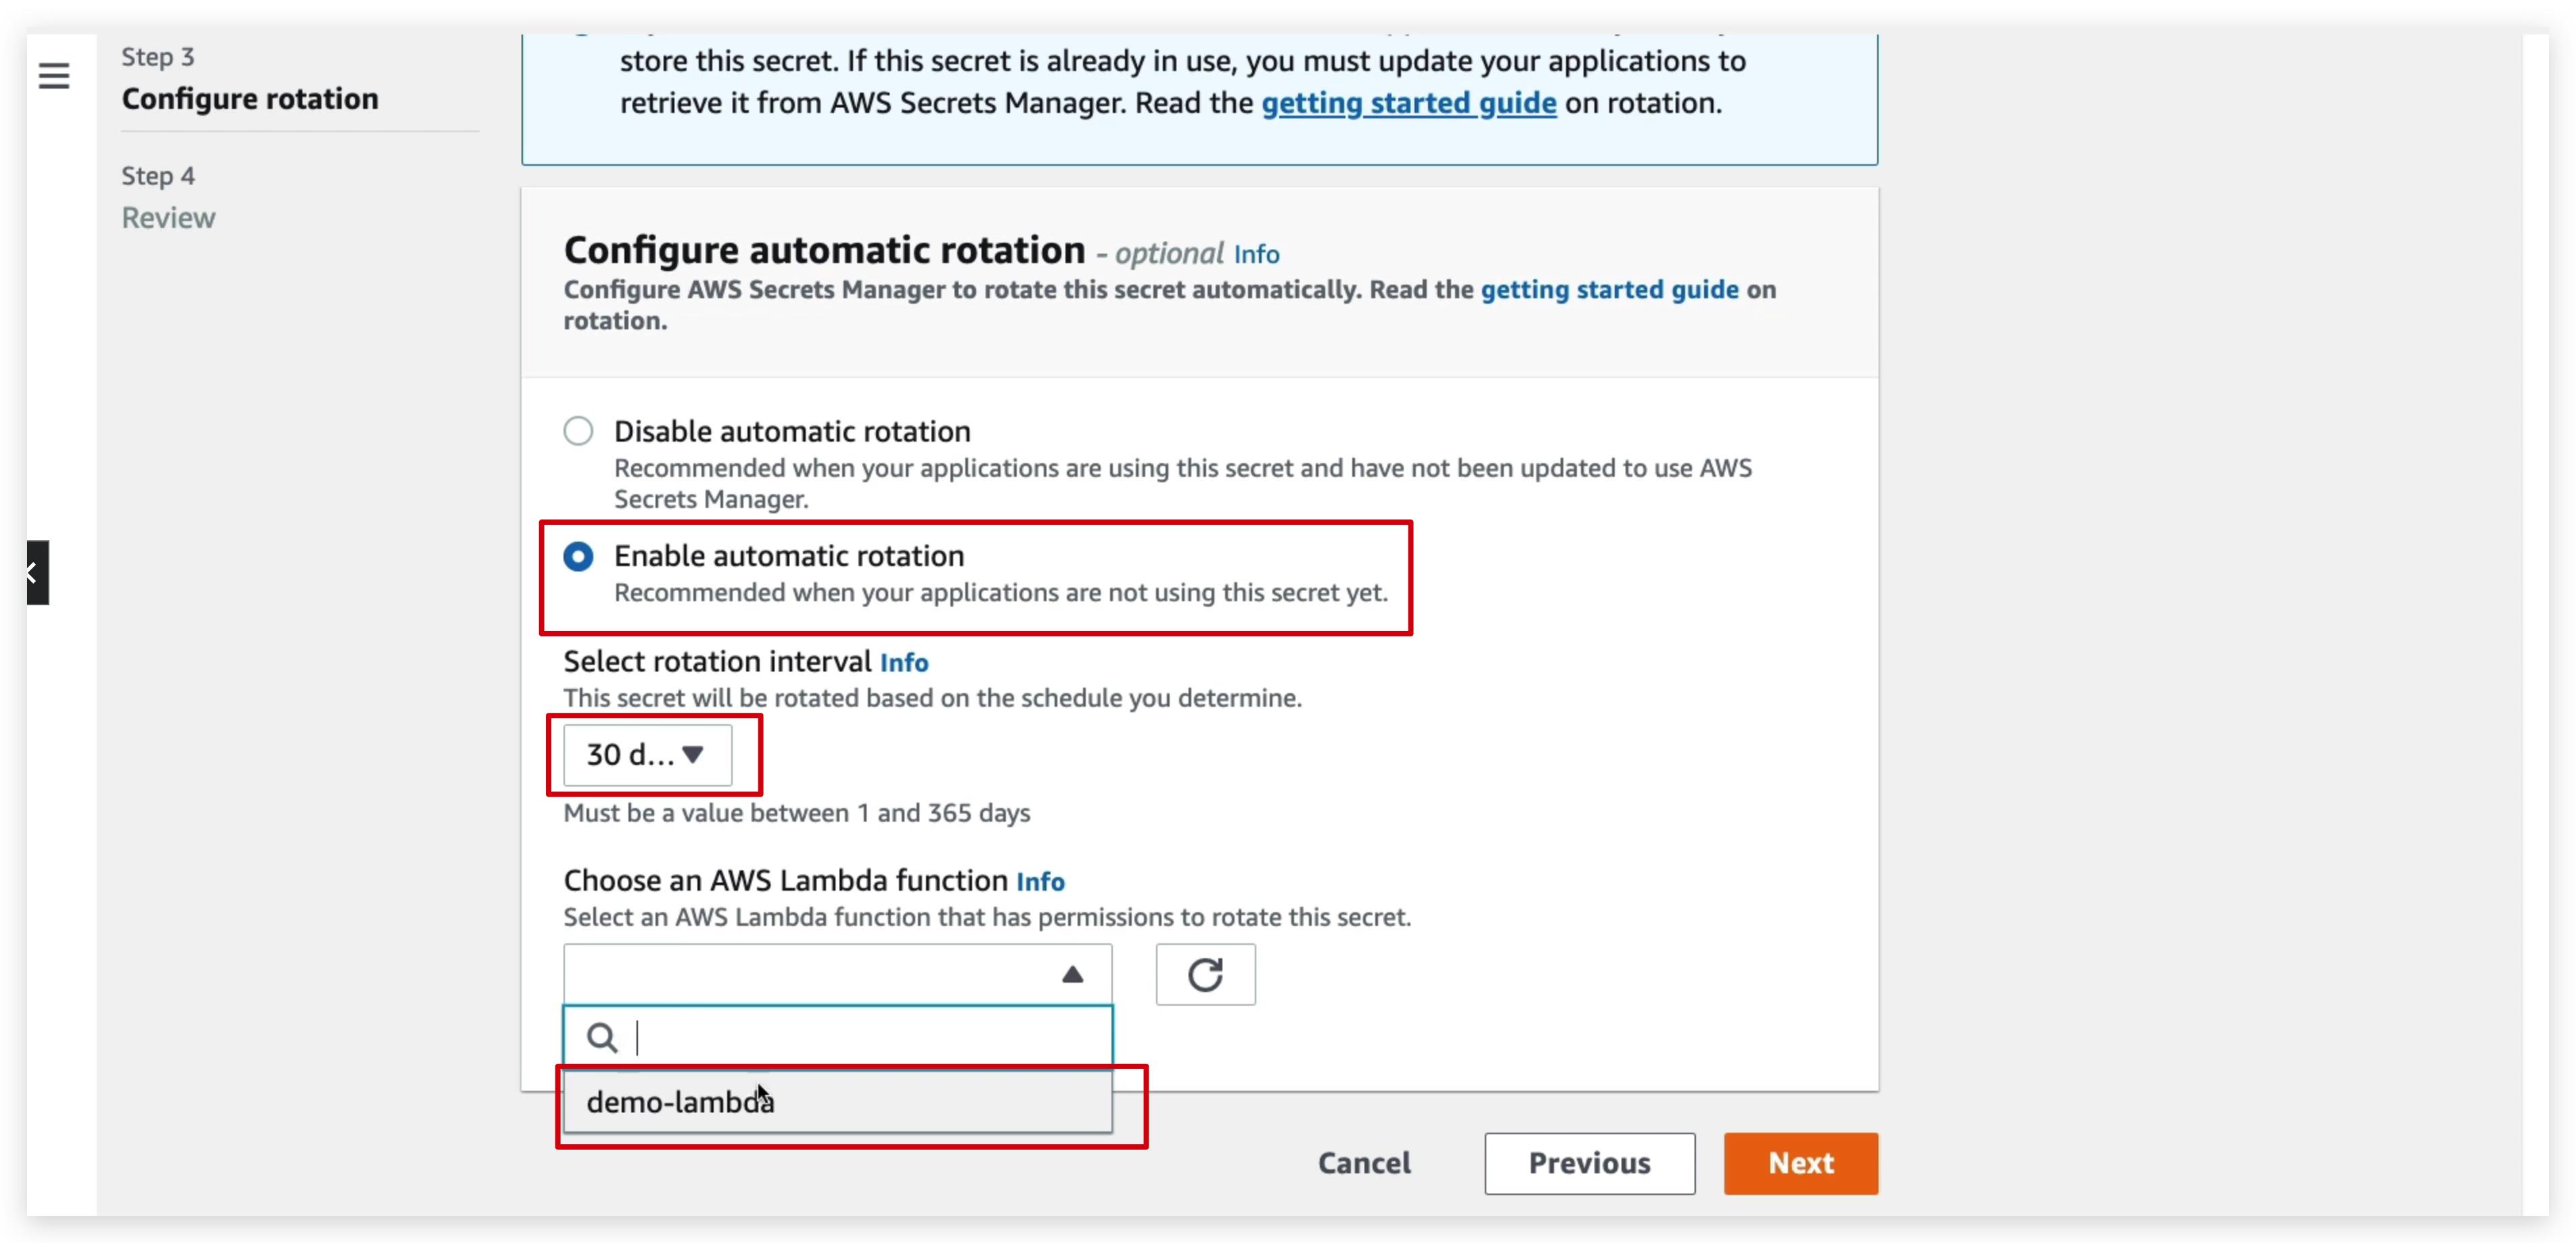
By clicking the “store a new secret” button and populating the mandates in the upcoming pages from step 1 to 4, you will get your new secret created. In these steps, you will need to specify the secret types, username/password, rotation policy and rotation interval etc. And in the final step, namely step 4, you can review your secret spec and choose to redirect previous steps if anything is wrong or click “store” button to create that secret.
And also, you can see some sample code in the review step to retrieve the secrets in our applications: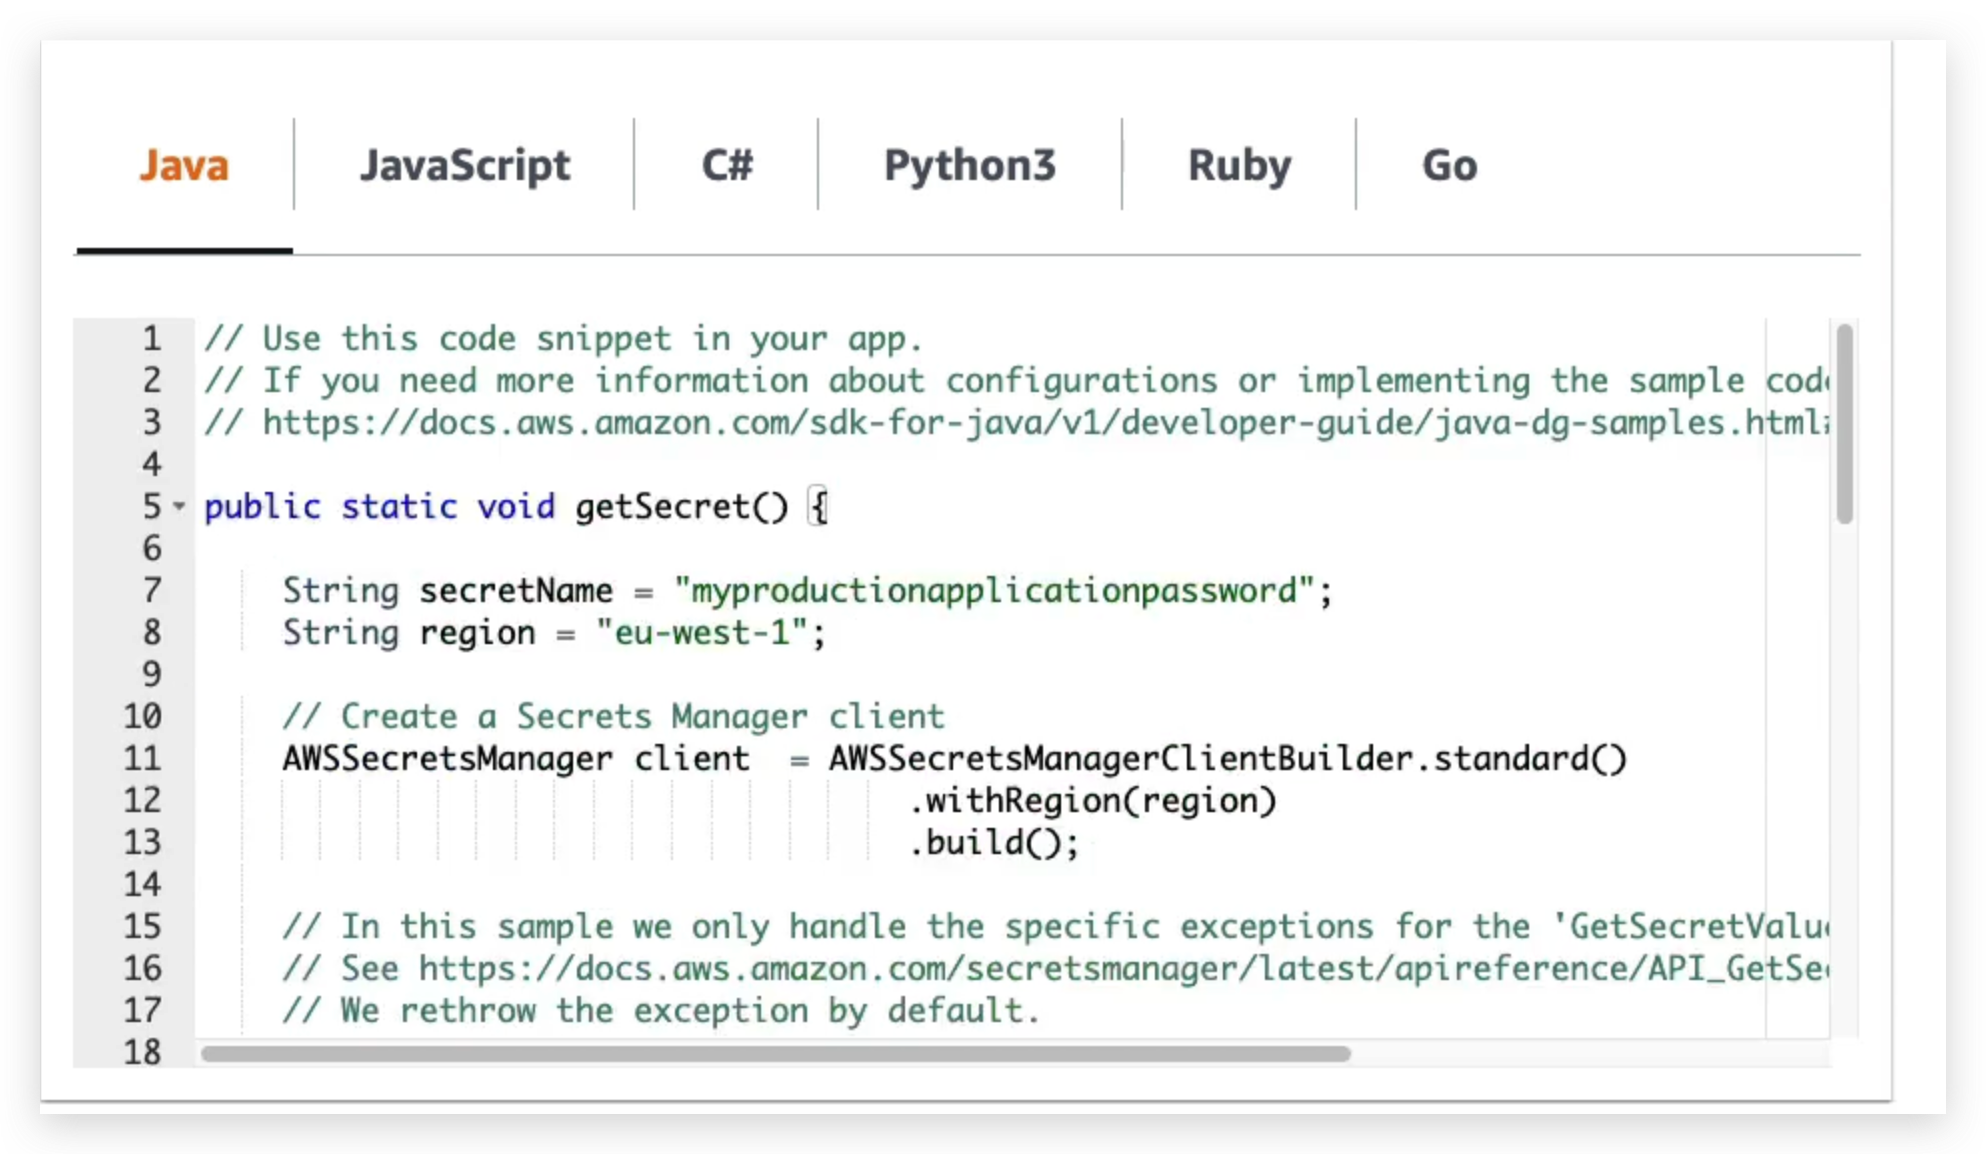
Below is the dependency for secrets rotation and the Java code for rotation. So similarly, you can write your lambda code snippets to enable the code rotation automation.
1 | <dependency> |
1 | import software.amazon.awssdk.auth.credentials.ProfileCredentialsProvider; |
Artifact Overview
So now let’s talk about AWS Artifacts, which is NOT really a service, but it is presented as one in the console.
So what is it?
It is a portal that will give you, the customer, access on demand to the compliance reports and AWS agreements. So these artifact reports can be downloaded, and they represent a security and compliance documents from third party auditors, such as the alias ISO certifications, the payment card industry and System and Organization Control(PCI reports and the SOC reports).
There’s also artifacts agreements which is allowing you to review, accept and track the status of alias arguments such as the Business Associate Addendum (BAA agreements) or the Health Insurance Portability and Accountability Act, which is HIPAA, we’ll see this maybe in exempt, for an individual accounts or in your organization.
And so these reports can be used to support internal audits capabilities within your company or complaints needs to show that your compliance by using the AWS cloud.
So this lecture is just for you to get a glimpse on how and where we can view/download the agreement/reports.
Pinpoint the “artifact” from the search bar and redirect to the page below: via clicking on the “view reports”/“view agreements”, you can then select the ones you’re interested in to view or download the agreement.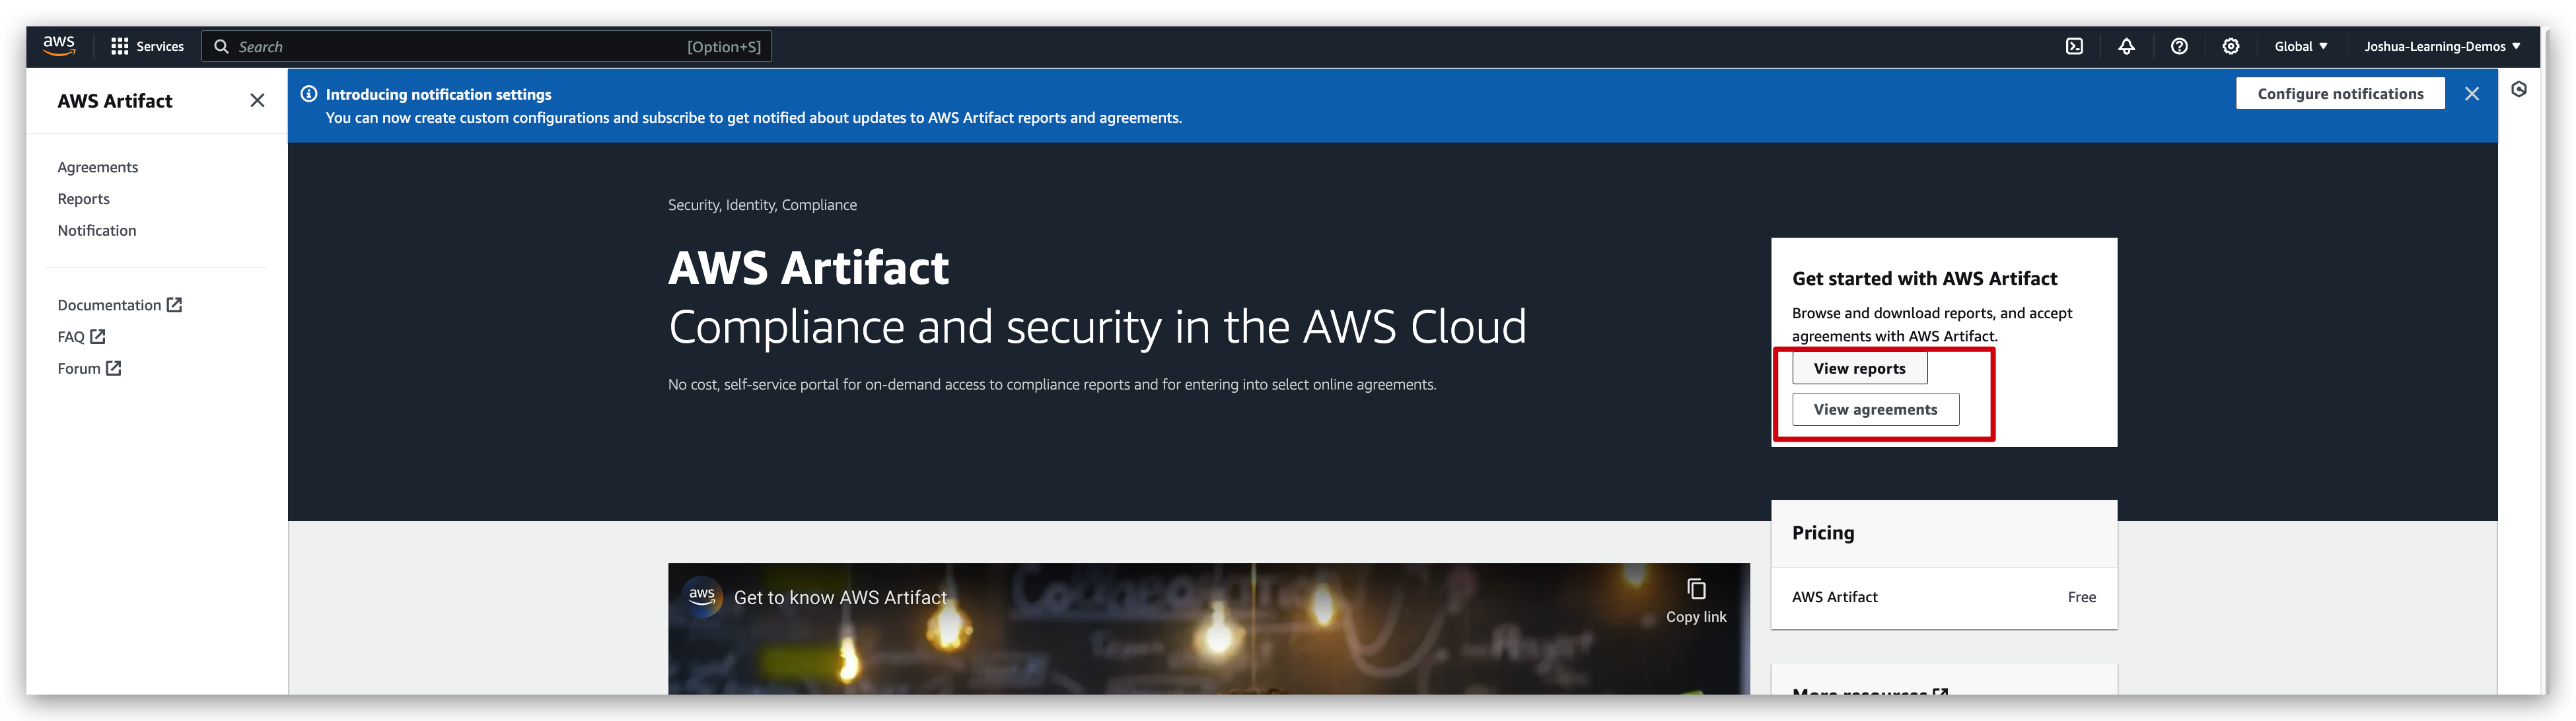
GuardDuty Overview
GuardDuty helps you do intelligent threat discovery to protect your AWS accounts.
How does it do it?
Well, it has machine learning algorithm, performs anomaly detection and uses third party data to find these threats.
So to enable it, it’s just one click. Then you have a 30 days trial. You don’t need to install any software.
So GuardDuty is going to look at a lot of input data, such as your CloudTrail event logs to look for unusual API calls or unauthorized deployments.
It’s going to look at your management events and your data events. So for example, on the management side, the create VPC Subnet event and so on, whereas on the S3 data events for example, get object, list objects, delete objects and so on.
And then for VPC flow logs, it’s going to look at unusual internet traffic. It’s going to look at unusual IP addresses.
As for DNS logs, to look at EC2 instances, sending encoded data within DNS queries, which would mean they’re compromised and optional features to allow you to analyze, for example, other input data sources such as your EKS audit logs, your RDS and Aurora login events, your EBS, your Lambda and your S3 data events.
So we can also set up EventBridge rules to be notified automatically in case you have findings. And then these rules can target whatever EventBridge, can target, such as AWS Lambda, or SNS topics.
Also, this can come up in the exam.
GuardDuty is a very good tool to protect you against cryptocurrency attacks because there is a dedicated finding for it. So it knows how to analyze all these input data and find that there is a cryptocurrency attack.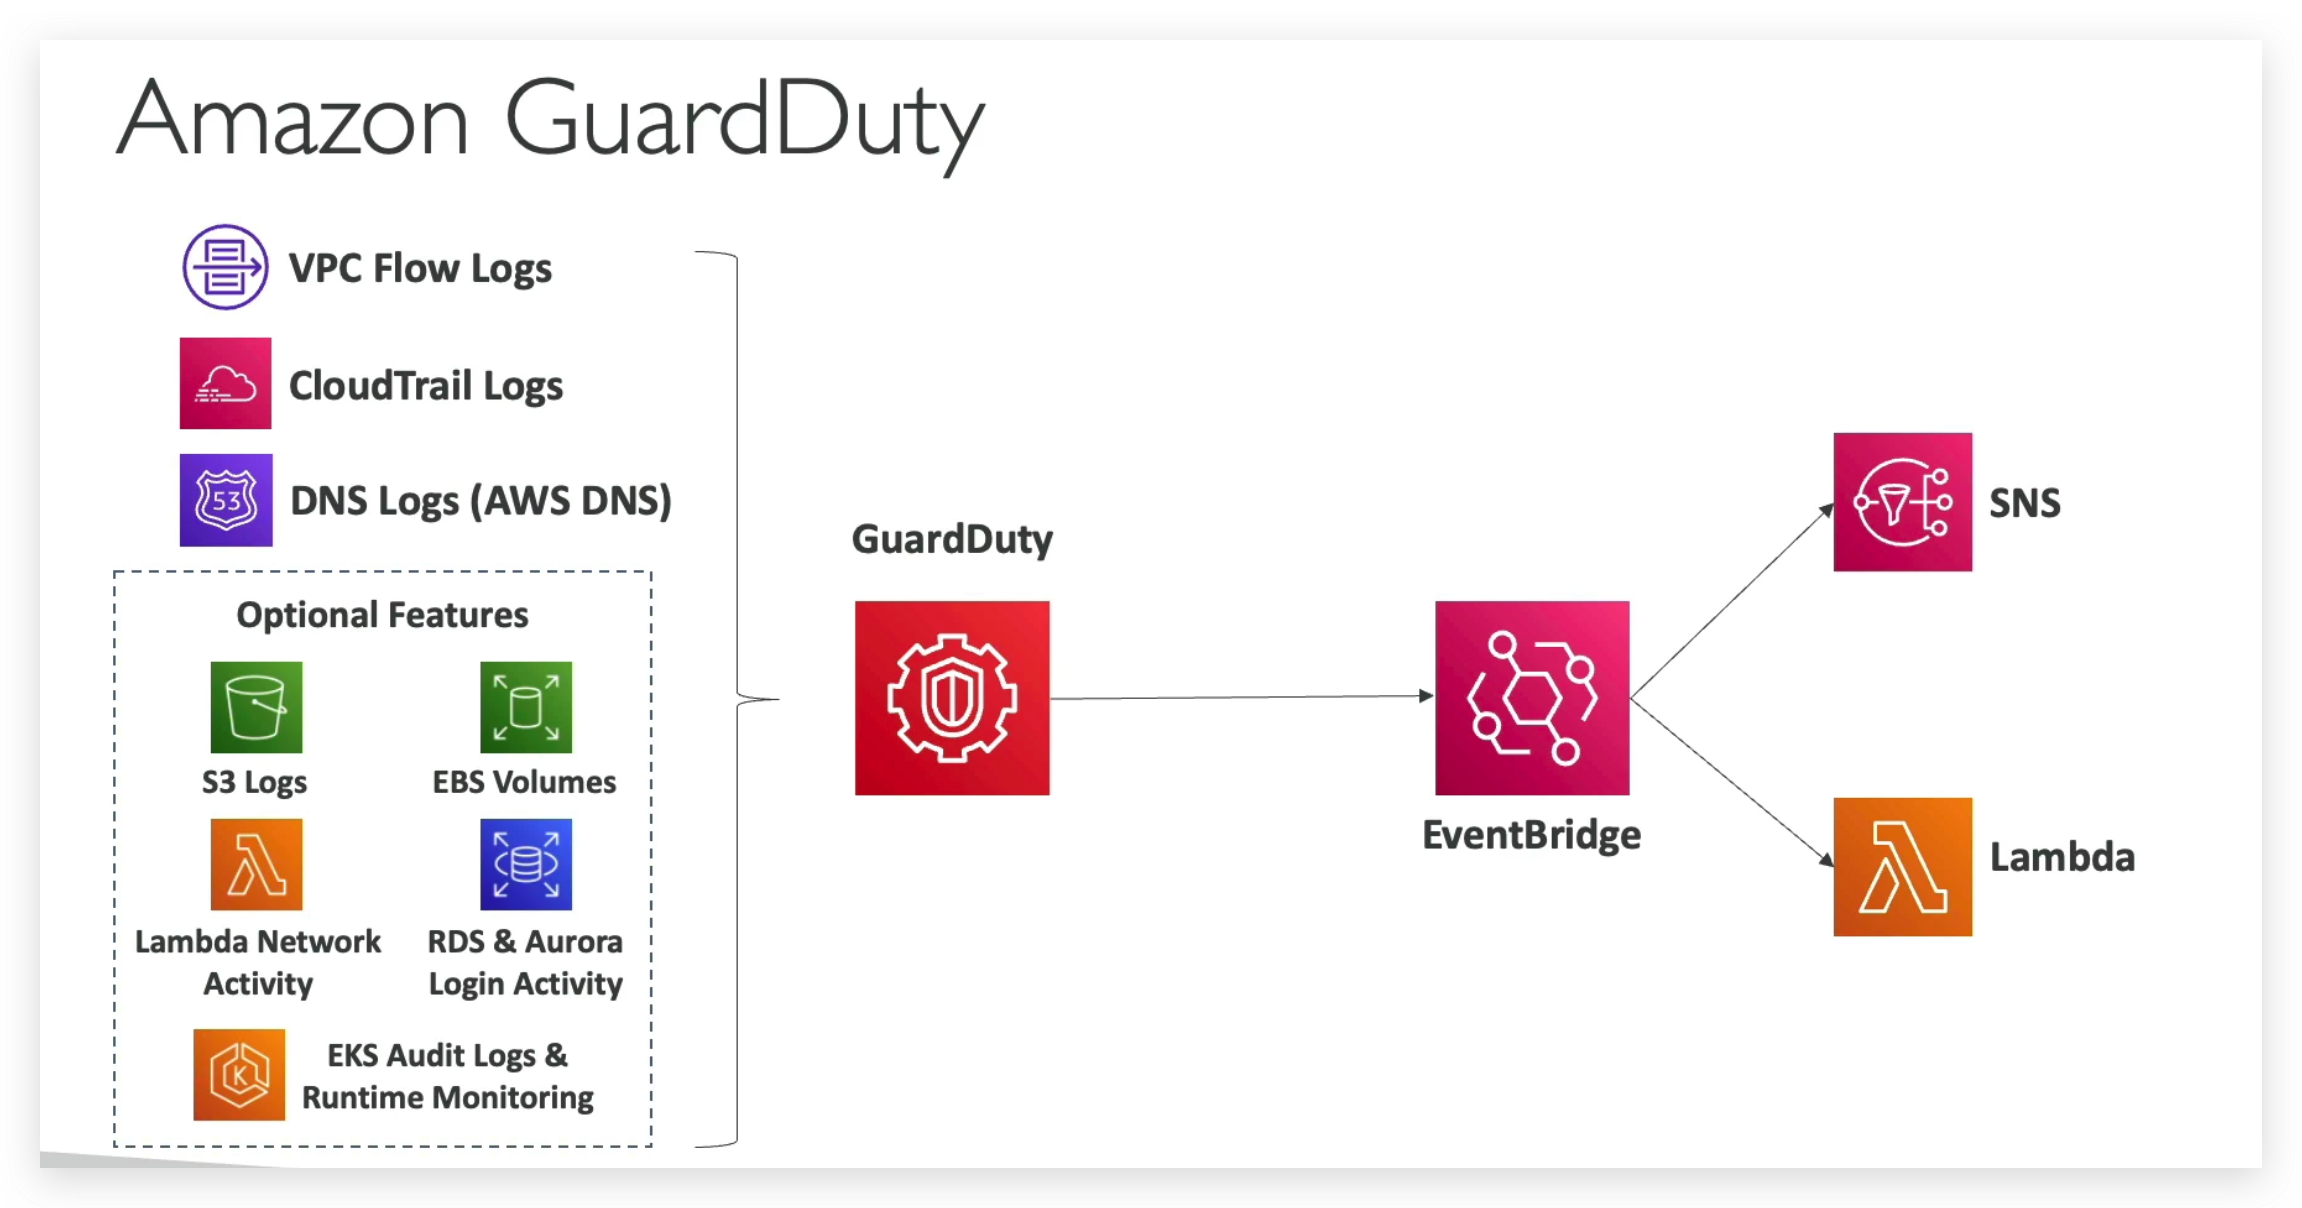
So to summarize, within GuardDuty, we have several input data. We have the VPC flow logs, the CloudTrail logs, and the DNS logs that will be, no matter what, into GuardDuty as well as some optional features you can enable, such as your S3 logs, your EBS volumes, your Lambda network activity, RDS and Aurora login activity and your EKS logs and runtime monitoring as well as most likely, more features over time that I will not put here because you get the idea of optional features.
And so from all these things, then GuardDuty can generate findings and if these findings are detected, an event is created in Amazon EventBridge. And therefore from EventBridge, thanks to rules, we can trigger automations, for example, using Lambda functions or send notifications, for example, using SNS.
Inspector Overview
So what does Amazon Inspector evaluate?
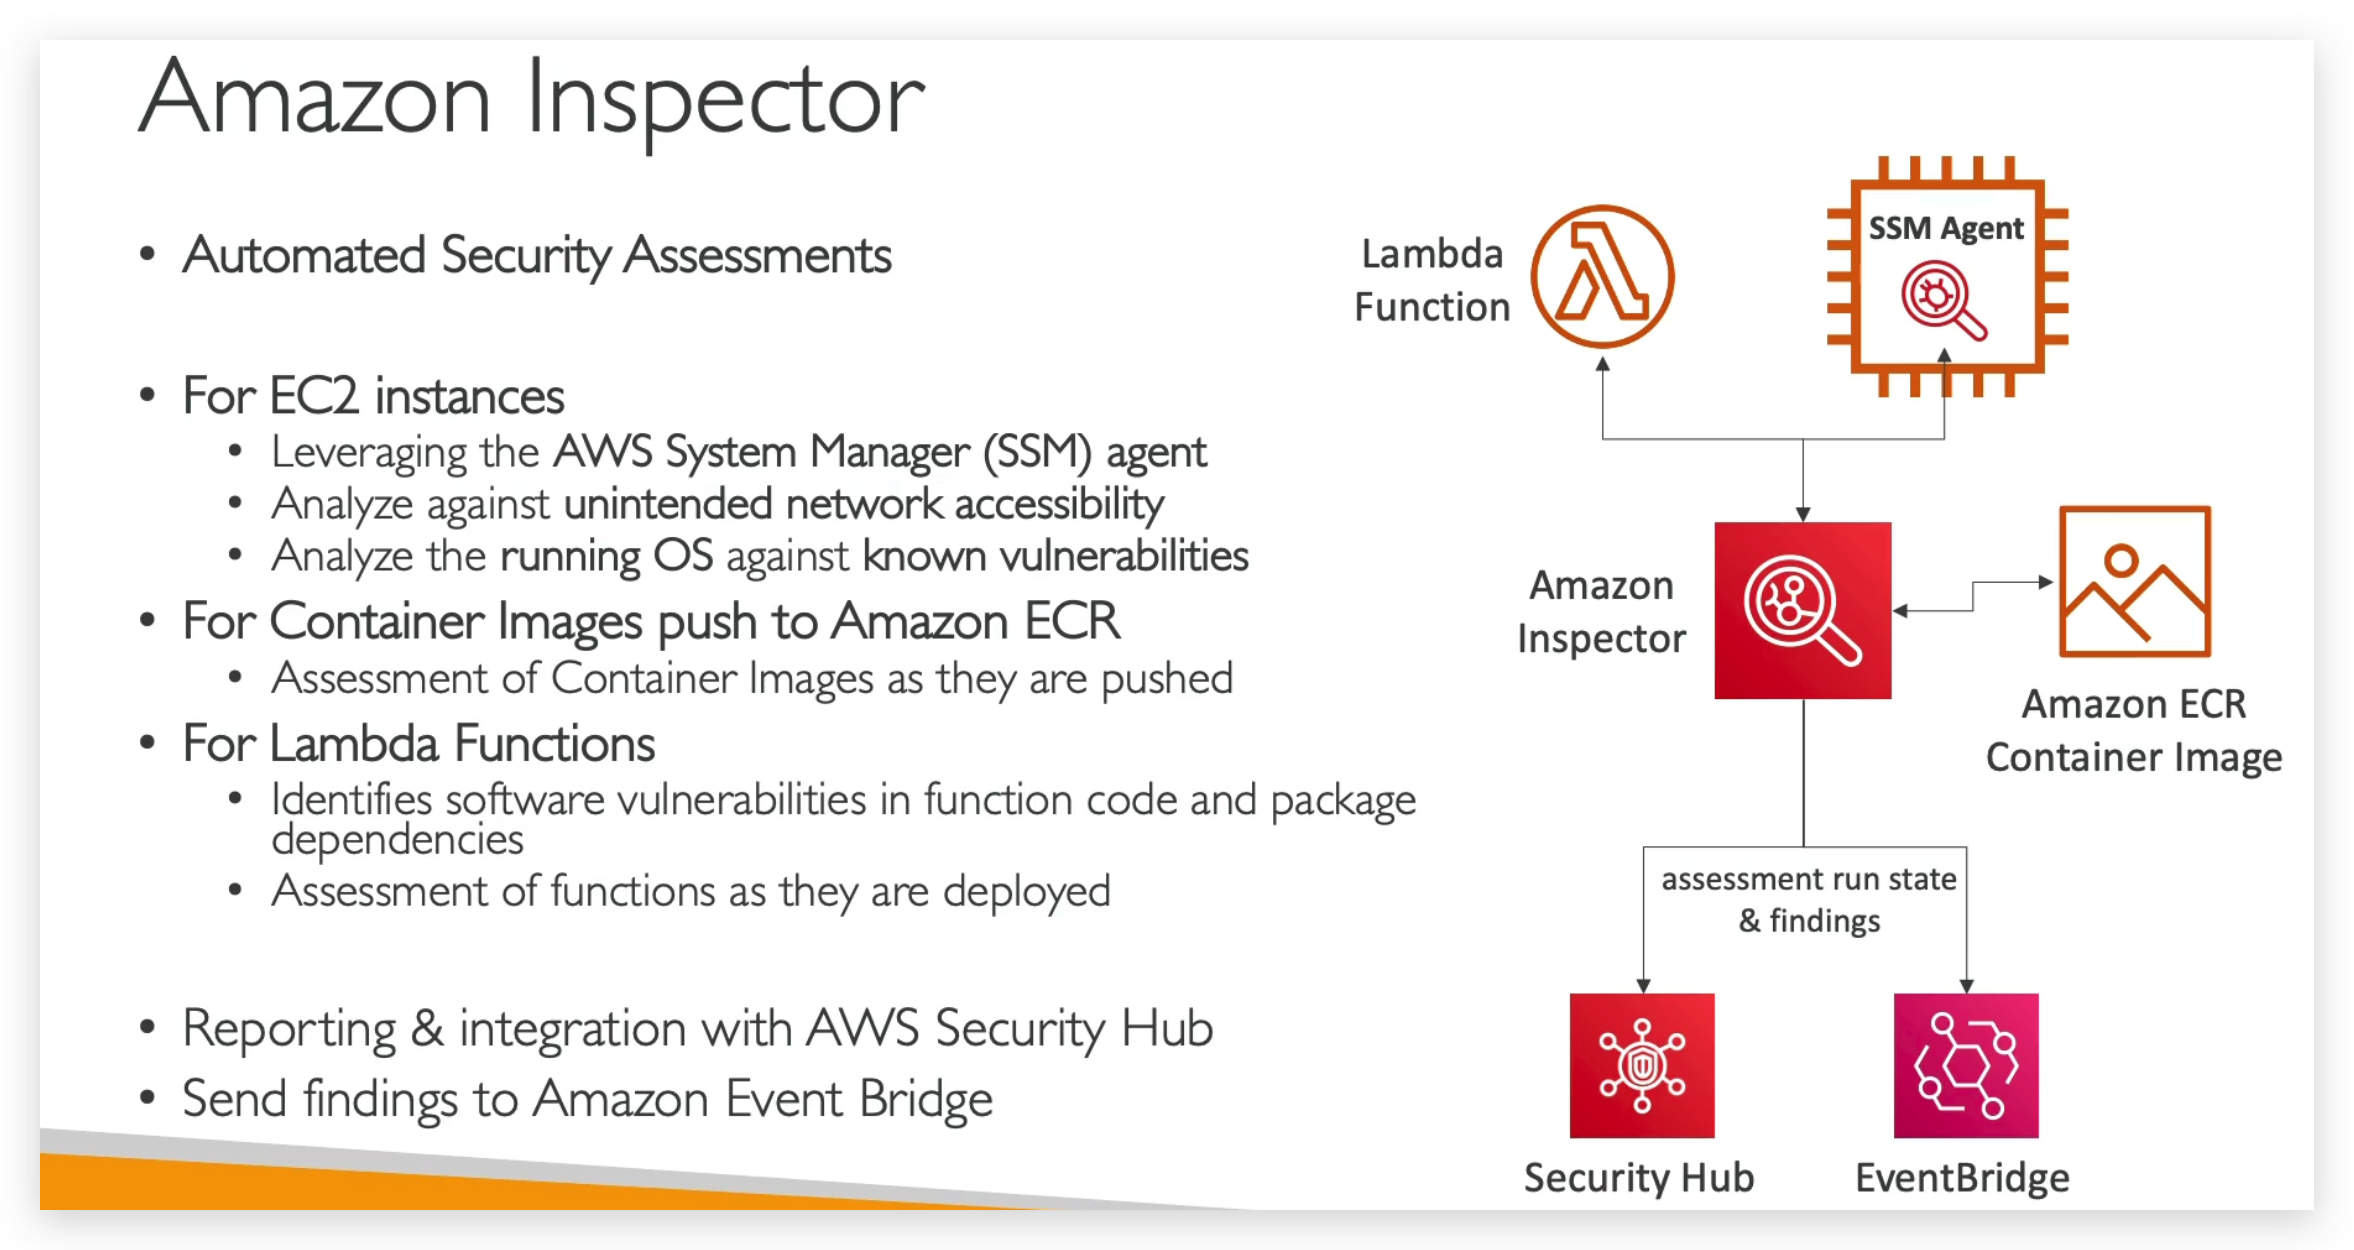
You have to remember, the Inspector is only for your running EC2 instances, your Container Images on Amazon ECR and your Lambda functions.
And it’s going to do a continuous scanning of the infrastructure only when needed. So it’s going to look at a database of vulnerabilities, so CVE, for package vulnerability for EC2, ECR and Lambda.
And it’s going to look at network reachability on Amazon EC2 and in case the database of CVE gets updated, then Amazon Inspector is going to automatically run again to make sure that all your infrastructure is tested one more time. Every time it runs, a risk score is going to be associated with all the vulnerabilities for prioritization.
Config Overview
AWS Config provides a detailed view of the resources associated with your AWS account, including how they are configured, how they are related to one another, and how the configurations and their relationships have changed over time.
So the idea is when you find some resources under your AWS account is non-sompliance, you can pinpoint them and then check the configurations of them and then fix them.
For example, Like the screenshots above, if I attach the “restricted-ssh” rule to all resources, and check the compliance stats of them from dashboard, you will find those which are non-compliance by a warning signal.
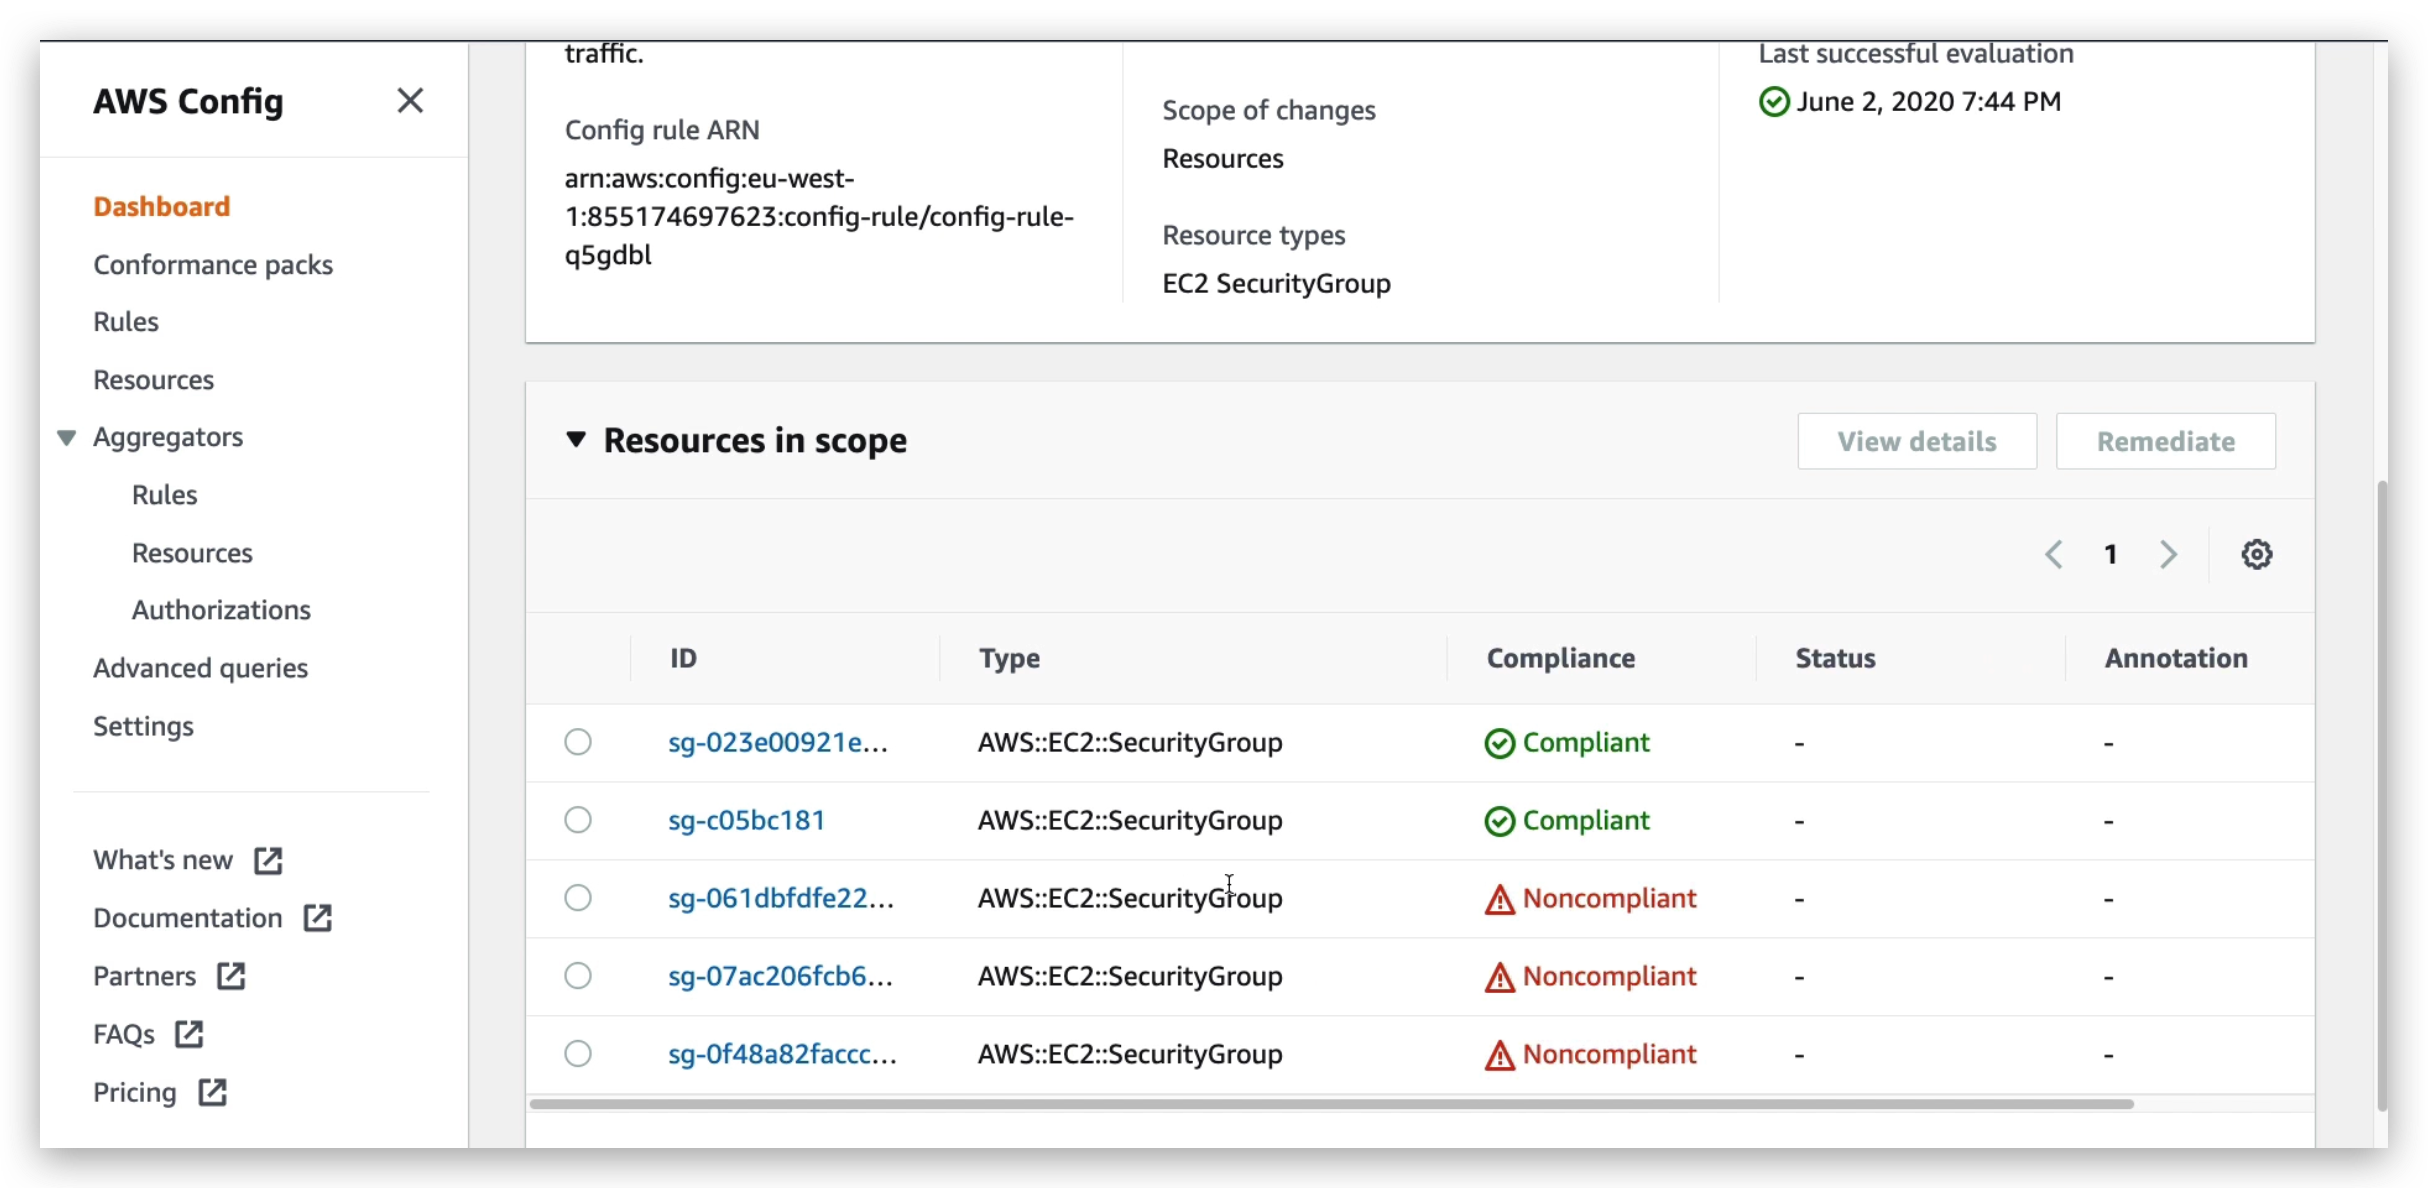
If I click the resource that has this issue to take me to the configuration page of this resource, we will see the ssh configuration is:
Since this ssh is open to any inbound connection no matter what the IP is, so the unrestricted ssh disallowing is not in place, which in result trigger the non-compliance.
To fix this, we can easily delete that inbound rule or specify its IP range and then go back to the compliance dashboard to check. This might take a few minutes. If you want them to take effect immediately, go to that rule and re-evaluate it like below: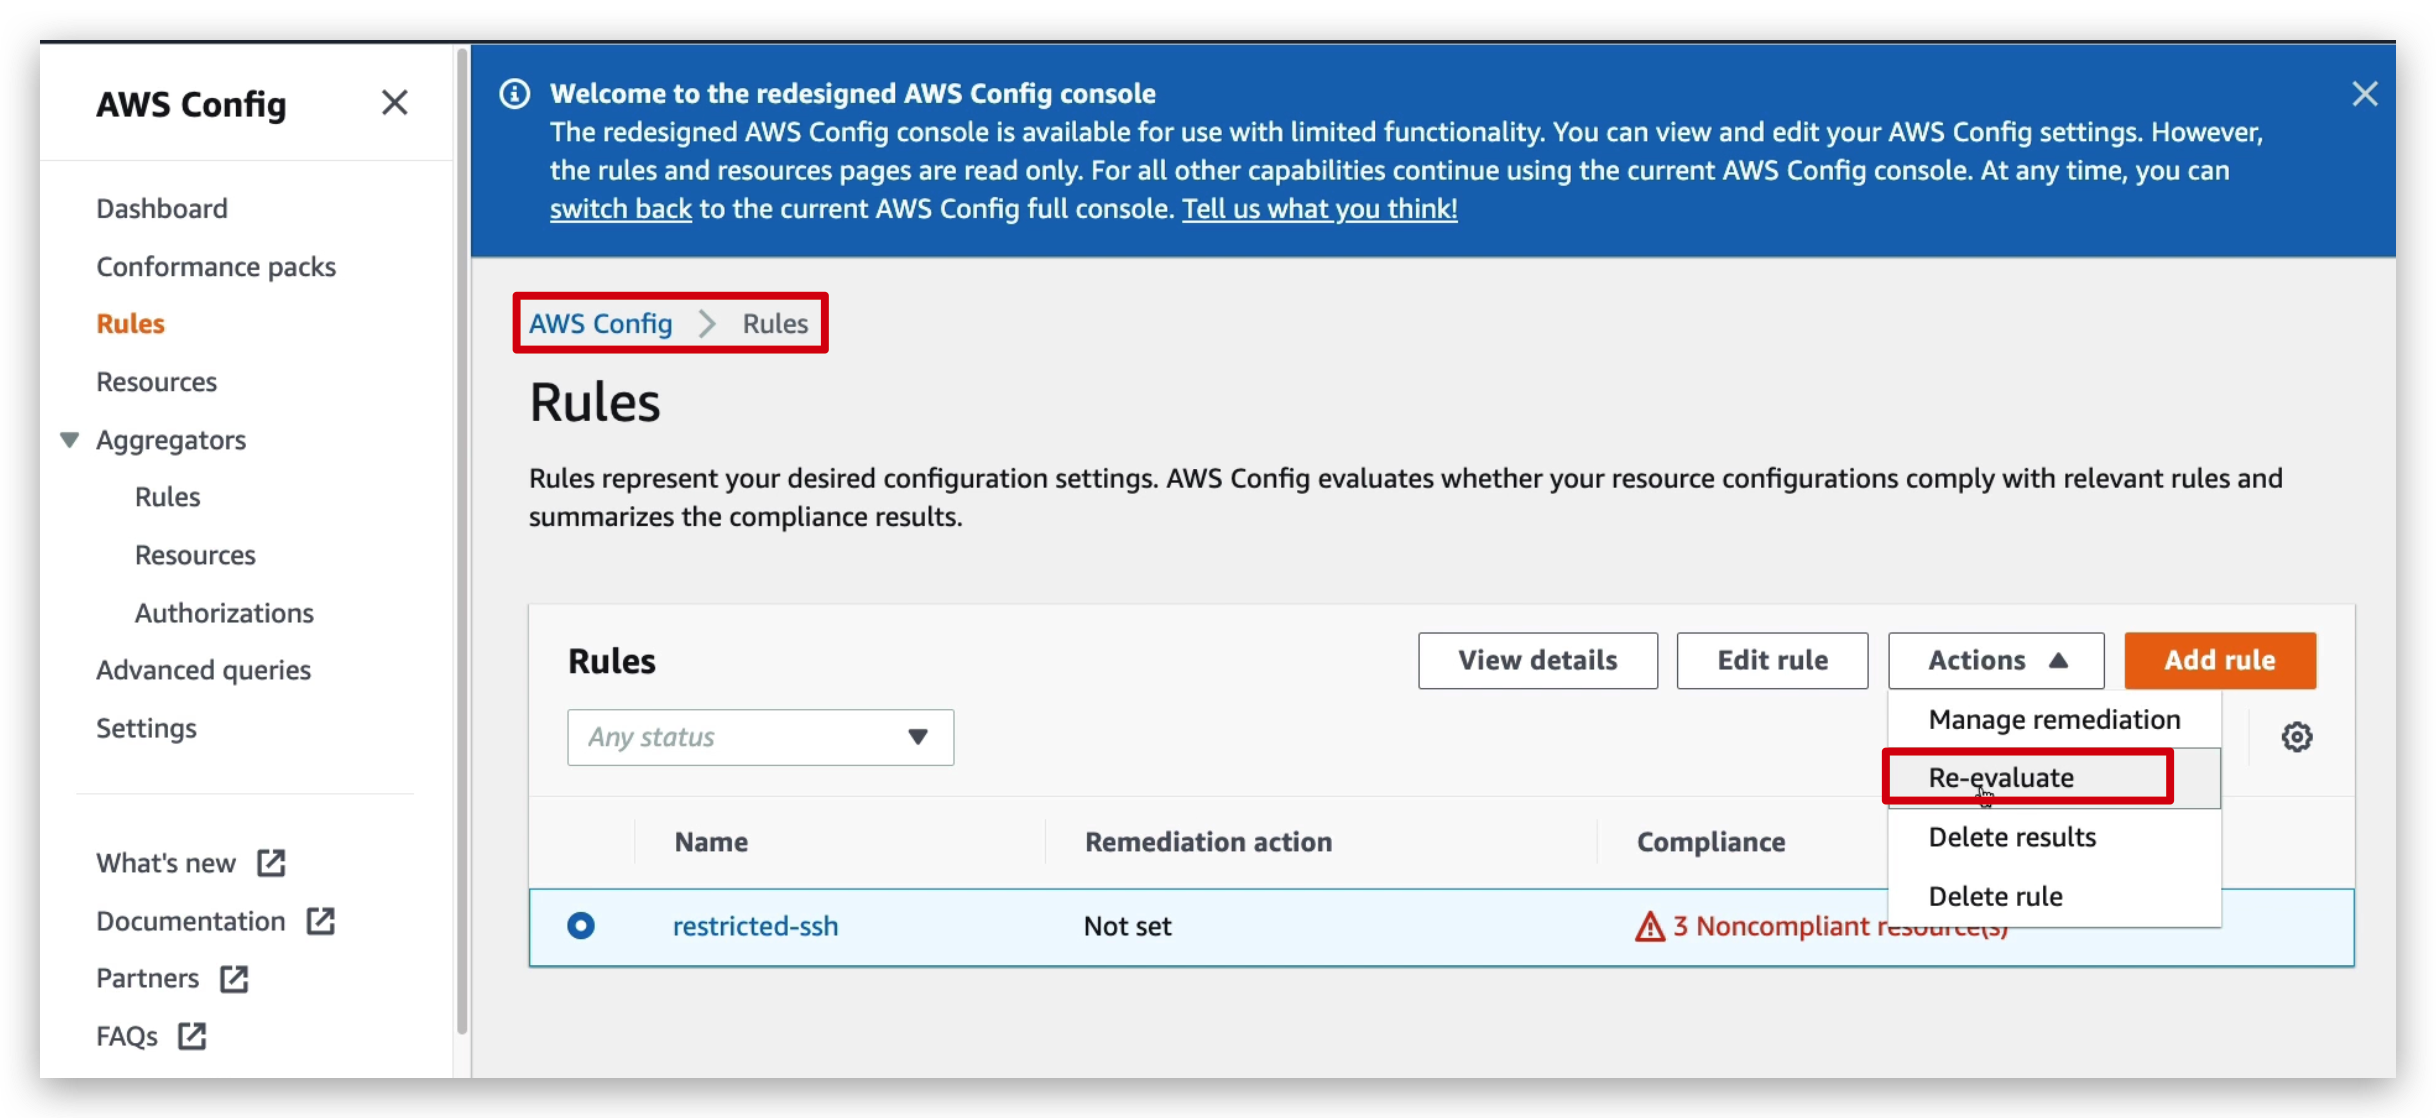
And then you will see the number of non-compliance resources became 2, from 3, which means the one of “restricted ssh” rule compliance issue disappeared.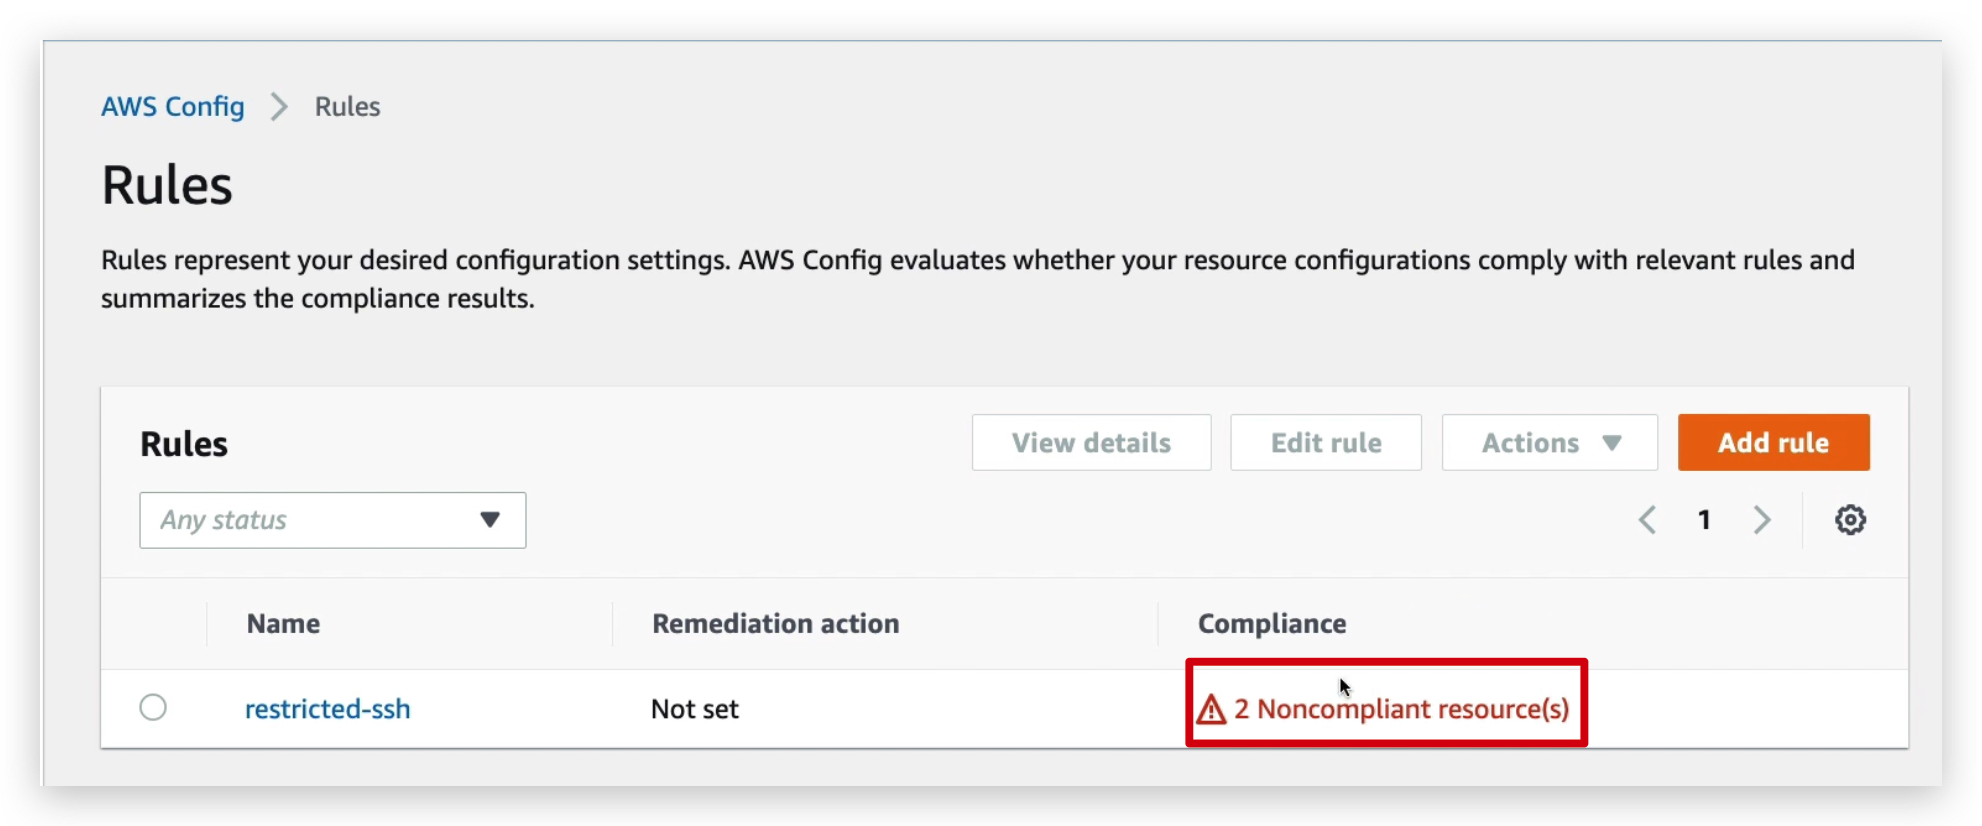
To confirm this, you can also check the resource Timeline as below: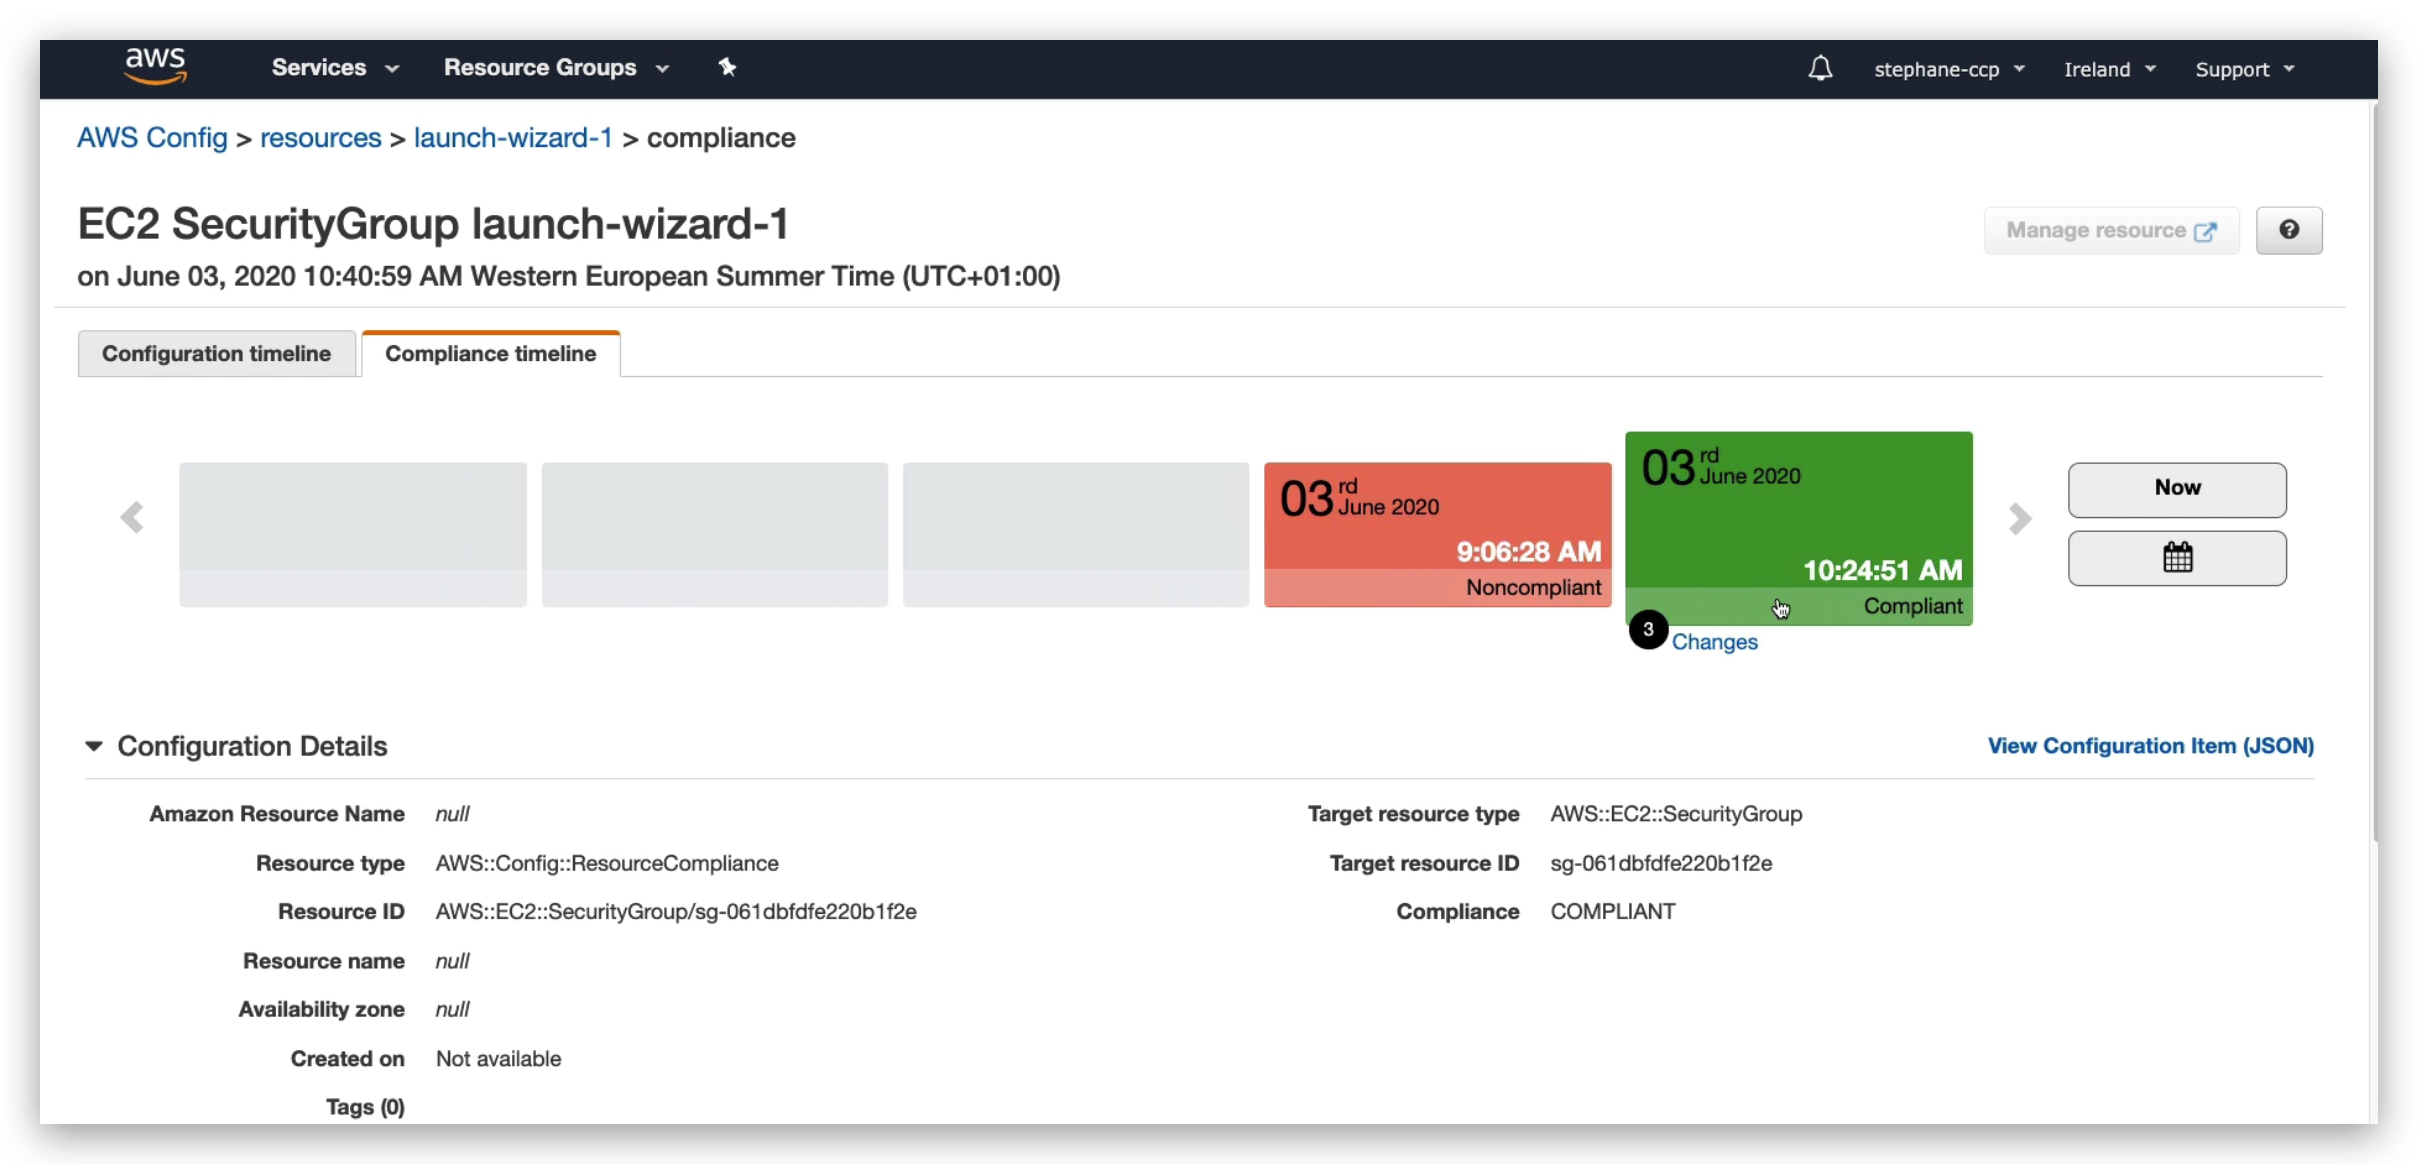
And if I click on the “Change” hyperlink in the timeline shown in below pic, it will take me to the detailed list of changes made.

You might also notice from this list above, the Configuration.complianceType became from non-compliant to compliant.
Till now, above are the compliance timeline of that specific resource, but if you check the configuration timeline, you will also have a change hyperlink that can take you to the configuration change list, as below: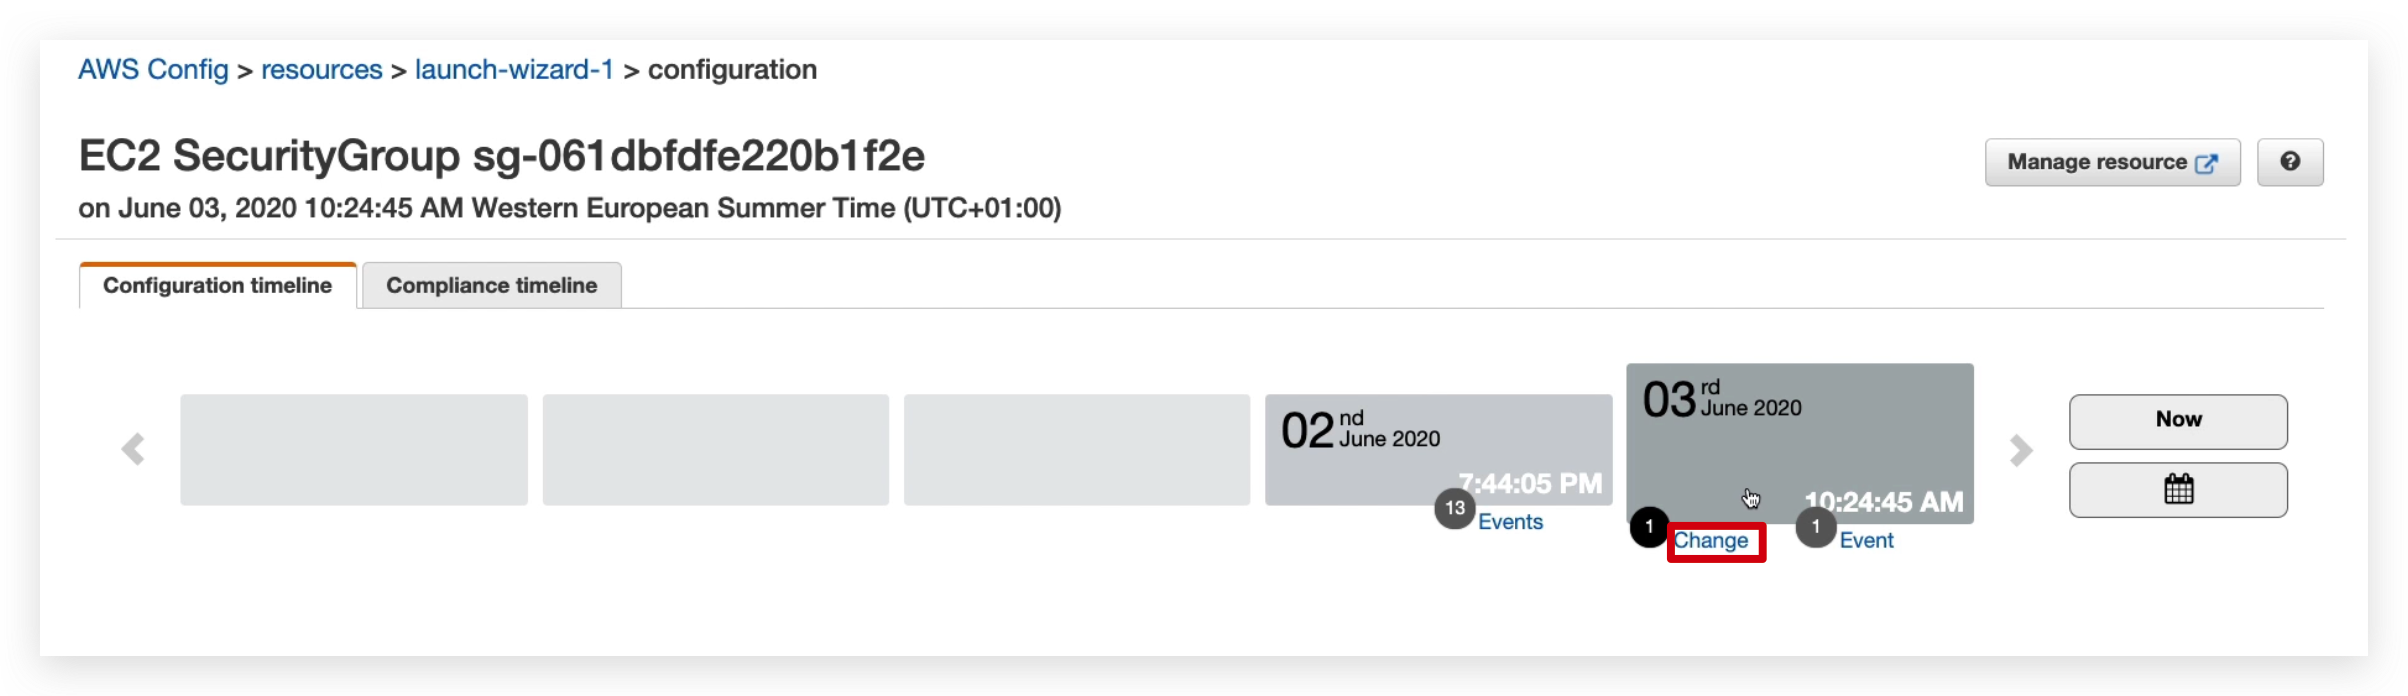
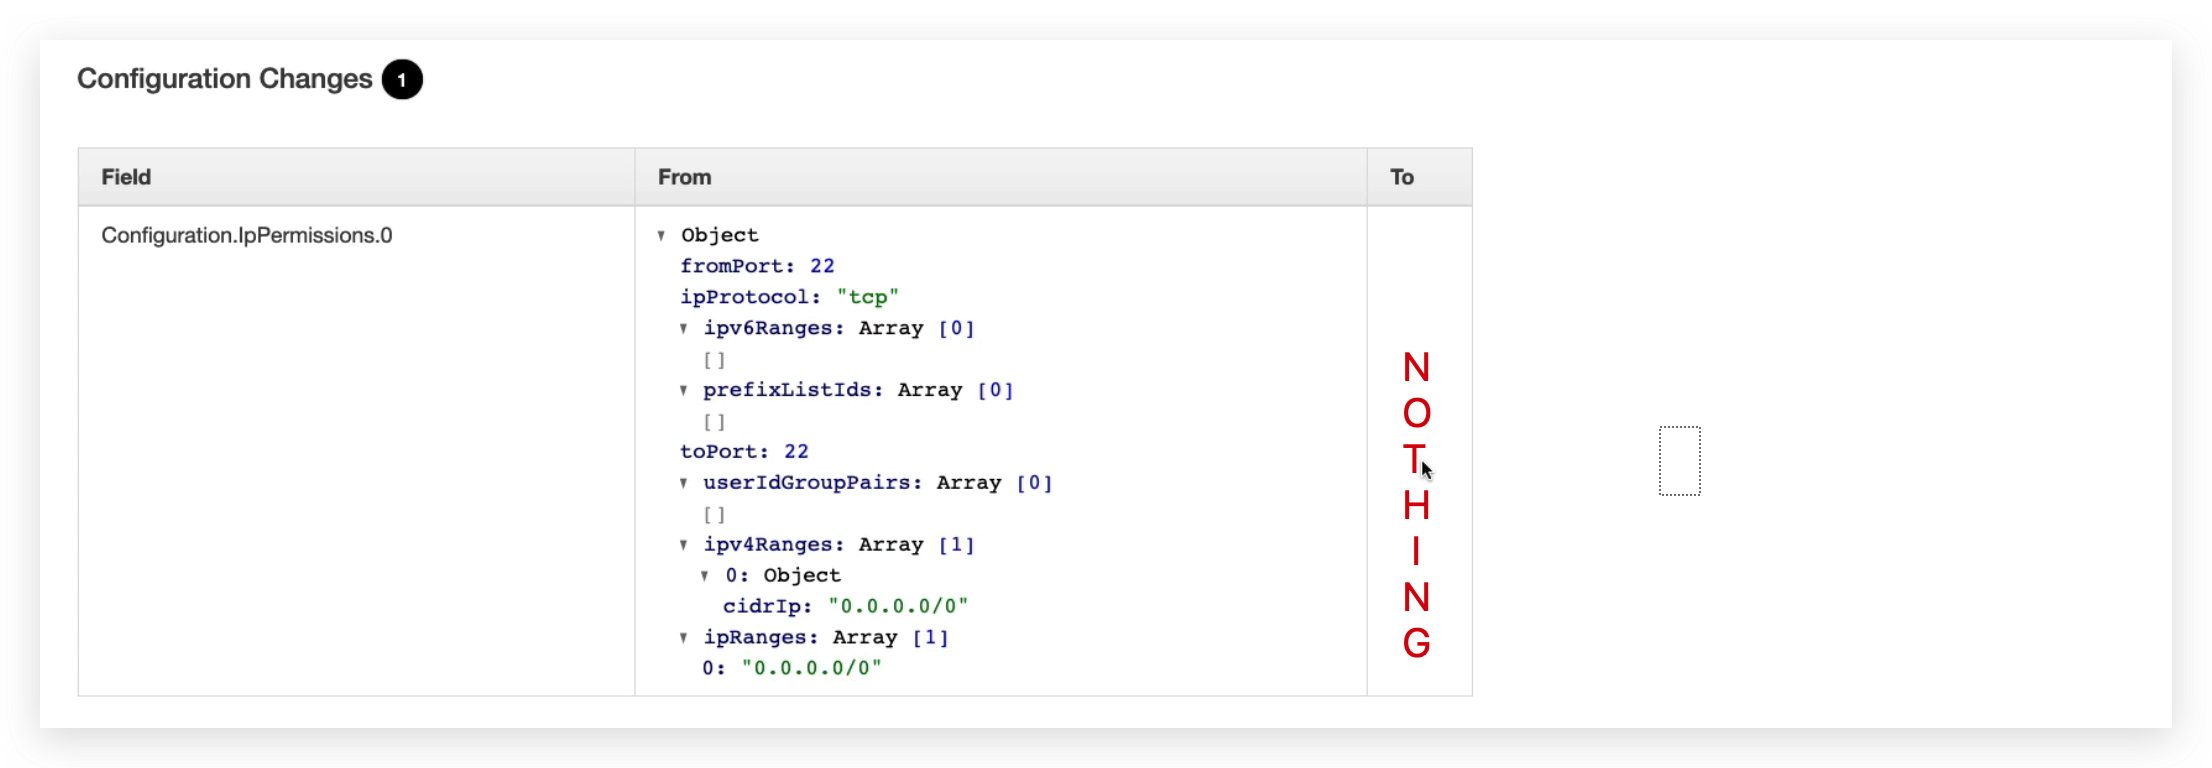
You will obviously see the Configuration.IpPermissions.0 became from a JSON String to nothing, which is identically saying this configuration is removed.
If you look at the CloudTrail event, you will see an event is there as: showing user root Revoked Security Group Ingress once.
Click on the hyperlink highlighted, you will see the event details: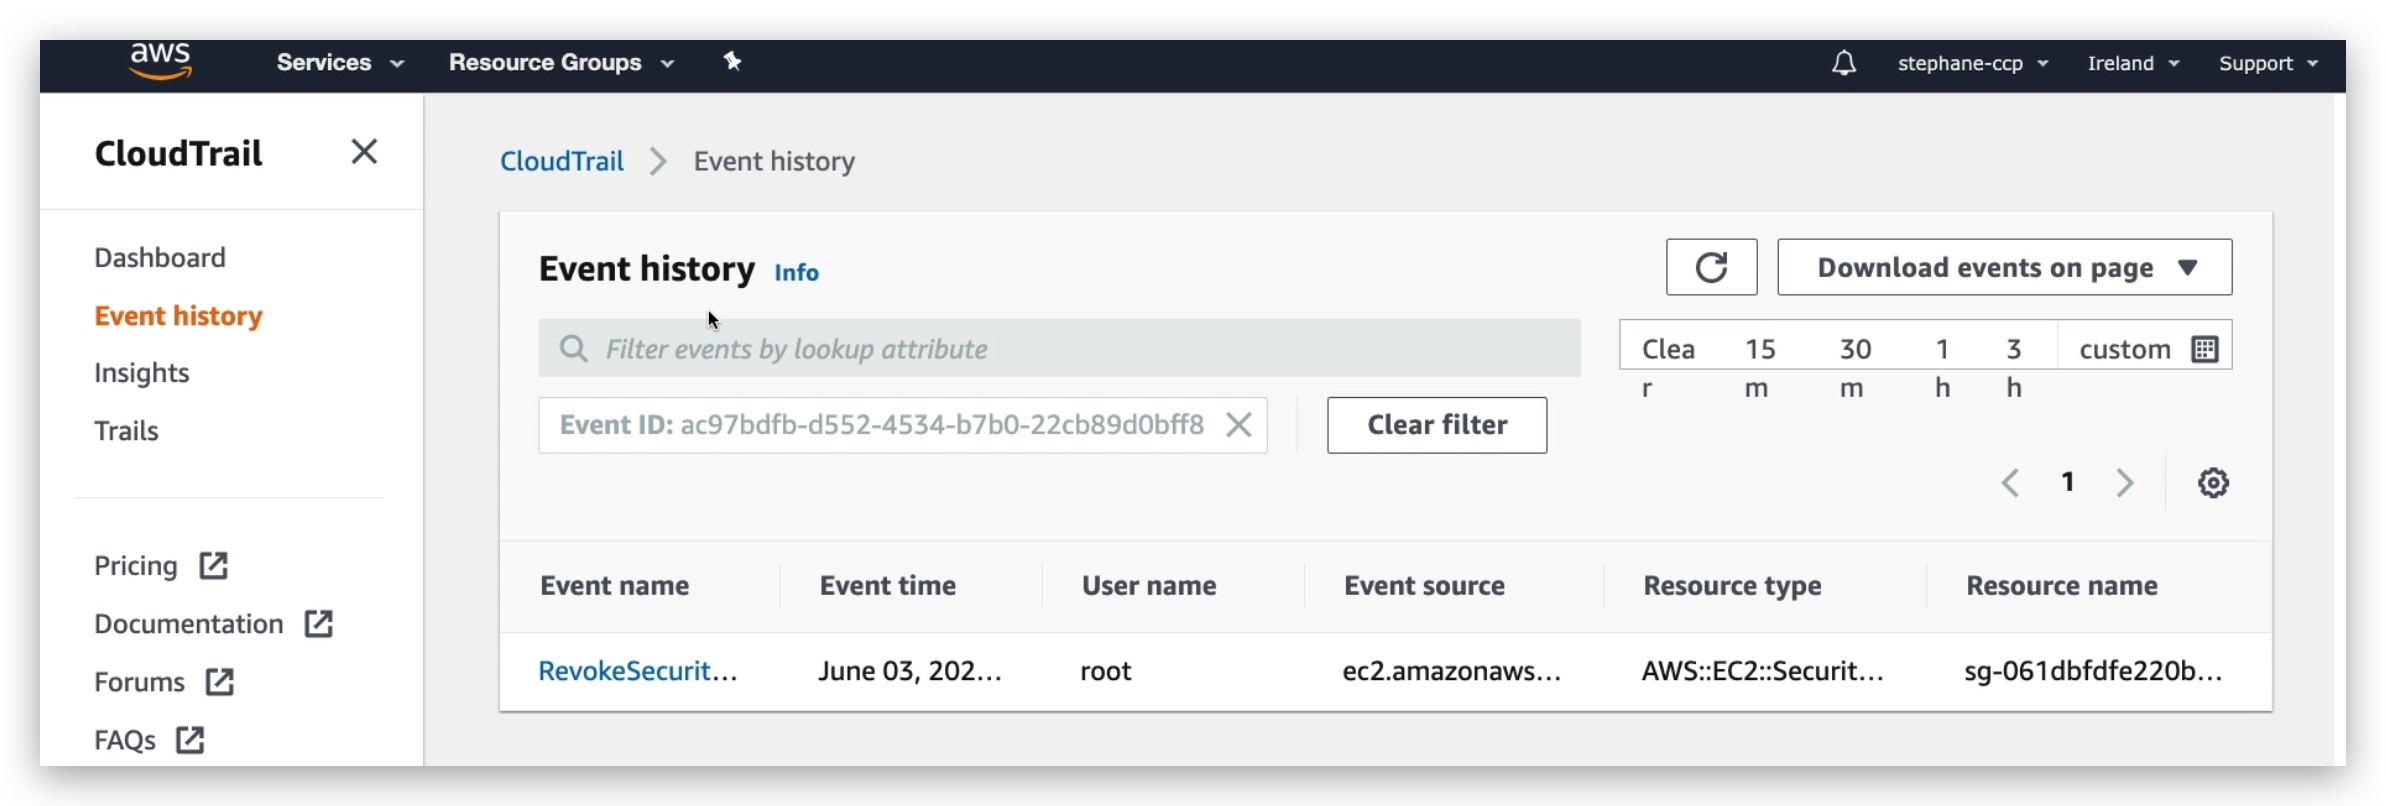
So I hope that’s helpful, I hope you now understand the whole aspect of using Config to track the resource configuration and their compliance over time, and this is very helpful to ensure that all the resources created by your employees within your company are compliant with whatever you have decided for security rules.
Macie Overview
Macie is a fully managed data security and data privacy service that will use machine learning and pattern matching to discover and protect your sensitive data in AWS.
More specifically, it will alert you around sensitive data such as personally identifiable information, which is named PII.
So very simply, your PII data will be in your S3 buckets, and it will be analyzed by Macie which will discover what data can be classified as PII. And then will notify you through EventBridge of the discoveries. Then you can have integrations into an SNS topic, Lambda functions and so on.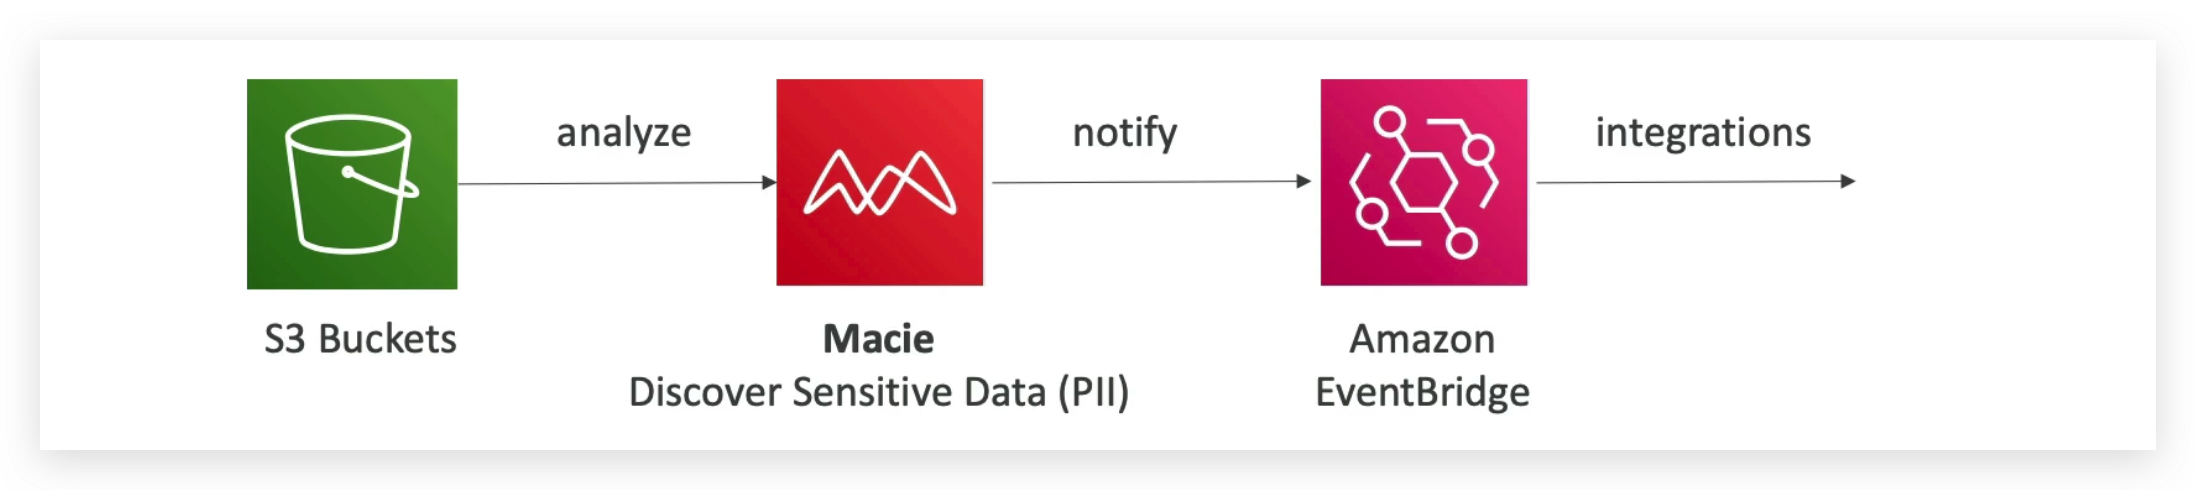
So Macie in this instance will be used to find the sensitive data in your S3 buckets and that’s the only thing it will do.
It’s just one click to enable it. You just specify the S3 buckets you want to have and that will be it.
Security Hub Overview
From the homepage of the Security Hub, we can see the charging model of it as shown below: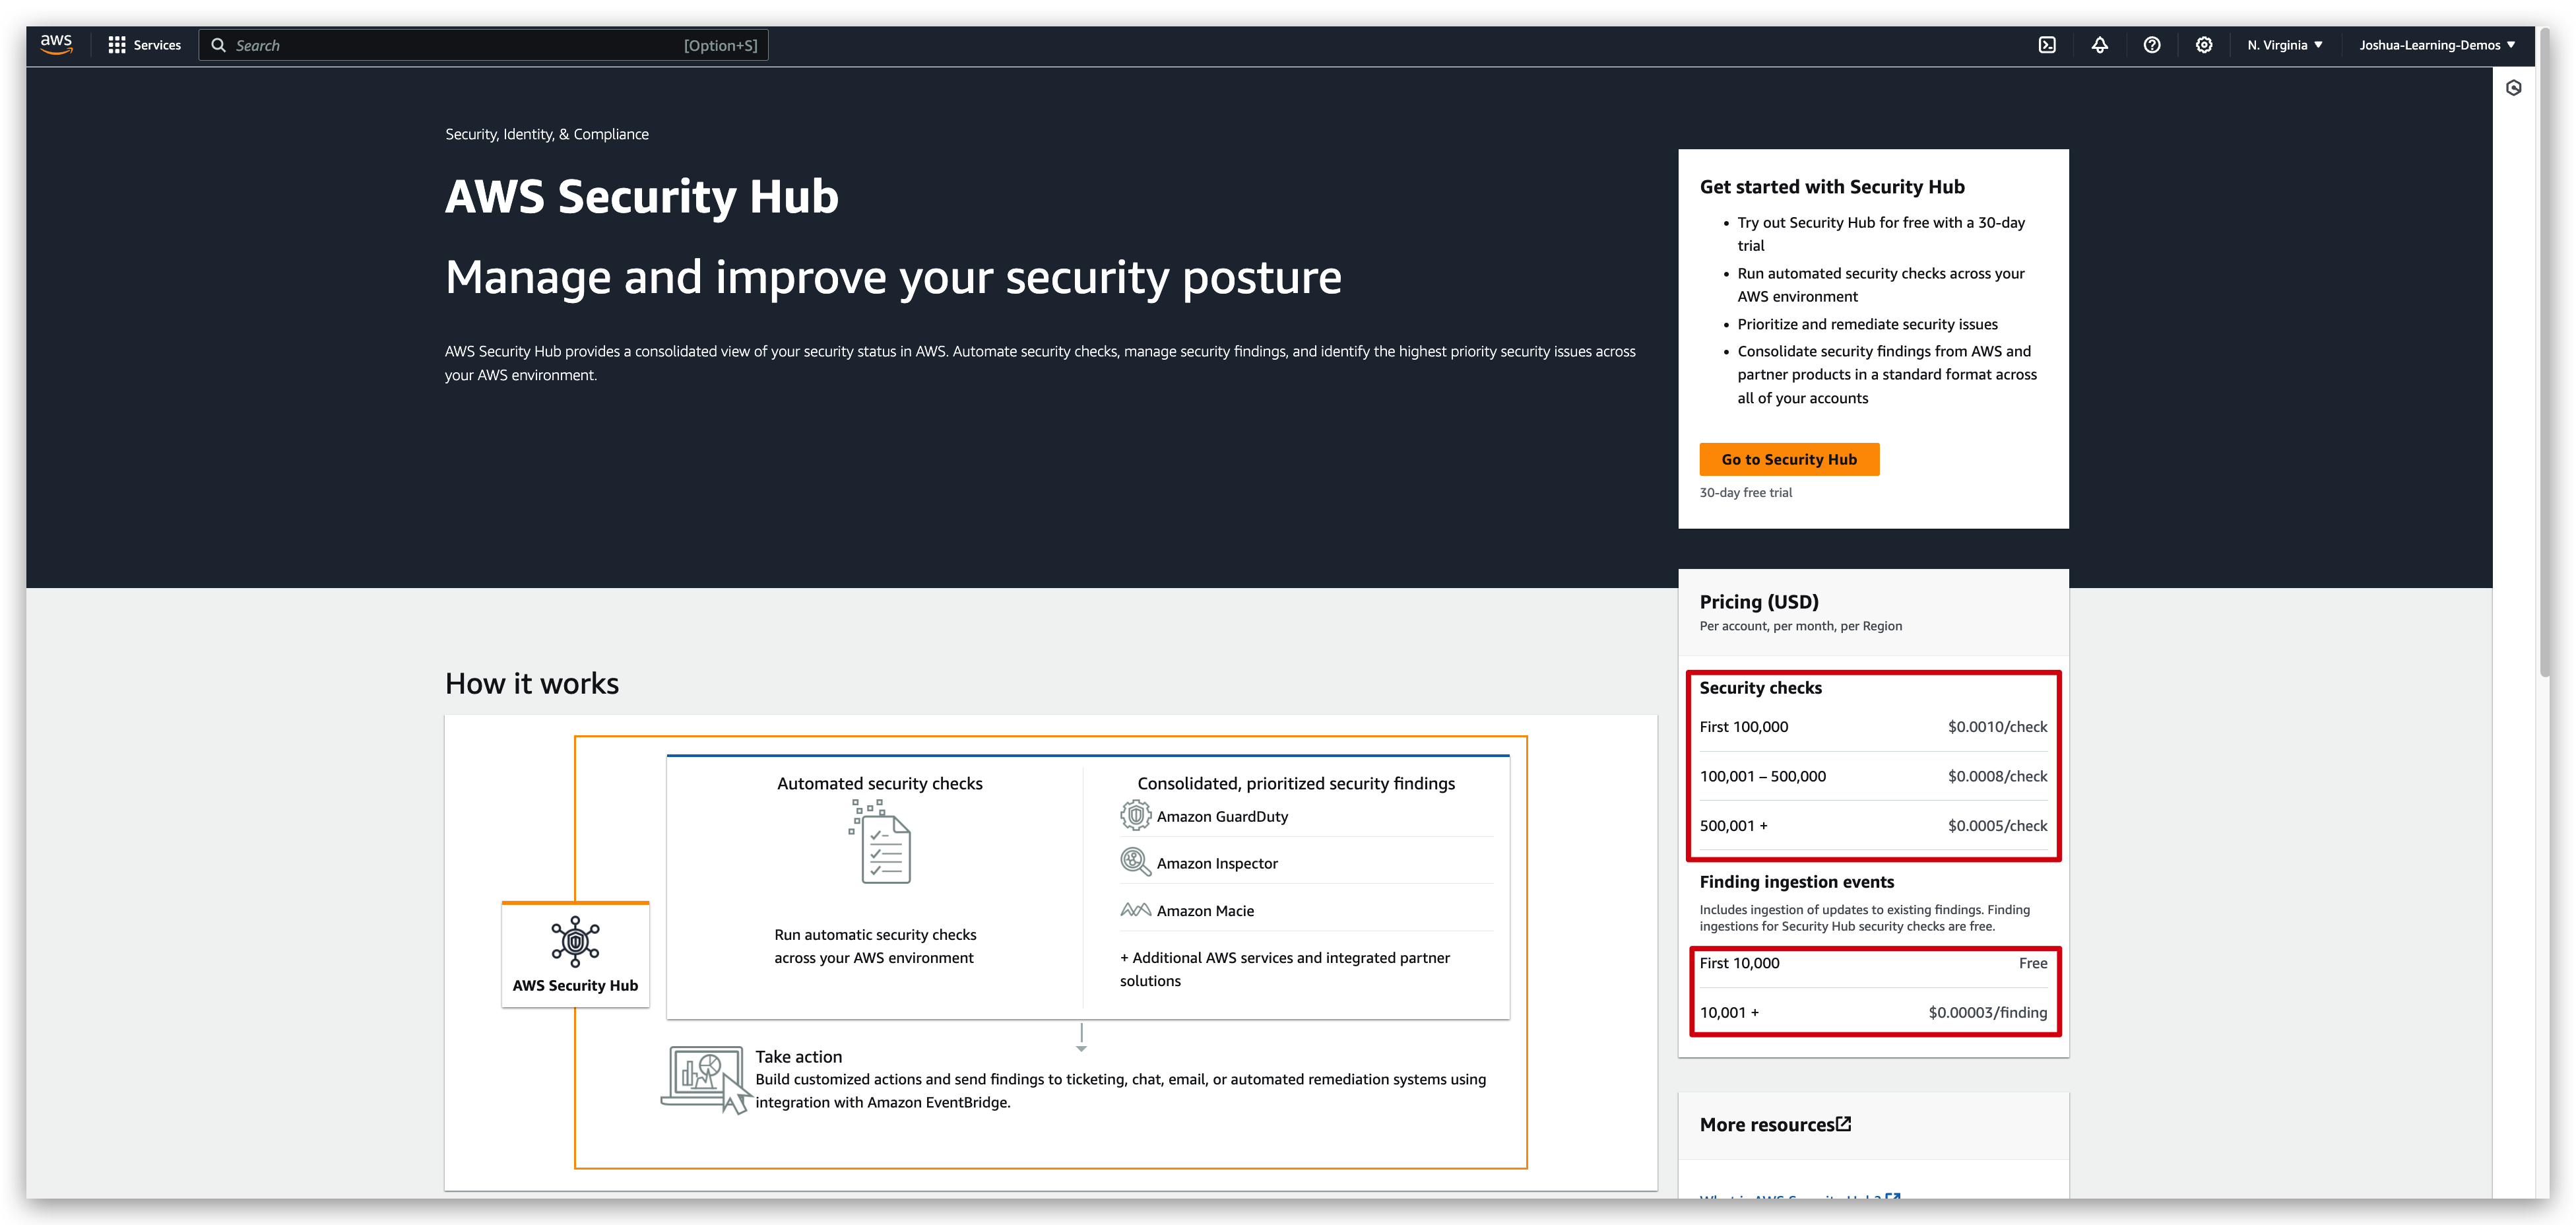
Additionally, from the screenshot, we can also see the enablement of security hub including: automated security checks, consolidated & prioritized security findings and actions to be taken, under each of which there are some specific tools to make it happen.
So if we go to Security Hub and enable the trial, we’ll see that first we need to enable AWS Config to make sure that Security Hub can work. And then we need to choose the security standards we want to adhere to so that we can have three different options. And finally, the integrations based on the services that we have enabled. And then you click on Enable Security Hub, and you’ll be good to go.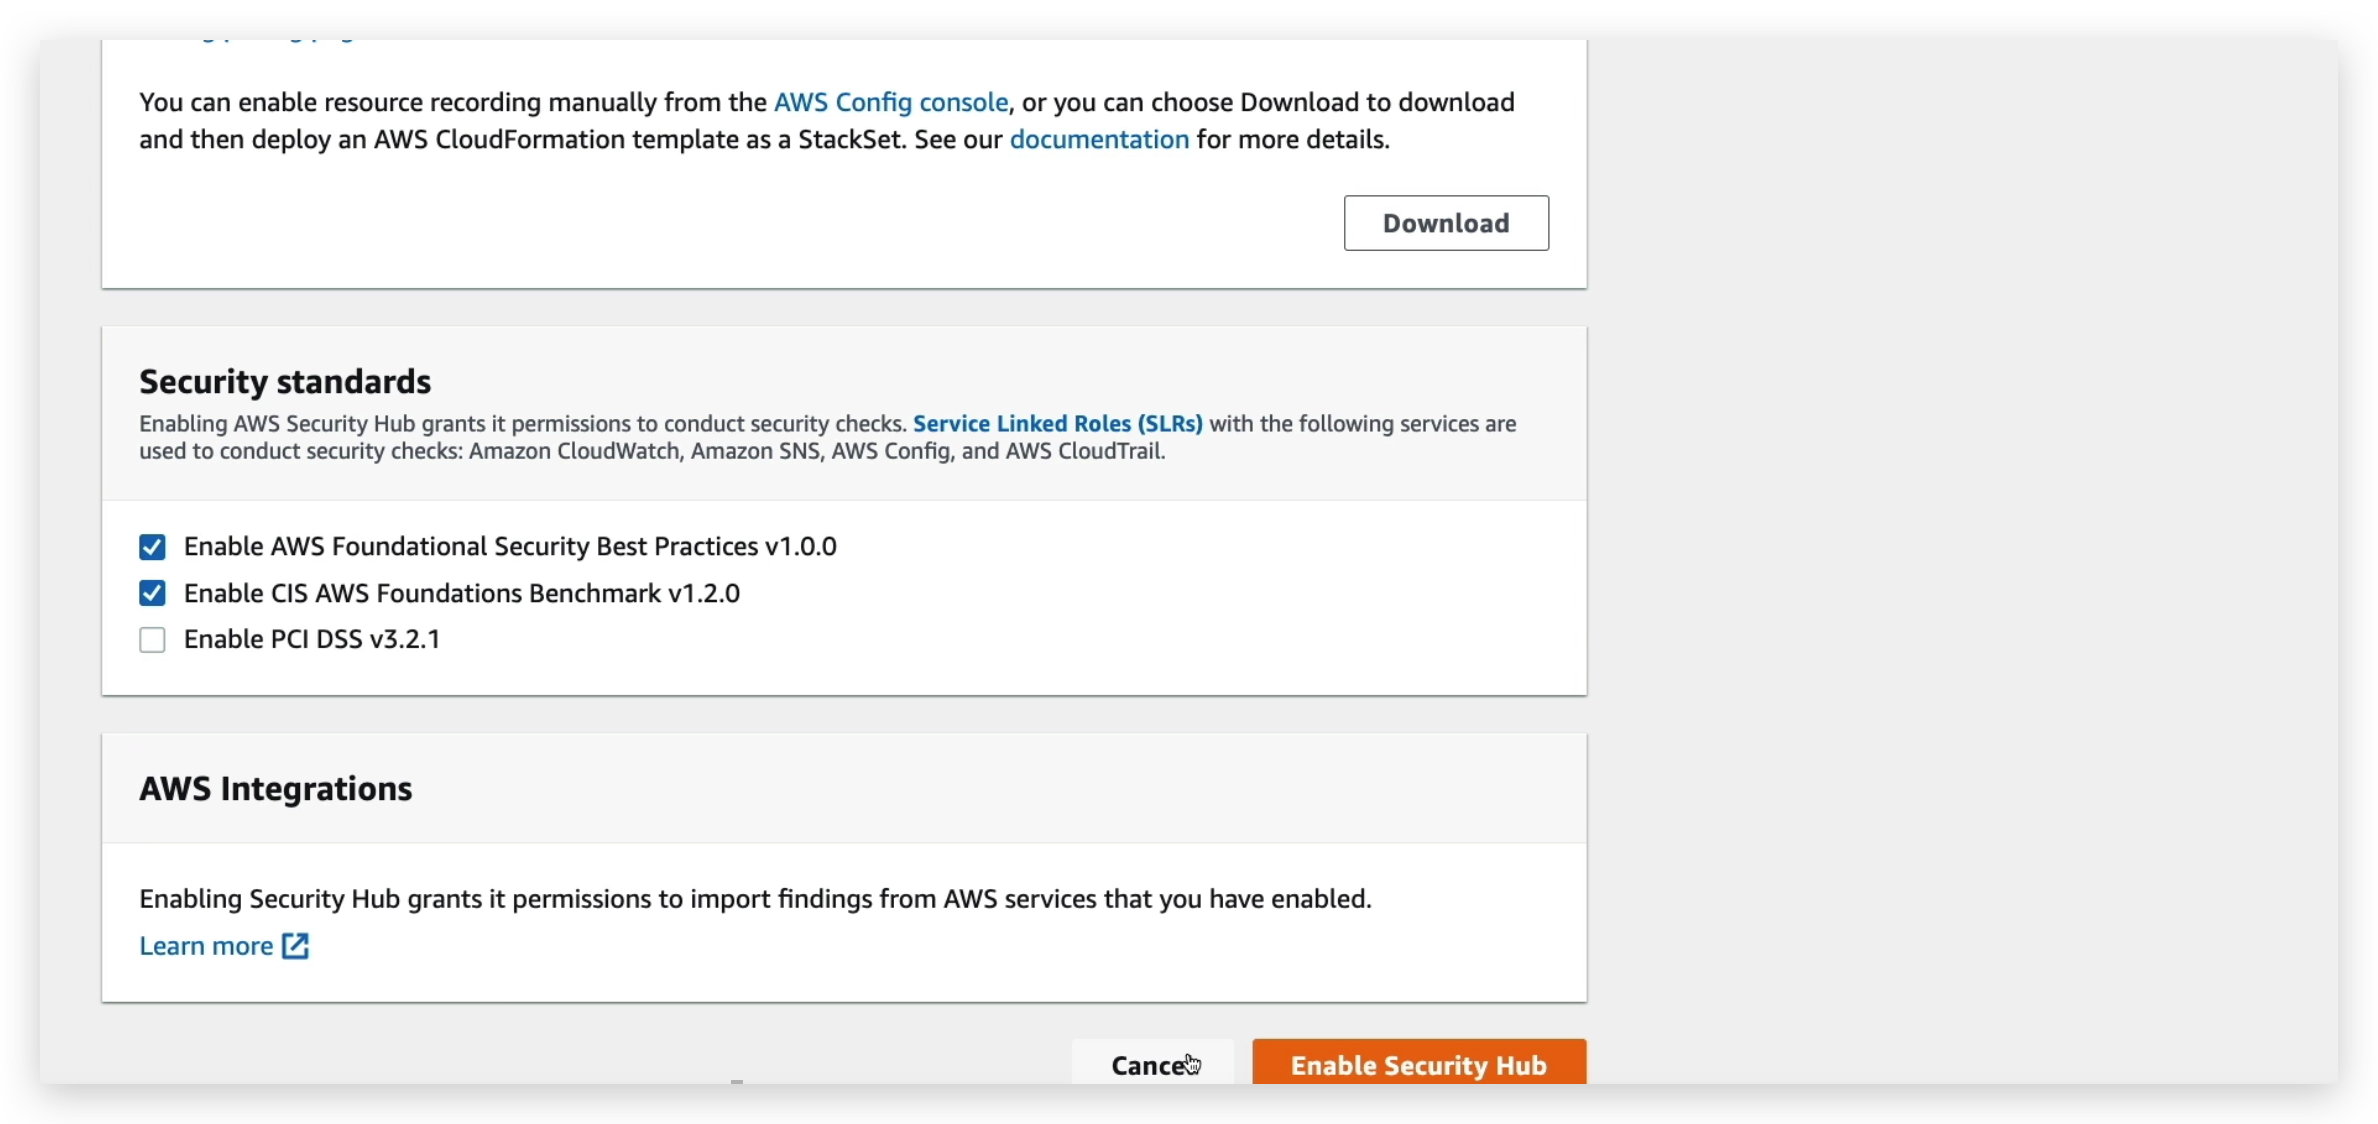
Amazon Detective Overview
So, when you have all these services such as GuardDuty, Macie, and Security Hub that are used to identify potential security issues or findings, you need to find how these happen and get to the root cause.
And so, sometimes the deeper analysis to isolate the root cause can be long and complicated. It’s a complex process to analyze data from different places and link it together.
It could be quite long and when you’re dealing with security, you want to get to the root cause as quickly as possible because there may be a security hole in your architecture.
And so, this is the purpose of Amazon Detective. The name is quite explicit.
Detective is going to analyze, investigate, and quickly identify the root cause of security issues or suspicious activities using machine learning and graphs in the backend to really allow you to quickly get down to where the issue is coming from.
And to do so, it’s going to automatically collect and process events from your VPC Flow Logs, your CloudTrail trails, and GuardDuty to create this unified view. And it will, in turn, give you visualizations with details and context, so you can get to the root cause.
AWS Abuse
All you need to know about AWS abuse for the CLF02 exam is to contact AWS by reporting to them via email address shown below when you find something similar to the list:
Root User Privileges
- Root user = Account Owner (created when the account is created)
- Has complete access to all AWS services and resources • Lock away your AWS account root user access keys!
- Do not use the root account for everyday tasks, even administrative tasks
- Actions that can be performed only by the root user:
- Change account settings (account name, email address, root user password, root user access keys)
- View certain tax invoices
- Close your AWS account
- Restore IAM user permissions
- Change or cancel your AWS Support plan
- Register as a seller in the Reserved Instance Marketplace
- Configure an Amazon S3 bucket to enable MFA
- Edit or delete an Amazon S3 bucket policy that includes an invalid VPC ID or VPC endpoint ID
- Sign up for GovCloud.
Above list is quite important because in exam, there is question asking you: Which action in below list can be done only by root user? So you’d better memorize them all.
And amongst them, as for the one in red , I’ll give you a use case for it.
For example, say you are buying a Reserved Instance for three years, but after two years, you realize you don’t need to have it anymore,
so what you can do is that there is a marketplace in which you can sell back your Reserved Instance and so to do so, you need to register as a seller first and only the root user can do it.
IAM Access Analyzer
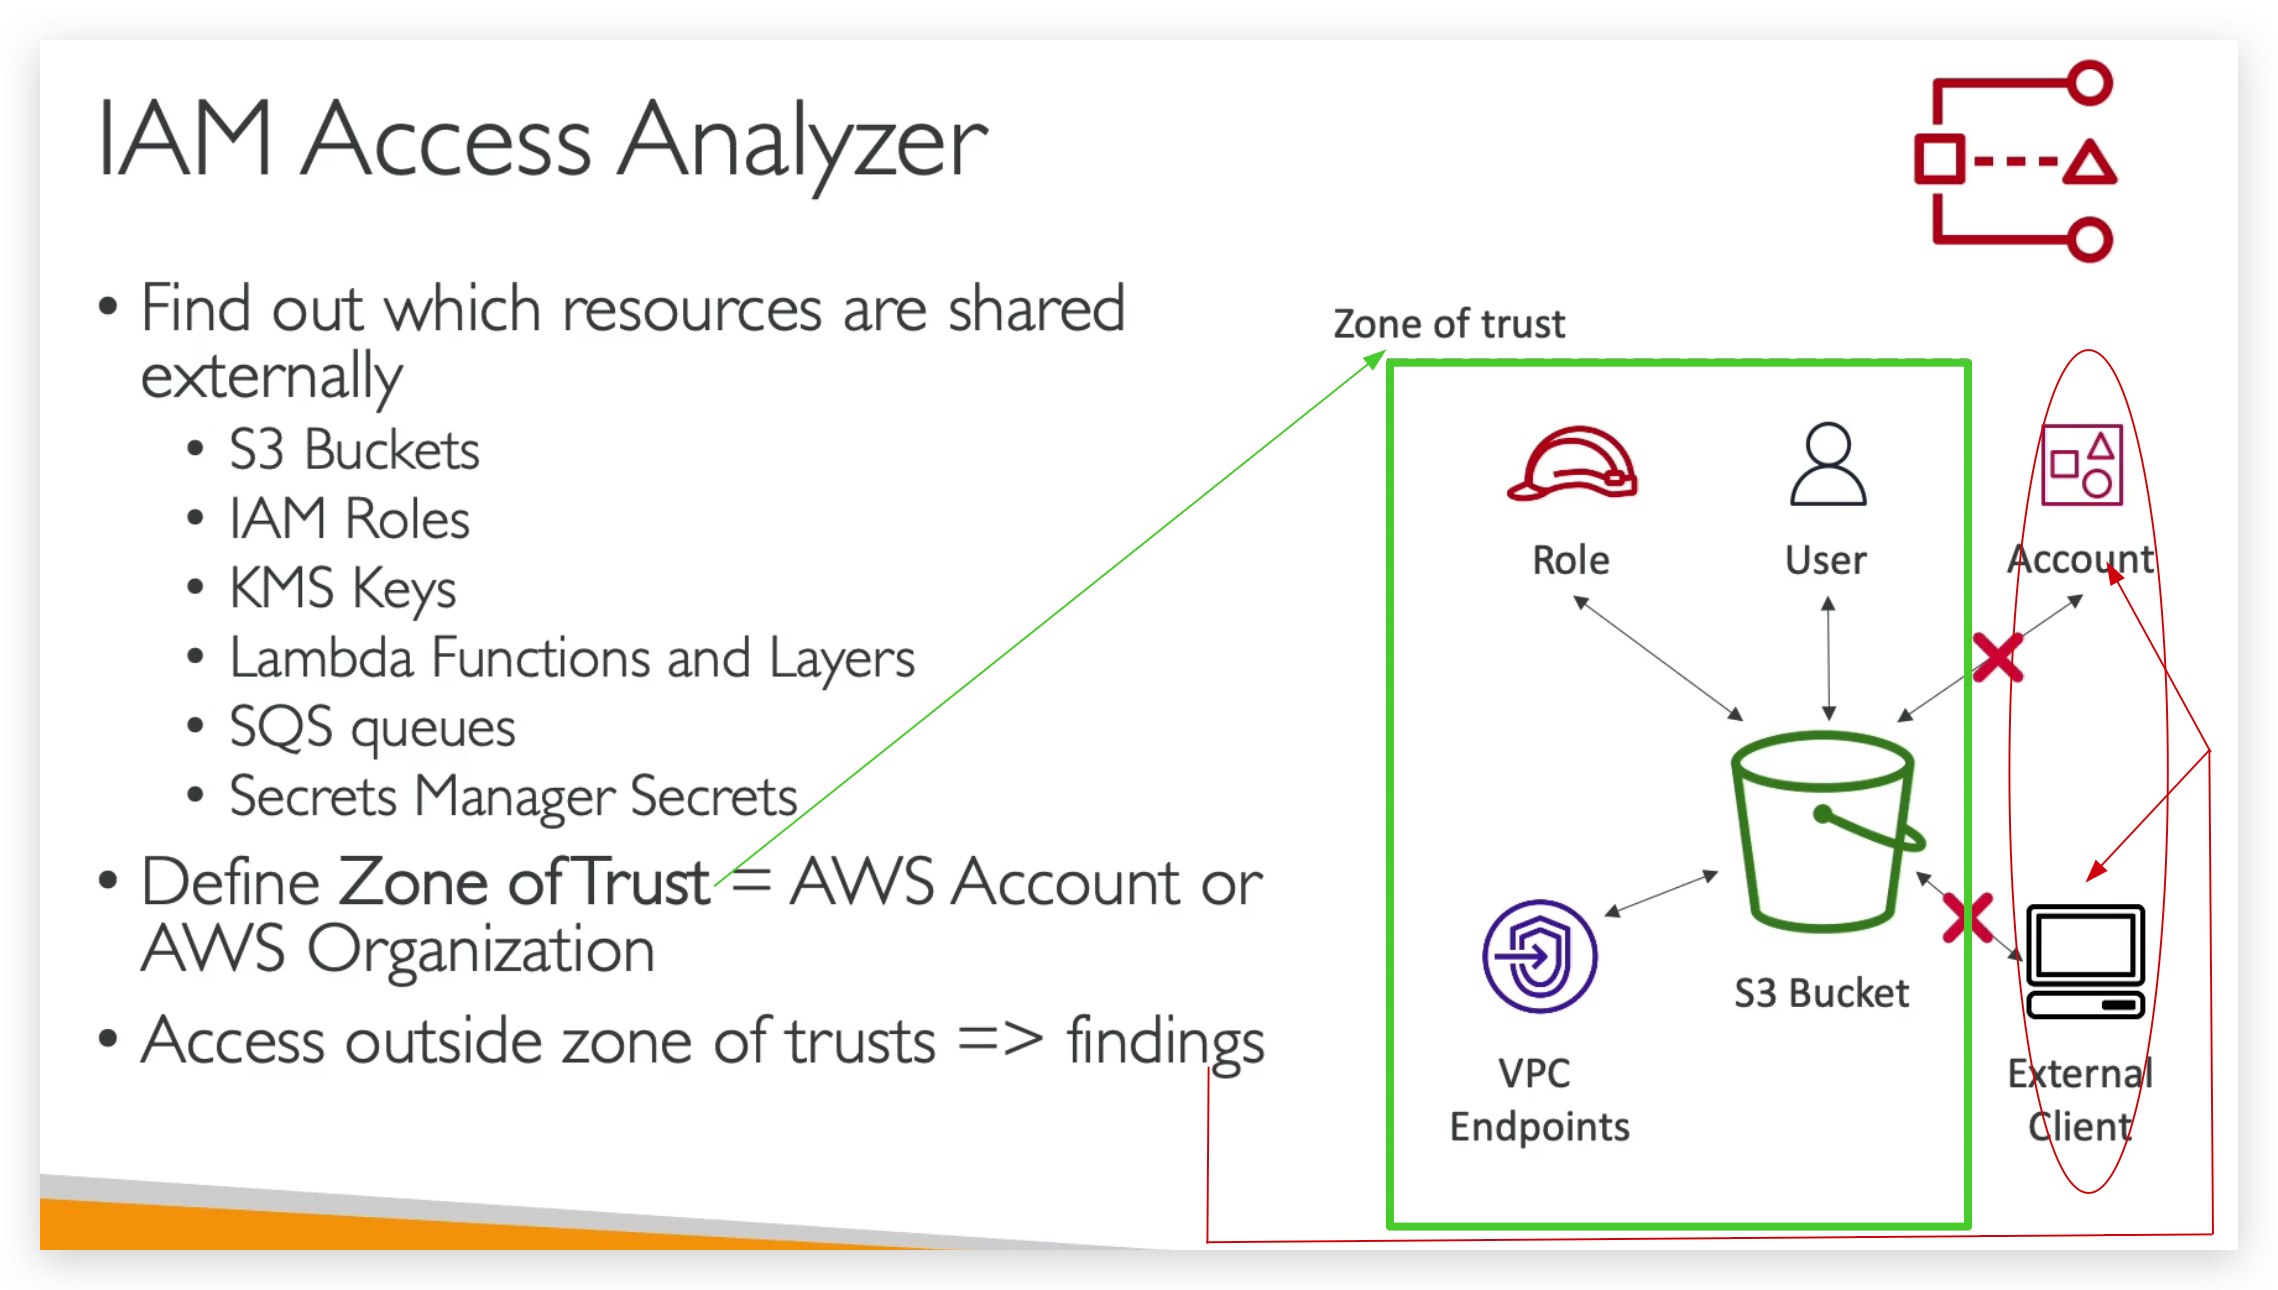
So now let’s discuss IAM Access Analyzer, and this is a service within the IAM console that is used to find out which resources are going to be shared externally.
- S3 buckets
- IAM Roles
- KMS Keys
- Lambda Functions and Layers
- SQS Queues
- Secrets Manager Secrets
So, the idea is that some of these obviously can have resource policies attached with them, or they can be shared with other accounts.
But sometimes you forget about sharing these items, and it can be a security risk for your company because some of the app may be accessible by external sources.
And so you define a zone of trust, which is going to correspond to your AWS accounts or your entire AWS organization, and then anything outside your zone of trust that has access to the resources said above are going to be reported as findings of security risk / issue.
So for example, we have an S3 buckets, we can share it with a specific role, a user, an account, an external client by IP or VPC endpoint.
But if we define the zone of trust to be: only the role, the user and the VPC endpoints are within the zone, then the accounts and the external clients are going to be flagged as a finding.
And you can look at it and then decide to take action if you think this is a security risk.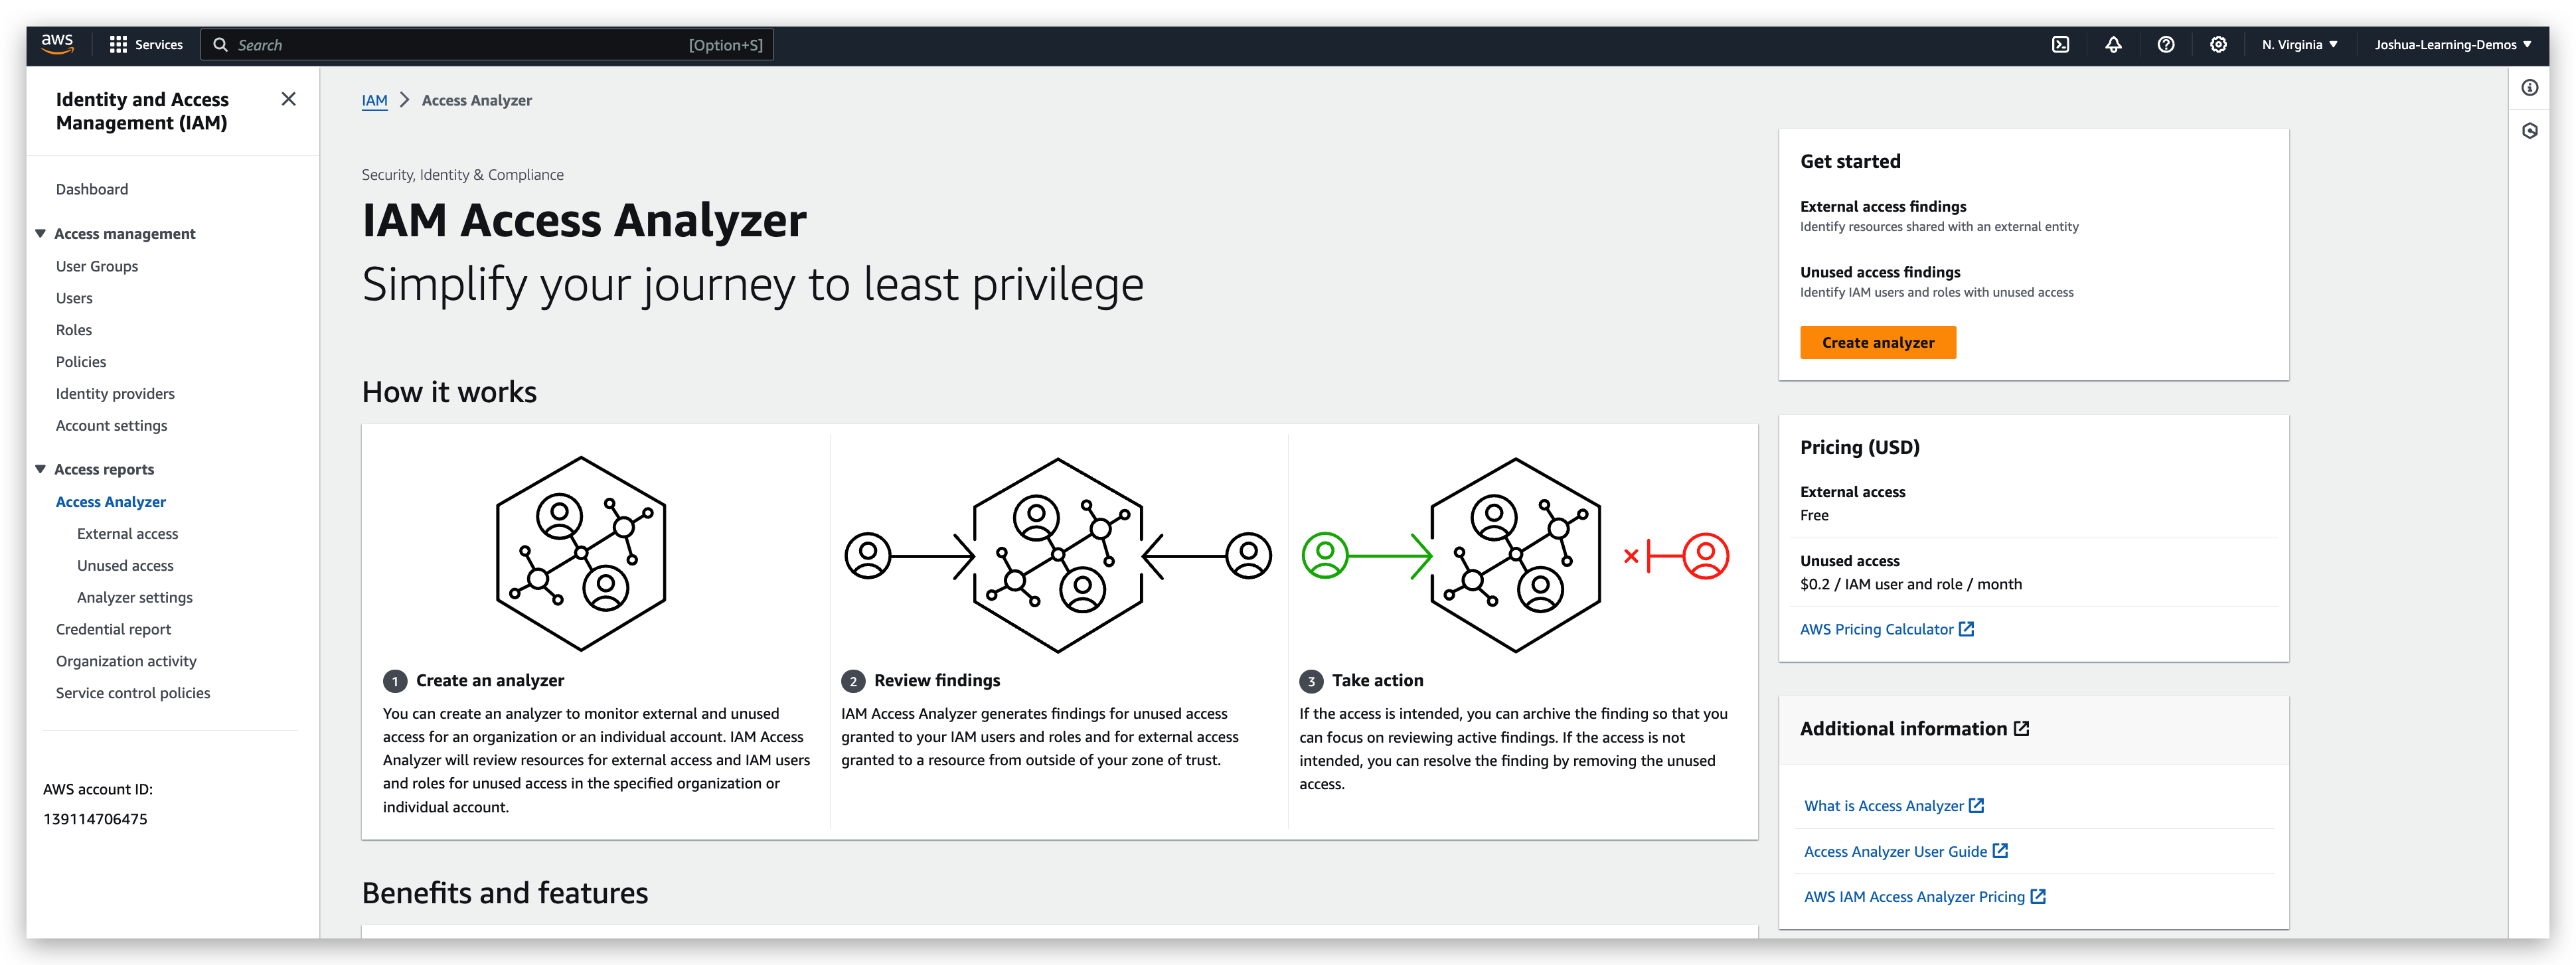
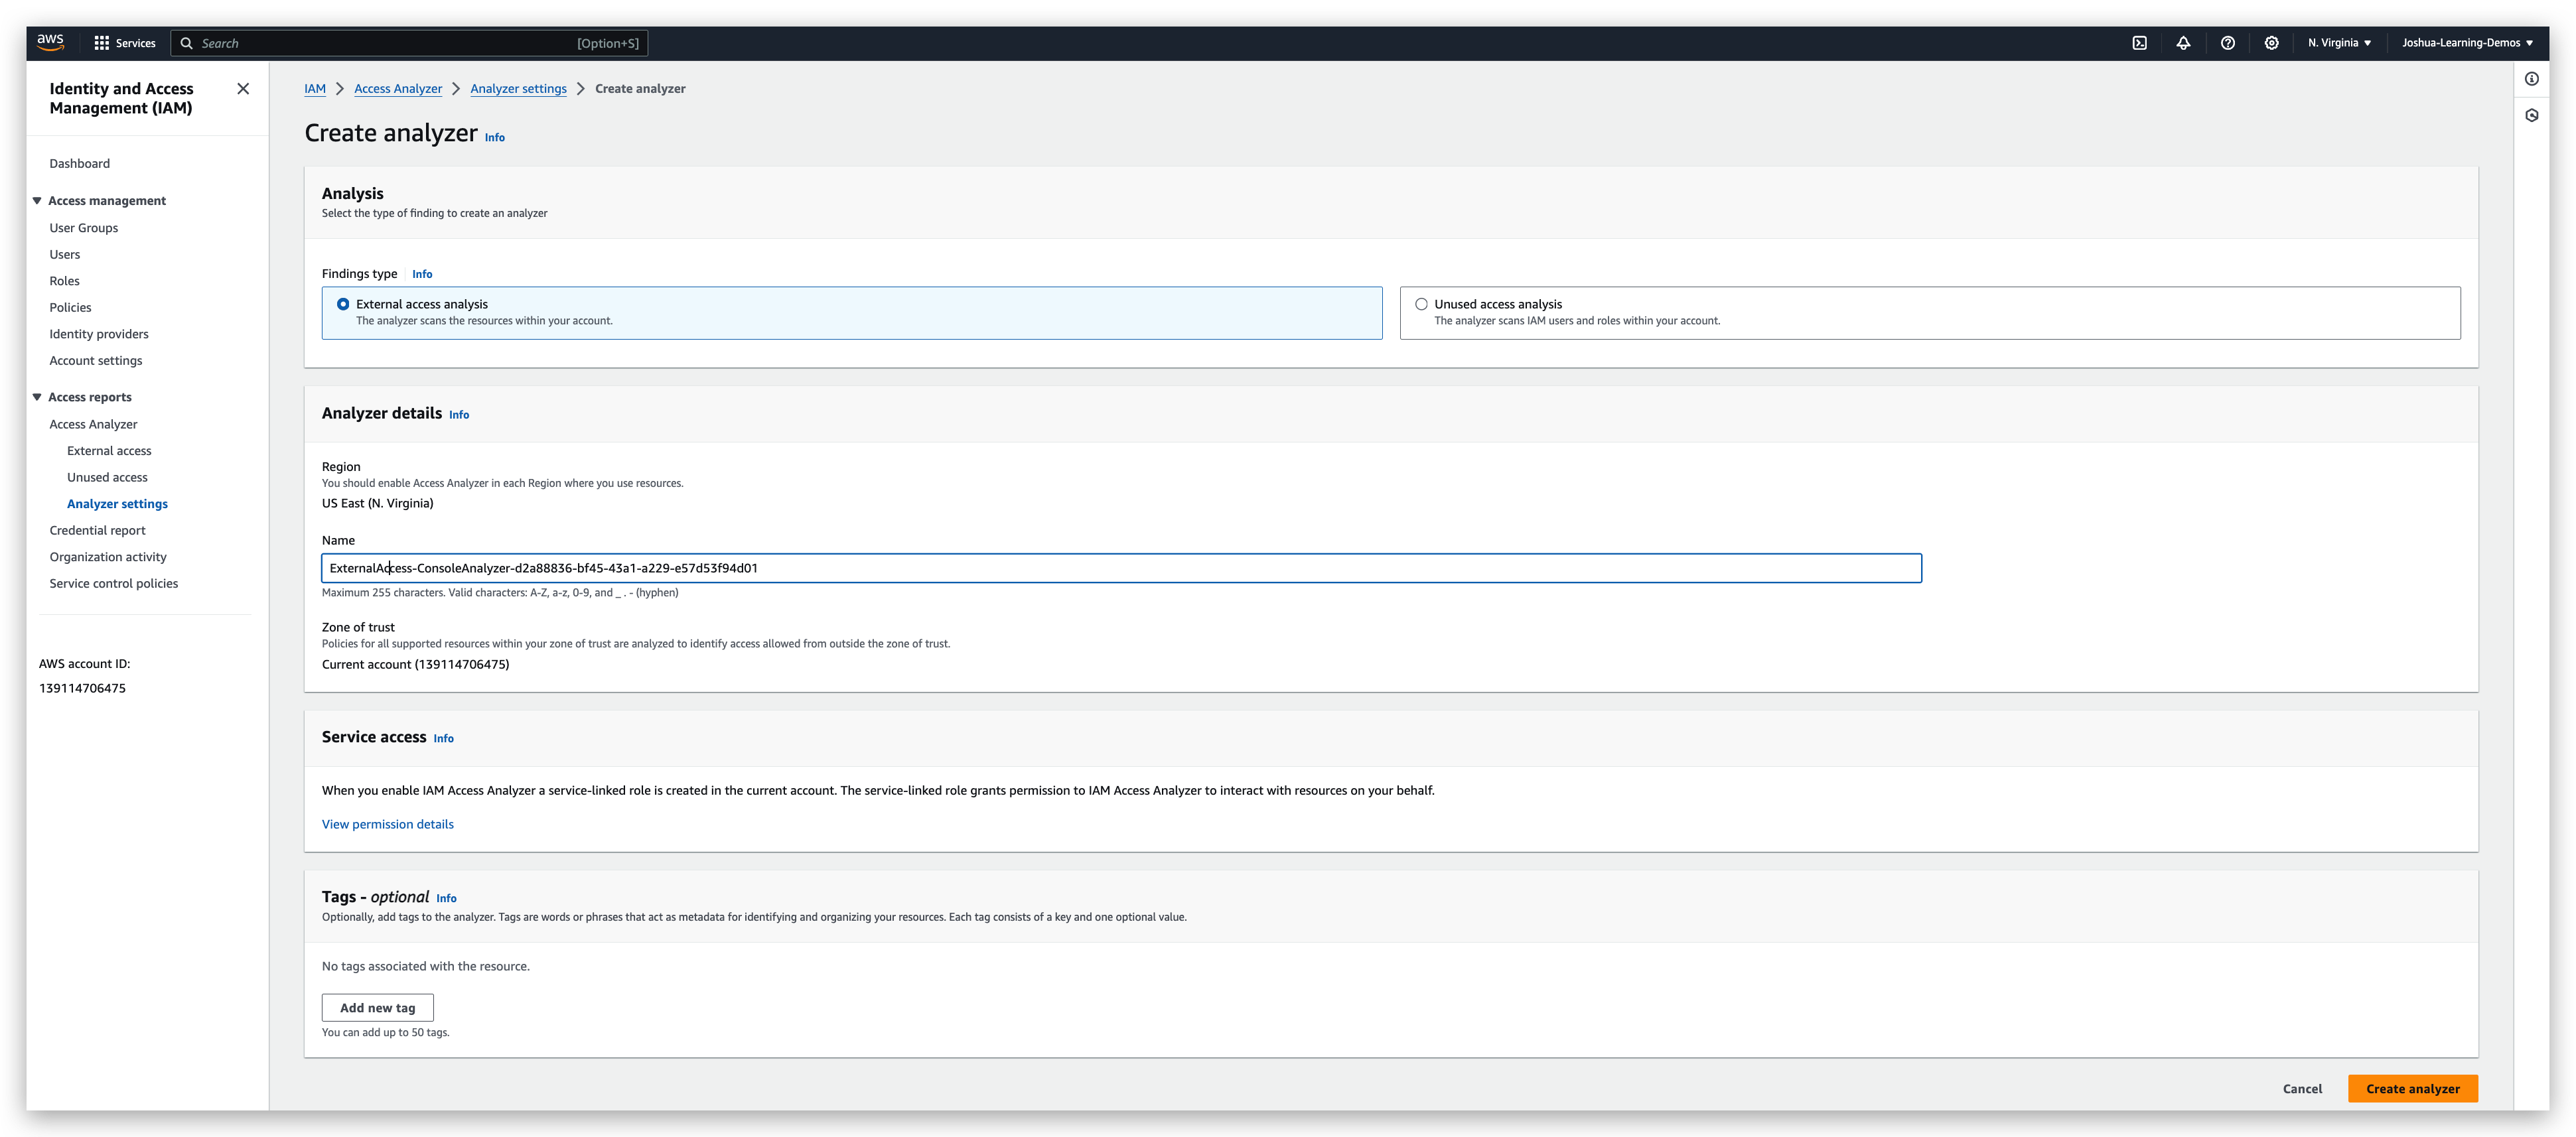

By the way, this is free of charge. By clicking on the “create analyzer” button and populating the properties properly, you will get an analyzer.
For my case, there is no findings, but still I will show you how it looks like when there is a finding.
The reason why above is a finding is because that the resource, namely the SQS / S3 Bucket, is accessible from all principals that some of which might NOT be the current account. And the current account is the Zone of Trust when the analyzer was created. Hence, this is a finding.
Once a finding is detected, what we should do is click the finding to check the details and then scroll down to the bottom of the details page. And the archive it as “Intended Access” or confirm it as “Unintended Access” and then go to the console of corresponding service to rectify the configuration of it. In the SQS case, a principal resetting of the resource policy is all it takes to remediate it.
And then go to the finding details page to invoke a rescan to check the outcome of the change.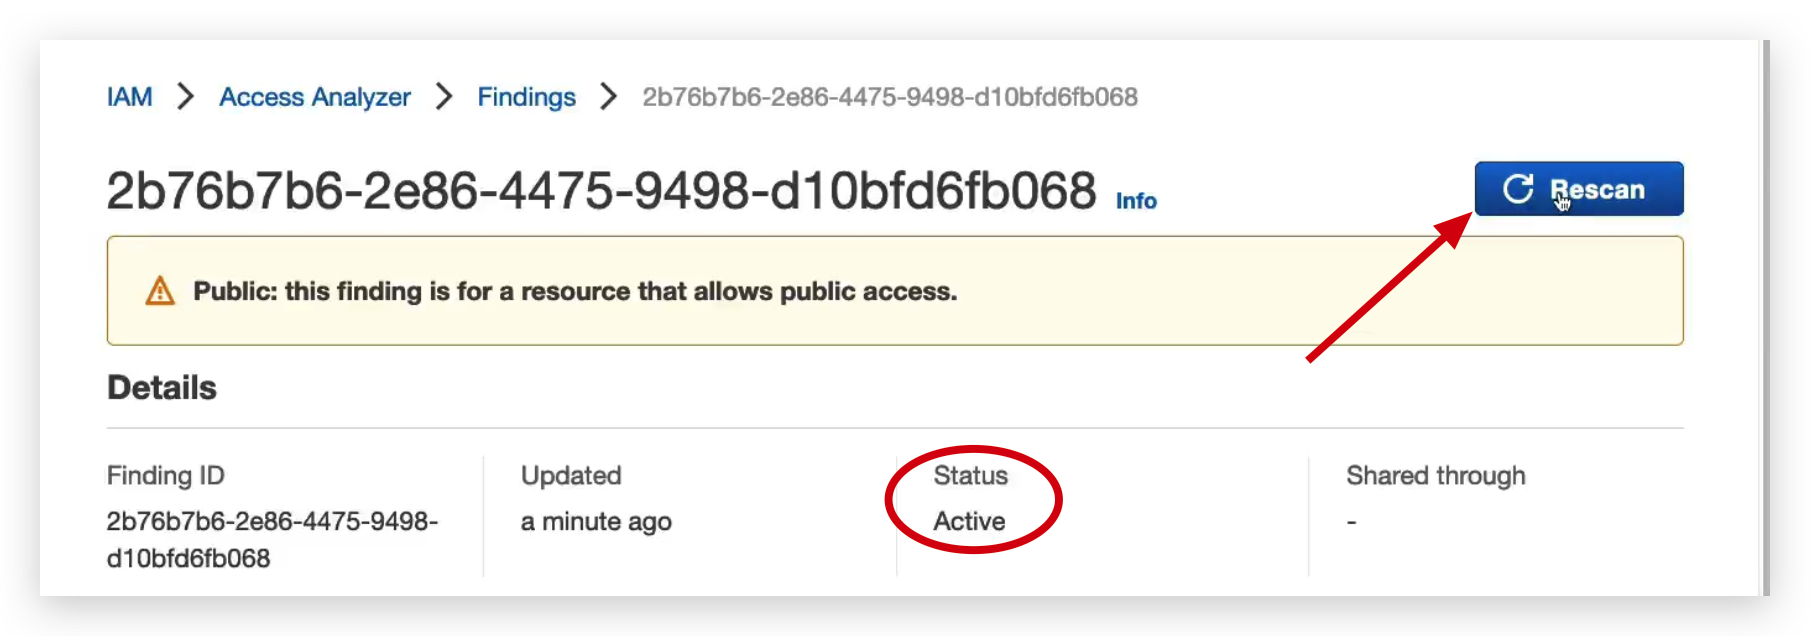
Then, you will find the status of the finding becomes Resolved from Active.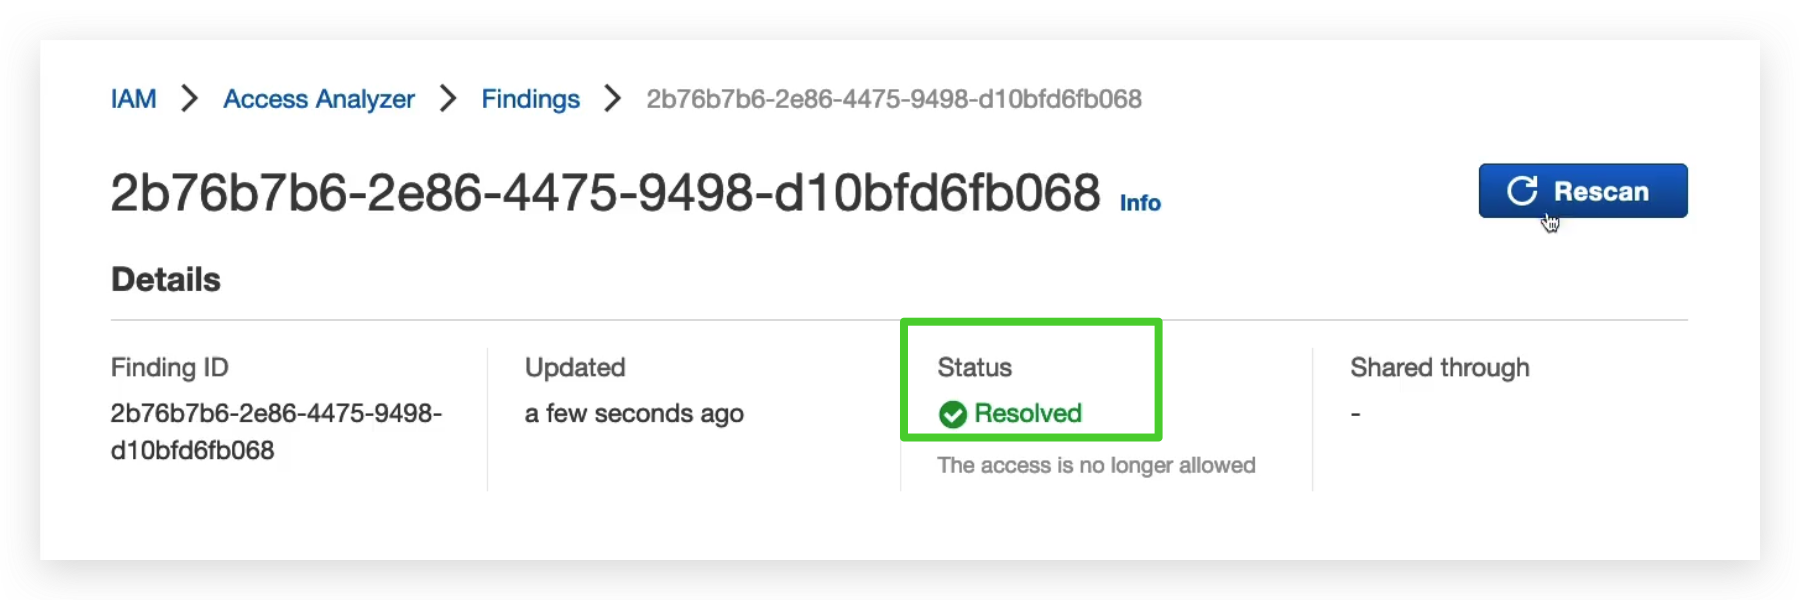
Now, go back to the finding list to check again, you will see the number of findings decreased by 1, which is the one we just resolved.
Similarly, you can resolve the remaining two. Or you can archive them as intended access if you are sure they are desirable or not going to do any harm to the existing resources that in the Zone of Trust. By doing this, it can let you focus on the potential security risks.
If you do so, the finding will disappear from the list, I mean the active finding list, and the Finding Status will change to “Archived”. PFB for your demonstration.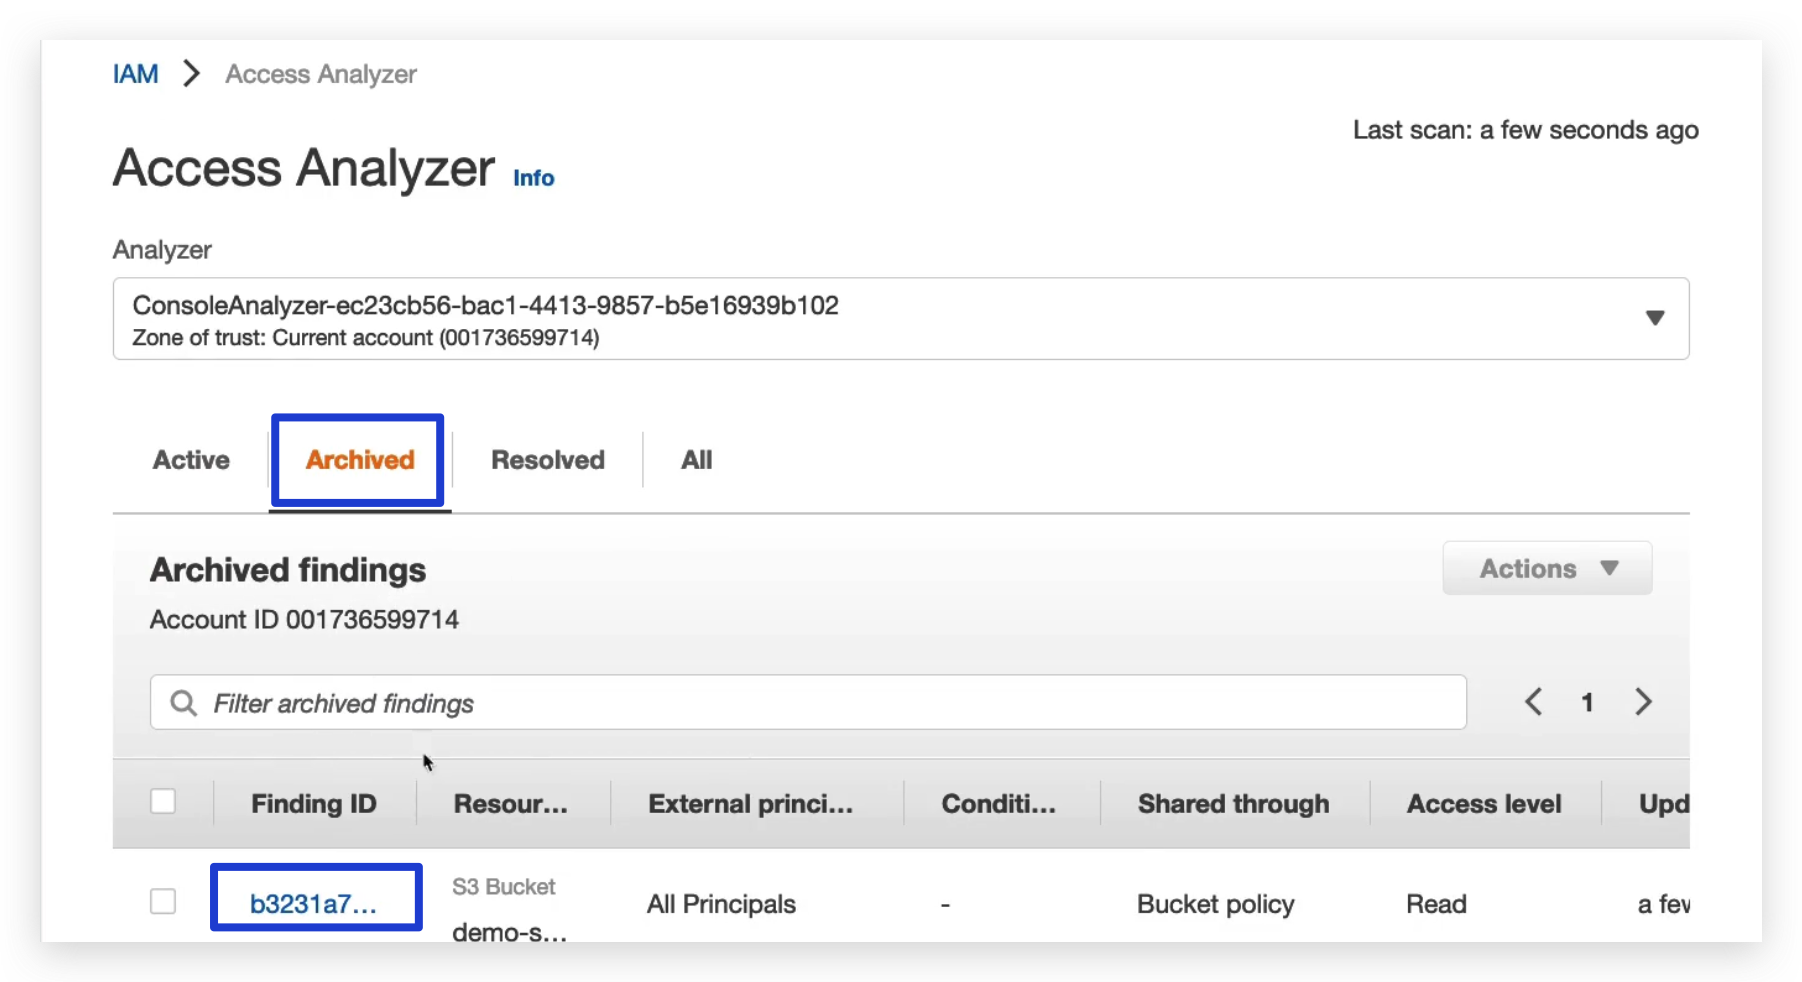
Security & Compliance Summary
- Shared responsibility model on AWS, we’ve seen it at length in this course so that you know about it.
- Shield is a way for you to get automatic DDoS protection and then if you use Shield Advanced, you get 24/7 support.
- WAF, a firewall to filter incoming requests, based on specific rules. It’s also known as Web Application Firewall
- KMS to manage your encryption keys on AWS
- CloudHSM to have hardware encryption And this time, it’s not AWS that manages the keys,it is ourselves that manages the encryption keys. AWS will only manage the hardware behind it.
- ACM, short for AWS Certificate Manager, is a way for you to provision, manage, and deploy SSL and TLS certificates and to get in-flight encryption.
- Artifact, giving you access to complaints reports, such as PCI, ISQ, etc.
- GuardDuty is a way for you to find malicious behavior automatically by analyzing VPC logs, DNS logs, and CloudTrail logs
- Inspector you’ll find software vulnerabilities in EC2, ECR container images and Lambda functions.
- Network Firewall, which allows you to protect your VPC against network attacks.
- AWS Config, which is allowing us for compliance to track configuration changes and also create rules to check compliance of these resources configuration over time.
- Macie is a way for us to find sensitive data. For example, PII data. So personal information in Amazon S3 buckets.
- CloudTrail is a way for us to track API calls made by users within the accounts.
- Security Hub is a way for us to gather all the security findings from so many different services, from multiple AWS accounts into one place and really act on these security findings directly from there.
- AWS Detective is in case we have a security finding, how do we get to the root cause very quickly, and this is with Detective, which is going to link up all these services together and help you with that.
- The Abuse team is a team that you report to when you see abusive behavior by using AWS resources for abusive or illegal purposes. And you either have a form or email them.
- And then you have to remember, I think the four most important things that a root user can do in your accounts. It can change the account settings, it can close your AWS accounts, it can change or cancel your support plan, or it can register as a seller in the Reserved Instances marketplace.
- IAM Access Analyzer, used to identify which resources are going to be shared externally, so outside your zone of trust.
- Firewall Manager that is used to manage the security rules across an organization, that is for your security groups, but also for WAF and Shield and so on.
Quiz 14

Readings:
Macie, has both French and English (UK) based origin, it is typically a girl name, has various meanings. The first meaning of Macie that was found, said that that name meant “weapon”. The second meaning noted the name was representative of a person that is bold, sporty, and sweet.
New – Enhanced Amazon Macie Now Available with Substantially Reduced Pricing